Antipasto Salad with Grilled Chicken – Easy Summer Salad Recipe!
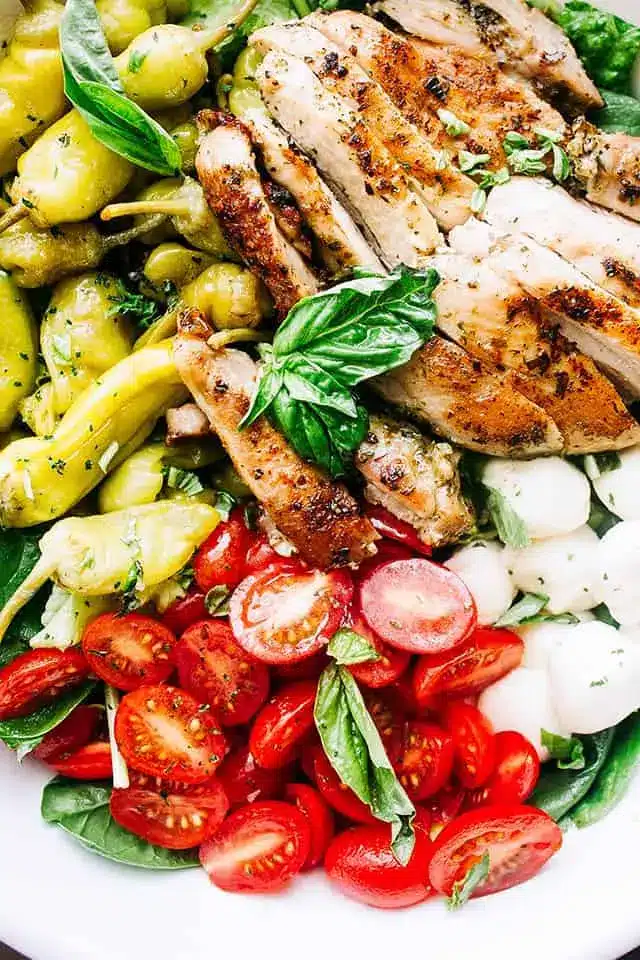
Embark on a culinary adventure with this vibrant Italian antipasto salad, a dish that masterfully blends the fresh, zesty flavors of the Mediterranean with the satisfying heartiness of perfectly grilled chicken. This salad is more than just a meal; it’s an experience, a symphony of textures and tastes designed to transport your palate straight to the sun-drenched coasts of Italy.
Imagine a generous bed of crisp Romaine lettuce, adorned with plump cherry tomatoes bursting with sweetness, creamy mozzarella pearls, and the delightful tang of pepperoncini. Crowned with succulent, herb-marinated grilled chicken, this salad promises an unforgettable dining experience, whether served as an elegant starter or a complete, fulfilling main course. Its appeal lies in its simplicity, its freshness, and its ability to be both sophisticated and wonderfully approachable.
Why You Will Love This Recipe
- Vibrant Flavor Profile: A delightful combination of fresh tomatoes, creamy mozzarella, tangy pepperoncini, and herbaceous basil pesto creates a taste sensation that is both complex and utterly delicious.
- Marinated Grilled Chicken: The chicken is marinated in a portion of the homemade basil pesto vinaigrette, ensuring every juicy bite is infused with incredible flavor and grilled to tender perfection.
- Versatile Serving Options: This salad shines as an impressive appetizer for gatherings or as a complete, light yet satisfying meal for a healthy lunch or dinner.
- Customizable Ingredients: Easily adapt the salad with your favorite antipasto additions, from cured meats to other pickled vegetables, making it uniquely yours.
- Quick Preparation: While the flavors are deep and complex, the actual preparation is straightforward, allowing you to enjoy this delightful dish without spending hours in the kitchen.
Ingredients You Need
Crafting this exquisite Italian antipasto salad begins with selecting the freshest, highest-quality ingredients. The vibrant colors and distinct textures of each component play a crucial role in the salad’s overall appeal. Choosing ripe tomatoes, fresh mozzarella, and crisp lettuce will elevate this dish from good to truly exceptional, ensuring a delightful culinary experience with every forkful.
Antipasto Salad with Grilled Chicken

This fresh and delicious antipasto salad is packed with grilled chicken, mozzarella cheese, tomatoes, and pepperoncini, tossed in a homemade vinaigrette. It's a perfect starter or a satisfying meal.
- For the Vinaigrette Dressing: ½ cup store-bought Basil Pesto, ¼ cup extra virgin olive oil, 3 tablespoons white wine vinegar, 1 tablespoon fresh lemon juice, Salt and fresh ground pepper, to taste
- For the Chicken: 1 pound (4 pieces) boneless skinless chicken breasts
- For the Salad: 4 cups chopped Romaine lettuce, 1 cup cherry tomatoes, halved, 8 ounces fresh mozzarella cheese balls, 1 cup pickled pepperoncini
- 1Make the dressing: In a bowl, combine pesto, olive oil, vinegar, and lemon juice; add salt and pepper to taste, and whisk until combined. Pour half of the dressing into a ziploc bag. Place the other half in the fridge.
- 2Marinate the chicken: Add the chicken breasts to the ziploc bag, seal it, and shake it all up until well combined. Place the chicken in the fridge for 30 minutes, or for up to 2 hours.
- 3Prepare to grill: When you're ready to cook your chicken, preheat the grill to 400ºF. Brush grill grates with olive oil.
- 4Grill the chicken: Remove the chicken breasts from the marinade and place them on the hot grill. Cook without touching until the chicken breasts start getting some grill marks, about 5 minutes. Turn the chicken breasts over, cover the grill, and let them finish cooking, about 7 more minutes, depending on the thickness of the chicken. Chicken is done when a meat thermometer registers 165ºF.
- 5Rest: Remove the chicken from the grill. Cover and let it rest for 5 minutes before slicing.
- 6Assemble the Salad: In the meantime, prepare the salad and transfer the chopped lettuce to a large salad bowl. Top the lettuce with tomatoes, cheese, and pepperoncini. Cut the chicken breasts into strips and add them to the salad.
- 7Dress the salad: Pour the remaining basil pesto dressing over the salad; toss to combine.
- 8Serve.
Keywords: antipasto salad, grilled chicken, Italian salad, pesto dressing, summer salad, main course salad
The specific quantities for each ingredient are detailed in the recipe card, guiding you to the perfect balance of flavors and textures.
Variations
For those seeking a plant-based delight, transforming this antipasto salad into a spectacular vegan masterpiece is incredibly simple and rewarding. Begin by omitting the chicken and mozzarella entirely. Instead, introduce pan-seared or grilled slices of firm tofu, marinated in a similar herb-infused vinaigrette for a protein boost, or opt for hearty roasted chickpeas for a delightful crunch.
A fantastic addition would be marinated artichoke hearts and Kalamata olives, providing a salty, briny depth. Consider adding sun-dried tomatoes for an intense burst of sweet-savory flavor. A sprinkle of nutritional yeast can offer a cheesy, umami note, rounding out the vegan profile beautifully. This variation proves that rich flavor and satisfying texture are entirely achievable without animal products, making it a guilt-free indulgence.
To cater to a low-carbohydrate lifestyle, this Italian antipasto salad can be effortlessly adapted. The core ingredients of lettuce, tomatoes (in moderation due to natural sugars), mozzarella, and pepperoncini are already quite keto-friendly. The key is to focus on protein and healthy fats while minimizing any potential carb sources. Grilled chicken is an excellent choice, and you could also incorporate other low-carb proteins like grilled shrimp or even slices of deli turkey or ham.
Elevate the salad with generous portions of olives, pickled vegetables like dill pickles or asparagus spears, and a rich avocado. For the dressing, ensure it’s free from added sugars; a simple blend of olive oil, red wine vinegar, and Italian herbs would be ideal. Skip any croutons or bread-based additions to keep the carbohydrate count down, focusing instead on the abundance of flavorful, nutrient-dense ingredients. This approach results in a filling and delicious meal that supports a low-carb diet perfectly.
Further enhancing the salad’s appeal, consider introducing a variety of textures and flavors. For instance, adding toasted pine nuts or slivered almonds can provide a delightful nutty crunch and healthy fats, making the salad even more satisfying. A scattering of fresh basil leaves not only adds a burst of aroma but also intensifies the Italian essence of the dish.
If you have leftover baked lemon chicken or even some grilled dinner steak, these can be sliced and added for a different protein dimension. This adaptability makes the antipasto salad a fantastic way to use up existing ingredients while creating something new and exciting, showcasing its versatility and ease of customization for any palate or dietary need.
How to Prepare Italian antipasto salad grilled chicken
Step 1: Crafting the Exquisite Basil Pesto Vinaigrette and Marinade
The foundation of this spectacular salad lies in its incredibly flavorful basil pesto vinaigrette, which ingeniously doubles as a marinade for the chicken. Begin by gathering all your vinaigrette ingredients in a medium-sized bowl. This includes the store-bought basil pesto, which offers a convenient shortcut to authentic flavor, the extra virgin olive oil for richness, white wine vinegar for a bright tang, and a splash of fresh lemon juice to awaken the palate.
Whisk these components together vigorously until they are thoroughly combined into a smooth, emulsified dressing. Season this mixture generously with salt and freshly ground black pepper to taste, adjusting until you achieve a perfect balance of savory, acidic, and herbaceous notes. This step is crucial for developing the depth of flavor that will permeate both the chicken and the salad.
Once your vinaigrette is perfected, it’s time to divide it. Carefully pour about half of this luscious mixture into a large zip-top bag. This portion will be dedicated to marinating the chicken, infusing it with its vibrant taste. The remaining half should be transferred to a separate, airtight container and placed in the refrigerator. This reserved dressing will be used to toss the salad later, ensuring every component is coated in its delicious essence.
The beauty of this dual-purpose dressing is its efficiency; you get two essential flavor elements from one simple preparation. This streamlines the cooking process without compromising on taste, making this salad a weeknight-friendly option that still feels special. The aroma of fresh basil and lemon as you whisk is a delightful preview of the fresh flavors to come.
As you prepare to marinate the chicken, ensure the zip-top bag is properly sealed to prevent any leaks in the refrigerator. The acidity in the vinaigrette will begin to tenderize the chicken as it marinates, a process that enhances its succulence and readiness for grilling. A minimum of 30 minutes is recommended to allow the flavors to penetrate, but avoid marinating for excessively long periods, as the acid can break down the chicken’s texture too much.
This initial step sets the stage for a truly remarkable salad, transforming simple ingredients into a cohesive and deeply satisfying culinary creation. The thoughtful preparation of this dressing highlights how simple techniques can yield profound flavor. Experimenting with different types of pesto, such as a sun-dried tomato or even a spinach pesto, can offer subtle variations on this theme, further personalizing the dish.
Step 2: Marinating the Chicken for Ultimate Flavor Infusion
Now, it’s time to introduce the star protein to its flavorful bath. Take your boneless, skinless chicken breasts and place them directly into the zip-top bag containing half of the prepared basil pesto vinaigrette. Ensure the chicken is fully submerged in the marinade, coating every surface evenly.
Seal the bag securely, pressing out as much air as possible to create a vacuum seal. This is important for maximizing contact between the chicken and the marinade, allowing for optimal flavor absorption. Gently shake the bag to ensure the marinade is distributed throughout, and then place it in the refrigerator to marinate.
For the best results, allow the chicken to marinate for at least 30 minutes. This duration provides a good balance, infusing the chicken with the vibrant pesto and lemon flavors without making the texture too soft. If you have more time, you can marinate it for up to two hours, but exceeding this timeframe is generally not recommended as the acidity can begin to negatively impact the chicken’s integrity, leading to a mushy consistency rather than a desirable tender one.
This marination period is crucial. It’s not just about adding flavor; it’s about tenderizing the meat and preparing it for the intense heat of the grill. The olive oil in the marinade helps to keep the chicken moist during cooking, while the vinegar and lemon juice work to break down muscle fibers, resulting in a more tender final product. This step is key to achieving that perfectly juicy, flavorful grilled chicken that elevates the entire salad.
While the chicken is marinating, you can use this time to prepare other components of the salad, such as chopping the vegetables and preparing your serving bowl. This multitasking ensures that when the chicken is ready, the rest of the salad can be assembled quickly. The anticipation of that first bite of herb-infused, grilled chicken builds with every passing minute of the marination.
Remember the important safety tip: any marinade that has come into contact with raw chicken should never be reused as a dressing or sauce without being thoroughly cooked first. Since you’ve already set aside a separate portion of the dressing for the salad, this concern is easily managed. Discard any leftover marinade from the chicken bag after removing the chicken for grilling.
Step 3: Preparing the Grill and Grilling the Chicken to Perfection
As your chicken finishes its flavorful marination, it’s time to turn your attention to the grill. Preheat your grill to a medium-high heat, aiming for a temperature of approximately 400°F (200°C). This precise temperature is ideal for achieving beautiful grill marks and ensuring the chicken cooks through evenly without burning.
Once the grill is preheated, it’s essential to prepare the grates. Lightly brush the grill grates with a high-heat cooking oil, such as canola or vegetable oil. This step is crucial for preventing the marinated chicken from sticking to the grates, which can ruin the presentation and make it difficult to flip the chicken cleanly. Ensuring the grates are well-oiled is a small but vital part of the grilling process.
Carefully remove the marinated chicken breasts from the zip-top bag. Let any excess marinade drip off briefly; you don’t want excessive oil pooling on the chicken, as this can cause flare-ups. Place the chicken breasts onto the hot, oiled grill grates. Resist the urge to move or press down on the chicken immediately.
Allow the chicken to cook undisturbed for about 5 minutes on the first side. During this time, the heat will sear the surface, creating those desirable grill marks that add both visual appeal and a slightly charred flavor. You’ll know it’s time to flip when the chicken easily releases from the grates and distinct grill marks have formed. This patience is key to achieving a beautiful crust.
After 5 minutes, carefully flip each chicken breast using tongs. Once flipped, close the grill lid. This traps the heat and allows the chicken to cook through evenly from both sides. Continue to cook for another 7 to 10 minutes, depending on the thickness of the chicken breasts. The exact cooking time will vary, so it’s always best to use a meat thermometer to ensure the chicken has reached a safe internal temperature.
The chicken is fully cooked when a meat thermometer inserted into the thickest part of the breast registers an internal temperature of 165°F (74°C). Overcooking can lead to dry chicken, so monitoring the temperature is essential. Once cooked, remove the chicken from the grill and set it aside.
The importance of perfectly grilled chicken cannot be overstated; it’s the centerpiece that ties all the fresh elements of the salad together. The slight char from the grill, combined with the internal juiciness achieved through proper cooking and resting, makes it an irresistible addition. This careful grilling process transforms a simple chicken breast into a gourmet component of your antipasto salad.
Step 4: Resting the Chicken and Preparing the Salad Base
Once the grilled chicken has reached its perfect internal temperature of 165°F (74°C), remove it from the grill. Place the cooked chicken breasts onto a clean plate or cutting board. Now comes a critical step that many home cooks overlook: allowing the chicken to rest. Tent the chicken loosely with aluminum foil, and let it rest for at least 5 minutes.
This resting period is absolutely vital for juicy chicken. During cooking, the muscle fibers in the chicken tighten, pushing the juices towards the center. If you slice into the chicken immediately after grilling, these juices will run out onto the plate, leaving you with dry, less flavorful meat. Allowing the chicken to rest lets those juices redistribute throughout the meat, ensuring each slice is moist and tender.
While the chicken is resting, turn your attention to assembling the base of your vibrant antipasto salad. Take a large, attractive salad bowl – one that is wide enough to comfortably toss the ingredients without them spilling over. This will be the canvas for your colorful creation.
Add the chopped Romaine lettuce to the salad bowl. Romaine lettuce is an excellent choice for antipasto salads because its sturdy leaves hold up well against the heavier ingredients and the dressing, remaining crisp and refreshing. Ensure the lettuce is well-drained and dry to prevent a watery salad. If you’ve washed your lettuce, give it a thorough spin in a salad spinner or pat it dry with clean kitchen towels.
The crisp, cool foundation of the lettuce is essential. It provides a refreshing contrast to the richer ingredients and acts as a perfect bed for everything else. The volume of lettuce should be generous, providing ample space for all the other delightful antipasto elements to be arranged artfully.
This phase is about building the salad layer by layer, creating a visually appealing and texturally diverse dish. The contrast between the cool, crisp lettuce and the warm, grilled chicken is a sensory delight that begins to unfold even before the dressing is added. The resting chicken, enveloped in foil, continues its magic, ensuring optimal moisture for the final assembly.
This step is a testament to the power of patience in cooking. Rushing the resting process can undo all the hard work of perfectly grilling the chicken. Therefore, embrace this brief pause; it’s an integral part of achieving the ultimate texture and flavor in your Italian antipasto salad with grilled chicken. It allows the components to come together harmoniously.
Step 5: Assembling the Antipasto Components
With the grilled chicken resting and the salad base prepped, it’s time to add the star antipasto ingredients. This is where the salad truly comes alive with a burst of color and authentic Italian flavors. The arrangement of these components is as important as their taste, creating a visually stunning dish.
Begin by artfully arranging the halved cherry tomatoes over the bed of Romaine lettuce. Their vibrant red hue provides a striking contrast to the green lettuce. Next, scatter the fresh mozzarella cheese balls (or cubes, if you couldn’t find pearls) throughout the salad. Their creamy white texture and mild, milky flavor are a classic antipasto pairing that melts beautifully into the other ingredients.
Then, add the pickled pepperoncini. These tangy, slightly spicy pickled peppers are a signature element of antipasto, adding a delightful zesty kick that cuts through the richness of the cheese and the savoriness of the chicken. Distribute them evenly so that each serving gets a good amount of their unique flavor. If you find them too spicy, you can always opt for milder pickled red peppers.
This layering of ingredients creates visual interest and ensures a balanced distribution of flavors in every bite. The combination of sweet tomatoes, creamy mozzarella, and tangy pepperoncini forms the classic antipasto medley that is both refreshing and satisfying. Each ingredient brings its own unique character to the salad, contributing to its overall complexity and appeal.
Once the antipasto components are arranged, it’s time to add the beautifully grilled and rested chicken. Using a sharp knife, slice the chicken breasts into bite-sized strips. The thickness of the slices can be adjusted to your preference, but strips are generally easy to manage and integrate into the salad.
Carefully place these chicken strips over the top of the assembled antipasto ingredients. The golden-brown grill marks on the chicken add another layer of visual appeal, signaling the deliciousness within. Ensure the chicken is distributed evenly across the salad, so every portion receives a generous amount of protein.
The interplay of colors and textures at this stage is remarkable: the deep green of the lettuce, the bright red of the tomatoes, the pristine white of the mozzarella, the vibrant yellow of the pepperoncini, and the perfectly cooked, slightly charred chicken. It’s a feast for the eyes before it even becomes a feast for the palate.
This step is where the magic of the antipasto salad truly comes together. The careful placement and selection of each ingredient contribute to the dish’s overall harmony. The anticipation of tossing it all with the dressing is palpable, promising a final, cohesive, and utterly delicious outcome. The visual appeal alone is enough to make anyone eager to dig in.
Step 6: Dressing and Final Toss for Perfect Harmony
The final, crucial step in bringing this exquisite Italian antipasto salad to life is to dress it with the reserved basil pesto vinaigrette. Retrieve the container of dressing from the refrigerator that you set aside earlier. Ensure it has been shaken or stirred to re-emulsify if any separation has occurred during its chilling time.
Gently pour the dressing evenly over the entire salad. Start with about half of the dressing, and then add more to your preference. You can always add more dressing, but you can’t take it away, so it’s often best to start conservatively and build up to your desired level of coating. The vibrant green of the pesto dressing will immediately start to glisten over the colorful ingredients.
Now, it’s time to toss the salad. Using two large salad servers or your clean hands, gently toss all the ingredients together. The goal is to coat every piece of lettuce, every tomato, every mozzarella ball, every pepperoncini, and every slice of chicken with the flavorful dressing. Be thorough but gentle to avoid bruising the lettuce or breaking down the delicate ingredients.
Continue tossing until all the components are well-combined and evenly coated. The dressing will bind the flavors together, creating a harmonious blend of pesto, lemon, vinegar, and herbs. The oil in the dressing will help the flavors meld and adhere to each ingredient, ensuring a consistent taste experience with every bite.
The act of tossing is the culmination of all the previous preparation steps. It’s where the individual elements truly become a cohesive dish. The aroma of the freshly dressed salad is intoxicating, promising a burst of authentic Italian flavors with every forkful. The visual transformation as the ingredients are coated in the dressing is also quite appealing.
Once tossed, give the salad a final taste and adjust seasoning if necessary. You might find it needs a little more salt or pepper, depending on your preference and the saltiness of your pesto and pepperoncini. This final taste test ensures the salad is perfect before serving.
Serve the salad immediately while the lettuce is still crisp and the grilled chicken is at its best. The combination of fresh, cool ingredients with the warm, savory chicken, all brought together by the vibrant basil pesto vinaigrette, creates an unforgettable dining experience. This salad is a testament to the beauty of simple, high-quality ingredients prepared with care and intention. It embodies the spirit of Italian cuisine – fresh, flavorful, and made with love.
Pro Tips for Italian antipasto salad grilled chicken
Prioritize Fresh Ingredients: The quality of your antipasto salad hinges significantly on the freshness of its components. Opt for ripe, vibrant cherry tomatoes that burst with sweetness, choose fresh mozzarella balls that are creamy and tender, and select crisp, unblemished Romaine lettuce. Using the best possible ingredients will directly translate into a more flavorful and enjoyable salad, making every bite a delightful experience.
Don’t Over-Marinate the Chicken: While marinating is key for flavor, it’s crucial not to overdo it with acidic marinades. The basil pesto vinaigrette contains vinegar and lemon juice, which are excellent for tenderizing. However, leaving the chicken in for too long (more than 2 hours) can break down the proteins excessively, leading to a mushy texture. Stick to the recommended marination time for optimal results.
Master the Grill: Achieving perfectly grilled chicken is essential. Ensure your grill is preheated to the correct temperature (around 400°F) and that the grates are well-oiled to prevent sticking. Grill the chicken undisturbed for the first few minutes to develop good grill marks, and then flip only once. Use a meat thermometer to ensure it reaches an internal temperature of 165°F, and most importantly, let it rest for at least 5 minutes after grilling before slicing to lock in the juices.
Embrace the Pesto Vinaigrette’s Dual Role: The genius of this recipe is using the same vinaigrette for both the chicken marinade and the salad dressing. This creates a seamless flavor profile throughout the dish. Remember to reserve half of the dressing *before* adding the chicken to the marinade. This ensures you have a clean, unadulterated dressing for the salad, maintaining the intended taste and safety.
Customization is Key: While the recipe provides a fantastic base, don’t hesitate to personalize your antipasto salad. Feel free to add other traditional antipasto elements like Kalamata olives, marinated artichoke hearts, thin slices of salami or prosciutto, or roasted red peppers. A sprinkle of toasted pine nuts can add a delightful crunch. Adjust the tanginess by varying the amount of vinegar or lemon juice. This flexibility allows you to tailor the salad to your exact preferences, making it uniquely yours.
Serving Suggestions for Italian antipasto salad grilled chicken
Decoration
Elevate the visual appeal of your Italian antipasto salad by adding a final flourish of fresh garnishes. A generous scattering of torn fresh basil leaves not only enhances the aroma but also reinforces the herbaceous notes of the pesto. For a touch of elegance and an extra layer of flavor, consider a drizzle of high-quality balsamic glaze over the top just before serving.
A sprinkle of freshly grated Parmesan or Pecorino Romano cheese can add a salty, nutty depth that complements the other ingredients beautifully. If you want to add a pop of color, consider a few edible flowers, such as nasturtiums or pansies, for a truly gourmet presentation that will impress your guests. These decorative touches transform the salad from a delicious meal into a culinary masterpiece.
Side Dishes
This substantial antipasto salad with grilled chicken is often a complete meal in itself, but it pairs wonderfully with a few complementary side dishes. Crusty Italian bread, perhaps lightly toasted and rubbed with garlic, is perfect for soaking up any leftover dressing. A simple side of olives or a small bowl of marinated artichoke hearts can further enhance the antipasto theme.
For a lighter accompaniment, consider serving it alongside a refreshing glass of crisp white wine, such as a Pinot Grigio or Sauvignon Blanc. If you’re looking for something slightly more substantial, a small portion of simple pasta, like Aglio e Olio or a light marinara, could round out the meal without overpowering the salad’s delicate flavors. Consider a simple side of steamed asparagus for a touch of green and freshness.
Creative Serving Ideas
Move beyond the traditional salad bowl for a truly memorable presentation. Serve individual portions in clear glass bowls or mason jars for a visually appealing layered effect, perfect for picnics or packed lunches. Another creative idea is to serve the salad family-style on a large platter, arranging the ingredients artfully rather than tossing them all together, allowing guests to customize their own plates.
Consider deconstructing the salad for a more modern presentation: arrange the grilled chicken strips on a separate platter alongside bowls of the mixed antipasto components and the lettuce, with the dressing served in a small pitcher on the side. This allows guests to assemble their perfect bite. For a lighter appetizer, serve smaller portions on individual small plates or even in edible mini bell pepper “cups” for a fun and flavorful twist.
Preparation & Storage
Storing Leftovers
To store leftover Italian antipasto salad with grilled chicken, it’s best to separate the dressed salad from any undressed components or protein. If the salad has already been tossed with dressing, transfer it to an airtight container and refrigerate. It will generally keep well for 1-2 days, though the lettuce may become slightly wilted over time.
Ideally, store the undressed salad components (lettuce, tomatoes, cheese, pepperoncini) separately from the dressing and the grilled chicken. This will help maintain the crispness of the vegetables and the texture of the chicken. Keep the dressing in a separate, sealed container in the refrigerator. The grilled chicken can be stored in its own airtight container.
When ready to enjoy leftovers, gently reassemble the salad, adding the dressing and chicken as needed. This method ensures that the salad remains as fresh and appetizing as possible, even after being stored. Always ensure leftovers are stored in the refrigerator within two hours of initial serving.
Freezing
Freezing this Italian antipasto salad with grilled chicken is generally not recommended, as many of its fresh components do not freeze well. The lettuce will become limp and watery upon thawing, and the fresh mozzarella can develop an undesirable chewy texture. The crispness of the vegetables and the integrity of the grilled chicken can also be compromised by the freezing process.
While the basil pesto vinaigrette might freeze reasonably well on its own, the salad as a whole is best enjoyed fresh. For the best results, plan to consume any prepared salad within a day or two of making it. Freezing will significantly alter the texture and overall quality of the dish, making it less appealing than its freshly prepared counterpart.
If you must freeze parts of it, consider freezing only the basil pesto vinaigrette in an ice cube tray for later use in other dishes. However, for the salad itself, it is far superior to prepare it just before serving or shortly beforehand, as intended for maximum freshness and flavor. Avoid the freezing route entirely for this particular recipe.
Reheating
Reheating this Italian antipasto salad with grilled chicken is typically unnecessary and can negatively impact its quality. The salad is designed to be served cold or at room temperature, with the crisp lettuce and fresh vegetables providing a refreshing contrast to the grilled chicken. Reheating would make the lettuce soggy and diminish the vibrant flavors of the fresh ingredients.
If you have leftover grilled chicken that you wish to reheat, do so gently. You can warm it slightly in a skillet over low heat or in a microwave for a very short period, just until warmed through. Avoid overheating, as this will dry out the chicken. It is best to add the chicken cold or at room temperature back into the salad when serving leftovers.
The goal is to preserve the salad’s intended fresh and crisp character. Therefore, treat leftovers as a cold dish. If the salad components have been stored separately, you can reassemble them and add the dressing just before serving. The chicken can be served chilled or slightly warmed if preferred, but the salad itself should not be heated.
Frequently Asked Questions
-
Can I make this antipasto salad ahead of time?
It’s best to assemble this salad just before serving for optimal freshness and texture. However, you can prepare components in advance. The basil pesto vinaigrette can be made up to 3 days ahead and stored in an airtight container in the refrigerator. The chicken can be grilled and cooled, then stored separately. The vegetables (lettuce, tomatoes, pepperoncini) can be washed and chopped, but it’s ideal to add the mozzarella and toss with the dressing closer to serving time to prevent the cheese from becoming rubbery and the lettuce from wilting.
-
What are some good substitutes for fresh mozzarella balls?
If fresh mozzarella balls (ciliegine) are unavailable, you have several excellent alternatives. You can use a ball of fresh mozzarella cheese (larger size) and cut it into bite-sized cubes. Another option is to use mini mozzarella balls if available, which are similar in size. For a different cheese experience, consider using small cubes of provolone or even small balls of goat cheese for a tangier flavor profile, though this will alter the classic antipasto character of the dish.
-
How can I make the basil pesto vinaigrette from scratch?
To make homemade basil pesto, you’ll need fresh basil leaves, pine nuts, garlic, Parmesan cheese, extra virgin olive oil, salt, and pepper. Combine the basil, pine nuts, and garlic in a food processor and pulse until finely chopped. Gradually stream in the olive oil while the processor is running until the mixture emulsifies into a thick paste. Stir in the grated Parmesan cheese, salt, and pepper to taste. You’ll then use this homemade pesto as the base for your vinaigrette, whisking it with white wine vinegar, lemon juice, and olive oil, just as you would with store-bought pesto.