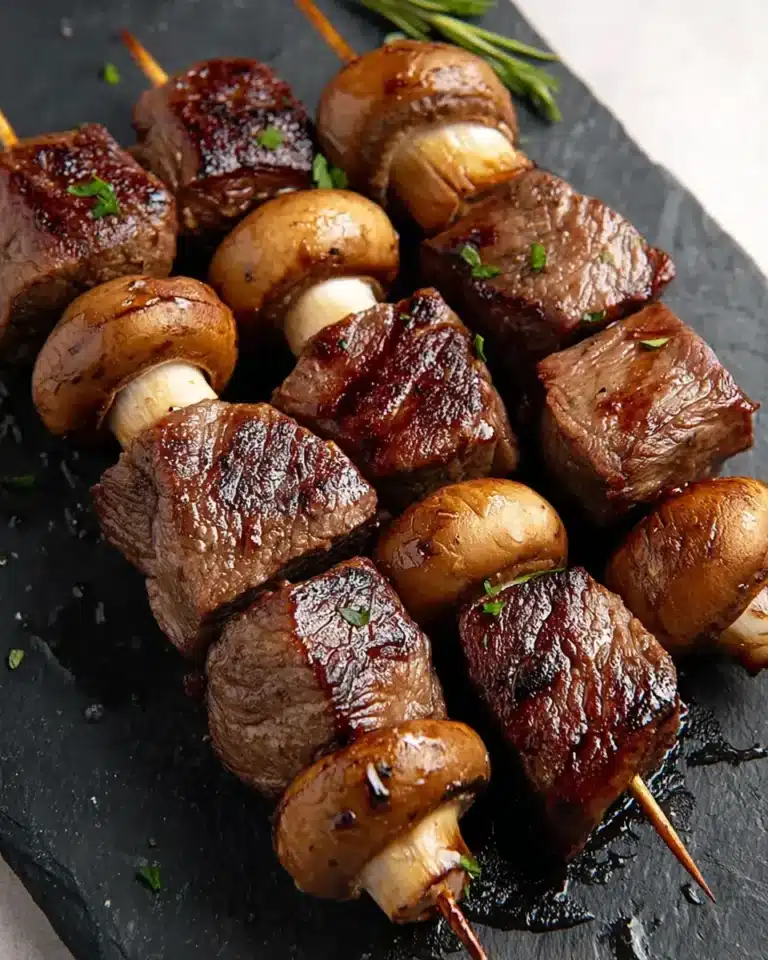
Irresistible Chuck Roast Tacos
Have you ever craved a meal that wraps comfort and flavor all in one bite? Chuck Roast Tacos might just be the answer. This recipe takes the humble chuck roast, slow-cooking it until tender, creating a filling that you simply can’t resist. A marriage of spices and perfectly warm tortillas, Chuck Roast Tacos deliver a satisfying experience that elevates taco night from mundane to extraordinary. Imagine biting into a taco filled with succulent beef, vibrant toppings, and bold spices!
What sets Chuck Roast Tacos apart is their ability to blend simplicity with depth of flavor. The slow-cooked roast absorbs spices, forming a deliciously rich filling that pairs perfectly with your choice of toppings. Add to that the joy of assembling your tacos just the way you like them—this dish unites friends and family around the dinner table. Not only are these tacos amazingly tasty, but they also offer versatility. You can customize them with a range of toppings and sides, making them suitable for just about any occasion.
Why You Will Love This Recipe
- Flavorful Depth: The slow cooking process allows the chuck roast to absorb a rich blend of spices, resulting in incredibly tender and intensely flavorful meat that is the star of every bite.
- Simple Preparation: Despite the incredible flavor, the steps are straightforward, making it an accessible recipe for home cooks of all skill levels, even those new to slow-cooking techniques.
- Endless Customization: Chuck Roast Tacos are a blank canvas for your culinary creativity, allowing you to personalize each taco with an array of fresh vegetables, creamy sauces, and zesty additions.
- Excellent for Meal Prep: This dish is ideal for preparing ahead of time, as the flavors meld beautifully overnight, making it a perfect option for busy weeknights or for having delicious leftovers.
- Crowd-Pleasing Potential: Whether for a casual family dinner or a lively gathering, the interactive nature of building your own tacos and the universally loved combination of tender beef and warm tortillas guarantees happy eaters.
Ingredients You Need
The foundation of truly exceptional Chuck Roast Tacos lies in the quality of your ingredients. Opting for a well-marbled chuck roast is key, as its connective tissues will break down during the slow cooking, yielding that signature tender, shreddable texture. Fresh aromatics like onions and garlic, combined with robust spices, are essential for building a deep flavor profile that complements the rich beef beautifully. The choice of tortillas and a vibrant selection of fresh toppings are what truly bring the taco to life.
Chuck Roast Tacos

Enjoy flavorful and customizable Chuck Roast Tacos with slow-cooked, tender beef and your choice of toppings. Perfect for family dinners or gatherings.
- 2 pounds chuck roast, trimmed of excess fat
- 2 tablespoons olive oil
- 1 onion, chopped
- 3 cloves garlic, minced
- 1 tablespoon chili powder
- 1 teaspoon cumin
- Salt and pepper to taste
- 4-6 cups water or broth
- 8-10 tortillas (corn or flour)
- Toppings (e.g., chopped cilantro, diced tomatoes, shredded lettuce, avocado, cheese, sour cream)
- 1Gather all ingredients. Trim chuck roast and chop onion and garlic. Measure spices.
- 2Heat olive oil in a large pot over medium heat. Season roast generously with salt, pepper, chili powder, and cumin. Sear roast on all sides until browned, about 5-7 minutes.
- 3Add chopped onion and minced garlic to the pot. Stir until onions are translucent, about 3-4 minutes.
- 4Pour in enough water or broth to cover roast halfway. Bring to a gentle simmer, then cover the pot with a lid.
- 5Turn heat down to low and cook slowly for 4-6 hours, or until roast is fork-tender and shreds easily.
- 6Remove roast from the pot, shred into bite-sized pieces, and incorporate some cooking liquid for moisture.
- 7Warm tortillas over medium heat until pliable.
- 8Assemble tacos by laying shredded beef in each tortilla, then adding your favorite toppings.
- 9Serve immediately while warm.
Keywords: Beef Tacos, Chuck Roast Tacos, Customizable Tacos, Slow-Cooked Tacos, taco night
- chuck roast: a well-marbled cut, about 2-3 pounds, trimmed of excess hard fat.
- olive oil: 2 tablespoons, for searing the roast to develop a rich crust.
- onion: 1 large, chopped, to provide a sweet aromatic base.
- garlic: 3-4 cloves, minced, for pungent depth of flavor.
- chili powder: 1 tablespoon, a classic for a mild, earthy heat.
- cumin: 1 teaspoon, adding its distinctive warm, smoky notes.
- salt: to taste, to enhance all the other flavors.
- black pepper: freshly ground, to taste, providing a sharp contrast.
- water or beef broth: 4-6 cups, enough to partially cover the roast during cooking.
- tortillas: 8-10, your choice of corn or flour, warmed before serving.
- toppings: a variety such as chopped cilantro, diced tomatoes, shredded lettuce, diced onion, avocado slices or guacamole, shredded cheese, sour cream or crema, and salsa or hot sauce.
The specific quantities for the components of the filling and the suggested toppings are readily available within the detailed recipe card for your convenience.
Variations
To elevate your Chuck Roast Taco experience, consider a few exciting variations. For a spicy kick, incorporate a few chipotle peppers in adobo sauce along with the shredded beef, or add a diced jalapeño to the searing aromatics for an extra layer of heat that permeates the dish. This simple addition transforms the classic into something with a bolder, more fiery personality, perfect for those who love a bit of a challenge for their taste buds.
Embrace a healthier lifestyle with a low-carb adaptation. Instead of traditional tortillas, opt for large lettuce leaves, such as butter or romaine, as your taco shells. This dramatically cuts down on carbohydrates while still allowing the flavorful chuck roast filling and your favorite toppings to shine, offering a refreshing and guilt-free meal option that feels both light and satisfying.
For a plant-based twist that still delivers immense satisfaction, replace the chuck roast with shredded jackfruit or large Portobello mushrooms. Sauté these ingredients with the same aromatic base and spices used for the beef. The jackfruit will mimic the shreddable texture of the meat, while the mushrooms offer a deep, umami flavor that makes these vegetarian tacos incredibly hearty and delicious, proving that meatless can be magnificent.
How to Prepare Chuck Roast Tacos
Step 1: Prepare Your Ingredients for Success
Begin this culinary adventure by meticulously gathering all your necessary ingredients. Ensure your chuck roast is properly prepped, trimming away any excessive, tough fat that won’t render down during the slow cooking process. This step is crucial for achieving the desired tender texture. Finely chop your onion and mince your garlic; having these aromatics ready will streamline the cooking process and ensure even distribution of flavor.
Measure out your spices with precision. Having your chili powder, cumin, salt, and pepper measured and set aside means you can add them quickly and accurately when the time comes, preventing any rushed or forgotten seasonings. This organized approach not only makes the cooking smoother but also guarantees that the flavor profile will be perfectly balanced, laying a solid foundation for the delicious tacos to come.
It’s also a good practice to have your liquid component, whether it’s water or beef broth, measured and ready to go. This ensures a seamless transition to the braising stage, preventing any delays that could affect the cooking temperature or process. This attention to detail at the outset significantly contributes to the overall success and enjoyment of the final dish, making the whole endeavor feel more manageable and rewarding.
Step 2: Achieve a Perfect Sear on the Chuck Roast
Heat two tablespoons of olive oil in a large, heavy-bottomed pot or Dutch oven over medium-high heat until it shimmers. This initial searing is a critical flavor-building step, as it creates a delicious Maillard reaction on the surface of the meat, developing rich, savory notes that will infuse the entire dish. Don’t overcrowd the pot; if your roast is very large, you might need to sear it in batches to ensure proper browning on all sides.
While the oil heats, generously season your chuck roast on all sides with salt, freshly ground black pepper, chili powder, and cumin. Ensure an even coating so that every inch of the roast contributes to the overall flavor profile. Once the oil is hot, carefully place the seasoned roast into the pot and sear it for approximately 5-7 minutes per side, until a deep, golden-brown crust has formed all around. This crust not only adds flavor but also helps to lock in the juices.
After searing, remove the roast from the pot and set it aside on a plate. You don’t need to clean the pot; the browned bits left on the bottom, known as fond, are packed with flavor and will be incorporated into the sauce. This fond is a treasure trove of savory essence that will greatly enhance the final taste of your shredded beef filling, making it more complex and deeply satisfying.
Step 3: Build the Aromatic Foundation
In the same pot where you seared the chuck roast, add your chopped onion. If the pot seems a little dry, you can add another tablespoon of olive oil, but often the rendered fat from the roast is sufficient. Sauté the onions over medium heat, stirring occasionally, until they begin to soften and become translucent, which usually takes about 3-5 minutes. This process mellows their sharp flavor and releases their natural sweetness.
Once the onions are softened, add the minced garlic to the pot. Cook for another minute or two, stirring constantly, until the garlic is fragrant. Be careful not to burn the garlic, as this can impart a bitter taste to your dish. The combination of softened onions and fragrant garlic creates a foundational aromatic base that is essential for developing the rich flavor profile of the shredded beef.
After the garlic has become fragrant, stir everything together, scraping up any browned bits from the bottom of the pot. These bits are full of concentrated flavor and will dissolve into the liquid added in the next step, enriching the overall taste of your chuck roast filling. This simple step of building aromatics is a cornerstone of developing deep, complex flavors in many slow-cooked dishes.
Step 4: Introduce the Braising Liquid and Initiate Simmering
Return the seared chuck roast to the pot, nestling it amongst the softened onions and garlic. Now, it’s time to add the liquid that will transform the tough cut of meat into tender, shreddable deliciousness. Pour in enough water or beef broth to come halfway up the sides of the roast. The liquid should not completely submerge the meat; this partial submersion allows the top of the roast to develop a different texture and absorb flavors from the steam.
Bring the liquid in the pot to a gentle simmer over medium heat. Watch for small bubbles just beginning to break the surface. This initial simmer is important for allowing the flavors to start melding and to ensure the liquid is at the correct temperature before reducing the heat for the slow cooking process. It also helps to evenly distribute the heat throughout the pot.
Once a gentle simmer is achieved, carefully place a tight-fitting lid onto the pot. This lid is crucial for trapping the steam and moisture, creating the perfect environment for slow, tender cooking. The sealed pot will prevent the liquid from evaporating too quickly and will ensure that the chuck roast cooks evenly and becomes incredibly succulent over the next several hours.
Step 5: The Magic of Low and Slow Cooking
Reduce the heat under the pot to its lowest setting. The goal here is a very gentle, slow simmer, not a vigorous boil. You want to see only occasional, small bubbles rising to the surface, indicating that the liquid is just barely active. This low and slow approach is what allows the tough connective tissues in the chuck roast to break down gradually, turning the meat incredibly tender and moist over an extended period.
Allow the chuck roast to cook in this gentle, low heat environment for approximately 4 to 6 hours. The exact cooking time will depend on the thickness and size of your roast, as well as the specific heat output of your stove. During this time, your kitchen will fill with an absolutely tantalizing aroma, a testament to the rich flavors that are developing within the pot. Resist the urge to lift the lid too often, as each time you do, you release precious heat and moisture.
The extended cooking time is not just about tenderizing the meat; it’s also about allowing the spices and aromatics to fully penetrate the roast, creating a deeply flavorful and satisfying filling. The slow braising process ensures that the beef becomes so tender that it will easily fall apart with the slightest touch, making it perfect for shredding into delicious tacos. Patience is truly rewarded with this method, yielding a melt-in-your-mouth experience.
Step 6: Confirming Perfect Tenderness
After about 4 hours of slow cooking, begin checking the chuck roast for tenderness. The ideal state for shredding is when the meat is fork-tender, meaning a fork can easily pierce it and it feels like it’s ready to fall apart on its own. Insert a fork into the thickest part of the roast and gently twist or lift. If it offers significant resistance or feels firm, it needs more time to cook.
If the roast is not yet tender, simply replace the lid, ensure the heat is still on its lowest setting, and continue cooking. Check again every 30-60 minutes until it reaches the desired tenderness. It’s better to overcook slightly than to undercook when aiming for shredded beef, as the goal is absolute melt-in-your-mouth succulence. The connective tissues need ample time to break down into gelatin, which contributes to both tenderness and a rich mouthfeel.
The Best Part: Witnessing the transformation of a tough cut of meat into something so incredibly tender and yielding is one of the most satisfying aspects of this cooking process. The visual cue of the meat beginning to separate and look almost creamy is a strong indicator that it’s almost ready for shredding. This stage signifies that the hard work is done, and the delicious reward is within reach, promising an exceptional taco filling.
Step 7: Effortlessly Shredding the Flavorful Roast
Once the chuck roast has achieved perfect fork-tenderness, carefully remove it from the pot using tongs or a slotted spoon. Place the hot roast onto a clean cutting board or into a large bowl. Be sure to leave the cooking liquid and aromatics in the pot, as this liquid is full of concentrated flavor and will be used to moisten the shredded meat.
Using two forks, begin to shred the chuck roast into bite-sized pieces. The meat should shred very easily, almost falling apart as you pull it with the forks. If any parts are still a bit firm, you can set them aside and continue shredding the more tender sections. The goal is to achieve an appealing texture that holds together well within a tortilla but is also incredibly tender to eat.
After you have shredded all the tender meat, take a ladle of the reserved cooking liquid and stir it into the shredded beef. This step is crucial for reintroducing moisture and flavor, ensuring that your taco filling is not dry but wonderfully succulent and rich. You can adjust the amount of liquid added to achieve your desired level of moistness. This technique ensures that every shred of beef is infused with the delicious braising liquid.
Step 8: Gently Warm Your Tortillas
While the shredded beef is resting or being mixed with the cooking liquid, it’s time to prepare your tortillas. Warm tortillas are essential for a good taco experience, as they become more pliable and flavorful when heated. You can warm them in a dry skillet over medium heat for about 30-60 seconds per side until they are soft and slightly puffed. Be careful not to overcook them, which can make them brittle.
Alternatively, you can warm them in the microwave, wrapped in a slightly damp paper towel, for about 30-60 seconds until they are warm and flexible. For a hint of smoky char, you can also briefly pass them over an open gas flame or toast them on a grill. The method you choose will depend on your preference and the equipment you have available.
Having warm tortillas ready ensures that your tacos can be assembled immediately after the beef is ready. This keeps the tortillas soft and prevents them from tearing when you fill them. The warmth of the tortilla also helps to enhance the flavors of the filling and toppings, making each bite a cohesive and delightful experience. This simple step significantly contributes to the overall enjoyment of your Chuck Roast Tacos.
Step 9: Assemble Your Perfect Tacos
Now comes the most enjoyable part: assembling your personalized Chuck Roast Tacos! Take a warm tortilla and lay it flat on a plate or your hand. Spoon a generous portion of the shredded chuck roast filling into the center of the tortilla. Don’t be shy; the tender, flavorful beef is the star of the show.
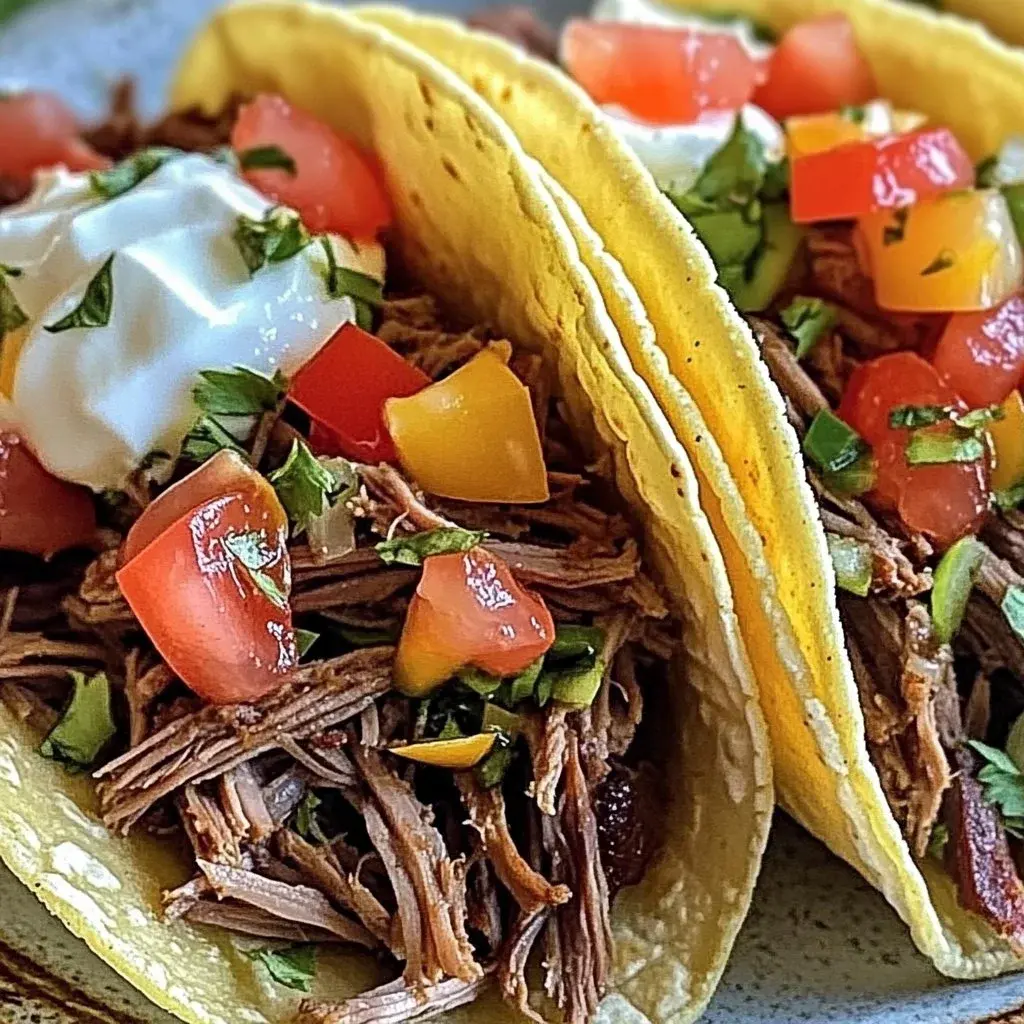
Next, it’s time to add your favorite toppings. This is where your creativity can truly shine. Pile on fresh chopped cilantro for a burst of freshness, add diced tomatoes and shredded lettuce for texture and color, and perhaps some creamy avocado slices or a dollop of rich guacamole. Sprinkle with shredded cheese and finish with a swirl of sour cream or a drizzle of your favorite salsa or hot sauce for that perfect finishing touch.
The beauty of building your own tacos is that each one can be unique. You can cater to individual preferences, dietary needs, or simply experiment with different topping combinations to discover your ultimate taco creation. This interactive element makes taco night a fun and engaging experience for everyone involved, fostering a sense of shared enjoyment around the meal.
Step 10: Serve and Savor the Flavor!
Once your masterpieces are assembled, serve the Chuck Roast Tacos immediately. Tacos are best enjoyed when the tortillas are warm, the beef is hot, and the toppings are fresh and vibrant. The contrast in temperatures and textures is what makes them so delightful. Have all your toppings laid out buffet-style so that guests can easily customize their own tacos.
Encourage everyone to build their tacos just the way they like them, fostering a fun and interactive dining experience. The process of selecting toppings and creating the perfect bite is part of the joy of taco night. This hands-on approach makes the meal memorable and ensures that every individual can tailor the flavors to their exact liking.
Enjoy the incredible flavors and the satisfying nature of your homemade Chuck Roast Tacos! This dish is a testament to how simple ingredients, combined with a bit of time and care, can create something truly extraordinary. The tender, flavorful beef, paired with fresh toppings and warm tortillas, offers a delightful culinary experience that is sure to become a favorite.
Pro Tips for Chuck Roast Tacos
Don’t Skip the Sear: Searing the chuck roast before slow cooking is absolutely crucial for developing deep, complex flavors. This browning process, known as the Maillard reaction, creates savory notes that caramelize the meat’s surface and infuse the braising liquid, contributing significantly to the final taste of your taco filling.
Season Generously: When seasoning the roast and the cooking liquid, don’t be shy. The spices need to penetrate the meat during the long cooking time to create a robust flavor profile. Remember that the flavors will also be diluted slightly by the braising liquid, so starting with well-seasoned components is key to a delicious outcome.
Low and Slow is the Way to Go: Resist the temptation to rush the cooking process by using high heat. Chuck roast requires a long, slow braise at a low temperature to break down its connective tissues and become incredibly tender. Impatience here will result in tough, chewy meat, so ensure your heat is on the lowest setting possible.
Taste and Adjust: Before shredding the meat, taste the braising liquid. This is your chance to adjust the seasoning. If it needs more salt, pepper, or a pinch more chili powder, now is the time to add it. The liquid you add back to the shredded meat will carry these adjusted flavors directly into your filling.
Embrace the Toppings: The beauty of tacos lies in their versatility. Prepare a wide array of fresh, vibrant toppings, from classic cilantro and diced tomatoes to more adventurous options like pickled onions or a spicy slaw. Providing plenty of choices allows everyone to customize their tacos and enhances the overall dining experience with a variety of textures and flavors.
Serving Suggestions for Chuck Roast Tacos
Decoration
Elevate your presentation by artfully arranging your toppings. Place bowls of vibrant cilantro, bright red diced tomatoes, crisp shredded lettuce, creamy avocado slices, and golden shredded cheese around the serving area. A small bowl of fresh lime wedges adds a zesty garnish and encourages guests to add a squeeze of citrus before digging in. Don’t forget a selection of salsas, from mild pico de gallo to fiery habanero, allowing guests to control their heat level.
Side Dishes
Complement the rich flavor of your chuck roast tacos with traditional Mexican-inspired sides. A fluffy cilantro-lime rice offers a fragrant and light accompaniment that absorbs any stray juices beautifully. Creamy refried beans or whole black beans, seasoned with cumin and a hint of garlic, provide a hearty and satisfying counterpoint. A fresh, crisp salad with a light vinaigrette, perhaps incorporating corn and black beans, adds a refreshing balance to the meal.
Creative Serving Ideas
Transform your taco night into a festive fiesta with a build-your-own taco bar. Arrange all the components attractively, allowing each guest to craft their perfect taco. For a more casual gathering, serve the shredded chuck roast in a slow cooker on the warm setting, making it easy for guests to serve themselves. You could also present the tacos with a side of warm queso dip for an extra indulgent touch, perfect for dipping those delicious tortilla edges.
Preparation & Storage
Storing Leftovers
Once cooled, store any leftover shredded chuck roast in an airtight container in the refrigerator. The meat should remain fresh and flavorful for up to 3 to 4 days. It’s best to store the meat separately from any assembled tacos, as the moisture from the toppings can make the tortillas soggy over time. Ensure the container is well-sealed to prevent any air exposure, which can lead to drying out.
Freezing
For longer storage, the shredded chuck roast can be frozen. Place the cooled meat into heavy-duty freezer bags or airtight freezer-safe containers. Remove as much air as possible from the bags before sealing to prevent freezer burn. Properly stored, the shredded beef can be kept in the freezer for up to 3 months. Remember to label the containers with the date for easy tracking.
Reheating
To reheat refrigerated leftovers, gently warm the shredded chuck roast in a skillet over low heat. Adding a tablespoon or two of water or beef broth can help restore moisture and prevent the meat from drying out. Alternatively, you can microwave the meat, covered loosely with a damp paper towel, until heated through. For frozen portions, thaw them overnight in the refrigerator before reheating using one of these methods.
Frequently Asked Questions
-
How can I make Chuck Roast Tacos ahead of time for a party?
Preparing the chuck roast a day in advance is an excellent strategy for party planning. Simply follow the recipe through the shredding stage, and then store the shredded beef in an airtight container in the refrigerator. You can also prepare your toppings and store them separately. On the day of the party, gently reheat the shredded beef on the stovetop or in the oven, warm your tortillas, and set out all the toppings for guests to assemble their own tacos.
-
What are the best ways to prevent the chuck roast from becoming dry during slow cooking?
To prevent dryness, ensure you use a properly marbled chuck roast, as the fat renders down to keep the meat moist. Don’t overcook the roast; check for tenderness after the minimum cooking time. When shredding, incorporating a good amount of the reserved braising liquid back into the shredded meat is vital for maintaining succulence. Also, make sure the lid on your pot is tightly fitted during the entire cooking process to trap all the steam.
-
Can I use a different cut of beef for this recipe if chuck roast is unavailable?
Yes, other cuts can be substituted, but they may require adjustments to cooking time and might yield a slightly different texture. Brisket, for instance, can also be slow-cooked until tender and shreddable. If you opt for leaner cuts like top sirloin, you’ll need to shorten the cooking time significantly and may need to add extra liquid or fat to ensure tenderness and moisture. For shredded chicken tacos, chicken thighs or breasts can be used, cooked until they are easily pulled apart.