Mississippi Mud Pie – Easy Chocolate Lover's Dessert!
Prepare to embark on a culinary journey that promises pure indulgence. This Mississippi Mud Pie is more than just a dessert; it’s an experience designed to captivate the senses and satisfy the deepest chocolate cravings. Get ready to create a show-stopping treat that will have everyone asking for seconds.
From its rich, fudgy interior to its buttery Oreo crust and cloud-like whipped cream topping, every element of this pie is crafted for maximum delight. It’s a testament to how simple ingredients can transform into something truly extraordinary with a little love and attention.
Why You Will Love This Recipe
- Decadent Chocolate Flavor: Experience an intensely rich and fudgy chocolate layer, reminiscent of the best brownies, that forms the heart of this pie.
- Irresistible Texture Contrast: The combination of the crumbly Oreo crust, the smooth, dense filling, and the light, airy whipped cream creates a delightful textural symphony in every bite.
- Effortless Elegance: Despite its impressive appearance and luxurious taste, this pie is surprisingly straightforward to make, requiring minimal hands-on time.
- Make-Ahead Convenience: This dessert is a perfect candidate for advance preparation, allowing you to bake the base and store it, making it ideal for busy schedules and entertaining.
- Customizable Topping: While the classic whipped cream is divine, the pie serves as a magnificent canvas for various garnishes, from chocolate shavings to drizzles of fudge.
Ingredients You Need
Crafting an exceptional Mississippi Mud Pie begins with selecting high-quality ingredients, as they are the bedrock of its incredible flavor and texture. Opting for good chocolate and fresh dairy will elevate this dessert from merely delicious to truly unforgettable. Always ensure your butter is fresh and your vanilla extract is pure for the best results.
Mississippi Mud Pie

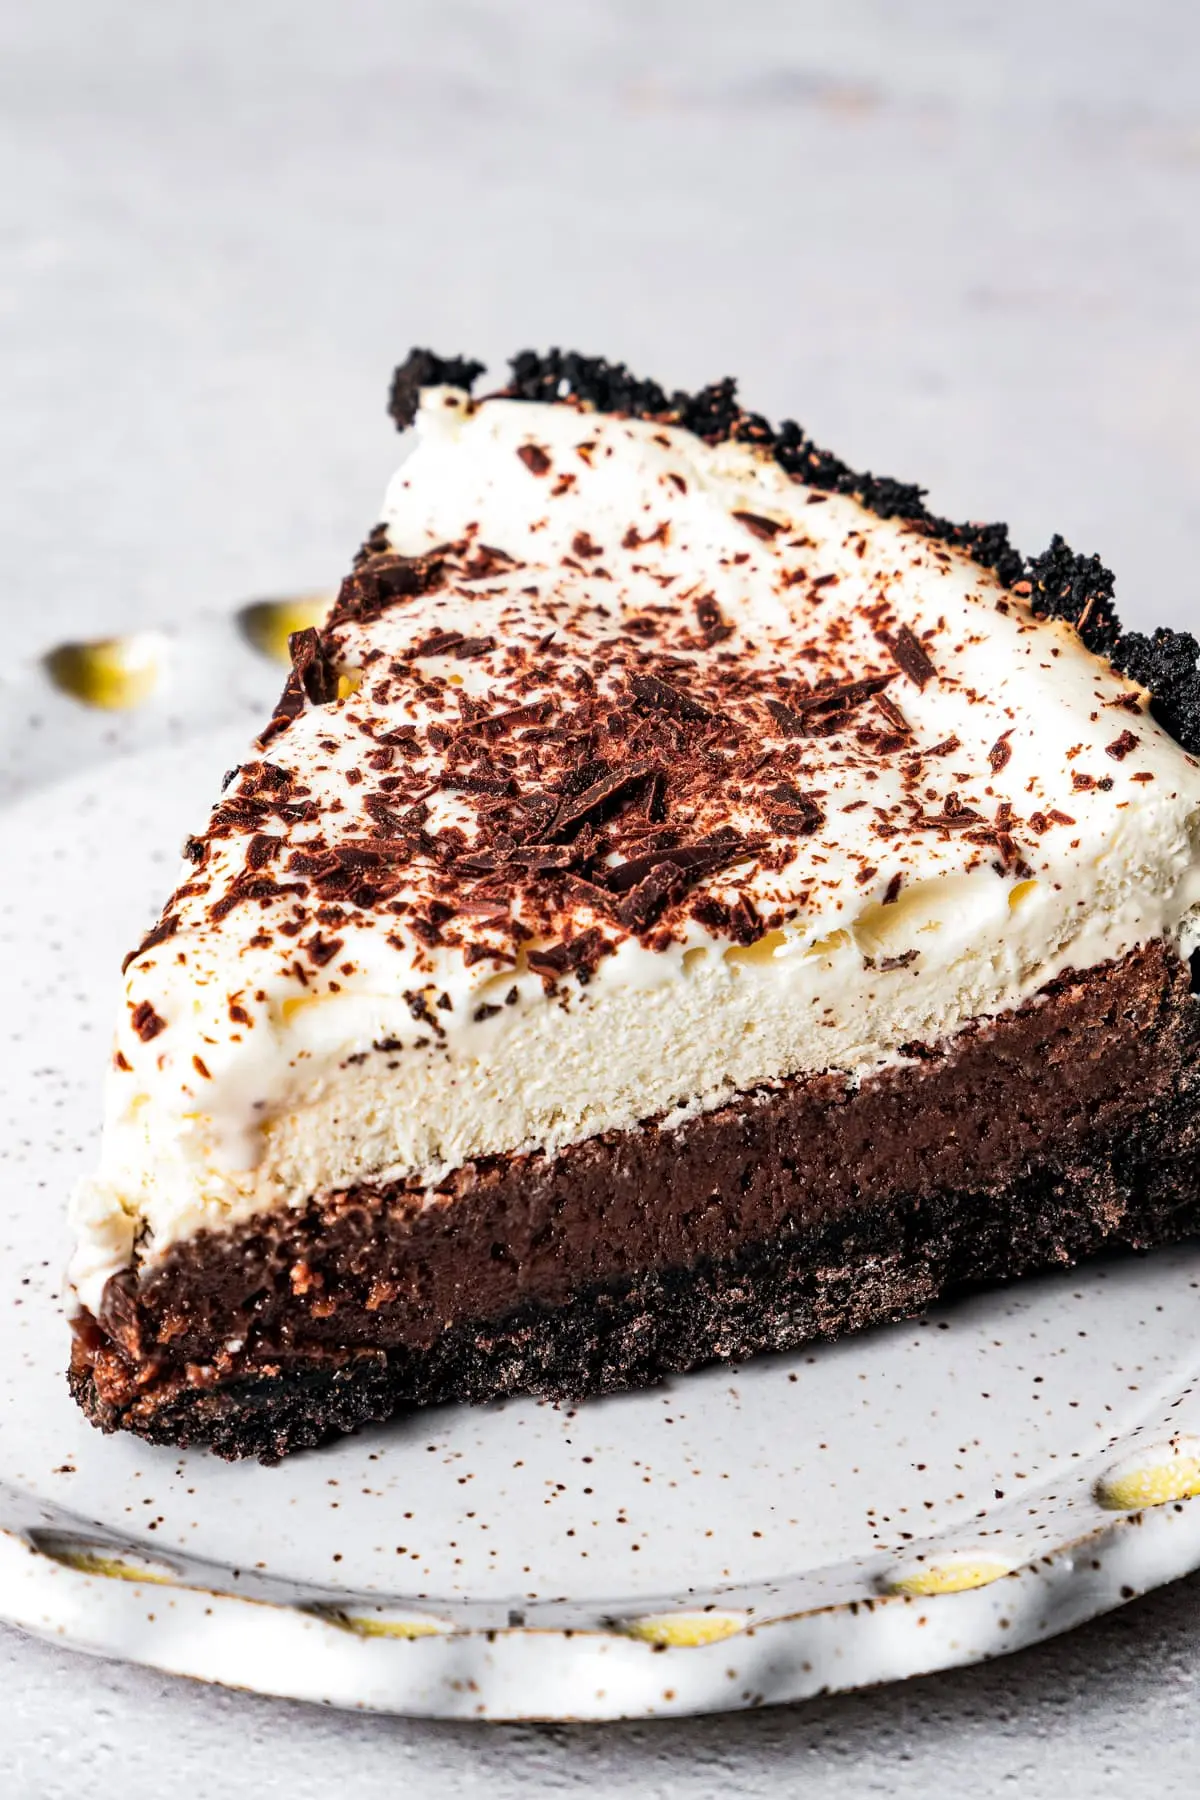
This Mississippi mud pie recipe is a real chocolate lover's dessert! It has a rich and fudgy brownie-like filling and fluffy whipped cream topping, all wrapped up in an Oreo cookie crust. Every bite is rich and decadent!
- For the Crust: 14.3 ounce package Oreos, 8 ounces butter, melted
- For the Chocolate Filling: 8 tablespoons butter, cut into small pieces, 4 ounces unsweetened or semi-sweet chocolate, chopped, 2 tablespoons all-purpose flour, pinch of salt, 1¼ cups sugar, 2 tablespoons corn syrup, 2 tablespoons pure vanilla extract, 3 large eggs
- For the Whipped Cream: 1 cup heavy whipping cream, ½ teaspoon pure vanilla extract, 1 tablespoon granulated sugar
- Garnish: chocolate shavings, for garnish, optional
- 1Preheat the oven to 375ºF.
- 2Combine Oreos and melted butter in a food processor; process until finely ground. Place the crumbs in a 9-inch springform pan, shape the crust into an even layer on the bottom of the pan, and press it about 1-1/2 inches up the sides.
- 3Bake for 10 minutes, or until set. Set aside.
- 4In the meantime, prepare the filling. Combine the butter and chocolate in a medium saucepan; melt over medium heat, stirring constantly until the butter is melted. Remove from heat.
- 5Stir in the flour and salt; continue to stir until smooth.
- 6Add sugar, corn syrup, and vanilla; stir until combined. Add eggs, one at a time, and stir until smooth.
- 7Pour the chocolate mixture into the previously prepared crust. Bake at 375ºF for 30 minutes, or until the chocolate filling is set and the top is cracked.
- 8Remove from oven and let completely cool; about 2 hours.
- 9Meanwhile, prepare the whipped cream by combining heavy whipping cream, vanilla, and sugar in a mixing bowl. Cover with cling wrap and chill in the refrigerator for 30 minutes.
- 10Once chilled, take it out of the fridge and beat the mixture with an electric mixer on high until stiff peaks form.
- 11Spread the whipped cream on top of the pie. Garnish with chocolate shavings, cut, and serve.
Keywords: chocolate pie, Oreo crust, brownie, dessert, comfort food, Katerina Petrovska
Please refer to the recipe card above for precise measurements of all the ingredients needed to create this magnificent pie. You will find a comprehensive list detailing the quantities for the crust, the decadent chocolate filling, and the luscious whipped cream topping.
Variations
While the classic Mississippi Mud Pie is a masterpiece in itself, its versatile nature allows for delightful variations that can cater to different dietary preferences and taste profiles. These creative twists ensure that everyone can enjoy a slice of this chocolatey heaven.
For those seeking a vegan interpretation, the crust can be made using vegan chocolate cookies and plant-based butter. The filling can be adapted by using a rich chocolate ganache made with coconut cream and a binder like agar-agar or cornstarch, ensuring a fudgy texture without eggs. The whipped cream topping can be replaced with a dairy-free alternative, such as whipped coconut cream or a specially formulated vegan whipped topping, offering a satisfyingly creamy finish.
A low-carb or keto-friendly version is also achievable with a few thoughtful substitutions. The Oreo crust can be reimagined using crushed nuts like almonds or pecans, mixed with a keto-friendly sweetener and melted butter. For the filling, sugar can be replaced with a low-carb sweetener like erythritol or stevia, and a touch of xanthan gum can help achieve the desired fudgy consistency. This allows for a rich chocolate experience with significantly fewer carbohydrates.
Experimenting with the chocolate itself opens up another avenue for variation. Consider using a blend of different types of chocolate for a more complex flavor profile; perhaps a combination of dark and milk chocolate, or even incorporating a hint of espresso powder to deepen the chocolate notes. You could also introduce a swirl of caramel or a layer of rich chocolate ganache within the fudgy filling for an extra layer of decadence.
How to Prepare Mississippi Mud Pie
Step 1: Crafting the Irresistible Oreo Crust
The foundation of a perfect Mississippi Mud Pie is its remarkably easy yet utterly delicious Oreo crust. This part of the preparation sets the stage for the rich chocolatey goodness to come. Begin by taking your package of Oreo cookies – and yes, the entire cookies, cream filling and all, work beautifully here. You’ll want to process these until they are finely ground into consistent crumbs.
A food processor is your best friend for this task, ensuring a uniform texture that will bake into a cohesive crust. If a food processor isn’t available, you can achieve a similar result by placing the Oreos in a sturdy zip-top bag and using a rolling pin to crush them into fine crumbs. The goal is to have a powder-like consistency with minimal large chunks.
Once your Oreos are finely crushed, it’s time to incorporate the melted butter. Gently mix the butter into the cookie crumbs until every particle is moistened. This butter is crucial as it acts as the binder, holding the crust together during baking and cooling. The mixture should resemble wet sand, clumping together when squeezed. If it seems too dry, you can add a touch more melted butter, but be careful not to make it soggy.
Now, transfer this crumbly mixture into your 9-inch springform pan. It’s important to create an even layer across the bottom of the pan. After spreading the crumbs, press them firmly upwards along the sides of the pan, aiming for a height of about 1 ½ inches. This forms a sturdy barrier that will hold the luscious chocolate filling. Using the bottom of a glass or a measuring cup can help compact the crumbs evenly and create a smooth surface.
With your crust pressed into the pan, it’s time for a quick pre-bake. Place the springform pan into a preheated oven at 375°F (190°C). Allow it to bake for approximately 10 minutes. This initial baking step is vital for setting the crust, making it firm and slightly toasty, which prevents it from becoming soggy when the wet filling is added. Once baked, carefully remove the pan from the oven and set it aside to cool slightly while you prepare the decadent chocolate filling.
Step 2: Creating the Fudgy Chocolate Filling
This is where the magic truly happens – crafting the signature “mud” that gives the pie its name. In a medium saucepan, begin by melting the butter over medium heat. It’s important to use good quality butter for the best flavor contribution. Once the butter is mostly melted, add your chopped chocolate to the pan. Continue to stir gently until both the butter and chocolate are completely melted and form a smooth, glossy mixture.
Remove the saucepan from the heat as soon as the chocolate is fully melted. This prevents the chocolate from scorching or becoming grainy. Into this rich chocolate base, stir in the all-purpose flour and a pinch of salt. Whisk these dry ingredients in thoroughly until they are smoothly incorporated into the chocolate mixture, creating a thick, pudding-like consistency. The flour will act as a thickening agent, contributing to the fudgy texture of the filling.
Next, add the sugar, corn syrup, and pure vanilla extract to the saucepan. Stir everything together until it is well combined. The sugar provides sweetness, while the corn syrup plays a critical role in preventing sugar crystallization and ensuring a tender, smooth filling. Vanilla extract enhances the overall chocolate flavor and adds a subtle aromatic complexity that makes the pie even more irresistible. Mix until the sugar is fully dissolved into the liquid.
Now it’s time to add the eggs. Ensure the chocolate mixture has cooled slightly before adding the eggs, as very hot temperatures can cook them prematurely. Add the eggs one at a time, whisking thoroughly after each addition until the mixture is smooth and homogeneous. This process emulsifies the ingredients, creating a rich, decadent batter that will set beautifully during baking. The eggs contribute to the structure and the characteristic fudgy chew of the filling. Once all eggs are incorporated, you should have a thick, glossy, and intensely chocolatey batter ready to be poured.
Step 3: Baking the Decadent Mud Pie
With your pre-baked Oreo crust ready and your luscious chocolate filling prepared, it’s time to bring them together for the crucial baking stage. Carefully pour the thick chocolate mixture directly into the partially cooled Oreo crust. Ensure the filling is distributed evenly across the crust, making sure to fill up to the edges of the pressed sides.
Once the filling is in place, it’s time to bake the pie. Return the springform pan to the preheated oven, which should still be at 375°F (190°C). Bake for approximately 30 minutes. During this time, you’ll notice the filling begin to set, and the top will develop a characteristic glossy, crackly appearance, very much like a perfectly baked fudgy brownie.
The baking time may vary slightly depending on your oven’s calibration and the moisture content of your ingredients. You’ll know the pie is ready when the edges are set and the center is just slightly soft, indicating a wonderfully fudgy interior that will continue to firm up as it cools. Avoid overbaking, as this can lead to a drier, less fudgy texture. A toothpick inserted into the center should come out with moist crumbs attached, not completely clean.
Once baked to perfection, carefully remove the Mississippi Mud Pie from the oven. Place the pan on a wire cooling rack. It is absolutely essential to allow the pie to cool completely at room temperature. This cooling process typically takes about 2 hours. Rushing this step can lead to the filling not setting properly, and it can cause the whipped cream topping to melt when applied. Patience during the cooling phase is key to achieving the perfect texture and presentation.
Step 4: Preparing the Heavenly Whipped Cream Topping
While the rich chocolate base of your Mississippi Mud Pie is diligently cooling, it’s the perfect opportunity to prepare the light and airy whipped cream topping. This component offers a delightful contrast to the dense, fudgy filling, adding a refreshing counterpoint to the intense chocolate flavor. You have the option to use high-quality store-bought whipped topping or Cool Whip for convenience, but crafting your own homemade whipped cream offers an unparalleled freshness and superior texture.
To make homemade whipped cream, you will need one cup of heavy whipping cream, which should be thoroughly chilled. The colder the cream, the more easily it will whip up to stiff peaks. Place the chilled cream into a clean, dry mixing bowl. Ensure there is no residual grease in the bowl or on your whisk attachment, as this can also hinder the whipping process.
Add ½ teaspoon of pure vanilla extract and 1 tablespoon of granulated sugar to the cream. The vanilla enhances the overall flavor profile, while the sugar adds just a touch of sweetness without making the topping overly sweet. For those who prefer a less sweet topping, you can adjust the sugar quantity to your preference. Some bakers also like to add a pinch of cream of tartar to help stabilize the whipped cream, ensuring it holds its shape longer.
Using an electric mixer (stand mixer or hand mixer), begin beating the cream mixture on medium speed. Gradually increase the speed to high as the cream begins to thicken. Continue to beat until stiff peaks form. This means that when you lift the beaters out of the cream, the peaks that form should stand up straight without curling over. Be careful not to overbeat, as this can turn the whipped cream into butter.
Once your whipped cream has reached the desired stiff peaks, it’s ready to be applied to the cooled pie. Gently spread a generous, even layer of the whipped cream over the entire surface of the chocolate filling. You can create decorative swirls with your spatula or spoon for an elegant presentation. The contrast between the dark, glossy chocolate and the pristine white whipped cream is visually stunning and promises a delightful textural and flavor experience.
Step 5: The Grand Finale: Garnishing and Serving
The moment of truth has arrived: garnishing your magnificent Mississippi Mud Pie and preparing it for its grand debut. Once the pie has completely cooled and the luscious whipped cream topping has been artfully spread, it’s time to add those final touches that elevate its visual appeal and add an extra layer of flavor complexity. This step is where you can truly express your creativity and make the pie uniquely yours.
A classic and highly effective garnish for Mississippi Mud Pie is chocolate shavings. You can easily create these by using a vegetable peeler or a sharp knife to shave curls from a good quality bar of chocolate. Dark, milk, or semi-sweet chocolate all work beautifully, offering a subtle textural crunch and an intensified chocolate aroma. Sprinkle these shavings generously over the whipped cream, creating a cascade of chocolatey delight that hints at the richness within.
Other delightful garnishing options include crumbled Oreo cookies that echo the crust, a drizzle of warm chocolate ganache or fudge sauce for an extra layer of gooey decadence, or even a dusting of cocoa powder for a more sophisticated look. Fresh berries, such as raspberries or strawberries, can also provide a welcome burst of color and a tart contrast to the rich chocolate. For a touch of elegance, consider adding a few mint leaves or a dollop of chocolate curls made from tempered chocolate.
When it comes time to serve, ensure your pie is well-chilled. Use a sharp knife that has been dipped in hot water and wiped dry to create clean, precise slices. The springform pan makes removal easy; simply unlatch the sides. Serve each slice of Mississippi Mud Pie on individual dessert plates. This pie is a substantial dessert, so a modest slice is often perfectly satisfying.
The best way to enjoy this pie is when it’s fully chilled, allowing all the flavors and textures to meld together perfectly. The combination of the crunchy crust, the dense, fudgy filling, and the cool, creamy topping is a symphony of sensations. Pair it with a glass of cold milk, a robust cup of coffee, or even a sweet dessert wine for an unforgettable culinary experience. This pie is guaranteed to be the highlight of any meal or gathering, leaving a lasting impression of pure chocolate bliss.
Pro Tips for Mississippi Mud Pie
Perfectly Crushed Cookies: For the Oreo crust, aim for very fine crumbs. This ensures the crust holds together well and bakes up evenly, providing a solid foundation without being too coarse. If using a food processor, pulse until the texture is consistent, similar to coarse sand.
Chocolate Quality Matters: The richness of your mud pie is directly tied to the quality of chocolate you use. Opt for good-quality baking chocolate, whether unsweetened or semi-sweet, for the deepest, most satisfying chocolate flavor. Avoid using chocolate chips, as they contain stabilizers that prevent them from melting smoothly into the filling.
Don’t Overbake the Filling: The sign of a perfectly fudgy filling is a slightly soft center that continues to set as it cools. Overbaking will result in a drier, more cake-like texture, rather than the desired dense, gooey consistency. Keep a close eye on it during the last few minutes of baking.
Complete Cooling is Crucial: Patience is a virtue, especially when it comes to letting the pie cool completely before adding the whipped cream. Applying whipped cream to a warm filling will cause it to melt and slide off, ruining the presentation and texture. Allow at least 2 hours for thorough cooling.
Homemade Whipped Cream Advantage: While store-bought is convenient, homemade whipped cream offers a superior light, airy texture and fresher taste. Ensure your cream and bowl are very cold for optimal whipping. If you plan to make it ahead, whip it just before you’re ready to assemble the pie.
Serving Suggestions for Mississippi Mud Pie
Decoration
Elevate the visual appeal of your Mississippi Mud Pie with thoughtful garnishes. Chocolate shavings, whether dark, milk, or white, add texture and an intense chocolate aroma. Crumbled Oreo cookies provide a visual nod to the crust, while a drizzle of chocolate ganache or a rich fudge sauce offers an extra layer of decadent gloss. For a touch of color and brightness, consider a scattering of fresh raspberries or a dusting of cocoa powder.
Side Dishes
While this pie is a decadent dessert on its own, it pairs beautifully with simple accompaniments that don’t overpower its rich flavor. A tall glass of cold milk is a classic and satisfying pairing. For those who enjoy coffee, a strong, freshly brewed coffee or an espresso can cut through the sweetness and enhance the chocolate notes. A small scoop of vanilla bean ice cream can add another layer of creamy indulgence.
Creative Serving Ideas
Move beyond individual slices by presenting the pie in unique ways. Consider serving slightly warmed slices with a dollop of crème fraîche for a sophisticated twist. For a fun, interactive experience, set up a “mud pie bar” where guests can customize their slices with various toppings like chopped nuts, caramel sauce, or mini chocolate chips. Another idea is to serve small, individual mud pie parfaits layered in glasses, featuring crumbled crust, chocolate filling, and whipped cream.
Preparation & Storage
Storing Leftovers
To keep your Mississippi Mud Pie fresh, store it properly after it has been fully cooled. Cover the entire pie tightly with plastic wrap or transfer it to an airtight container. Refrigerate the pie immediately. It will remain delicious and maintain its texture for up to 4 days. Be aware that the whipped cream topping may soften slightly over time, but the fudgy chocolate filling will remain wonderfully intact.
Freezing
If you wish to freeze your Mississippi Mud Pie, it’s best to do so before adding the whipped cream topping. Bake the chocolate filling in the Oreo crust and allow it to cool completely. Once cooled, wrap the entire pie (still in its springform pan or transferred to a freezer-safe container) securely in a double layer of plastic wrap, followed by a layer of aluminum foil to prevent freezer burn. Freeze for up to 2 months.
Reheating
When you are ready to enjoy your frozen Mississippi Mud Pie, the best method is to allow it to thaw completely in the refrigerator overnight. This gradual thawing process ensures the structure and texture are preserved. Once thawed, you can add a fresh layer of homemade or store-bought whipped cream and any desired garnishes. If you prefer a slightly warmer filling, you can gently warm individual slices in a low-heat oven (around 250°F or 120°C) for about 10-15 minutes, though this is generally not necessary as the pie is delicious served chilled.
Frequently Asked Questions
-
What makes the filling so fudgy and rich, and can I achieve this texture without corn syrup?
The fudgy and rich texture of the Mississippi Mud Pie filling is primarily achieved through the combination of a high ratio of chocolate and butter, along with the eggs acting as a binder and enricher. Corn syrup is used in many recipes to prevent sugar crystallization, ensuring a smooth, tender, and non-grainy texture, and it also contributes to the moistness. While it’s possible to achieve a fudgy texture without corn syrup, it requires careful attention to sugar and ingredient ratios to avoid crystallization. Some bakers have had success using alternatives like golden syrup or even a small amount of inverted sugar, but these can alter the flavor profile slightly. Ensuring the chocolate and butter are of good quality and that the mixture is not overbaked are also key factors in achieving that desirable dense, gooey, and intensely chocolatey result.
-
Why does my Oreo crust sometimes turn out soggy, and how can I prevent this?
A soggy Oreo crust is often a result of insufficient binding of the crumbs with butter, or the crust not being properly pre-baked. To prevent this, ensure that the Oreo crumbs are very finely ground and thoroughly mixed with the melted butter until they resemble wet sand; every crumb should be moistened. The pre-baking step is crucial as it toasts the crumbs and solidifies the butter, creating a more stable and less permeable base for the filling. Pressing the crust firmly and evenly into the pan, especially up the sides, also helps create a barrier. Furthermore, making sure the filling is completely cooled before adding the whipped cream topping is vital, as a warm filling can also contribute to a soggy crust over time.
-
Can I make this Mississippi Mud Pie in advance, and how should I store it if I do?
Yes, Mississippi Mud Pie is an excellent make-ahead dessert, which is one of its many appealing qualities. The chocolate filling can be baked and cooled completely a day or two in advance. Once cooled, it can be covered tightly and stored at room temperature if it doesn’t contain the whipped cream topping. If you are making it more than a day ahead or want to be extra cautious, refrigerating the un-topped pie is recommended. Apply the fresh whipped cream topping just a few hours before serving to ensure it remains light and fluffy. If freezing, it’s best to omit the whipped cream entirely and add it after thawing the pie in the refrigerator.