Creamy Garlic Sauce Chicken Recipe | Easy Chicken Dinner

Embark on a culinary adventure with this exceptional Creamy Garlic Sauce Chicken Breasts recipe. It promises a symphony of flavors and textures that will delight your palate and impress your guests. This dish is a testament to how simple ingredients can transform into a restaurant-quality meal right in your own kitchen.
Prepare to be amazed by the ease and speed with which this dish comes together, making it a perfect candidate for busy weeknights or any occasion demanding a touch of elegance without the fuss. The rich, velvety sauce clinging to perfectly cooked chicken is an experience in itself.
Why You Will Love This Recipe
- Effortless Preparation: This recipe is designed for simplicity, allowing you to create a gourmet meal with minimal effort and time investment.
- Rich & Creamy Sauce: The star of the show is the luscious, garlicky cream sauce that coats every piece of chicken, providing an explosion of savory goodness.
- One-Pan Wonder: Streamline your cleanup with this ingenious one-pan method, reducing the number of dishes and making the cooking process even more enjoyable.
- Adaptable Ingredients: Feel free to customize this recipe with your preferred liquids or adjust the garlic quantity to suit your taste, ensuring a perfect outcome every time.
- Quick & Satisfying: In approximately 30 minutes, you can have a complete, incredibly satisfying meal on the table, perfect for those times when hunger strikes fast.
Ingredients You Need
The key to an outstanding creamy garlic sauce chicken dish lies in the quality of your ingredients. Using fresh, vibrant components will elevate the final taste profile significantly. From plump garlic cloves to good quality chicken breasts and rich heavy cream, each element plays a crucial role in building the complex yet harmonious flavor of this recipe.
Creamy Garlic Sauce Chicken Breasts

Tender chicken breasts smothered in a mouthwatering creamy garlic sauce! This quick and tasty Creamy Garlic Sauce Chicken Breasts recipe is super easy to make and great for busy weeknights. It's all made in just one pan in about 30 minutes.
- 4 (1 pound altogether) boneless, skinless chicken breasts
- Cooking spray
- 1/2 cup grated parmesan cheese
- Salt and fresh ground pepper, to taste
- 1/2 teaspoon Italian Seasoning
- 1/2 teaspoon dried basil
- 1/2 teaspoon dried parsley
- 1/2 teaspoon sweet paprika
- 1 tablespoon olive oil
- 2 tablespoons butter, divided
- 10 cloves garlic
- 1/2 cup low sodium chicken broth (or white wine)
- 1 cup heavy cream
- Fresh chopped parsley, for garnish
- 1Pound the chicken breasts to an even thickness of 1-inch. Generously spray each chicken breast with cooking spray; set aside.
- 2In a mixing bowl, combine cheese, salt, pepper, Italian Seasoning, basil, parsley, and sweet paprika. Take the seasoning mixture and rub it all over the chicken breasts.
- 3Heat olive oil with 1 tablespoon butter in a large skillet over medium-high heat. Add chicken to the hot oil and cook for 5 minutes; flip and continue to cook for 5 more minutes, or until golden brown. Remove chicken from pan; set aside and keep covered.
- 4Reduce heat to medium and add the remaining butter; let it melt. Stir in the garlic cloves and cook for 3 to 4 minutes, or until they are lightly browned on the outside. Stir often so you do not burn the garlic.
- 5Add chicken broth or wine to the skillet and let cook for 3 minutes, or until the liquid has reduced.
- 6Stir in the heavy cream and add chicken back into the skillet. Cook for an additional 5 minutes, or until the sauce is reduced and chicken is cooked through.
- 7Remove from heat. Garnish with fresh parsley, and serve.
Keywords: chicken, creamy, garlic, sauce, dinner, quick, easy, one pan
- boneless, skinless chicken breasts: ensure they are of good quality and uniformly sized for even cooking.
- cooking spray: a light application helps prevent sticking and aids in achieving a beautiful sear.
- grated parmesan cheese: adds a nutty, salty depth and helps create a delightful crust on the chicken.
- salt and fresh ground pepper: essential for seasoning and bringing out the natural flavors of the chicken.
- Italian seasoning: a blend of herbs that offers a classic, aromatic base for the chicken coating.
- dried basil: contributes a sweet, slightly peppery note that complements the garlic and cream beautifully.
- dried parsley: adds a fresh, herbaceous undertone to the overall flavor profile of the chicken coating.
- sweet paprika: provides a mild sweetness and a vibrant color, enhancing the visual appeal of the dish.
- olive oil: used for searing the chicken, it imparts a delicate fruity flavor and helps achieve a golden-brown exterior.
- butter: essential for sautéing the garlic and forming the rich base of the creamy sauce.
- garlic cloves: the star of the sauce, use plenty of fresh cloves for an intense, aromatic flavor.
- low sodium chicken broth (or white wine): deglazes the pan, adding moisture and depth of flavor to the sauce, with wine offering a slightly more acidic and complex note.
- heavy cream: creates the luxurious, velvety texture of the sauce, binding all the flavors together.
- fresh chopped parsley: used as a garnish, it adds a burst of freshness and a beautiful pop of color to finish the dish.
The specific quantities for these ingredients can be found within the recipe card provided.
Variations
To tailor this exquisite creamy garlic sauce chicken to your specific dietary needs or preferences, consider these delightful variations. Each offers a unique twist while maintaining the core appeal of the dish.
For a vegan adaptation, you can substitute the chicken with thick slices of firm tofu or portobello mushrooms. The tofu can be pan-fried until golden and slightly crispy. Portobellos will absorb the sauce beautifully. The cream sauce can be transformed using a base of soaked cashews blended with vegetable broth and nutritional yeast for a cheesy flavor, or a good quality plant-based cream alternative. Ensure your broth is also vegan-friendly.
If you’re aiming for a low-carb meal, this recipe is already a fantastic starting point. The chicken itself is naturally low in carbohydrates. When coating the chicken, ensure you are only using the parmesan cheese and seasonings, omitting any flour-based alternatives. For serving, skip traditional pasta or rice and opt for cauliflower rice, zucchini noodles, or a generous side of steamed or roasted vegetables.
To introduce a touch of Mediterranean flair, consider adding sun-dried tomatoes, Kalamata olives, or capers to the sauce in the final stages of cooking. A pinch of red pepper flakes can also introduce a gentle warmth that complements the creamy garlic base. These additions bring a briny, tangy, or slightly spicy dimension that is incredibly appealing.
How to Prepare creamy garlic sauce chicken breasts
Step 1: Prepare the Chicken for Searing
Begin by selecting four uniformly sized chicken breasts, aiming for approximately one pound in total weight. It is crucial to pound these chicken breasts to an even thickness of about one inch. This ensures that the chicken cooks uniformly, preventing some parts from becoming dry while others remain undercooked. You can achieve this by placing the chicken breasts between two sheets of parchment paper or plastic wrap and gently pounding them with a meat mallet or the flat side of a heavy pan.
Once pounded to the correct thickness, generously spray each side of the chicken breasts with cooking spray. This simple step is vital for preventing the chicken from sticking to the pan during the searing process. A good coating of cooking spray also contributes to a beautifully golden and slightly crisp exterior, which is highly desirable for both texture and visual appeal. Place the prepared chicken breasts aside momentarily while you prepare the flavorful coating for them.
In a medium-sized mixing bowl, combine the grated Parmesan cheese with the carefully measured salt, freshly ground black pepper, Italian seasoning, dried basil, dried parsley, and sweet paprika. Ensure that all these dry ingredients are thoroughly mixed together, creating a uniform blend of flavors and aromas. This seasoning mixture is what will provide the chicken with its initial layer of deliciousness and a delightful crust.
Step 2: Coat and Sear the Chicken
Take the prepared chicken breasts and meticulously rub the seasoning mixture all over both sides. Ensure that every surface of the chicken is well-coated with the cheesy, herby blend. Press the mixture gently into the chicken to help it adhere, creating an even layer that will crisp up beautifully during cooking. This step is where much of the initial flavor is infused into the chicken, setting the stage for the incredible sauce to come.
Now, heat one tablespoon of olive oil along with one tablespoon of butter in a large, heavy-bottomed skillet over medium-high heat. It’s important for the pan to be sufficiently hot before adding the chicken to achieve a proper sear. You should see a slight shimmer on the oil and butter mixture, indicating it’s ready for the chicken.
Carefully place the seasoned chicken breasts into the hot skillet, ensuring not to overcrowd the pan, as this can lead to steaming rather than searing. Cook the chicken for approximately five minutes on the first side, allowing it to develop a beautiful golden-brown crust. Once the first side is perfectly seared, flip the chicken breasts and continue to cook for an additional five minutes on the second side, or until the chicken is golden brown and cooked through. The internal temperature should reach 165°F (74°C). Remove the chicken from the pan and set it aside on a clean plate or cutting board. Cover it loosely with foil to keep it warm and moist while you prepare the creamy garlic sauce.
Step 3: Infuse the Garlic Flavor
Reduce the heat of the skillet to medium. Add the remaining one tablespoon of butter to the pan. Allow the butter to melt completely, and once it has melted and is slightly bubbling, add the minced garlic cloves. It’s crucial to stir the garlic frequently during this stage to prevent it from burning, which can impart a bitter taste to your sauce. You are looking for the garlic to become fragrant and lightly browned, which typically takes about three to four minutes. This gentle sautéing releases the potent aromas and foundational flavors of the garlic, which are essential for the creamy sauce.
The aroma of the garlic should be intoxicating at this point, signaling that the base of your sauce is developing beautifully. Take care to scrape up any browned bits that may have adhered to the bottom of the pan from searing the chicken; these are packed with flavor and will contribute significantly to the richness of the sauce. This initial infusion of garlic into the melted butter is a critical step that builds the aromatic backbone of the entire dish.
As the garlic reaches its peak fragrance and color, you are ready to proceed to the next crucial step: deglazing the pan. This process not only adds liquid to create a sauce but also lifts all those delicious caramelized bits from the bottom of the skillet. The interplay of garlic, butter, and these browned bits forms an incredibly savory foundation that will be transformed into the luscious sauce.
Step 4: Deglaze and Build the Sauce Base
Pour the half cup of low-sodium chicken broth (or white wine, if using) into the skillet. As the liquid hits the hot pan, it will immediately start to sizzle and steam, lifting all those flavorful browned bits from the bottom of the skillet. Use a wooden spoon or spatula to gently scrape the bottom of the pan, ensuring that all the caramelized bits of chicken and garlic are incorporated into the liquid. This action is known as deglazing and is a fundamental technique in creating deeply flavored sauces.
Allow the chicken broth or wine to simmer and reduce slightly in the pan. This process concentrates the flavors and helps to mellow any harshness from the wine, should you be using it. Cook for about three minutes, or until the liquid has visibly reduced by about half. This reduction concentrates the savory essence, creating a more robust flavor profile that will form the foundation of your creamy sauce.
The liquid in the pan should have thickened slightly and will have taken on a richer, more intense color from the browned bits it has dissolved. This is a sign that the flavors are melding beautifully and that the sauce is well on its way to becoming wonderfully delicious. The skillet should now be filled with a fragrant, flavorful base that is ready for the final enrichment with cream.
Step 5: Introduce the Cream and Return the Chicken
Once the chicken broth or wine has reduced and its flavors have intensified, it’s time to introduce the heavy cream. Pour the one cup of heavy cream into the skillet. Stir the cream into the reduced liquid, ensuring it is thoroughly combined. The cream will immediately begin to create a beautiful, opaque sauce, smoothing out the texture and enriching the overall flavor profile of the dish. Be sure to stir continuously as the cream heats to prevent it from curdling.
Continue to cook the sauce over medium heat, stirring occasionally, until it begins to thicken. This usually takes about five minutes. You are looking for a consistency that is rich and velvety, coating the back of a spoon. The sauce should not be too thin, as it needs to cling to the chicken. The gentle simmering allows the flavors to meld together harmoniously and the sauce to reach its perfect texture.
Once the sauce has reached your desired consistency, gently return the seared chicken breasts to the skillet. Nestle the chicken pieces into the creamy garlic sauce, ensuring they are well-coated. Allow the chicken to simmer gently in the sauce for an additional five minutes. This final cooking time allows the chicken to absorb the rich flavors of the sauce and ensures it is heated through completely. The residual heat will also help the sauce to thicken further around the chicken.
Step 6: Finish and Serve
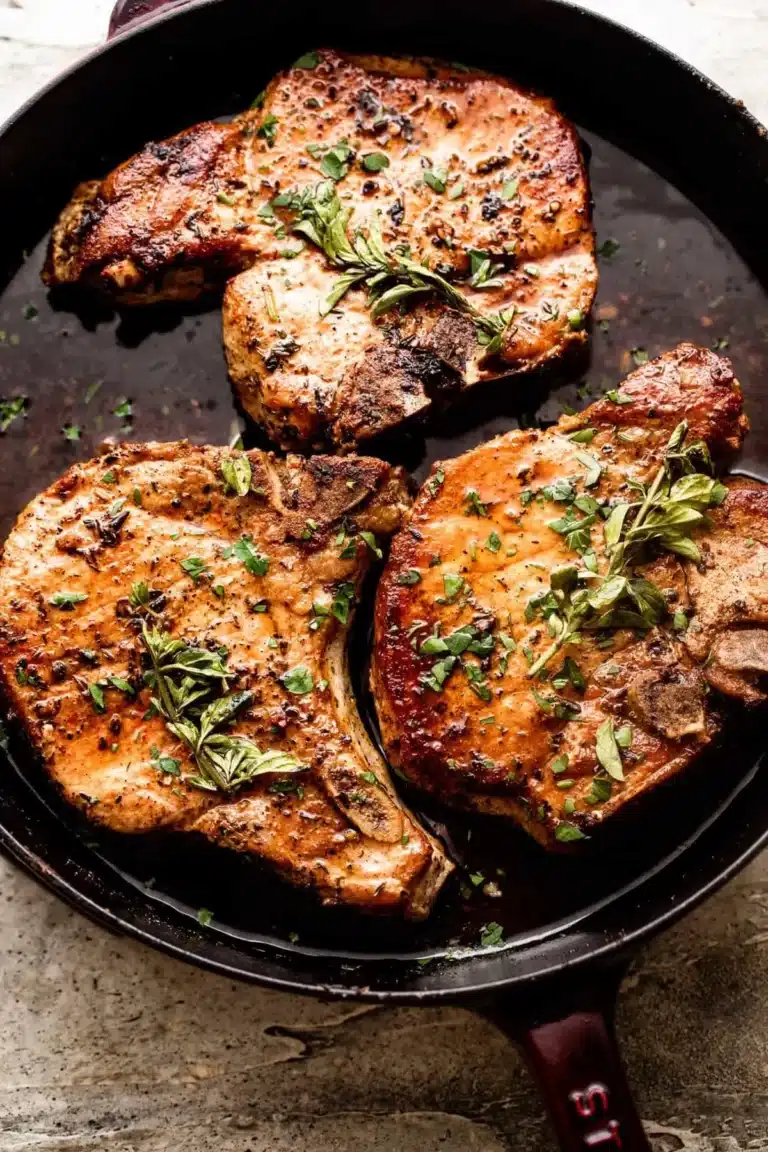
After the chicken has simmered in the creamy garlic sauce for five minutes, it should be perfectly cooked through and coated in a luxurious, flavorful sauce. Carefully remove the skillet from the heat. At this point, the aroma wafting from your pan will be absolutely incredible, a testament to the simple yet powerful combination of garlic, cream, and perfectly cooked chicken.
To add a final touch of freshness and visual appeal, garnish the dish generously with freshly chopped parsley. The bright green flecks of parsley will not only make the dish look more vibrant but will also provide a subtle herbaceous contrast to the richness of the sauce. The parsley offers a delightful freshness that balances the savory notes of the garlic and cream.
Serve the creamy garlic sauce chicken breasts immediately while they are hot and the sauce is at its most luscious. This dish is a complete meal in itself but is also wonderful when paired with various side dishes. Enjoy the incredible taste and satisfaction of this easy yet elegant meal!
Pro Tips for creamy garlic sauce chicken breasts
Don’t Overcook the Garlic: The biggest pitfall when making this dish is burning the garlic. It can turn bitter very quickly. Keep the heat moderate and stir constantly while the garlic is sautéing. Aim for a light golden color, not dark brown.
Use Quality Ingredients: The creaminess and flavor of this dish heavily rely on the quality of your heavy cream and Parmesan cheese. Opt for full-fat heavy cream for the richest sauce and freshly grated Parmesan for the best flavor and meltability.
Achieve an Even Sear: Ensure your skillet is hot enough before adding the chicken. Overcrowding the pan will steam the chicken instead of searing it, preventing that desirable golden-brown crust. Sear the chicken in batches if necessary to maintain a high cooking temperature.
Adjust Seasoning Carefully: Taste your sauce as you go, especially after adding the cream. The Parmesan cheese is salty, so you may need less additional salt than you think. Adjust pepper and herbs to your personal preference.
Consider Alcohol for Deglazing: While chicken broth is excellent, using a dry white wine like Sauvignon Blanc or Pinot Grigio for deglazing adds a wonderful depth and a touch of acidity that cuts through the richness of the cream beautifully. Just be sure to let it simmer and reduce sufficiently to cook off the alcohol.
Serving Suggestions for creamy garlic sauce chicken breasts
Decoration
A sprinkle of fresh, vibrant green chopped parsley is the classic and most effective garnish for this dish. It adds a beautiful contrast to the creamy sauce and offers a hint of herbaceous freshness. Thinly sliced chives can also provide a delicate oniony bite and a lovely visual appeal. For a touch of elegance, consider a very light dusting of smoked paprika, adding a subtle smoky aroma and a warm reddish hue.
Side Dishes
This rich and flavorful chicken dish pairs wonderfully with a variety of accompaniments. Steamed or roasted asparagus, broccoli, or green beans offer a healthy and vibrant contrast. A simple side salad with a light vinaigrette can also balance the richness of the chicken. For a heartier meal, consider serving it over a bed of fluffy rice, creamy mashed potatoes, or a delightful cauliflower mash for a low-carb option. You could also serve it alongside some crusty bread to soak up every last drop of the delicious sauce.
Creative Serving Ideas
Transform this dish into a sophisticated pasta topping by tossing it with al dente fettuccine or linguine. For a delightful appetizer, serve smaller pieces of the chicken over toasted crostini, creating mini chicken toasts with creamy garlic sauce. You could also incorporate the chicken and sauce into a savory pot pie filling, adding puff pastry for a comforting baked entree. Another idea is to serve it alongside baked seafood for a surf-and-turf inspired meal.
Preparation & Storage
Storing Leftovers
Once cooled, store any leftover creamy garlic sauce chicken breasts in an airtight container in the refrigerator. They will keep well for up to 4 days. It’s best to ensure the chicken is completely submerged or covered by the sauce to maintain its moisture. Cold leftover chicken can be a delicious addition to salads or sandwiches, offering a quick and flavorful protein boost.
Freezing
While it is possible to freeze this dish, it’s important to be aware that the texture of the creamy sauce may change upon thawing. Dairy products can sometimes separate and become grainy when frozen and reheated. If you plan to freeze it, allow the dish to cool completely before transferring it to a freezer-safe container or heavy-duty freezer bags. It’s advisable to add a splash more cream when reheating to help emulsify the sauce again.
Reheating
To reheat leftovers, the best method is often on the stovetop. Gently warm the chicken and sauce in a skillet over low to medium heat, stirring frequently. This helps to re-emulsify the sauce and prevent it from becoming oily or broken. If the sauce seems too thick, you can add a tablespoon or two of milk, broth, or additional cream to achieve your desired consistency. Avoid overheating, as this can dry out the chicken.
Frequently Asked Questions
-
Can I use chicken thighs instead of breasts for this recipe?
Absolutely! Chicken thighs are a fantastic alternative and some even prefer them due to their higher fat content, which keeps them incredibly moist. If you opt for boneless, skinless chicken thighs, you will likely need to increase the cooking time slightly to ensure they are cooked through. Aim for thighs that are about an inch thick and be prepared to cook them for approximately 7 minutes per side during the searing stage, and then allow them to simmer in the sauce for the specified time until tender and cooked to an internal temperature of 165°F (74°C).
-
How can I make the creamy garlic sauce thicker if it turns out too thin?
If your creamy garlic sauce is thinner than you desire, there are a couple of effective methods to thicken it. You can continue to simmer the sauce uncovered over low heat, allowing excess liquid to evaporate and the sauce to reduce naturally. Another option is to create a slurry by whisking together one tablespoon of cornstarch or arrowroot powder with two tablespoons of cold water until smooth. Gradually whisk this slurry into the simmering sauce until it reaches your desired thickness. Ensure you cook it for at least a minute or two after adding the slurry to allow the thickener to activate fully and eliminate any starchy taste. Always remember to stir consistently to prevent lumps.
-
What are some good gluten-free alternatives for serving this dish?
This dish is wonderfully versatile and can be served with numerous gluten-free options. Instead of traditional pasta, consider serving the chicken and sauce over gluten-free pasta, zucchini noodles (zoodles), or spaghetti squash. Cauliflower rice is another excellent choice, offering a healthy and low-carbohydrate base that soaks up the delicious sauce beautifully. You can also pair it with steamed or roasted vegetables such as broccoli, asparagus, or green beans, or serve it with a side of quinoa or a hearty gluten-free bread for dipping. Remember to check the labels of all your ingredients, such as chicken broth and seasonings, to ensure they are certified gluten-free.