Irresistible Banana Snickers: A Delicious Guilt-Free Treat
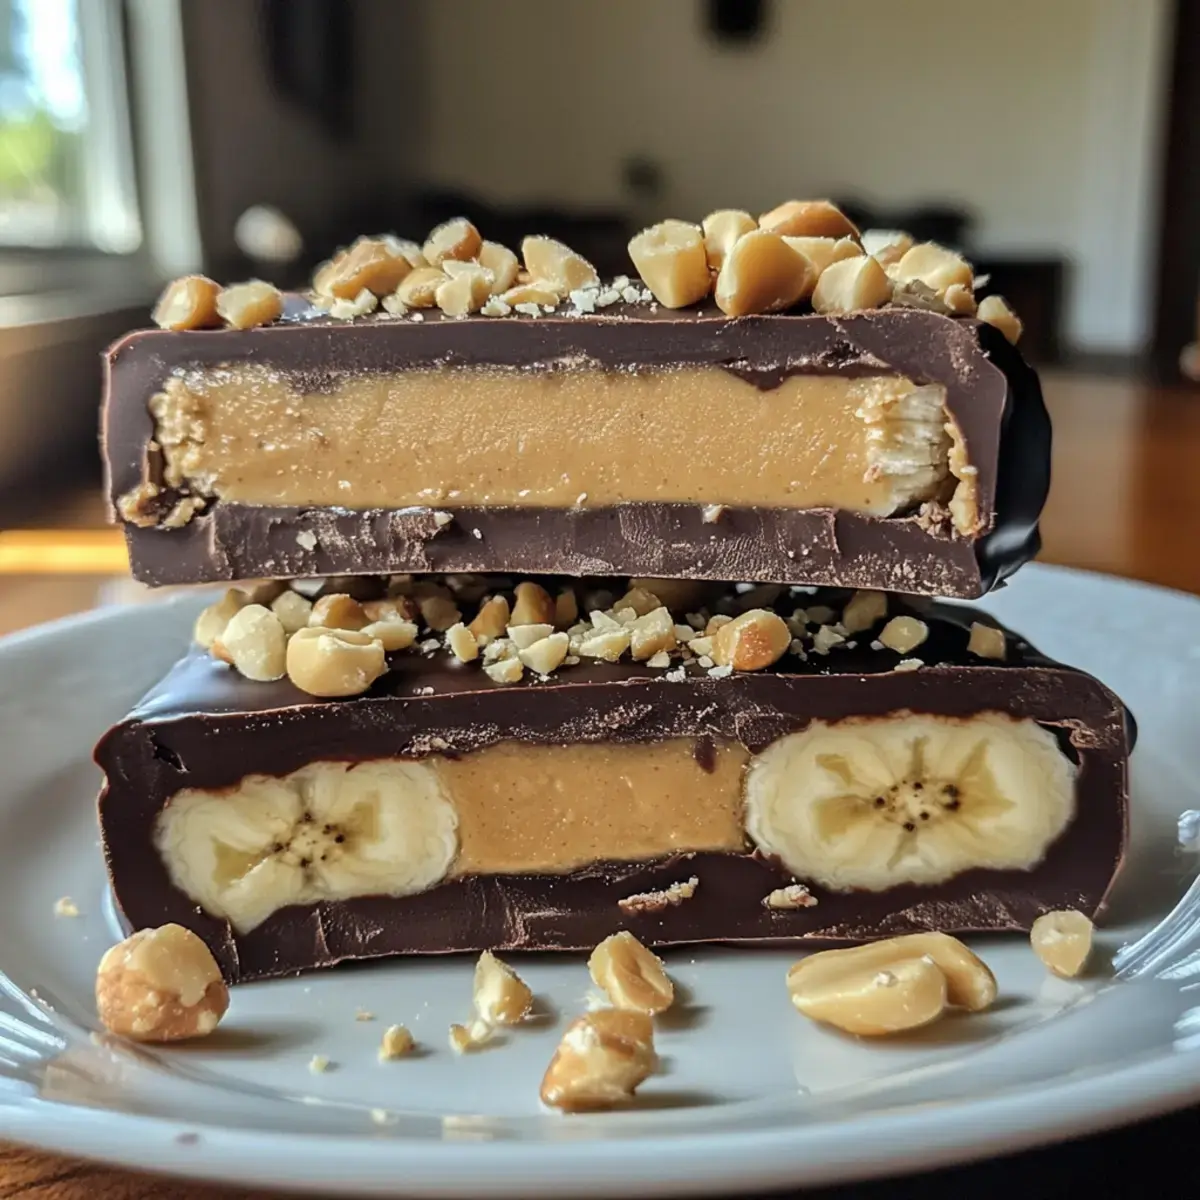
As I rummaged through my kitchen the other afternoon, a thought struck me—sweet cravings don’t have to lead to a sugary spiral. Enter my delightful Frozen Banana Snickers, a heavenly concoction that’s not only low-calorie and gluten-free but also packs a nutritious punch!
Imagine ripe bananas lovingly layered with creamy nut butter and crunchy peanuts, all dressed up in a rich dark chocolate coat. This guilt-free indulgence is perfect for satisfying those afternoon snack attacks without the post-treat remorse. Curious to learn how to create these delicious treats that feel like a decadent reward? Let’s get started!
Why You Will Love This Recipe
- Guilt-Free Indulgence: These Frozen Banana Snickers allow you to indulge in something sweet without the guilt, making them a perfect treat for any time.
- Simple Preparation: No baking is required—you can whip these up in minutes, making them an ideal quick fix for busy evenings or sunny afternoons.
- Customizable Delight: With variations in nut butters and toppings, you can tailor them to your taste or dietary preferences, ensuring everyone finds a combination they love.
- Healthy Pleasure: Packed with nutrients from bananas and nut butter, they provide a wholesome snack option that nourishes your body.
- Crowd-Pleasing Snack: Ideal for all ages, these treats are perfect for parties or as a quick on-the-go option, guaranteeing smiles all around.
Ingredients You Need
Choosing high-quality ingredients is paramount for creating the most flavorful and satisfying Frozen Banana Snickers. The natural sweetness of ripe bananas, the creamy richness of nut butter, the satisfying crunch of peanuts, and the indulgent depth of dark chocolate all play crucial roles in this delightful treat. Sourcing fresh, vibrant ingredients will elevate your homemade Snickers from simply good to truly exceptional.
Guilt-Free Banana Snickers

Satisfy your sweet cravings with these Guilt-Free Banana Snickers, a healthy treat that's low-calorie and gluten-free. A simple, no-bake dessert perfect for any occasion.
- 2 Ripe Bananas
- 2 tablespoons Nut Butter (Peanut, Almond, etc.)
- 1 teaspoon Chopped Peanuts
- 6 ounces Dark Chocolate
- 1 pinch Sea Salt
- 1Peel and slice ripe bananas into halves or thick rounds, around 1-inch thick. Lay on a parchment-lined baking tray.
- 2Generously spread a layer of nut butter on each banana slice, about 1 tablespoon per piece.
- 3Sprinkle about 1 teaspoon of chopped peanuts on each banana piece.
- 4Melt dark chocolate in a microwave-safe bowl in 30-second intervals until smooth.
- 5Dip each banana slice into the melted chocolate, ensuring it is completely coated.
- 6Place the tray in the freezer for 1 to 2 hours until chocolate is firm.
- 7Serve immediately or store in an airtight container in the freezer for up to 2 months.
Keywords: banana snickers, healthy dessert, no bake, gluten-free, low-calorie, chocolate, peanut butter
- ripe bananas: choose bananas that are ripe but not overly mushy for the perfect creamy texture and natural sweetness.
- nut butter: creamy peanut or almond butter adds richness; sunflower seed butter is an excellent nut-free alternative.
- chopped peanuts: provides a delightful crunch; sunflower seeds or pumpkin seeds can be used as a substitute.
- dark chocolate: high-quality dark chocolate offers an indulgent outer shell packed with antioxidants.
- sea salt: a pinch enhances the sweet flavors and mimics salted caramel, adding a delightful complexity.
The precise quantities for each ingredient are detailed within the recipe card for your convenience.
Variations
Let’s explore some exciting variations to make your Frozen Banana Snickers truly your own. Consider a tropical twist by adding shredded coconut to the nut butter layer; the sweet, chewy texture of coconut pairs beautifully with banana and chocolate. For those who love a hint of saltiness with their sweetness, a sprinkle of finely crushed pretzels over the nut butter before coating in chocolate can add a wonderfully unexpected crunch and savory note.
If you’re aiming for a richer, more decadent experience, try drizzling a homemade date-caramel sauce over the chocolate coating once it has partially set. This adds a natural sweetness and a chewy texture that elevates the entire treat. Alternatively, for a brighter flavor profile, consider incorporating finely chopped dried fruits like cranberries or raisins into the nut butter layer for bursts of tartness and chewiness.
For a completely different sensory experience, experiment with different types of nut butters. Cashew butter offers a milder, creamier flavor than peanut butter, while pecan butter can add a subtle toasty depth. Don’t be afraid to mix and match; perhaps a swirl of almond butter with a touch of tahini could offer a unique nutty profile.
The possibilities are truly endless when it comes to personalizing these delightful Frozen Banana Snickers. You can also play with the outer coating by adding a dusting of cocoa powder to the melted chocolate, or even swirling in a bit of peppermint extract for a festive flair. These variations ensure that every batch you make can be a unique adventure for your taste buds.
How to Prepare Frozen Banana Snickers
Step 1: Prepare the Bananas
Begin by selecting two ripe yet firm bananas; overripe bananas can become too mushy once frozen, while underripe ones might lack sufficient sweetness. Peel the bananas carefully, ensuring you remove any strings that might cling to the flesh. Slice each banana into thick rounds, approximately one inch thick; this thickness provides a substantial base for the toppings and coating, making them easier to handle and enjoy.
Once sliced, arrange the banana pieces on a baking tray that has been lined with parchment paper. Parchment paper is essential as it prevents the banana pieces from sticking to the tray during the freezing process, ensuring they can be easily removed once firm. Ensure there is a small space between each banana slice to allow for even freezing and to prevent them from adhering to each other.
This initial preparation step is crucial for creating uniformly sized treats that freeze well. The parchment paper creates a non-stick surface, which is a lifesaver when dealing with frozen fruits. This organized arrangement also sets the stage for the next layers of flavor and texture that will transform these simple banana slices into a decadent treat reminiscent of a classic candy bar.
Step 2: Spread the Nut Butter
Now, for the luscious filling that mimics the caramel layer of a Snickers bar. Generously spread a layer of your chosen nut butter onto the flat side of each banana slice. Aim for about one tablespoon of nut butter per banana piece, ensuring a thick and creamy coating that will bind the peanuts and provide a rich, satisfying base.
You can use a small offset spatula or the back of a spoon to create an even layer of nut butter across the banana. Peanut butter is a classic choice, but almond butter, cashew butter, or even sunflower seed butter for a nut-free option are equally delicious. The key is to use a nut butter that is smooth and spreadable, providing a creamy texture that complements the banana perfectly.
This layer of nut butter is not just for flavor; it acts as an adhesive for the next ingredient, the chopped peanuts. It also adds a significant amount of healthy fats and protein to the treat, making it more substantial and satisfying. Ensure the coverage is consistent so that each bite offers that signature creamy, nutty goodness.
Step 3: Sprinkle with Crunch
The next step introduces the essential crunchy element, reminiscent of the peanuts in a traditional Snickers bar. Sprinkle about one teaspoon of finely chopped peanuts evenly over the layer of nut butter on each banana slice. This adds a delightful textural contrast and a savory depth that balances the sweetness of the banana and the richness of the nut butter.
If you prefer a different crunch, consider using chopped almonds, pecans, or even sunflower seeds. Some people like to add a tiny pinch of sea salt on top of the peanuts for an extra layer of flavor complexity. This small addition can really make the sweet and savory notes pop, mimicking the salted caramel experience found in many confectioneries.
Press the chopped peanuts gently into the nut butter layer to ensure they adhere well. This will prevent them from falling off once the chocolate coating is applied and the treats are frozen. This careful adherence is key to achieving that perfect bite where every component, from the soft banana to the crunchy peanuts and smooth chocolate, comes together harmoniously.
Step 4: Melt the Chocolate
The final, indulgent layer is the rich dark chocolate coating. You’ll need about six ounces of high-quality dark chocolate, preferably with a cocoa content of 60% or higher, for the best flavor and texture. Place the dark chocolate, either in chopped pieces or chips, into a microwave-safe bowl.
Melt the chocolate in short intervals, typically 30 seconds at a time, in the microwave. Crucially, stir the chocolate thoroughly after each interval, even if it doesn’t appear melted yet. This helps to distribute the heat evenly and prevents the chocolate from burning or seizing, which can render it unusable. Continue this process until the chocolate is completely smooth and glossy.
Alternatively, you can melt the chocolate using a double boiler method over low heat on the stovetop. Whichever method you choose, the goal is a smooth, fluid chocolate that coats the banana pieces beautifully. A well-melted chocolate coating is key to achieving that satisfying snap when you bite into your Frozen Banana Snickers.
Step 5: Coat the Banana Pieces
With the chocolate perfectly melted and glossy, it’s time to coat your prepared banana slices. Use a fork or a toothpick to carefully dip each banana piece into the melted chocolate. Ensure the entire surface of the banana, including the sides, is completely submerged in the chocolate.
Allow any excess chocolate to drip back into the bowl for a few seconds before carefully transferring the coated banana piece back onto the parchment-lined baking tray. This ensures a clean coating and prevents the chocolate from becoming too thick on the underside, which can make the treats uneven.
Work relatively quickly, as the chocolate will begin to set as it cools. If the chocolate starts to thicken too much in the bowl, you can gently reheat it for a few more seconds in the microwave. Achieving a smooth, even coating is essential for both the appearance and the taste of your homemade Snickers. This step is where the magic truly happens, transforming the layered banana into a delightful confection.
Step 6: Freeze Until Firm
Once all the banana pieces are coated in chocolate and arranged on the parchment-lined tray, it’s time for the crucial freezing step. Carefully place the entire baking tray into the freezer.
Allow the Frozen Banana Snickers to freeze for at least 1 to 2 hours, or until the chocolate coating is completely firm and solid to the touch. This ensures that the treats maintain their shape and texture when served, providing that satisfying, cold, and crisp bite.
The freezing process solidifies the chocolate and also makes the banana firmer, creating a delightful contrast. For best results, ensure they are fully frozen before attempting to handle or store them, as this will prevent them from melting or sticking together. This patient waiting period is essential for the perfect end product.
Step 7: Store or Serve
Once your Frozen Banana Snickers are thoroughly frozen and the chocolate is firm, they are ready to be enjoyed. You can serve them immediately straight from the freezer for the ultimate cool and refreshing treat.
If you have any leftovers or wish to prepare them in advance, store them in an airtight container in the freezer. It is highly recommended to separate the layers of banana Snickers with pieces of parchment paper to prevent them from sticking together. This will ensure that each treat can be easily removed and enjoyed individually.
These delightful treats can be stored in the freezer for up to 2 months, making them a perfect make-ahead snack. Enjoy them whenever a sweet craving strikes, and savor the delicious, guilt-free indulgence!
Pro Tips for Frozen Banana Snickers
Banana Selection is Key: Always opt for bananas that are ripe but not overly soft. Look for a few brown spots, as this indicates peak sweetness and a creamy texture that freezes beautifully without becoming watery. A banana that is too ripe can turn mushy, while an unripe one will lack sweetness and flavor.
Nut Butter Consistency Matters: Use a smooth, creamy nut butter that is easy to spread. If your nut butter is too stiff, you can gently warm it for a few seconds in the microwave or stir in a tiny bit of coconut oil to achieve a more pliable consistency. This ensures an even layer and better adhesion for the peanuts.
Chocolate Coating Technique: When melting your dark chocolate, use short intervals and stir frequently to prevent burning. If the chocolate seizes, sometimes adding a teaspoon of coconut oil or vegetable shortening can help smooth it out, though it’s best to melt slowly and patiently. Ensure the chocolate is fluid enough to coat the bananas smoothly for an appealing finish.
Work Quickly with Bananas: Bananas are prone to browning quickly once cut, especially when exposed to air. Slice and coat your banana pieces promptly after peeling. If you’re preparing them slightly in advance, a very light toss with a tiny bit of lemon juice can help maintain their color, but this is often unnecessary if you are working efficiently.
Freezing for Best Results: Arrange the chocolate-coated banana pieces on the parchment-lined tray with a little space between them. This prevents them from sticking together in a frozen clump. Once they are fully firm, you can transfer them to an airtight container for longer storage, still using parchment paper between layers.
Personalize Your Treats: Don’t shy away from adding your own creative touches. Consider a sprinkle of toasted coconut flakes, a drizzle of melted white chocolate for contrast, or even a dash of cinnamon mixed into the nut butter layer. These small additions can make your Frozen Banana Snickers uniquely yours and incredibly delicious.
Serving Suggestions for Frozen Banana Snickers
Decoration
For an extra touch of elegance and flavor, consider some simple decorative elements. A light drizzle of melted white chocolate over the dark chocolate coating can create a beautiful visual contrast, reminiscent of elegant candy bars. Alternatively, a sprinkle of shredded coconut, toasted or untoasted, adds a tropical flair and delightful texture. For a touch of shimmer, a very fine dusting of edible glitter or colored sugar can make these treats party-ready.
Side Dishes
Frozen Banana Snickers are a delightful treat on their own, but they can be wonderfully complemented by a few select pairings. A glass of cold almond milk or a creamy peanut butter smoothie provides a harmonious flavor profile that enhances the nutty and chocolatey notes. For a lighter, more refreshing accompaniment, consider a vibrant mixed berry salad; the tartness of the berries offers a pleasant counterpoint to the sweetness of the Snickers.
A small scoop of homemade vanilla or coconut milk ice cream can transform this snack into a more decadent dessert. The coolness of the ice cream alongside the frozen banana Snickers creates a delightful temperature contrast. For those seeking a healthier pairing, a simple cup of herbal tea, like peppermint or chamomile, offers a soothing and refreshing finish that cleanses the palate without overpowering the treat’s flavors.
Creative Serving Ideas
Elevate the presentation of your Frozen Banana Snickers by serving them in miniature candy wrappers or on decorative small plates. For a party setting, create a “build-your-own” topping bar with an assortment of chopped nuts, seeds, dried fruits, and even a few drizzles of contrasting chocolate or caramel sauce. This allows guests to customize their own unique banana Snickers creations, adding an interactive and fun element to the gathering.
Consider arranging them artfully on a platter, perhaps interspersed with fresh berries or mint leaves for a pop of color. You could also serve them as part of a dessert board, alongside other small sweet bites like funfetti cookies or miniature berry tarts. For a more substantial treat, serve one or two alongside a slice of German pancake or as a sweet finish to a light lunch.
Another creative idea is to slightly soften them for a few minutes before serving, allowing the chocolate to develop a bit of a gloss and the banana to become slightly more yielding, creating a more ‘caramel-like’ chew. This can also be done by gently warming them under a broiler for mere seconds, but extreme caution is advised to avoid melting the chocolate entirely.
Preparation & Storage
Storing Leftovers
If you happen to have any Frozen Banana Snickers leftover, proper storage is key to maintaining their delightful texture and flavor. The best method is to place them in an airtight container in your freezer. To prevent them from sticking together into one large frozen mass, ensure you separate each layer of banana Snickers with a piece of parchment paper.
This simple step will allow you to easily retrieve individual treats whenever a craving strikes. Stored correctly, these homemade delights can maintain their optimal quality for several weeks, offering a convenient and healthy sweet option at your fingertips.
If you prefer a softer, slightly chewier texture rather than the firm, frozen bite, you can store them in the refrigerator. In the fridge, they will last for about 3 days. However, be aware that the banana may soften considerably, and the chocolate might develop a slight bloom if exposed to condensation, so freezing is generally the preferred method for long-term storage.
Freezing
Freezing is the primary method for preserving the ideal texture and taste of your Banana Snickers. After coating the banana pieces in chocolate and arranging them on the parchment-lined tray, place the entire tray into your freezer. Allow them to freeze until the chocolate is completely solid and firm, which typically takes 1 to 2 hours.
Once frozen solid, you can then transfer them to an airtight container for longer storage. Remember to use parchment paper between layers to ensure easy separation later on. Properly frozen, these treats can last for up to two months, providing a readily available healthy indulgence.
When you’re ready to enjoy them, you can either eat them directly from the freezer for a refreshingly cold snack, or let them sit at room temperature for a few minutes if you prefer a slightly softer bite. The freezing process is what truly transforms these simple ingredients into a satisfying frozen confection.
Reheating
There is generally no need to reheat Frozen Banana Snickers, as they are designed to be enjoyed cold straight from the freezer. The frozen state is what provides their unique texture and refreshing quality, making them an ideal treat on a warm day or whenever you desire a cool indulgence.
If, for some reason, you prefer a slightly less frozen banana or a softer chocolate coating, you can allow them to sit at room temperature for approximately 5-10 minutes before consuming. This brief thawing period will soften them slightly without causing them to melt completely, offering a different, yet still enjoyable, eating experience.
Attempting to reheat them by microwaving or baking would likely result in a melted mess and defeat the purpose of a frozen treat. The beauty of these is their inherent coldness, so embrace the chill and enjoy them as nature intended!
Frequently Asked Questions
-
What kind of bananas should I use for the best results?
For the most delightful Frozen Banana Snickers, it’s crucial to select ripe but not overly mushy bananas. Ripe bananas are naturally sweeter and have a creamier texture that freezes exceptionally well, providing a satisfying contrast to the firm chocolate coating. Look for bananas with a few brown spots, as this is a good indicator of peak ripeness and sweetness. Overripe bananas can become too soft and watery, while unripe bananas might lack sweetness and develop an unpleasant texture when frozen. The ideal banana provides a good balance of sweetness and structural integrity.
-
How should I properly store my homemade Banana Snickers to keep them fresh?
To maintain the ideal freshness and texture of your Banana Snickers, the best storage method is in an airtight container placed in the freezer. It is highly recommended to place a sheet of parchment paper between each layer of banana Snickers. This prevents them from sticking together, ensuring you can easily retrieve an individual treat whenever you desire. When stored this way, they can retain their delicious quality for up to two months. If you prefer a softer texture, they can be stored in the refrigerator for up to 3 days, although they will not maintain their frozen firmness.
-
Can I freeze the Banana Snickers after preparing them, and if so, how long do they last?
Absolutely, freezing is the primary method for enjoying these treats as intended! Once you have prepared and coated the banana slices in chocolate, place the entire baking tray into the freezer. Let them freeze until the chocolate coating is completely firm and solid, which typically takes about 1 to 2 hours. After they are frozen solid, you can then transfer them to an airtight container for long-term storage. Properly frozen, your Banana Snickers can last for up to two months, making them a perfect make-ahead snack for satisfying those sweet cravings.