Hot Italian Sub Sliders: The Ultimate Comfort Food Delight
Hot Italian Sub Sliders are a delightful culinary creation that brings the robust flavors of a classic Italian sub to a perfectly portioned, bite-sized format. These sliders are designed to be a showstopper at any event, offering a symphony of savory meats, melty cheese, and a hint of zesty peppers, all cradled within soft, yielding rolls. They represent the ultimate in convenient yet delicious party food.
The genius of these sliders lies in their ability to satisfy a crowd without demanding extensive preparation time. They are ideal for those moments when you want to impress guests with minimal fuss, proving that impressive flavor can indeed come in small packages. Whether it’s a lively tailgate, a casual family gathering, or a sophisticated cocktail party, these sliders are guaranteed to be the star attraction.
Why You Will Love This Recipe
- Quick Preparation: These sliders are remarkably fast to assemble, requiring only about 5 minutes of active prep time before they’re ready for the oven.
- Flavorful Layers: The combination of thinly sliced, high-quality deli meats, creamy provolone cheese, and the bright tang of pepperoncini and hot cherry peppers creates an incredibly satisfying flavor profile.
- Versatile Serving: They excel as a main course, a substantial snack, or an appetizer, adapting seamlessly to any mealtime occasion or gathering.
- Easy to Scale: The recipe is incredibly flexible, allowing you to effortlessly double or even triple the quantities to accommodate larger groups without any added complexity.
- Kid-Friendly Appeal: While packed with adult-pleasing flavors, the overall taste is generally mild enough to be a hit with younger palates, making them a universally loved option.
Ingredients You Need
The success of any great dish hinges on the quality of its ingredients. For these Hot Italian Sub Sliders, selecting fresh, flavorful deli meats and good quality cheese will elevate the final product significantly. Taking a moment to source premium ingredients ensures that each bite is a testament to simple yet delicious cooking. Remember, the better the components, the more outstanding the result will be.
Hot Italian Sub Sliders

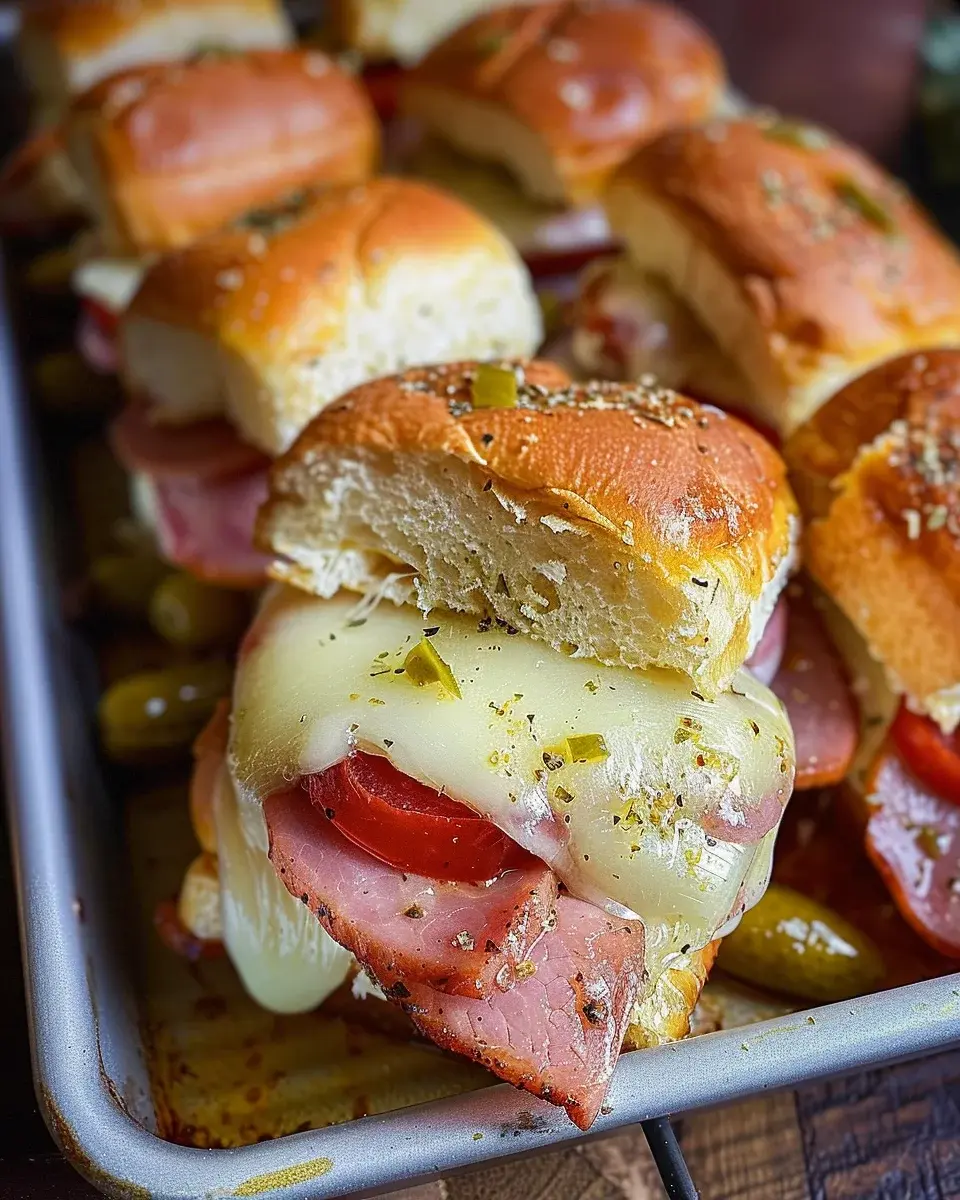
These Hot Italian Sub Sliders are a crowd-pleaser, perfect for any gathering or tailgate. With layers of delicious meats, cheeses, and zesty peppers, they pack a flavorful punch in every bite. Not only are they easy to prepare, but they can also be made in large batches, making them ideal for parties or game day. Serve them with marinara sauce for dipping, and you've got a winning dish that everyone will love!
- 12 pack rolls, halved lengthwise (Kings Hawaiian rolls recommended)
- 6 oz package of ham, thinly sliced
- 5 oz package of salami, thinly sliced
- 5 oz package of pepperoni, thinly sliced
- 9 slices provolone cheese
- 1/3 cup pepperoncini, sliced
- 1/3 cup pickled hot cherry peppers, sliced
- 1/4 cup salted butter, melted
- 1 tsp Italian seasoning
- 2 cloves garlic, crushed
- 1 cup marinara sauce
- 1Preheat your oven to 350 degrees F.
- 2Lay the bottom half of the rolls on a baking sheet. Layer on slices of ham, followed by salami, pepperoni, and provolone cheese. Add sliced hot cherry peppers and sliced pepperoncini on top. Replace the top bun gently.
- 3In a small bowl, combine melted butter with Italian seasoning and crushed garlic. Mix well.
- 4Brush the seasoned butter mixture over the top of the sliders, ensuring all nooks are coated. Cover the sliders with foil.
- 5Bake at 350 degrees F for about 30 minutes until golden brown.
- 6Remove from the oven, slice into individual sliders, and serve warm with marinara sauce on the side for dipping!
Keywords: Tailgate, Party, Game Day, Appetizer, Sandwich, Slider, Italian
- 12 pack rolls, halved lengthwise: These form the soft, pillowy foundation for all the delicious fillings.
- 6 oz package of ham, thinly sliced: A mild, savory meat that provides a pleasant base note.
- 5 oz package of salami, thinly sliced: Adds a salty, slightly spicy depth to the sandwich.
- 5 oz package of pepperoni, thinly sliced: Brings a classic Italian flavor with a touch of heat and richness.
- 9 slices provolone cheese: Melts beautifully and offers a slightly sharp, milky taste.
- 1/3 cup pepperoncini, sliced: Provides a delightful tanginess and a mild crunch.
- 1/3 cup pickled hot cherry peppers, sliced: Introduces a welcome kick of heat and a fruity undertone.
- 1/4 cup salted butter, melted: The secret to a golden, flavorful crust on the rolls.
- 1 tsp Italian seasoning: A fragrant blend that infuses the butter with classic herbs.
- 2 cloves garlic, crushed: Adds a pungent, aromatic boost to the seasoned butter.
- 1 cup marinara sauce: The perfect accompaniment for dipping, adding moisture and a rich tomato flavor.
Exact quantities for all these fantastic ingredients are readily available within the accompanying recipe card, ensuring precision in your culinary adventure.
Variations
The beauty of these Hot Italian Sub Sliders lies in their inherent adaptability. You can easily transform them into a variety of exciting new dishes by simply swapping out a few key components. This flexibility allows you to cater to different dietary needs or simply explore new flavor frontiers with minimal effort.
For a vibrant Vegan Twist, omit the meats and cheeses entirely. Instead, layer the bottom of the rolls with a generous spread of sun-dried tomato pesto or a rich hummus. Then, pile on marinated artichoke hearts, roasted red peppers, grilled zucchini slices, and a handful of fresh spinach. Drizzle with a balsamic glaze before baking for an equally satisfying, plant-based option that bursts with Mediterranean flavors.
To create a Low-Carb option, you’ll need to forgo the traditional rolls. Instead, consider using large portobello mushroom caps, halved and hollowed out slightly, or thick slices of grilled eggplant as your base. Layer these with your favorite low-carb deli meats like turkey or roast beef, Swiss or cheddar cheese, and sugar-free pickles. Top with another mushroom cap or eggplant slice and bake until tender and heated through for a delicious, carb-conscious alternative.
You could also venture into a spicy Southwestern variation. Replace the Italian meats with thinly sliced grilled chicken breast or seasoned ground beef. Layer with Monterey Jack or Pepper Jack cheese, sliced jalapeños, and a spoonful of corn and black bean salsa. Brush the tops with a melted butter and chili powder mixture before baking for a zesty, South-of-the-border inspired slider that offers a delightful change of pace.
How to Prepare Hot Italian Sub Sliders
Step 1: Preheat the Oven and Prepare the Rolls
Begin by preheating your oven to a steady 350 degrees Fahrenheit (175 degrees Celsius). This crucial first step ensures that the sliders will bake evenly, developing a beautifully golden-brown crust and perfectly melted cheese. A consistent oven temperature is key to achieving that desirable texture and preventing undercooked or burnt edges.
Next, carefully take your 12-pack of slider rolls and slice them horizontally, creating a distinct top and bottom half. Lay the bottom halves of all the rolls out in a single layer on a spacious baking sheet. This provides a stable and accessible platform for building the layers of deliciousness that define these sliders.
Ensure there’s a little space between each roll if possible, although they can be quite close together. This arrangement helps to promote even baking and makes it easier to manage the assembly process. The goal here is to create a uniform base ready to receive the flavorful fillings.
Step 2: Layer the Delicious Fillings
Now comes the exciting part: layering the incredible ingredients that give these sliders their signature Italian flair. Start by generously arranging the thinly sliced ham over the bottom halves of the rolls, ensuring good coverage across each one. This provides a solid, savory foundation for the subsequent layers.
Follow this with a layer of thinly sliced salami, distributing it evenly to complement the ham. On top of the salami, add a layer of pepperoni, which brings its own distinct spice and richness to the mix. The overlapping nature of these thin slices helps to create a cohesive and satisfying bite in every slider.
Once the meats are in place, artfully arrange the slices of provolone cheese over the pepperoni. Don’t be afraid to let the cheese overlap slightly, as it will melt into a wonderfully gooey layer. Finally, scatter the sliced pepperoncini and the pickled hot cherry peppers evenly over the cheese. These tangy, slightly spicy elements cut through the richness of the meats and cheese, adding a vibrant burst of flavor and a pleasing textural contrast.
Step 3: Assemble and Prepare for Baking
With all the savory and zesty fillings artfully arranged, it’s time to complete the assembly of your sliders. Gently take the top halves of the rolls and place them carefully back onto the bottom halves, creating the complete slider sandwiches. Press down lightly to secure everything in place, but avoid squashing the rolls too firmly, as you want to maintain their airy texture.
The key to achieving that irresistible golden-brown, slightly crispy top is a delicious butter mixture. In a small, separate bowl, combine the 1/4 cup of melted salted butter. This forms the base for infusing maximum flavor and moisture into the tops of the rolls, ensuring they don’t dry out during baking.
To this melted butter, add the 1 teaspoon of Italian seasoning and the 2 crushed cloves of garlic. Stir these ingredients together thoroughly, allowing the flavors of the herbs and garlic to meld with the butter. This simple yet potent mixture is what transforms ordinary rolls into something truly special, infusing them with aromatic goodness that complements the rich fillings perfectly.
Step 4: Brush with Seasoned Butter and Bake
Using a pastry brush or the back of a spoon, generously brush the seasoned butter mixture all over the top surfaces of each assembled slider. Ensure you get into all the nooks and crannies, coating the bread thoroughly. This step is crucial for developing a beautiful, golden-brown crust that is both visually appealing and deliciously flavorful. The butter helps the herbs and garlic adhere to the bread, creating a toasted, aromatic topping.
Once the tops are beautifully coated, carefully cover the entire baking sheet with aluminum foil. This tenting effect is important; it traps the steam generated during baking, which helps to keep the sliders moist and tender on the inside while the cheese melts to perfection. The foil also prevents the tops from browning too quickly before the inside is heated through.
Place the foil-covered baking sheet into your preheated 350°F (175°C) oven. Allow the sliders to bake undisturbed for approximately 30 minutes. During this time, the magic happens: the meats will heat through, the cheese will become luxuriously melted and gooey, and the rolls will absorb some of that wonderful seasoned butter, becoming tender and flavorful. You’re looking for a bubbly, hot interior and a perfectly toasted exterior.
Step 5: Cool Slightly, Slice, and Serve
After the allotted 30 minutes, carefully remove the baking sheet from the oven. It’s tempting to dive in immediately, but allowing the sliders to rest for a few minutes is a vital step. This brief resting period allows the melted cheese to set slightly, preventing it from oozing out excessively when you cut into them. It also helps the flavors to meld together more harmoniously.
Using a sharp serrated knife, carefully slice through the entire block of sliders to separate them into individual portions. A gentle sawing motion works best to cut through the soft rolls and the assembled fillings without causing too much disruption. Aim for clean cuts that showcase the beautiful layers within each slider. This makes them easy to pick up and eat.
Finally, arrange the individual sliders on a serving platter. Serve them immediately while they are warm and the cheese is still wonderfully melty. Present the cup of marinara sauce alongside the sliders, ready for dipping. The combination of the warm, savory sliders and the rich, tangy sauce is an absolute delight for the senses and a guaranteed hit with your guests.
Pro Tips for Hot Italian Sub Sliders
To elevate your Hot Italian Sub Sliders from delicious to absolutely unforgettable, consider a few expert tips that can make a significant difference in both flavor and presentation. These small adjustments can take your sliders to the next level, impressing even the most discerning palates. They are simple steps that yield remarkable results.
Use High-Quality Deli Meats: The foundation of these sliders is the meats, so don’t skimp here. Opt for freshly sliced deli meats from a good butcher or deli counter rather than pre-packaged options. This ensures superior flavor and texture, making a noticeable impact on the final taste. Consider a mix of mild and slightly spicier options for complexity.
Don’t Overstuff the Sliders: While it’s tempting to pack in as much filling as possible, restraint is key. Overstuffing can lead to uneven baking, soggy bread, and difficulty in eating the sliders. Aim for a balanced ratio of bread to filling so that each component can be enjoyed without overwhelming the others.
Experiment with Cheeses: While provolone is classic, don’t hesitate to mix it up. Consider using a blend of provolone and mozzarella for extra gooeyness, or add a slice of sharp cheddar for a different flavor profile. Even a sprinkle of Parmesan on top before baking can add a salty, nutty dimension. The cheese is a critical flavor component, so tailoring it to your preference is a great idea.
Add a Kick with Peppers: The pepperoncini and hot cherry peppers provide a welcome tang and spice. If you enjoy more heat, consider adding a few thinly sliced jalapeños or even a small amount of Calabrian chili paste mixed into the butter. Conversely, if you prefer milder flavors, you can reduce the quantity or opt for milder pickled peppers.
Consider a Quick Broil: For an extra crispy, golden-brown finish on top, you can briefly broil the sliders for the last 1-2 minutes of baking. Watch them very closely to prevent burning, as the broiler is powerful. This will give them a delightful crunch and an even richer toasted flavor.
Serving Suggestions for Hot Italian Sub Sliders
Decoration
While these sliders are beautiful in their golden-baked glory, a few decorative touches can enhance their visual appeal. A light sprinkle of fresh, finely chopped parsley over the top after baking adds a pop of vibrant green and a hint of freshness. You can also add a few thin slices of red bell pepper or cherry tomato on top of the cheese before baking for a splash of color and extra flavor.
Side Dishes
To create a complete and satisfying meal, pair your Hot Italian Sub Sliders with a variety of complementary side dishes. A crisp Caesar salad or a fresh Caprese salad offers a refreshing counterpoint to the richness of the sliders. Crispy baked potato wedges or sweet potato fries provide a hearty and familiar accompaniment.
For a more traditional Italian-American experience, serve them alongside a bowl of steaming garlic bread or a simple pasta salad tossed with Italian dressing. Crunchy kettle-cooked potato chips or a zesty coleslaw also make excellent accompaniments, adding texture and balancing the flavors. Don’t forget to include extra marinara sauce for dipping, as it’s an essential part of the experience.
Creative Serving Ideas
Think beyond the traditional platter. For a tailgating event, serve the sliders directly from the baking pan, allowing guests to serve themselves. You can also arrange them on a tiered stand for a more elegant presentation at a party. Consider offering small appetizer plates and cocktail napkins to make for easy handling and enjoyment.
For a fun, interactive option, set up a “build-your-own slider” station with extra toppings like olives, pickles, and different types of cheese. This allows guests to customize their sliders to their exact preferences. Another creative idea is to serve them as part of a larger Italian-themed buffet alongside pasta dishes and other appetizers, making them a versatile component of a grand feast.
Preparation & Storage
Storing Leftovers
If by some chance you have any Hot Italian Sub Sliders left over, proper storage is key to maintaining their quality. Allow the sliders to cool completely to room temperature. Once cooled, transfer them to an airtight container or wrap them tightly in plastic wrap or aluminum foil. This prevents them from drying out and absorbing odors from other foods in the refrigerator.
Stored correctly, these sliders will remain delicious for up to 2-3 days in the refrigerator. It’s important to keep them well-sealed to preserve their moisture and flavor. Avoid stacking them too high in the container, as this can cause them to flatten or become compressed.
Freezing
For longer-term storage, these sliders freeze remarkably well. After cooling completely, wrap each individual slider very tightly in plastic wrap, ensuring there are no air pockets. Then, place the wrapped sliders into a heavy-duty freezer bag or an airtight freezer-safe container. This double-layer protection is essential for preventing freezer burn.
When frozen properly, Hot Italian Sub Sliders can be stored for up to 1-2 months. It’s a good idea to label the bag or container with the date they were frozen so you can keep track. Having a batch of these ready in the freezer means you can quickly whip up a delicious snack or meal whenever the craving strikes.
Reheating
Reheating is straightforward and ensures you can enjoy the sliders almost as if they were freshly made. The best method for reheating is in a conventional oven. Preheat your oven to 350°F (175°C). Place the chilled or frozen sliders on a baking sheet and cover them loosely with aluminum foil.
Bake for about 15-20 minutes if reheating from the refrigerator, or 25-30 minutes if reheating from frozen. The foil helps to trap moisture and heat them through evenly without drying them out. For a slightly crispier finish, you can remove the foil for the last 5 minutes of baking. Alternatively, you can reheat them in a microwave for about 30-60 seconds per slider, but this method can sometimes result in a softer texture.
Frequently Asked Questions
-
Can I customize the meats and cheeses used in these Hot Italian Sub Sliders?
Absolutely! One of the best aspects of these sliders is their versatility. Feel free to substitute the ham, salami, and pepperoni with other deli favorites like thinly sliced turkey, roast beef, capicola, or even shredded chicken. For the cheese, provolone is classic, but you can easily swap it for mozzarella, Swiss, cheddar, or a combination to suit your taste preferences. Don’t hesitate to explore different combinations to create your perfect slider.
-
What is the best way to serve Hot Italian Sub Sliders to ensure they are enjoyed at their peak flavor and texture?
These sliders are best served warm, immediately after being baked, or reheated. The warmth allows the cheese to be wonderfully gooey and the bread to be soft and flavorful from the butter mixture. Serving them with a side of warm marinara sauce for dipping is a highly recommended practice, as it adds an extra layer of rich tomato flavor and moisture. Ensure they are sliced into individual portions for easy handling and enjoyment.
-
How long does it typically take to prepare and cook these Hot Italian Sub Sliders from start to finish?
The beauty of this recipe is its speed. The active preparation time is incredibly short, usually around 5 minutes, making it perfect for busy weeknights or last-minute entertaining. The baking time is approximately 30 minutes. Therefore, from the moment you start gathering your ingredients to when you’re ready to serve, the entire process typically takes about 35 minutes, making it a quick and efficient crowd-pleaser.