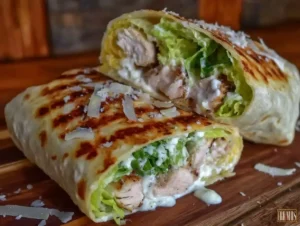
Grilled Chicken Caesar Wrap Recipe Easy 15-Minute Dinner Idea for Busy Weeknights

Some evenings, the clock feels like it’s sprinting ahead, and dinner feels like a distant dream. That was me last Thursday, juggling emails, a pile of laundry, and a toddler who decided 6pm was the perfect time for a meltdown. I needed something fast, satisfying, and not utterly boring. Enter the grilled chicken Caesar wrap—a total lifesaver that came together in under 15 minutes and felt anything but rushed.
What hooked me was how this wrap took the classic Caesar salad vibe I love and turned it into a handheld meal that’s perfect for hectic weeknights. Juicy grilled chicken, crisp romaine, sharp Parmesan, and creamy dressing all wrapped up in a soft tortilla. It’s filling, flavorful, and doesn’t leave you with a sink-full of dishes (major win). I’ve now made this recipe a dozen times, swapping out ingredients based on what I have, and honestly, it’s the kind of dinner I look forward to during the busiest weeks.
Why You Will Love This Recipe
- Quick Preparation: Dinner is on the table in less than 15 minutes, making it an ideal solution for busy weeknights when time is short and hunger is high. The minimal prep and cook time mean you can enjoy a delicious meal without spending hours in the kitchen.
- Satisfying Flavor Profile: It perfectly balances the tangy Caesar dressing, the savory grilled chicken, the crispness of romaine lettuce, and the salty bite of Parmesan cheese, creating a truly delightful taste experience in every bite. This combination is a classic for a reason and never disappoints.
- Minimal Cleanup: With only one pan for cooking the chicken and a few bowls for tossing the salad ingredients, the post-dinner cleanup is remarkably easy. This efficiency is a lifesaver after a long day.
- Highly Customizable: This recipe is incredibly adaptable. You can easily add extra ingredients like bacon, avocado, or different vegetables to suit your preferences or what you have on hand, making each wrap unique.
- Kid-Friendly Appeal: Even picky eaters often find the familiar flavors of grilled chicken and creamy dressing appealing, making it a fantastic option for family dinners where everyone needs to be satisfied. It’s a way to serve a salad-like meal that still feels like a treat.
Ingredients You Need
This recipe is designed for simplicity and speed, utilizing everyday ingredients that are readily available in most kitchens. The quality of your ingredients, especially the chicken and lettuce, will significantly impact the final taste, so opting for fresh produce and good quality chicken is always recommended. For those looking to elevate the flavors even further, consider using freshly grated Parmesan cheese and a high-quality Caesar dressing.
Quick Grilled Chicken Caesar Wrap
A quick and satisfying handheld meal combining juicy grilled chicken, crisp romaine, sharp Parmesan, and creamy Caesar dressing wrapped in a soft tortilla. Perfect for busy weeknights and ready in under 15 minutes.
- 2 medium skinless, boneless chicken breasts (about 12 oz / 340g)
- 1 tablespoon olive oil (15 ml)
- Salt and black pepper to taste
- 2 cups chopped romaine lettuce (about
- 100g)
- 3 tablespoons Caesar dressing (45 ml)
- 4 large flour tortillas (about 10 inches / 25cm each)
- Optional add-ins: crumbled bacon, sliced avocado, or cherry tomatoes
- 1Pat chicken breasts dry with paper towels, then season both sides with salt and black pepper. Lightly brush with olive oil to help them sear nicely.
- 2Heat a skillet or grill pan over medium-high heat until hot. Add chicken and cook for about 5 minutes on one side without moving it to develop a golden crust. Flip and cook another 3-5 minutes until cooked through (internal temperature around 165°F / 74°C). Let rest for a few minutes, then slice thinly.
- 3While the chicken cooks, chop the romaine lettuce into bite-sized pieces and toss in a mixing bowl with shredded Parmesan and Caesar dressing. Toss gently to coat evenly but don’t overdress.
- 4Warm the tortillas slightly in a dry skillet or microwave (about 10 seconds) to make them pliable. Lay one flat, add a generous handful of the dressed romaine, then top with sliced grilled chicken. Add optional add-ins like avocado or bacon if desired.
- 5Fold in the sides of the tortilla and roll tightly from the bottom up. Slice in half if desired and serve immediately.
Keywords: grilled chicken wrap, Caesar wrap, quick dinner, easy chicken recipe, weeknight meal, healthy wrap, chicken Caesar salad
- chicken breasts: skinless and boneless for quick and even cooking, pounded slightly for uniform thickness.
- olive oil: a healthy fat that helps in searing the chicken and keeping it moist.
- salt and black pepper: essential seasonings to enhance the natural flavors of the chicken.
- romaine lettuce: chopped into bite-sized pieces, providing a fresh, crisp texture.
- Parmesan cheese: shredded, adding a sharp, nutty, and salty dimension to the filling.
- Caesar dressing: the creamy, garlicky, and tangy core of the wrap’s flavor profile.
- large flour tortillas: soft and pliable, perfect for wrapping all the delicious fillings securely.
- optional add-ins: such as crumbled bacon bits for smoky crunch, sliced avocado for extra creaminess, or halved cherry tomatoes for a burst of freshness.
Quantities for each ingredient are detailed in the provided recipe card for your convenience and accuracy.
Variations
The beauty of the grilled chicken Caesar wrap lies in its inherent adaptability, allowing for creative twists that cater to diverse dietary needs and flavor preferences. This flexibility makes it a sustainable favorite for repeated enjoyment.
For those seeking a vegetarian option, the grilled chicken can be wonderfully substituted. Consider using thick slices of portobello mushrooms that have been marinated in balsamic vinegar and grilled to a tender, meaty consistency. Alternatively, crispy baked chickpeas, seasoned with paprika and garlic powder, can provide a satisfying crunch and protein boost. These substitutions ensure that the wrap remains hearty and flavorful without meat, proving that vegetarian meals can be just as robust and appealing.
A low-carb or keto-friendly version can be achieved by simply replacing the traditional flour tortilla. Large, crisp leaves of iceberg or butter lettuce serve as an excellent, low-calorie, low-carbohydrate wrap. This swap maintains the integrity of the Caesar salad filling while drastically reducing the carbohydrate count. Another popular low-carb option involves serving all the fillings in a bowl, essentially transforming the wrap into a substantial Caesar salad with grilled chicken, omitting the tortilla entirely.
To infuse a touch of Mediterranean flair, consider adding ingredients like sun-dried tomatoes for a concentrated sweet and savory note, or a sprinkle of Kalamata olives for a briny punch. A light drizzle of lemon juice over the lettuce before adding the dressing can also brighten the flavors. These subtle additions can transport the wrap to a new culinary dimension, offering a refreshing change while still honoring the classic Caesar profile.
How to Prepare grilled chicken Caesar wrap
Step 1: Preparing the Chicken for Grilling
Begin by ensuring your chicken breasts are completely dry; this is a crucial step for achieving a good sear and preventing the chicken from steaming rather than grilling. Pat them thoroughly with paper towels, making sure no moisture remains on the surface. This simple act significantly enhances the Maillard reaction, leading to a more flavorful crust.
Next, season the chicken breasts generously on both sides with salt and freshly ground black pepper. The salt not only enhances flavor but also helps to draw out a tiny bit of moisture to aid in searing, while the pepper adds a pleasant warmth. Don’t be shy with the seasoning; remember that the chicken will be wrapped with other ingredients, so it needs a good flavor base.
Finally, lightly brush the seasoned chicken breasts with olive oil. The oil acts as a lubricant, preventing the chicken from sticking to the grill or pan, and it also helps to conduct heat evenly, promoting a beautiful golden-brown sear. This pre-cooking preparation is foundational for tender, juicy, and perfectly cooked chicken.
Step 2: Grilling or Pan-Searing the Chicken
Preheat your grill or a heavy-bottomed skillet, such as a cast iron or grill pan, over medium-high heat. It’s essential that the surface is hot before adding the chicken to achieve those desirable grill marks and a quick sear. A properly heated pan or grill will prevent sticking and ensure even cooking.
Carefully place the prepared chicken breasts onto the hot surface, ensuring they have enough space to cook without overcrowding the pan. Allow the chicken to cook undisturbed for approximately 5 to 6 minutes per side. This initial cooking time is critical for developing a flavorful crust and ensuring the chicken is cooked through without becoming dry. Resist the urge to move or flip the chicken too early, as this can disrupt the searing process.
Once cooked, remove the chicken from the heat and let it rest on a clean cutting board for at least 5 minutes. This resting period is vital; it allows the juices to redistribute throughout the meat, resulting in incredibly tender and moist chicken. Cutting into the chicken too soon will cause all those delicious juices to escape, leaving the meat dry.
Step 3: Slicing the Grilled Chicken
After the chicken has rested sufficiently, it’s time to slice it. For the best results and ease of wrapping, slice the chicken breasts thinly against the grain. This technique breaks down the muscle fibers, making the chicken more tender and easier to bite into within the wrap.
The thickness of your slices is a matter of preference, but aim for slices that are about 1/4 inch thick. If the chicken is still very warm, it might be slightly more challenging to slice cleanly, but the resting period should have made it manageable. You can use a sharp chef’s knife or a serrated knife for this task.
Keep the sliced chicken warm while you prepare the rest of the filling. You can loosely cover it with foil or keep it in a warm (but not hot) oven if your oven has a low setting. The warm chicken will add a pleasant temperature contrast to the cool, crisp lettuce within the wrap.
Step 4: Preparing the Caesar Salad Filling
While the chicken is cooking or resting, prepare the crisp romaine lettuce. Thoroughly wash and dry the lettuce leaves; any excess water can lead to a soggy wrap. Chop the romaine into bite-sized pieces that are easy to manage within the tortilla.
In a medium-sized mixing bowl, combine the chopped romaine lettuce with the shredded Parmesan cheese. Add the Caesar dressing to the bowl. Start with the amount of dressing specified, but you can adjust it to your personal preference. It’s better to under-dress the salad slightly at this stage, as the dressing will continue to meld with the other ingredients.
Gently toss the lettuce, Parmesan, and dressing together until everything is evenly coated. Be careful not to over-toss, which can bruise the lettuce and make it wilt. The goal is a light, even coating that enhances the crispness of the lettuce and the flavor of the cheese.
Step 5: Assembling and Wrapping the Caesar Wraps
To ensure the tortillas are pliable and easy to wrap, warm them slightly. You can do this by heating them for about 10-15 seconds per side in a dry skillet over medium heat, or by microwaving them briefly, wrapped in a damp paper towel, for about 15-20 seconds. This step is crucial for preventing the tortillas from cracking when you fold them.
Lay a warmed tortilla flat on a clean surface. Spoon a generous portion of the dressed romaine and Parmesan mixture onto the center of the tortilla, leaving some space around the edges for folding. Then, arrange a portion of the sliced grilled chicken over the lettuce mixture.
If you are including any optional add-ins, such as crumbled bacon, sliced avocado, or cherry tomatoes, now is the time to add them on top of the chicken. Distribute them evenly for the best flavor in every bite. This layering ensures that each component is present in every wrap, creating a harmonious blend of textures and tastes.
Step 6: Folding and Serving the Wraps
To wrap the tortilla, first fold in the two sides of the tortilla towards the center, tucking them snugly over the filling. This creates a secure base and prevents any ingredients from falling out during the rolling process. Ensure the folds are tight to maintain structural integrity.
Once the sides are folded in, begin rolling the tortilla tightly from the bottom upwards, keeping the filling contained and the wrap neat. The goal is to create a compact cylinder that is easy to hold and eat. A tightly rolled wrap is also more visually appealing.
You can serve the wraps whole or slice them in half diagonally for easier handling, especially for children or for a more elegant presentation. Serve immediately while the chicken is warm and the lettuce is crisp for the ultimate sensory experience. This makes for a complete and satisfying meal that’s both quick to assemble and delightful to consume.
Pro Tips for grilled chicken Caesar wrap
Don’t Overdress the Salad: A common pitfall is adding too much Caesar dressing, which can make the lettuce soggy and overpower the other flavors. Start with the recommended amount and toss gently; you can always add a tiny bit more if needed, but you can’t take it away once it’s soggy.
Warm Your Tortillas: Cold, stiff tortillas are prone to cracking when you try to wrap them. A quick warm-up in a dry skillet or a few seconds in the microwave makes them pliable and much easier to work with, ensuring a neat and intact wrap every time.
Rest Your Chicken: This is non-negotiable for juicy chicken. Allowing the grilled chicken to rest for at least 5 minutes after cooking lets the juices settle back into the meat. Skipping this step will result in dry chicken and a less enjoyable wrap.
Achieve a Good Sear: For flavorful chicken, make sure your grill or skillet is properly preheated and hot before adding the chicken. Don’t overcrowd the pan, and let the chicken cook undisturbed for a few minutes on each side to develop a beautiful, tasty crust.
Crisp Lettuce is Key: Use fresh, crisp romaine lettuce and ensure it’s thoroughly dried after washing. If your lettuce is looking a bit sad, consider adding a few thin slices of cucumber or even some crunchy bell pepper to the filling for added texture and freshness.
Serving Suggestions for grilled chicken Caesar wrap
Decoration
While the wrap is quite self-contained and visually appealing on its own, a few garnishes can elevate its presentation. A sprinkle of extra shaved Parmesan cheese over the top just before serving adds a gourmet touch. A few fresh parsley leaves, finely chopped, can provide a pop of color and a subtle herbaceous note.
If you’ve added optional ingredients like cherry tomatoes, ensure they are visible and perhaps halved to show off their vibrant red hue. A light dusting of paprika or a crack of fresh black pepper can also add visual interest. For a more elaborate setup, a drizzle of balsamic glaze over the plate can create an attractive contrast and complement the Caesar flavors.
Side Dishes
These wraps are incredibly satisfying on their own, but they pair wonderfully with a variety of simple sides. Classic kettle-cooked potato chips offer a delightful crunch that complements the soft tortilla and tender chicken. Alternatively, a medley of fresh vegetable sticks like carrots, celery, and cucumber, perhaps with a small side of ranch dip, provides a refreshing contrast.
For a more substantial meal, especially on cooler evenings, a light soup makes an excellent companion. A creamy tomato soup or a simple vegetable broth-based soup can add warmth and heartiness. Roasted sweet potato fries or baked potato wedges offer a comforting starchy element that pairs well with the savory wrap.
Creative Serving Ideas
Transform the wrap into a deconstructed experience by serving the grilled chicken and Caesar salad components separately on a platter, allowing guests to build their own wraps. This is particularly fun for parties or family gatherings where everyone has different topping preferences. For a healthier twist, serve the filling inside large butter lettuce cups instead of tortillas, catering to low-carb diets.
Consider offering a “build-your-own” wrap station with a variety of optional add-ins laid out attractively. This encourages interaction and allows individuals to customize their meal to their exact liking. For a lighter lunch option, serve the filling over a bed of mixed greens and perhaps some quinoa or farro, making it a hearty salad bowl that still captures the essence of the wrap.
Preparation & Storage
Storing Leftovers
If you find yourself with leftover grilled chicken Caesar wraps, proper storage is key to maintaining their quality. The best approach is to store the components separately if possible, as this prevents the lettuce from wilting and the tortilla from becoming soggy. Wrap the assembled wrap tightly in plastic wrap or aluminum foil, ensuring it’s well-sealed.
Store the wrapped leftovers in the refrigerator. They are best consumed within 24 hours. While they can technically be stored for a bit longer, the texture of the lettuce and tortilla will begin to degrade, impacting the overall enjoyment of the wrap. Aim to eat them as soon as possible for the freshest taste and texture.
If you anticipate having leftovers, it’s often advisable to prepare more chicken and dressing than you think you’ll need, but keep the lettuce separate and assemble the wraps just before you plan to eat them. This proactive approach guarantees a more satisfying leftover meal.
Freezing
Unfortunately, grilled chicken Caesar wraps are not ideal candidates for freezing. The primary issue lies with the fresh components – the crisp romaine lettuce and the creamy Caesar dressing – which do not freeze well. Upon thawing, the lettuce would likely become mushy and unappetizing, and the dressing might separate, altering its texture and flavor.
The grilled chicken itself can be frozen after it’s been cooked and cooled. It freezes relatively well for up to 2-3 months. However, once thawed and reheated, it should be incorporated into a fresh wrap assembly rather than refreezing the entire prepared wrap. This compromise allows for some make-ahead flexibility while respecting the limitations of freezing.
Therefore, it’s best to consider this recipe as a fresh meal to be enjoyed promptly. If you require make-ahead meals that can be frozen, it’s advisable to explore other recipes that are specifically designed for freezing, such as casseroles or stews, like my german pancake recipe which can be a great breakfast option.
Reheating
Reheating a fully assembled grilled chicken Caesar wrap can be a bit tricky due to the delicate nature of the ingredients. The best method is usually to avoid reheating the entire wrap if possible. If the chicken is cold and you want to incorporate it into a fresh wrap, gently reheat the chicken slices in a skillet over medium heat for a few minutes until warmed through. Avoid microwaving the chicken if you want to maintain its texture.
If you have an assembled wrap that needs reheating, the priority is to warm the chicken and tortilla without cooking the lettuce. A brief stint in a warm oven (around 300°F or 150°C) wrapped in foil for about 5-7 minutes can help warm the chicken and tortilla through. However, this might slightly wilt the lettuce, so it’s generally best to serve the wrap at room temperature or slightly warm.
For optimal results, it is highly recommended to assemble the wraps just before serving. This ensures the lettuce remains crisp and the tortilla is perfectly warm. If you need to prepare ahead, store the cooked chicken and dressed salad separately and warm the chicken gently before assembling with fresh lettuce and tortillas.
Frequently Asked Questions
-
Can I use rotisserie chicken instead of grilling my own?
Yes, absolutely! Rotisserie chicken is a fantastic shortcut for making these wraps even faster. Simply shred or slice the meat from a store-bought rotisserie chicken. It’s already cooked and seasoned, so it can be added directly to your Caesar salad mixture. This saves you the 10-15 minutes of cooking and resting the chicken, making the entire process incredibly efficient. The flavor might be slightly different from freshly grilled chicken, but it’s a convenient and delicious alternative for busy weeknights.
-
What is the best way to keep the wrap from getting soggy?
To prevent a soggy wrap, focus on two main areas: dressing and assembly timing. Firstly, avoid over-dressing the romaine lettuce. Toss the lettuce with just enough Caesar dressing to lightly coat it, rather than drenching it. Start with less dressing and add more only if necessary. Secondly, assemble the wraps just before you plan to eat them. If you need to prepare components in advance, keep the grilled chicken, the dressed salad mixture, and the tortillas stored separately. Assemble the wrap moments before serving to maintain the crispness of the lettuce and the integrity of the tortilla.
-
Can I make these wraps gluten-free?
Certainly! Making these grilled chicken Caesar wraps gluten-free is quite straightforward. The easiest substitution is to use large, crisp lettuce leaves, such as iceberg or butter lettuce, in place of traditional flour tortillas. These act as natural, low-carbohydrate wraps. Alternatively, you can purchase gluten-free tortillas, which are widely available in most supermarkets. When using gluten-free tortillas, remember they can sometimes be more brittle, so warming them slightly before wrapping will help prevent them from cracking and ensure a better final product. Ensure all other ingredients, like the dressing and any optional add-ins, are also gluten-free.