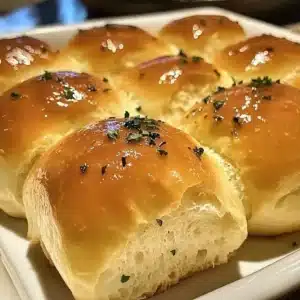
Easy Garlic Butter Dinner Rolls
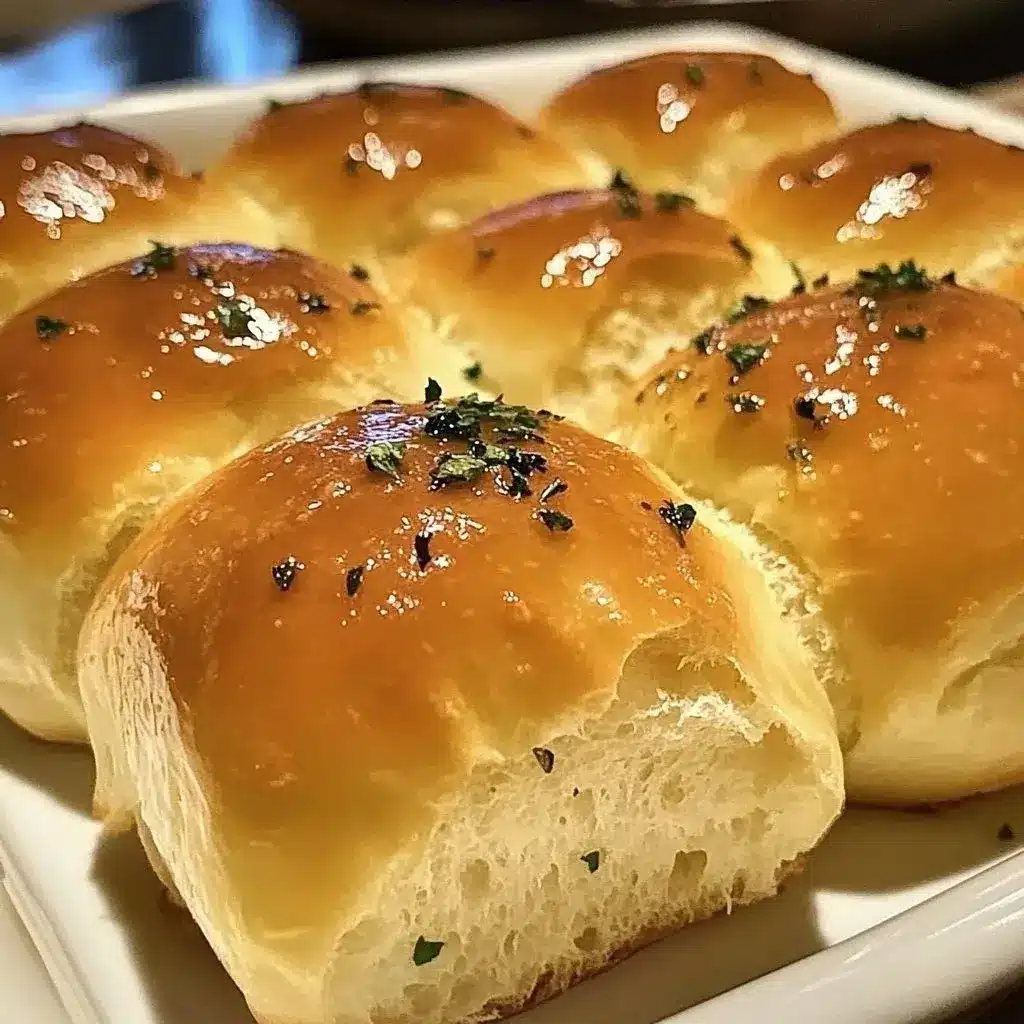
Have you ever experienced the irresistible aroma of freshly baked bread wafting through your home? Imagine sinking your teeth into a soft, fluffy dinner roll slathered in warm garlic butter. That’s exactly what this recipe for Garlic Butter Dinner Rolls delivers.
These rolls aren’t just a side dish; they are the epitome of comfort food, perfect for family gatherings, holiday feasts, or simply as a treat during a cozy dinner at home. What’s so special about Garlic Butter Dinner Rolls? Well, they are straightforward to make and only require a handful of ingredients. Even if you’re a novice in the kitchen, this recipe is beginner-friendly and provides a method to create rolls that taste like they’ve come straight from a gourmet bakery.
Why You Will Love This Recipe
- Irresistible Flavor: The rich, savory combination of garlic and butter creates an unparalleled taste experience that will have everyone asking for more.
- Incredible Texture: These rolls boast a perfectly soft and fluffy interior with a lightly golden crust, making them delightfully tender with every bite.
- Simple to Make: Designed for home bakers of all skill levels, the step-by-step instructions are clear and concise, ensuring success even for beginners.
- Versatile Pairing: These delightful rolls are the perfect accompaniment to a wide array of meals, from hearty soups and stews to grilled meats and fresh salads.
- Aromatic Delight: The warm scent of baking garlic butter rolls filling your kitchen is a comfort in itself, creating a cozy and inviting atmosphere.
Ingredients You Need
Crafting these delectable Garlic Butter Dinner Rolls begins with selecting high-quality ingredients. The foundation of any great bread lies in the freshness of its components, from the flour and yeast to the butter and aromatic garlic. Using good ingredients will ensure your rolls have the best possible texture and flavor. For instance, warm milk is essential for activating the yeast properly, ensuring a good rise and a light, airy crumb.
Garlic Butter Dinner Rolls
Soft, fluffy dinner rolls brushed with rich garlic butter — the perfect side for soups, pastas, or holiday meals. Easy to make and irresistibly buttery.
- 3 ½ cups all-purpose flour, plus extra for kneading
- 1 cup warm milk (about 110°F (43°C))
- 2 ¼ tsp instant yeast (1 packet)
- 1 tsp salt
- 1 large egg, room temperature
- 4 Tbsp unsalted butter, softened
- 4 Tbsp unsalted butter, melted
- 3 cloves garlic, minced
- 2 Tbsp fresh parsley, chopped (optional)
- 1In a large bowl, whisk together warm milk, sugar, and yeast. Let sit for 5–10 minutes until foamy.
- 2Add egg, salt, softened butter, and 3 cups of flour. Mix until a soft dough forms, adding the remaining flour as needed.
- 3Knead the dough on a lightly floured surface for 8–10 minutes until smooth and elastic. Place in a greased bowl, cover, and let rise for 1 hour or until doubled in size.
- 4Punch down the dough and divide into 12 equal pieces. Shape each into a ball and arrange in a greased 9x13-inch baking dish. Cover and let rise again for 30 minutes.
- 5Preheat oven to 375 °F (190 °C). Bake rolls for 20–25 minutes until golden brown on top.
- 6While baking, prepare the garlic butter by melting butter in a small saucepan. Add minced garlic, salt, and parsley. Cook 1 minute until fragrant.
- 7Brush warm rolls generously with garlic butter as soon as they come out of the oven. Serve warm and enjoy!
Keywords: Dinner Rolls, Garlic Butter, Holiday Side, Homemade Bread, Soft Rolls
- all-purpose flour: the primary structural component of the rolls, providing a soft and slightly chewy texture.
- active dry yeast: the leavening agent that gives the rolls their characteristic fluffy and airy rise.
- granulated sugar: feeds the yeast, aiding in its activation, and adds a subtle sweetness to the dough.
- salt: enhances the overall flavor of the dough and controls yeast activity.
- warm milk: provides moisture and contributes to a tender crumb, crucial for the rolls’ softness.
- unsalted butter, melted: adds richness and flavor to the dough, contributing to a tender crumb.
- large eggs: bind the ingredients together, add richness, and contribute to the dough’s structure and color.
- unsalted butter, softened: forms the base of the rich garlic butter topping, ensuring it melts beautifully over the warm rolls.
- garlic, minced: provides the signature pungent and aromatic flavor that defines these rolls.
- fresh parsley, chopped (optional): adds a touch of freshness and color to the garlic butter topping, enhancing visual appeal and taste.
The exact quantities for each ingredient are conveniently listed within the recipe card.
Variations
For those who love to customize, these Garlic Butter Dinner Rolls offer a fantastic canvas for creativity. You can easily adapt them to suit different tastes and dietary needs. Consider adding a touch of sweetness by incorporating a tablespoon of honey into the dough during the mixing stage. This subtle addition can beautifully balance the savory garlic notes.
A popular variation is the Cheesy Garlic Rolls. Simply sprinkle a generous amount of shredded cheddar, Parmesan, or a mozzarella-parmesan blend over the shaped dough before the second rise, or even mix some into the dough itself. The melted cheese will create a delightfully gooey texture and an even richer flavor profile, perfect for cheese lovers.
To introduce an herbal dimension, try adding finely chopped fresh rosemary, thyme, or chives directly into the dough mixture. Alternatively, you can mix these herbs into the garlic butter topping for a more pronounced aromatic quality. These herbaceous additions can transform the rolls into a more sophisticated accompaniment for specific dishes, such as roasted lamb or poultry.
How to Prepare Garlic Butter Dinner Rolls
Step 1: Activate the Yeast and Mix the Wet Ingredients
Begin by ensuring you have all your ingredients measured and ready. Warm your milk to approximately 110°F (43°C); this temperature is vital for awakening the dormant yeast. In a large mixing bowl, combine the warm milk, granulated sugar, and active dry yeast. Give it a gentle stir and let it rest for about 5 to 10 minutes.
During this resting period, you should observe the yeast mixture becoming frothy and bubbly on the surface. This visual cue confirms that your yeast is alive and active, ready to do its work in leavening the dough. If you don’t see any froth, your yeast may be expired, or the milk was not the correct temperature, and you’ll need to start this step again with fresh yeast and properly warmed milk.
Once the yeast is activated, it’s time to introduce the other wet ingredients. Add the two large eggs and the 1/4 cup of melted unsalted butter to the frothy yeast mixture. Whisk these ingredients together gently until they are well combined, creating a smooth, liquid base for your dough.
Step 2: Combine Dry Ingredients and Form the Dough
In a separate, larger mixing bowl, combine the 4 cups of all-purpose flour with the 1 teaspoon of salt. Whisk these dry components together to ensure the salt is evenly distributed throughout the flour. Evenly distributed salt is important for consistent flavor and proper yeast activity control.
Now, pour the activated yeast and wet ingredient mixture into the bowl containing the flour and salt. Using a sturdy spoon or a dough whisk, begin to mix everything together. Continue mixing until the ingredients just start to come together and form a shaggy, cohesive mass of dough. At this stage, the dough might still be a bit sticky and may not look smooth.
If the dough seems excessively wet and is sticking heavily to the sides of the bowl, you can add an additional tablespoon or two of flour, one at a time, until the dough begins to pull away from the sides more readily. However, be cautious not to add too much flour, as this can result in dense, heavy rolls. The goal is a slightly tacky but manageable dough.
Step 3: Knead the Dough to Develop Gluten
Turn the shaggy dough out onto a lightly floured, clean work surface. This is where the kneading process begins, which is crucial for developing the gluten structure in the dough. Gluten development gives the bread its characteristic elasticity and chewiness, allowing it to rise properly and achieve a light, airy texture.
Begin kneading by folding the dough over on itself, pressing down and away with the heels of your hands, then rotating the dough a quarter turn. Continue this rhythmic process of folding, pressing, and rotating for approximately 8 to 10 minutes. You should feel the dough gradually transform from a sticky, rough mass into a smooth, elastic ball.
As you knead, the dough will become less sticky and more pliable. If at any point the dough becomes unmanageably sticky and starts to adhere to your hands or the work surface, lightly dust your hands and the surface with a little more all-purpose flour. However, try to use as little extra flour as possible to maintain the desired dough consistency and prevent dryness.
Step 4: First Rise and Dough Resting
Once the dough has been kneaded to a smooth and elastic consistency, it’s time to let it rest and rise. Lightly grease a clean large mixing bowl with a bit of oil or cooking spray. Place the kneaded dough into the greased bowl, turning it over once to ensure the entire surface of the dough is lightly coated with oil. This coating helps prevent a dry skin from forming on the dough as it rises.
Cover the bowl tightly with plastic wrap or a clean kitchen towel. Find a warm, draft-free spot in your kitchen to place the bowl. This could be on top of your refrigerator, near a warm (but not hot) oven, or simply in a cozy corner of your kitchen. Allow the dough to rise for about 1 to 2 hours, or until it has visibly doubled in size.
The duration of the rise can vary depending on the ambient temperature of your kitchen. On a cooler day, it might take longer, while in a warmer environment, it may rise faster. Resist the temptation to rush this process, as this first rise is critical for developing the flavor and texture of your dinner rolls.
Step 5: Shaping the Rolls and Preparing for Baking
Once the dough has reached double its original size, gently punch it down to release the accumulated air. Turn the dough out onto your lightly floured work surface. Divide the dough into 12 to 15 equal portions. You can use a bench scraper or a knife for this, ensuring consistent sizes for even baking.
Take each portion of dough and gently shape it into a smooth, round ball. Roll each piece between your palms and the work surface, tucking the edges underneath to create a taut surface. Place these shaped dough balls onto a greased baking sheet or into a greased 9×13 inch baking dish. Ensure you leave a little space between each roll, as they will expand further during their second rise and while baking.
After shaping, loosely cover the baking sheet or dish with a clean kitchen towel or plastic wrap. Allow the rolls to rest and rise for a second time in a warm place for about 30 minutes. During this time, preheat your oven to 375°F (190°C). Having the oven preheated ensures that the rolls go into a hot environment, promoting a good oven spring.
Step 6: Applying the Garlic Butter and Baking
While the rolls are undergoing their second rise and the oven is preheating, prepare the luscious garlic butter topping. In a small bowl, combine the 1/2 cup of softened unsalted butter with the 3-4 cloves of minced garlic. If you are using fresh parsley, add the 1 tablespoon of chopped parsley to the mixture as well. Mix these ingredients thoroughly until they are well incorporated into a fragrant paste.
Once the rolls have completed their second rise and the oven is fully preheated, it’s time to brush them generously with the prepared garlic butter mixture. Use a pastry brush to evenly coat the tops and sides of each roll. Don’t be shy; a good amount of garlic butter will seep into the rolls as they bake, infusing them with incredible flavor. This step is one of the highlights of the entire process.
Place the baking sheet or dish into the preheated oven. Bake for approximately 15 to 20 minutes, or until the rolls are a beautiful golden brown color on top and around the edges. Keep a close eye on them during the last few minutes of baking, as oven temperatures can vary. Once they are perfectly baked, remove them from the oven. For an extra boost of flavor and shine, you can brush them with any remaining garlic butter mixture immediately after they come out of the oven. Serve them warm and enjoy the incredible aroma and taste.
Pro Tips for Garlic Butter Dinner Rolls
Use a Kitchen Thermometer: Ensuring your milk is at the perfect temperature, around 110°F (43°C), is crucial for yeast activation. An instant-read thermometer takes the guesswork out of this step, guaranteeing your yeast will thrive.
Don’t Over-Flour: While it’s tempting to add more flour when the dough feels sticky, resist the urge. Too much flour results in dry, dense rolls. Instead, try lightly oiling your hands or using a bench scraper to manage sticky dough.
Proper Kneading Technique: Kneading develops gluten, which is key to fluffy rolls. Spend the full 8-10 minutes working the dough, until it’s smooth, elastic, and springs back when gently poked.
Warm Rising Environment: Yeast loves warmth. Find a cozy spot for your dough to rise, like a slightly warmed oven (turned off!) or near a sunny window, to encourage a good, even rise.
Garlic Flavor Boost: For an even more intense garlic flavor, consider roasting the garlic cloves before mincing and adding them to the butter. Roasted garlic offers a sweeter, mellower, yet still potent garlic taste.
Fresh Herbs Make a Difference: While dried herbs work, fresh parsley, chives, or even a hint of rosemary or thyme in the garlic butter topping will provide a brighter, more vibrant flavor profile.
Brush with Extra Butter: For that irresistible sheen and an extra punch of garlic butter goodness, brush the warm rolls again with melted butter immediately after they come out of the oven. This seals in moisture and adds a delicious glossy finish.
Serving Suggestions for Garlic Butter Dinner Rolls
Decoration
The simplest and most effective decoration for these rolls is the garlic butter topping itself. As the butter melts and bakes, it creates a beautiful golden sheen on top of the rolls. You can enhance this visual appeal by sprinkling a little extra fresh chopped parsley over the brushed rolls just after they come out of the oven. This adds a pop of vibrant green color and a hint of fresh aroma that signals the deliciousness within.
For a slightly more elaborate touch, consider a very light dusting of grated Parmesan cheese over the garlic butter before baking. The cheese will melt and brown slightly, adding a subtle savory depth and an attractive, slightly speckled appearance. Ensure the cheese is applied sparingly so it doesn’t overpower the garlic flavor.
If you’re serving these for a special occasion, a small sprig of fresh rosemary placed on top of the baking dish as the rolls rise can impart a beautiful fragrance and a rustic, festive look. Remove the rosemary sprig before serving if you prefer a cleaner aesthetic, or leave it as an edible garnish for an added aromatic experience.
Side Dishes
These Garlic Butter Dinner Rolls are a perfect complement to a wide array of main courses. They are especially delightful when served alongside hearty soups and stews, as their soft texture is ideal for soaking up every last drop of rich broth. Think of pairing them with a classic Beef Stew, a creamy Tomato Soup, or a robust Lentil Soup.
For a more substantial meal, the rolls are excellent with roasted meats. They pair wonderfully with a traditional baked lemon chicken, a succulent pot roast, or a festive holiday turkey. The savory garlic butter flavor enhances the richness of these meats without competing.
Beyond meats and soups, these rolls also make a fantastic addition to pasta dishes. Imagine sopping up the extra sauce from a classic Spaghetti Bolognese or a creamy Alfredo pasta with a warm, buttery roll. They are also a great accompaniment to fresh green salads, providing a satisfying carb counterpoint to lighter, more refreshing dishes.
Creative Serving Ideas
Elevate your appetizer game by transforming these rolls into something truly unique. Consider making “Garlic Butter Pull-Apart Rolls.” Instead of shaping them into individual balls, cut the dough into smaller pieces and layer them, slightly overlapping, in a greased baking dish, drizzled generously with the garlic butter. They bake into a delightful communal bread that’s fun to tear apart and share.
For a fun twist on sliders or mini sandwiches, use these rolls as the perfect bun. Slice them horizontally and fill them with your favorite pulled pork, shredded chicken, or even a hearty mushroom filling. The subtle garlic flavor of the bun will add an extra layer of deliciousness to your miniature creations.
Another creative idea is to incorporate them into a bread pudding or savory bread stuffing. Dice the cooled rolls, toast them lightly, and then use them as the base for a flavorful bread pudding or a stuffing for poultry or pork. This is a fantastic way to use up any leftovers while creating a brand new, equally delicious dish.
Preparation & Storage
Storing Leftovers
Once your delicious Garlic Butter Dinner Rolls have cooled completely, proper storage is key to maintaining their delightful texture and flavor. The best way to store them at room temperature is in an airtight container. This prevents them from drying out and keeps them soft and inviting for your next meal. Typically, they will remain fresh and enjoyable for up to two days when stored this way.
If you plan to keep them for a bit longer, or if your environment is particularly warm or humid, refrigerating them might be a good option. However, be aware that refrigeration can sometimes lead to a slightly firmer texture. If refrigerating, ensure they are in an airtight container or a well-sealed bag. For optimal freshness upon reheating, it’s often best to enjoy them within a day or two of baking.
When storing, avoid leaving them exposed to the air, as this is the quickest way for them to lose their desirable softness. An airtight container or a resealable plastic bag will create a barrier against moisture loss, helping to preserve their pillowy consistency for as long as possible.
Freezing
Garlic Butter Dinner Rolls freeze exceptionally well, making them a perfect candidate for making ahead of time or preserving any extras. To freeze them, allow the rolls to cool down completely after baking. This is important to prevent condensation from forming inside the freezer bag, which can lead to ice crystals and a less desirable texture upon thawing.
Once cooled, place the rolls in a single layer on a baking sheet and freeze them until they are firm to the touch. This initial freeze helps prevent them from sticking together when you pack them into a freezer-safe bag or container. After they are solid, transfer them to a heavy-duty freezer-safe resealable plastic bag or an airtight freezer container. Squeeze out as much air as possible before sealing the bag.
Properly stored in the freezer, these rolls can maintain their quality for up to 3 months. When you’re ready to enjoy them, you can thaw them as described in the reheating section. Freezing is a fantastic strategy to ensure you always have a batch of warm, delicious homemade rolls on hand whenever the craving strikes.
Reheating
Reheating your Garlic Butter Dinner Rolls is a straightforward process designed to bring back their fresh-baked warmth and softness. If the rolls are at room temperature, preheat your oven to a moderate 350°F (175°C). Place the cooled rolls directly on a baking sheet or in a shallow oven-safe dish.
Bake them for about 8 to 10 minutes, or until they are heated through and feel soft and warm to the touch. Be careful not to overbake them, as this can cause them to dry out. If you want an extra touch of richness, you can brush them with a little melted butter or garlic butter just before or immediately after reheating.
If you’re reheating frozen rolls, it’s best to thaw them first. You can do this by placing them in the refrigerator overnight, or at room temperature for a few hours until they are no longer frozen. Once thawed, follow the same reheating instructions as for room-temperature rolls. This method ensures that the interior is heated evenly without the exterior becoming overly crisp or dry.
Frequently Asked Questions
-
Can I prepare the dough for Garlic Butter Dinner Rolls ahead of time?
Yes, absolutely! You can prepare the dough up to the point of the first rise. After kneading, place the dough in a greased bowl, cover it, and refrigerate it overnight. In the morning, let the dough come to room temperature for about an hour before proceeding with shaping and the second rise. This method allows for more convenience and can even develop deeper flavors in the dough.
-
What is the best way to freeze Garlic Butter Dinner Rolls, and how long do they last?
To freeze, allow the baked rolls to cool completely. Then, place them in a single layer on a baking sheet and freeze until firm. Transfer the frozen rolls to a freezer-safe airtight bag or container, removing as much air as possible. Properly stored, they can last in the freezer for up to 3 months. When you’re ready to enjoy them, thaw them at room temperature for a few hours or overnight in the refrigerator before reheating.
-
Are there any suitable substitutions for the ingredients if I have dietary restrictions?
Certainly! For a gluten-free version, use a high-quality 1:1 gluten-free flour blend specifically designed for baking. You can substitute almond milk, oat milk, or soy milk for the dairy milk, and use vegan butter or margarine in place of unsalted butter. If you need to replace the eggs, a common substitute is a “flax egg” (1 tablespoon ground flaxseed mixed with 3 tablespoons water, let sit for 5 minutes) or a commercial egg replacer. These substitutions allow most people to enjoy these delicious rolls.