Baked Plantains: 7 Reasons to Fall in Love Today

Have you ever wandered around the produce section, drawn to the allure of ripe plantains, and wondered what culinary magic you could create with them? If your curiosity has been piqued, prepare yourself for an utterly delightful revelation with this simple yet profound dish. Baked Plantains: 7 Reasons to Fall in Love Today isn’t merely a recipe; it’s your gateway to a world brimming with exquisite flavors, comforting warmth, and boundless culinary creativity. Imagine perfectly golden, beautifully caramelized plantains, each bite a burst of natural sweetness, offering a delightfully soft interior encased in a subtly crisp exterior.
The sheer enchantment of baked plantains lies predominantly in their remarkable versatility and ease of preparation. They effortlessly transition from a simple yet satisfying snack to an elegant side dish, or even a surprising and welcome component in your main courses. Across the vibrant cuisines of Latin America and the Caribbean, plantains hold a cherished position, celebrated for their inherent sweetness and incredible adaptability to a myriad of culinary styles. Doesn’t it feel wonderfully satisfying when a single ingredient possesses the power to elevate so many different meals?
Why You Will Love This Recipe
- Unmatched Sweetness: As the plantains bake, their natural sugars caramelize beautifully, creating an intensely sweet and rich flavor profile that is simply irresistible.
- Effortless Simplicity: This recipe demands minimal ingredients and straightforward steps, making it an ideal choice for cooks of all skill levels, from beginners to seasoned gourmands.
- Remarkable Versatility: Whether you’re seeking a quick snack, a delightful side dish to complement your dinner, or an interesting addition to a larger meal, baked plantains seamlessly adapt to any occasion.
- Universally Appealing: The sweet, tender nature of baked plantains makes them a favorite among both children and adults, ensuring happy faces and an enjoyable dining experience for the entire family.
- Nutritional Benefits: Beyond their delicious taste, plantains are a good source of essential nutrients like potassium and various vitamins, offering a wholesome and satisfying treat.
Ingredients You Need
The beauty of this recipe lies in its minimalist approach to ingredients, allowing the star, the ripe plantain, to truly shine. Selecting the right plantains is paramount; look for those with skins that are predominantly yellow, perhaps with a few brown spots, indicating optimal ripeness for a balance of sweetness and texture. Olive oil is used sparingly to enhance the plantains’ natural flavors and help achieve a lovely golden finish during the baking process. Salt, applied judiciously, plays a crucial role in balancing the inherent sweetness and bringing out the full spectrum of flavor.
Baked Plantains: A Sweet and Simple Delight
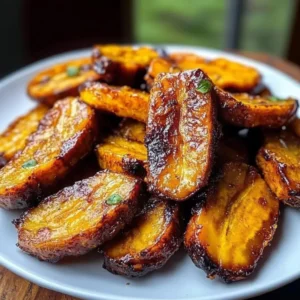
Golden, caramelized plantains that are bursting with sweetness and have a slightly crispy exterior. They’re versatile, easy to prepare, and a delight for the whole family.
- 2 ripe plantains
- 2 tablespoons olive oil
- Salt to taste
- 1Preheat your oven to 400°F (200°C).
- 2Peel the plantains and slice them diagonally into 1-inch pieces.
- 3In a bowl, toss the sliced plantains with olive oil and salt.
- 4Arrange the plantain slices on a baking sheet in a single layer.
- 5Bake for 20-25 minutes, flipping halfway through.
- 6Check the plantains after 20 minutes; they should be golden and tender. If they need more time, let them bake for an additional 5 minutes.
- 7Remove from the oven and let cool slightly before serving. Serve warm for the best flavor.
Keywords: baked plantains, Easy Recipe, plantains recipe, side dish, Snack Recipe
- ripe plantains: choose ones that are yellow with a few brown spots for the best sweet flavor and tender texture.
- olive oil: a small amount to coat the plantains, aiding in browning and flavor enhancement.
- salt: to season and balance the natural sweetness of the plantains.
Detailed quantities for these essential ingredients can be found within the recipe card.
Variations
The inherent adaptability of baked plantains means they can be transformed with just a few thoughtful additions. Consider transforming them into a spicy delight by tossing the sliced plantains with a pinch of cayenne pepper or a dusting of chili powder along with the olive oil before baking. This introduces a warm, lingering heat that beautifully contrasts with the plantains’ natural sweetness, creating a complex flavor profile.
For those with a penchant for sweeter notes, a sprinkle of cinnamon and a light dusting of brown sugar tossed with the plantains before they go into the oven will yield a dessert-like treat. The cinnamon infuses a warm, aromatic spice, while the sugar caramelizes further, creating a delightful crisp coating that’s perfect for an after-dinner indulgence or a special breakfast side. This approach elevates the humble baked plantain into something truly decadent.
If you’re aiming for a more savory experience, incorporating garlic powder and a blend of dried herbs such as oregano or thyme can dramatically shift the flavor profile. This savory version makes an excellent accompaniment to grilled meats or fish, offering a unique twist on traditional side dishes. The herbaceous notes add an aromatic depth that complements the plantains’ natural sweetness in an unexpected yet delicious way.
How to Prepare baked plantains
Step 1: Preheating and Preparation
Begin this culinary journey by preheating your oven to a precise 400 degrees Fahrenheit (200 degrees Celsius). This moderate-high heat is crucial for achieving that perfect balance of tender interior and slightly crisp exterior. Ensure your oven rack is positioned in the center, providing even heat distribution for the plantains.
Simultaneously, prepare your plantains. Select ripe plantains, characterized by their yellow skin, possibly with a few freckles or brown spots; this indicates they are sweet and will bake to the ideal consistency. Carefully peel the plantains, which can sometimes be a bit tricky. A good method is to slice off each end, then make a shallow slit lengthwise through the peel and gently pry it away.
Once peeled, slice the plantains diagonally into uniform pieces, approximately 1-inch thick. Uniformity in size is key to ensuring all the plantain pieces cook evenly, preventing some from becoming overcooked and mushy while others remain underdone. This precise preparation lays the groundwork for a flawlessly baked dish.
Step 2: Coating with Flavor
In a medium-sized mixing bowl, place the uniformly sliced plantains. Drizzle them generously with olive oil, ensuring every piece gets a light coating. The olive oil not only prevents the plantains from sticking to the baking sheet but also acts as a wonderful carrier for the seasonings and aids in achieving a beautiful golden-brown hue during baking.
Next, sprinkle the salt over the coated plantains. The amount of salt will depend on your personal preference, but start with a moderate pinch and you can always add more later if needed. Stir everything together gently, making sure each slice is evenly coated with both the olive oil and the salt. This step ensures that the flavor is distributed throughout the plantains, rather than being concentrated in just a few spots.
If you are opting for any of the flavor variations, such as cinnamon-sugar or spices, this is the stage to incorporate them. Gently toss the plantains with your chosen additions until they are well-distributed. The careful coating ensures that every bite of your baked plantains will be imbued with delicious flavor, transforming a simple ingredient into something truly special.
Step 3: Arranging for Perfection
Now, it’s time to prepare your baking sheet for optimal plantain roasting. Line a baking sheet with parchment paper or aluminum foil for easier cleanup, though this is optional if you prefer direct contact with the metal. The parchment paper helps prevent sticking and ensures an even bake.
Carefully arrange the seasoned plantain slices on the prepared baking sheet in a single layer. It is absolutely critical that the plantain pieces are not overcrowded. Giving them ample space allows hot air to circulate freely around each piece, promoting even cooking and encouraging the development of those desirable crispy edges. Overcrowding will steam the plantains rather than bake them, leading to a less appealing texture.
Ensure there’s a little space between each plantain slice. This separation is one of the most important factors in achieving a lovely, slightly caramelized exterior. Think of it as giving each plantain slice its own personal baking zone. This mindful arrangement directly contributes to the final texture and appearance of your baked plantains.
Step 4: The Baking Transformation
Place the baking sheet with the arranged plantains into the preheated oven. Set your timer for approximately 20 to 25 minutes. This duration is a guideline, and the exact time may vary slightly depending on your oven and the ripeness of your plantains.
Crucially, remember to flip the plantain slices halfway through the baking process. Typically, this would be around the 10 to 12-minute mark. Use a spatula to carefully turn each piece over. This ensures that both sides of the plantains are exposed to the heat, leading to uniform golden-brown coloration and consistent tenderness throughout. Consistent flipping is a hallmark of well-baked plantains.
During this baking phase, keep an eye and a nose on your plantains. You’ll start to notice a wonderful aroma filling your kitchen as their natural sugars begin to caramelize. The edges should start to look golden and slightly browned, indicating that they are well on their way to deliciousness. This attentive baking process is key to unlocking the plantains’ full potential.
Step 5: Assessing Doneness and Texture
After the initial 20 minutes of baking, it’s time to check for doneness. Gently press one of the plantain slices with the tip of a fork or a spatula. It should yield easily, indicating a tender interior. The edges should appear beautifully golden brown, with some areas possibly showing a deeper caramelization, which adds fantastic flavor.
You are looking for that perfect dichotomy of textures: tender and soft on the inside, with a delightful crispiness on the exterior. If the plantains have reached this stage, they are ready to be removed from the oven. However, if they still seem a bit firm or lack sufficient browning, don’t hesitate to let them bake for an additional 5 minutes. It’s better to give them a little extra time to achieve optimal results than to rush the process.
The visual cues are important here; the plantains should look invitingly caramelized, not burnt. A slight char on the edges can be desirable for some, adding a smoky depth, but avoid a completely blackened appearance. Achieving this perfect balance is the ultimate goal for delicious baked plantains.
Step 6: A Moment of Rest
Once your baked plantains have reached that perfect state of golden-brown tenderness, carefully remove the baking sheet from the oven. Using a spatula, transfer the plantains from the hot baking sheet onto a clean plate or a serving platter. This step is important because leaving them on the hot baking sheet can cause them to continue cooking and potentially become too soft or even burn on the bottom.
Allow the baked plantains to cool slightly for a few minutes before serving. While they are absolutely delicious served warm, letting them rest briefly ensures that the caramelized sugars solidify slightly, enhancing the texture and making them easier to handle. This short cooling period also allows the flavors to meld and deepen just a touch more.
This brief resting period is a small but significant step that contributes to the overall enjoyable eating experience. It prevents any immediate scalding from the hot sugars and allows the delightful aromas to become even more pronounced, building anticipation for that first delectable bite. The transformation from raw fruit to sweet, baked perfection is nearly complete.
Step 7: Serving and Savoring
Your perfectly baked plantains are now ready to be served and enjoyed! They are best presented warm, allowing their sweet, caramelized flavors to be at their peak. The contrast between the warm, soft interior and the slightly crisp exterior is most pronounced when served immediately after their short resting period.
As the baked plantains cool further, their sweetness tends to intensify, and the exterior might lose some of its crispness, becoming softer. However, they remain incredibly delicious even at room temperature, making them a versatile option. You can serve them as a standalone snack or incorporate them into a larger meal as a delightful side dish.
Encourage your guests or family members to savor each bite, appreciating the natural sweetness and the satisfying textures. This simple dish is a testament to how basic ingredients, prepared with care and attention, can yield truly extraordinary results, bringing joy and deliciousness to your table.
Pro Tips for baked plantains
Choose the Right Plantains: The ripeness of your plantains is absolutely crucial for achieving the best flavor and texture. Opt for plantains that are predominantly yellow, with a few brown spots appearing on the skin. These spots indicate that the starches have converted into sugars, ensuring a naturally sweet and tender result when baked. Avoid green plantains, as they will be starchy and less sweet, or overly black ones, which can become mushy.
Don’t Overcrowd the Pan: This is a cardinal rule for achieving perfectly roasted or baked items, and plantains are no exception. Ensure that each plantain slice has ample space around it on the baking sheet. Overcrowding leads to steaming rather than baking, which prevents the edges from caramelizing and developing that desirable crispiness. Give them room to breathe and brown evenly.
Flip for Even Browning: Just like with many roasted vegetables, flipping your plantains halfway through the baking process is essential. This simple step ensures that both sides of the plantain slices are exposed to the oven’s heat, resulting in uniform golden-brown coloration and consistent tenderness throughout. It’s a small effort that yields a significant improvement in appearance and texture.
Season Thoughtfully: While the natural sweetness of ripe plantains is a major draw, a little seasoning can elevate the dish beautifully. A pinch of salt is indispensable for balancing the sweetness and enhancing all the other flavors. Consider experimenting with other simple additions like a dash of cinnamon for warmth or a tiny sprinkle of brown sugar for extra caramelization, but always do so sparingly to let the plantain flavor shine.
Watch for Perfect Caramelization: Keep a close eye on your plantains during the last few minutes of baking. You’re looking for that beautiful golden-brown hue, with edges that are slightly darker and caramelized. This indicates that the natural sugars have cooked to perfection, creating a rich, sweet flavor. Avoid letting them burn, but embrace a good level of caramelization for maximum deliciousness.
Serving Suggestions for baked plantains
Decoration
Garnish your baked plantains with a sprinkle of finely chopped fresh cilantro or parsley for a vibrant pop of green and a hint of freshness. A light dusting of powdered sugar can also add an elegant touch, especially if serving as a dessert. For a more tropical presentation, a few thin slices of lime or a small sprig of mint can make a striking visual impact.
Side Dishes
Baked plantains pair wonderfully with a variety of savory dishes. Consider serving them alongside grilled or roasted meats like chicken or pork, where their sweetness offers a delightful contrast. They also complement fish dishes beautifully, adding a touch of tropical flair to any meal. For a hearty, plant-based option, serve them with seasoned black beans and rice, a classic combination that harmonizes perfectly.
Creative Serving Ideas
Transform your baked plantains into a delightful appetizer by topping them with a dollop of fresh guacamole or a spoonful of mild salsa. For a sweet and savory breakfast twist, serve them alongside scrambled eggs and crispy bacon. You can even incorporate them into a larger salad, adding a unique textural and flavor element that surprises and pleases.
Preparation & Storage
Storing Leftovers
Once your delicious baked plantains have cooled completely, transfer them to an airtight container. Stored properly in the refrigerator, they will maintain their quality for approximately 2 to 3 days. Ensure the container is well-sealed to prevent the plantains from drying out and to maintain their moisture.
Freezing
Baked plantains freeze remarkably well, making them a convenient option for future enjoyment. After cooling, arrange the plantain slices in a single layer on a baking sheet and freeze them until firm. Then, transfer the frozen slices to a freezer-safe bag or container, removing as much air as possible. They can be stored in the freezer for up to one month.
Reheating
To reheat leftover baked plantains, the best method for retaining texture is to use your oven. Preheat your oven to 350°F (175°C) and spread the plantains on a baking sheet. Reheat for about 10 minutes, or until they are warmed through and have regained a pleasant texture. If reheating from frozen, allow them to thaw in the refrigerator overnight before placing them in the oven.
Frequently Asked Questions
-
Can I prepare this recipe ahead of time?
Yes, you can certainly prepare some components of this recipe in advance to save time on the day of serving. Peeling and slicing the plantains can be done a few hours ahead of baking. To prevent browning, store the sliced plantains in a bowl of lightly salted water or a container with a splash of lemon or lime juice, ensuring they are fully submerged. However, for the absolute best flavor and texture, it is highly recommended to bake the plantains just before serving, as the caramelization and crispness are at their peak when fresh from the oven.
-
What are the best substitutions for olive oil?
While olive oil is excellent, there are several suitable substitutions that can offer a slightly different flavor profile. Coconut oil is a fantastic alternative, especially if you want to enhance the tropical notes of the plantains; it adds a subtle sweetness and rich aroma. Avocado oil is another excellent choice due to its high smoke point and neutral flavor, making it ideal for baking. For a lighter option, a neutral vegetable oil like canola or grapeseed oil can also be used, though they may not impart as much flavor as olive or coconut oil.
-
How do I know if my plantains are ripe enough?
Determining the ripeness of plantains is key to achieving the desired sweetness and texture in this baked recipe. You are looking for plantains that are primarily yellow, with some brown or black spots beginning to appear on the skin. These spots are an indicator that the starches within the plantain have begun to convert into sugars, which is essential for a sweet and tender baked result. If the plantains are completely green, they will be very starchy and not sweet enough for this particular recipe, leading to a firmer, less flavorful outcome. Conversely, if the skin is entirely black and the fruit feels very soft, they might be too ripe and could become overly mushy when baked, though they would still be delicious in other preparations.