Toasted Coconut Pancakes: Irresistibly Delicious Breakfast Treat
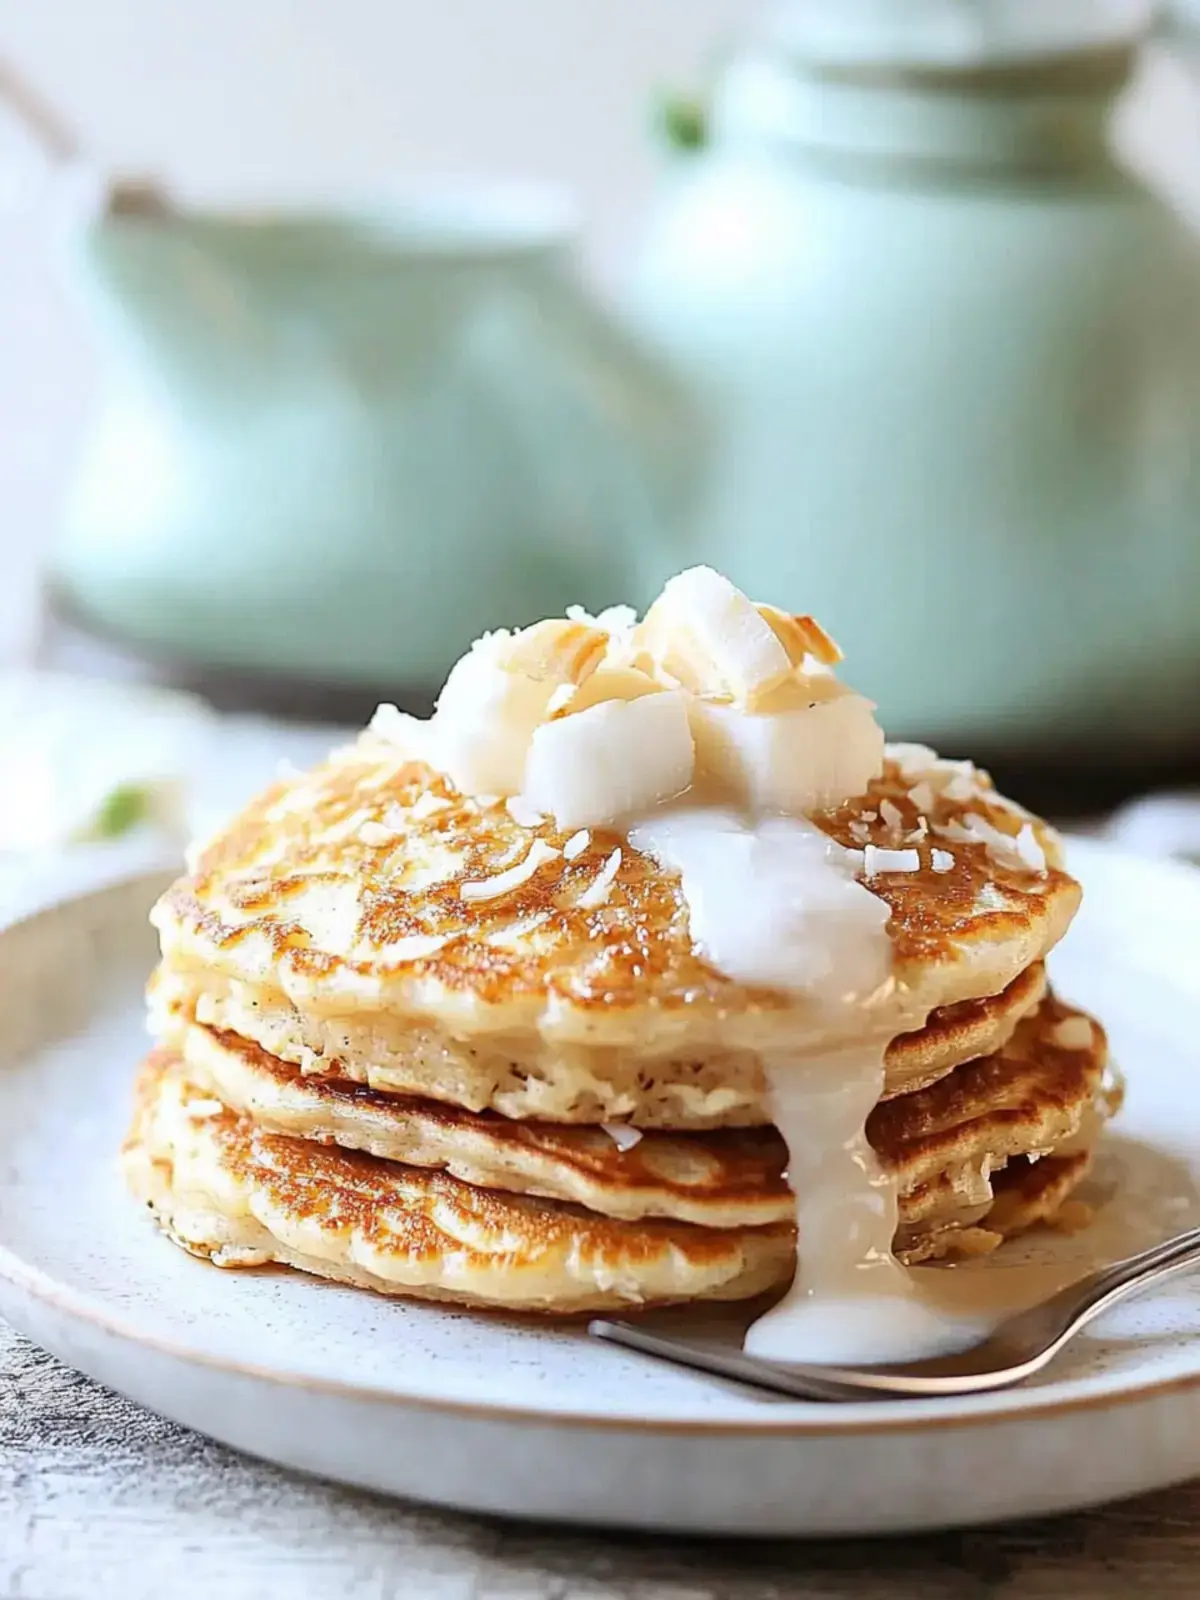
There’s a certain magic in the morning when the aroma of freshly made pancakes fills the kitchen, and these Toasted Coconut Pancakes transform that everyday joy into an extraordinary tropical escape. Imagine the satisfying crunch of perfectly toasted coconut nestled within a cloud-like, fluffy batter – it’s a breakfast experience that promises both indulgence and a delightful sense of well-being.
This recipe isn’t just about taste; it’s about crafting a moment of pure bliss, a mini-vacation that begins right at your breakfast table. The sweet, nutty fragrance of toasted coconut is incredibly inviting, setting the stage for a truly memorable start to your day.
Why You Will Love This Recipe
- Irresistible Flavor: The toasted coconut imparts a wonderfully rich and slightly sweet, nutty taste that elevates the pancakes far beyond the ordinary.
- Wholesome Base: Utilizing white whole wheat flour provides a nutritious foundation, ensuring your pancakes are not only delicious but also offer a good source of fiber.
- Effortless Preparation: Designed for real life, this recipe is remarkably quick, allowing you to enjoy a gourmet breakfast even on the busiest of mornings.
- Tropical Ambiance: Each bite transports you to a sunny beach, offering a refreshing and exotic twist on a beloved breakfast classic.
- Versatile Enjoyment: Whether for a special weekend brunch or a weekday treat, these pancakes are sure to be a hit with family and friends of all ages.
Ingredients You Need
The foundation of any exceptional dish lies in the quality of its ingredients, and these Toasted Coconut Pancakes are no exception. Opting for fresh, vibrant components ensures the best possible flavor and texture. The combination of creamy coconut milk, rich eggs, and subtly sweet coconut oil creates a batter that is both luscious and light, setting the stage for the star ingredient: toasted coconut.
Toasted Coconut Pancakes

Experience a tropical paradise with these Toasted Coconut Pancakes. Light and fluffy, they feature the delightful crunch of toasted coconut and a hint of caramel sweetness, perfect for a wholesome and indulgent breakfast.
- 1 cup shredded sweetened coconut, toasted
- 1 cup white whole wheat flour
- 2 tbsp coconut sugar
- 2 tsp baking powder
- 1 tsp baking soda
- 1/2 tsp salt
- 1 cup coconut milk
- 2 large eggs
- 2 tbsp melted coconut oil
- 1 tsp vanilla extract
- For Serving (optional): 2 tbsp butter, 1/4 cup coconut syrup for drizzling
- 1Preheat oven to 325°F (160°C). Spread shredded coconut on a baking sheet and bake for 5-7 minutes until golden brown, stirring once. Set aside.
- 2In a large bowl, whisk together white whole wheat flour, coconut sugar, baking powder, baking soda, and salt.
- 3In a smaller bowl, whisk together coconut milk, eggs, melted coconut oil, and vanilla extract.
- 4Gently fold the wet ingredients into the dry mixture until just combined; do not overmix.
- 5Heat a griddle or non-stick pan over medium-low heat and coat with cooking spray.
- 6Pour about 1/3 cup of batter onto the heated skillet and sprinkle with toasted coconut.
- 7Cook until bubbles form on the surface, about 2 minutes.
- 8Carefully flip and cook until the other side is browned, about another 2 minutes.
- 9Repeat with the remaining batter. Serve warm with butter and coconut syrup, if desired.
Keywords: Pancakes, Coconut, Tropical, Breakfast, Brunch, Whole Wheat, Easy, Fluffy, Toasted Coconut
These are the core components that bring the tropical dream to life, with quantities detailed precisely in the recipe card above for your convenience.
Variations
To cater to diverse palates and dietary needs, these Toasted Coconut Pancakes are wonderfully adaptable. For those seeking a lighter, dairy-free option, simply swap the coconut milk for almond milk or oat milk. This substitution maintains the pancakes’ moisture and texture beautifully, offering a delicious alternative that is just as satisfying.
Chocolate enthusiasts will delight in the addition of chocolate chips folded into the batter. The melty pockets of chocolate create an irresistible contrast with the coconut, turning these pancakes into a decadent treat. Imagine a warm, fluffy pancake studded with gooey chocolate – pure bliss!
For a burst of natural sweetness and vibrant flavor, consider incorporating mashed bananas or fresh blueberries directly into the batter. These additions not only enhance the taste but also contribute to a more moist and tender pancake. The natural sugars from the fruit pair exceptionally well with the coconut, creating a harmonious flavor profile.
Introducing warming spices like cinnamon or a hint of nutmeg can add a comforting depth to the pancakes, perfect for cooler mornings. These spices complement the coconut’s tropical notes, adding an extra layer of cozy complexity. The result is a familiar yet exciting flavor combination that feels both comforting and exotic.
For those who enjoy a bit of crunch and added nutrition, folding in chopped nuts such as walnuts or pecans is a fantastic idea. These nuts introduce a delightful textural contrast and a rich, earthy flavor that beautifully balances the sweetness of the coconut. It’s a simple addition that significantly enhances the overall experience of the pancake.
To boost the protein content and create a more filling meal, consider mixing in a scoop of your favorite protein powder. This is an excellent way to fuel your morning, making these pancakes a powerhouse of energy. The protein powder integrates seamlessly, enhancing satiety without compromising the delicious coconut flavor.
A surprisingly delightful twist comes from adding a pinch of smoked paprika or finely chopped herbs to the batter for a savory pancake experience. This unexpected savory element pairs wonderfully with a side of eggs or avocado, showcasing the versatility of this base recipe. It’s a daring yet rewarding variation for the adventurous foodie.
Finally, for individuals managing gluten sensitivities, substituting the white whole wheat flour with almond flour or a high-quality gluten-free flour blend is a straightforward solution. This ensures that everyone can enjoy the tropical delight of toasted coconut pancakes, regardless of dietary restrictions. Always ensure your chosen flour blend is suitable for baking to achieve the best results.
How to Prepare Toasted Coconut Pancakes
Step 1: Toasting the Coconut
The journey to delicious Toasted Coconut Pancakes begins with toasting the shredded coconut. This crucial step unlocks its full aromatic potential and imbues it with a delightful, nutty depth that is simply unparalleled. Preheat your oven to a moderate 325°F (160°C). Spread the shredded sweetened coconut in a single, even layer across a large baking sheet. This ensures uniform toasting and prevents clumps from burning.
Bake for approximately 5 to 7 minutes, keeping a very close watch. It is essential to stir the coconut once halfway through the baking time. This simple action guarantees that each piece is kissed by the heat, achieving a beautiful, uniform golden-brown hue. The aroma that wafts from the oven at this stage is truly intoxicating, a preview of the tropical bliss to come.
Once the coconut has reached that perfect golden color, remove the baking sheet from the oven immediately. The toasting process can accelerate rapidly, and burned coconut can impart an unpleasant bitter flavor. Allow the toasted coconut to cool completely on the baking sheet. This prevents it from steaming and becoming clumpy, maintaining its delightful crunch for when it’s time to incorporate it into the pancake batter.
Step 2: Combining the Dry Ingredients
While the toasted coconut is cooling, turn your attention to the dry components of the pancake batter. In a spacious mixing bowl, gather all your dry ingredients. This includes the white whole wheat flour, which provides a hearty yet light base for your pancakes. Add the coconut sugar, which lends a subtle caramel-like sweetness that beautifully complements the coconut flavor.
Next, carefully measure in the leavening agents: the baking powder and baking soda. These twin powerhouses are responsible for the pancakes’ signature fluffy texture, ensuring they rise beautifully during cooking. Don’t forget the salt; a mere pinch enhances all the other flavors in the batter, preventing them from tasting flat and bringing out the subtle nuances of the coconut and sugar.
Whisk these dry ingredients together thoroughly. A good whisking ensures that the baking powder, baking soda, sugar, and salt are evenly distributed throughout the flour. This even distribution is critical for consistent rising and flavor in every single pancake you make. The goal is a homogenous blend, ready to embrace the wet ingredients and transform into delicious batter.
Step 3: Mixing the Wet Ingredients
In a separate, slightly smaller bowl, it’s time to bring together the liquid elements that will bind and enrich the pancake batter. Pour in the creamy coconut milk, which not only adds a delightful richness but also amplifies the overall coconut experience. Crack in the large eggs; these act as a binder, holding the ingredients together and contributing significantly to the pancakes’ tender texture.
Add the melted coconut oil to the mixture. Coconut oil is an excellent choice here, as it keeps the pancakes wonderfully moist and infuses them with a delicate, underlying coconut essence that complements the toasted flakes. Finally, stir in the vanilla extract, a timeless ingredient that adds warmth, depth, and a touch of comforting sweetness to the overall flavor profile.
Whisk these wet ingredients together vigorously until they are completely combined and the mixture is smooth and uniform. You’ll notice a lovely aroma beginning to fill your kitchen at this stage, a promising sign of the deliciousness that awaits. Ensure there are no streaks of egg white remaining, as this ensures an even incorporation into the dry ingredients.
Step 4: Combining Wet and Dry Mixtures
Now comes the art of bringing the two halves of your pancake batter together. Gently pour the well-whisked wet ingredients into the bowl containing the dry ingredients. The key here is to be gentle and avoid overmixing. Overworking the batter can develop the gluten in the flour too much, resulting in tough, dense pancakes instead of the light, airy ones we desire.
Using a spatula or a wooden spoon, carefully fold the wet ingredients into the dry mixture. Stir just until the ingredients are combined and most of the flour streaks have disappeared. It is perfectly acceptable, and in fact, desirable, to have a few small lumps remaining in the batter. These lumps are a sign that you haven’t overmixed, ensuring those coveted fluffy pancakes.
Once the batter is just combined, set it aside for a moment. Allowing the batter to rest for a few minutes can help the flour absorb the liquid, leading to an even better texture. This brief pause ensures that all the components are happy and ready to transform into golden pancakes on the griddle.
Step 5: Heating and Preparing the Skillet
A perfectly cooked pancake relies heavily on the right cooking surface and temperature. Select a good-quality griddle or a non-stick frying pan for this task. Place your chosen cooking vessel over medium-low heat. It is crucial to maintain a moderate temperature to ensure the pancakes cook through evenly without burning on the outside before the inside is done.
Once the skillet is adequately heated, it’s time to prepare it to prevent any sticking. Lightly coat the surface with a cooking spray or a small amount of butter or coconut oil. Using a paper towel to spread it thinly ensures an even layer. A well-greased pan is essential for achieving beautifully golden-brown pancakes that release effortlessly.
Allow the skillet to preheat for a minute or two to ensure it reaches the stable medium-low temperature. You can test the heat by flicking a tiny drop of water onto the surface; it should sizzle gently and evaporate quickly, but not aggressively. This indicates the skillet is ready for the pancake batter.
Step 6: Cooking the Pancakes
With your skillet perfectly heated and prepared, it’s time to pour the batter. Using a measuring cup, such as a 1/3 cup measure, ladle portions of the pancake batter onto the hot skillet. Avoid overcrowding the pan; leave enough space between each pancake to allow for easy flipping and prevent them from running into each other. This ensures each pancake cooks optimally.
As soon as you’ve poured the batter for each pancake, this is your golden opportunity to add the star ingredient. Take a small pinch of your beautifully toasted coconut and sprinkle it evenly over the surface of the wet batter. This allows the coconut to adhere to the pancake as it cooks, ensuring you get that delightful crunch and flavor in every bite. Pressing them in gently can help them stick.
Now, observe the pancakes closely. You’ll want to cook the first side until bubbles begin to form and pop on the surface of the batter. This typically takes about 2 minutes. The edges of the pancake will also start to look set and slightly dry. This visual cue is your signal that it’s time to flip and reveal the beautifully cooked underside.
Step 7: Flipping and Finishing
When you see those tell-tale bubbles, it’s time for the flip! Using a thin, flexible spatula, carefully slide it under the edge of a pancake. With a confident, swift motion, flip the pancake over to the other side. The underside should be a beautiful golden-brown color, indicating perfect cooking.
Cook the second side for another couple of minutes, or until it is also golden brown and the pancake is cooked through. You can gently press the center of the pancake to check for doneness; it should feel slightly firm and spring back a little. The aroma at this stage is truly heavenly, a testament to your culinary efforts.
Repeat this process with the remaining batter, adding more toasted coconut to each new pancake as you pour the batter. Work in batches to ensure you don’t overcrowd the pan and maintain the optimal cooking temperature. Stack the cooked pancakes on a plate as you go, keeping them warm until all the batter has been transformed into fluffy, coconut-infused delights.
Pro Tips for Toasted Coconut Pancakes
Toast the Coconut Wisely: Always toast your shredded coconut; it’s non-negotiable for unlocking that deep, nutty flavor and delightful crunch. Keep a vigilant eye during toasting as it can go from golden to burnt in mere moments. Ensure it cools completely before adding to the batter to maintain its crispness.
The Art of Not Overmixing: This is perhaps the most critical tip for achieving fluffy pancakes. Mix the wet and dry ingredients only until they are just combined. A few lumps in the batter are a sign of success, not failure, and indicate you’re on your way to light, airy pancakes. Overmixing develops gluten, leading to toughness.
Mastering the Heat: Medium-low heat is your best friend for cooking pancakes evenly. Too high, and the outside will burn while the center remains raw and doughy. Too low, and they’ll cook too slowly, becoming flat and dense. Finding that sweet spot ensures a beautiful golden-brown exterior and a perfectly cooked, fluffy interior.
Freshness is Key: Always strive to use fresh ingredients for the best possible outcome. Fresh coconut milk, eggs, and leavening agents will significantly impact the final taste and texture. Older baking powder and soda can lead to pancakes that don’t rise properly, leaving you with disappointing results.
Embrace Customization: Don’t be afraid to experiment with toppings and additions! Fresh berries, a dollop of whipped cream, a drizzle of extra coconut syrup, or even a scattering of nuts can transform these pancakes into a unique culinary creation tailored to your preferences. This adaptability is part of their charm.
Serving Suggestions for Toasted Coconut Pancakes
Decoration
Elevate your Toasted Coconut Pancakes from delicious to visually stunning with thoughtful decoration. A light dusting of powdered sugar can add an elegant touch and a hint of extra sweetness. Consider arranging fresh, colorful berries like strawberries, blueberries, and raspberries artfully around the stack. This not only adds vibrant visual appeal but also offers a refreshing counterpoint to the warm pancakes.
For an extra tropical flourish, sprinkle a few more pieces of toasted coconut over the top of the finished stack. A delicate drizzle of extra coconut syrup, perhaps with a swirl pattern, can also enhance the visual presentation. If you’re feeling particularly creative, a small sprig of fresh mint can add a pop of green and a hint of subtle freshness.
Side Dishes
Complement your Toasted Coconut Pancakes with a selection of delightful side dishes that enhance the tropical theme and provide a balanced breakfast experience. Creamy Greek yogurt offers a tangy contrast to the sweetness of the pancakes and adds a valuable protein boost. A side of crispy breakfast sausages or bacon provides a savory element, creating a wonderful sweet and savory combination.
A vibrant fruit salad featuring seasonal fruits like mango, pineapple, and kiwi is an excellent choice. It echoes the tropical flavors and adds a refreshing, light element to the meal. For a warm, comforting addition, consider serving them alongside a bowl of warm oatmeal or a simple side of scrambled eggs. These pairings ensure a hearty and satisfying breakfast for everyone.
Creative Serving Ideas
Transform your breakfast into an event with unique serving ideas that celebrate the Toasted Coconut Pancakes. Serve them as part of a build-your-own pancake bar, offering a variety of toppings such as fresh fruit, different syrups, nuts, and whipped creams, allowing guests to customize their own tropical creation. This interactive approach is perfect for brunches or family gatherings.
Consider presenting them in a more elegant fashion by stacking them with a light layer of coconut whipped cream between each pancake, creating a pancake “cake.” Garnish with a few edible flowers or a dusting of edible gold glitter for a truly special occasion. For a fun, kid-friendly presentation, cut the pancakes into fun shapes using cookie cutters before serving.
Another creative idea is to serve them alongside a refreshing coconut smoothie or a tropical fruit punch. This reinforces the theme and provides a delightful beverage option that complements the pancakes perfectly. For an indulgent dessert-style presentation, drizzle generously with chocolate sauce or serve with a scoop of vanilla bean ice cream for a truly decadent treat.
Preparation & Storage
Storing Leftovers
Should you be fortunate enough to have any Toasted Coconut Pancakes leftover, storing them properly will ensure they remain delicious for later enjoyment. Once cooled completely, place the pancakes in an airtight container. To prevent them from sticking together, you can place a sheet of parchment paper between each layer of pancakes.
These pancakes can be stored in the refrigerator for up to 3 days. When you’re ready to enjoy them again, they can be easily reheated, bringing back their delightful warmth and texture. Proper storage ensures that the effort put into making them doesn’t go to waste, offering a quick and tasty option for future meals.
Freezing
For longer-term storage, Toasted Coconut Pancakes freeze exceptionally well, making them an ideal candidate for meal prepping. Once the pancakes have cooled completely, wrap each individual pancake tightly in plastic wrap. This initial wrapping helps to protect them from freezer burn and maintain their texture.
After individually wrapping, place the wrapped pancakes into a heavy-duty freezer bag or an airtight freezer-safe container. This double layer of protection is key to preserving their quality. Properly frozen, these pancakes can maintain their deliciousness for up to 2 months, providing a convenient breakfast option whenever the craving strikes.
Reheating
Reheating your stored or frozen Toasted Coconut Pancakes is a simple process that quickly brings them back to their delightful state. If reheating from the refrigerator, you can place the pancakes in a toaster on a low setting for a few minutes, or warm them in a microwave for about 20-30 seconds until they are heated through.
For frozen pancakes, the reheating process might take a little longer. You can pop them directly into a toaster oven or a regular toaster (ensure they are not too thick for your toaster slots) and toast them until warm. Alternatively, a microwave can be used for reheating frozen pancakes, typically requiring about 30-45 seconds per pancake. Be mindful not to overheat, as this can make them dry or rubbery. A final drizzle of coconut syrup after reheating is highly recommended to recapture that fresh-from-the-griddle flavor.
Frequently Asked Questions
-
What type of coconut is best for Toasted Coconut Pancakes, and why?
For the most delightful flavor and texture in Toasted Coconut Pancakes, using shredded sweetened coconut is highly recommended. The natural sweetness of the coconut, especially after toasting, adds a wonderful depth that complements the pancake batter beautifully. Unsweetened coconut can be used, but you may wish to slightly increase the sugar in the batter to compensate for the missing sweetness, and the toasting process is even more critical to develop flavor.
-
How long can I safely store leftover Toasted Coconut Pancakes, and what’s the best way to keep them fresh?
Leftover Toasted Coconut Pancakes can be stored in the refrigerator for up to 3 days. The most effective way to maintain their freshness and texture is to store them in an airtight container. To prevent the pancakes from sticking together, which can happen as they cool and settle, it’s a good practice to place a sheet of parchment paper between each layer of pancakes within the container. This simple step ensures they remain separate and easy to reheat.
-
Can Toasted Coconut Pancakes be frozen, and if so, how should I reheat them for the best results?
Absolutely, Toasted Coconut Pancakes freeze wonderfully, making them a perfect make-ahead breakfast option for busy schedules. To freeze them, wrap each individual pancake tightly in plastic wrap, ensuring a good seal to prevent freezer burn. Then, place the wrapped pancakes into a freezer-safe bag or container. They will retain their quality for up to 2 months. When you’re ready to enjoy them, you can reheat them in a toaster or toaster oven until warm, or gently in a microwave for about 30-45 seconds per pancake.