Ultimate Funfetti Icebox Cake Delight

When it comes to desserts that ignite joy, the Funfetti Icebox Cake Delight stands out. This no-bake cake is a star at every gathering, bringing vibrant colors and delightful flavors that appeal to all ages. Have you ever wondered how you can create something so delightful with minimal effort?
The allure of this Funfetti Icebox Cake Delight lies in its simplicity. You don’t need to be an experienced baker to whip it up, and you can customize it to your heart’s content. It’s a fantastic way to celebrate life’s little moments or to serve as a show-stopping dessert at birthdays, holidays, or parties.
Why You Will Love This Recipe
- Flavor Explosion: The delightful combination of vanilla pudding, rich cream cheese, and a generous scattering of vibrant rainbow sprinkles creates an unforgettable symphony of tastes in every single bite. This cake truly delivers a burst of nostalgic birthday cake flavor without any oven time. It’s a treat that satisfies both sweet cravings and a desire for colorful fun.
- Simplicity at Its Best: Embrace the ease of a no-bake dessert that requires minimal effort and no complex baking skills. This recipe is perfect for beginners or busy individuals looking for a show-stopping dessert without the fuss. You’ll be amazed at how quickly this delightful creation comes together.
- Versatile Treat: The Funfetti Icebox Cake Delight is incredibly adaptable, making it suitable for a wide array of occasions and dietary preferences. Easily adjust ingredients to create vegan or gluten-free versions, ensuring everyone at your gathering can enjoy a slice. This flexibility makes it a reliable go-to dessert for any event.
- Family-Friendly Fun: Both kids and adults are instantly captivated by the cake’s playful, colorful presentation and its irresistibly sweet flavor profile. It’s an excellent project for involving younger family members in the kitchen, fostering joy and creating lasting memories. This dessert promises smiles all around, making it a perfect addition to any family meal or celebration.
- Make Ahead Marvel: One of the greatest advantages of this icebox cake is its ability to be prepared a day or even two in advance. This incredible feature saves you precious time on the day of your event, allowing you to focus on other preparations. The flavors actually deepen and meld beautifully as it chills, enhancing its overall deliciousness.
Ingredients You Need
To achieve the best possible Funfetti Icebox Cake Delight, the quality of your ingredients truly matters. Opt for full-fat cream cheese for a richer, creamier texture and choose a high-quality vanilla extract for a more authentic flavor profile. Fresh, cold milk will also contribute to the pudding’s optimal setting and consistency, creating a truly luxurious dessert.
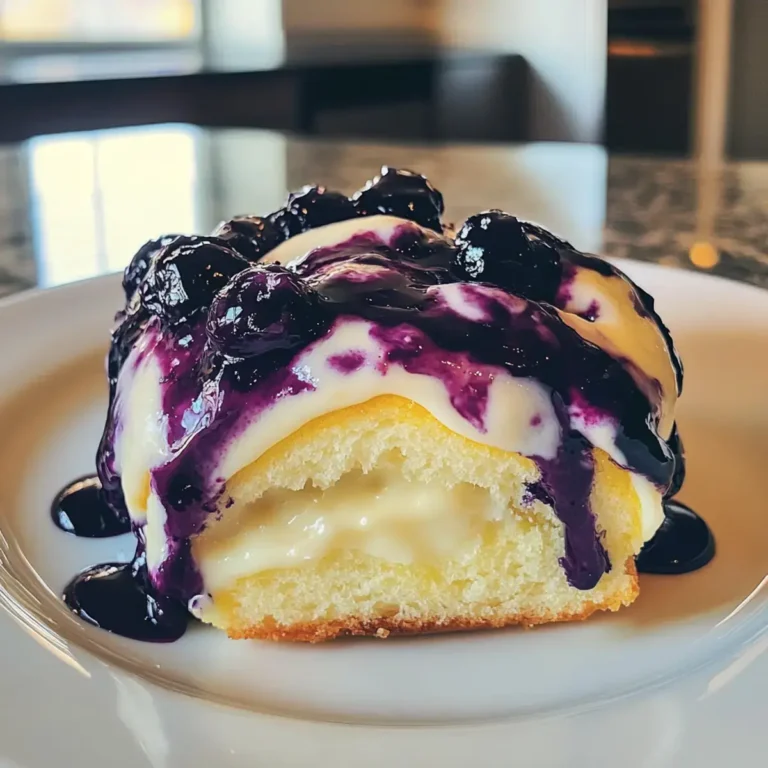
Funfetti Icebox Cake Delight
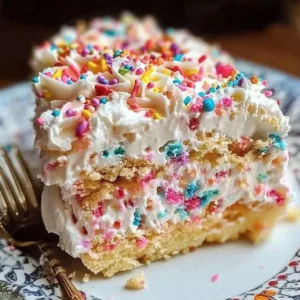
A vibrant no-bake cake featuring layers of creamy vanilla pudding, whipped topping, and colorful sprinkles, all nestled between crunchy shortbread cookies.
- 8 oz cream cheese, softened at room temperature
- 8 oz whipped topping (Cool Whip or homemade)
- 2 cups milk (Use almond milk or oat milk for dairy-free)
- 6.8 oz instant vanilla pudding mix (two 3.4 oz boxes)
- 2 teaspoons vanilla extract
- 11 oz rainbow sprinkles, plus extra for garnish
- 10 oz shortbread cookies (approximately one box)
- Whipped cream for garnish
- 1Gather all your ingredients and allow the cream cheese to soften.
- 2Using a hand mixer, beat the softened cream cheese in a large bowl until light and fluffy, about 2 minutes.
- 3Add the instant vanilla pudding mix and vanilla extract to the whipped cream cheese. Mix until smooth.
- 4Gradually pour in the milk while mixing until the mixture is mostly smooth.
- 5Gently fold the whipped topping into the pudding mixture using a rubber spatula.
- 6Fold in about 9 to 10 ounces of rainbow sprinkles, reserving some for later.
- 7Line the bottom of an 8-inch springform pan with parchment paper.
- 8Spread 1/2 cup of the pudding mixture evenly on the bottom of the pan.
- 9Arrange a layer of shortbread cookies on top.
- 10Pour one-third of the remaining pudding mixture over the cookies and smooth it out. Repeat the layering process until all pudding and cookies are used.
- 11Finish with a layer of pudding on top and sprinkle reserved rainbow sprinkles over it.
- 12Freeze the cake for 4 hours or refrigerate it overnight.
- 13If frozen, let it sit at room temperature for 10 minutes before slicing.
- 14Remove the springform pan sides, optionally garnish with whipped cream and additional sprinkles before serving.
Keywords: Birthday Cake, Funfetti Cake, Icebox Cake, No-Bake Dessert, Party Cake
- cream cheese: softened at room temperature for smooth mixing
- whipped topping: use a good quality store-bought brand or make your own fresh
- milk: cold whole milk for best pudding consistency, or dairy-free alternative
- instant vanilla pudding mix: two standard boxes for the perfect creamy base
- vanilla extract: pure vanilla extract enhances the overall sweetness
- rainbow sprinkles: vibrant, good quality sprinkles that hold their color
- shortbread cookies: classic shortbread provides a delightful crunch and buttery flavor
- whipped cream: for an optional, elegant garnish just before serving
The precise quantities for each of these ingredients can be found in the comprehensive recipe card below. Always refer to the card for accurate measurements to ensure your Funfetti Icebox Cake Delight turns out perfectly.
Variations
Chocolate Funfetti Delight: For all the chocolate lovers out there, consider swapping the instant vanilla pudding mix for an instant chocolate pudding mix. This simple change introduces a rich, cocoa-infused base that beautifully complements the vibrant rainbow sprinkles. The combination creates a decadent twist on the classic, offering a deeper flavor profile while maintaining its festive appearance.
Nutty Crunch Variation: Introduce an exciting textural element by adding finely chopped nuts between your cookie and pudding layers. Pecans, walnuts, or even toasted almonds can provide a delightful crunch and earthy flavor contrast to the sweet, creamy layers. Just be sure to alert guests about the presence of nuts if serving to a crowd.
Fruit-Inspired Freshness: Elevate the freshness of your Funfetti Icebox Cake by incorporating layers of thinly sliced fresh fruit. Sweet strawberries, ripe peaches, or even mixed berries can add a wonderful tanginess and natural sweetness, cutting through the richness of the pudding. This variation not only enhances flavor but also adds a beautiful pop of natural color to each slice.
Vegan & Dairy-Free Option: Craft a delightful vegan version of this icebox cake by making a few strategic substitutions. Opt for a dairy-free cream cheese alternative and use a coconut cream-based whipped topping for the creamy layers. Ensure your choice of shortbread cookies is certified vegan, allowing everyone to enjoy this vibrant, joyful dessert.
How to Prepare Funfetti Icebox Cake Delight
Step 1: Gather and Prepare Your Ingredients for Optimal Texture
Begin by setting out all your required ingredients on the counter, allowing your cream cheese to soften completely to room temperature. This crucial step ensures that the cream cheese will beat smoothly and incorporate effortlessly into the pudding mixture, preventing any lumps. A well-softened cream cheese is key to achieving that perfectly light and airy texture that makes this icebox cake so delightful.
Ensure all your measuring cups and spoons are readily accessible before you start mixing. Having everything prepped in advance, often referred to as “mise en place,” streamlines the entire assembly process and minimizes any potential stress in the kitchen. This thoughtful preparation allows you to focus solely on the fun of layering and mixing.
Step 2: Create the Creamy Pudding Base
First, in a large mixing bowl, use a hand mixer to beat the softened cream cheese until it becomes wonderfully light and fluffy. This usually takes about two minutes, and you’ll notice its color lightening and its consistency becoming incredibly smooth. Properly beaten cream cheese forms the luxurious foundation of your cake, providing a rich and tangy counterpoint to the sweet pudding.
Next, add both the instant vanilla pudding mix and the vanilla extract directly into the whipped cream cheese. Continue beating the mixture until all ingredients are thoroughly combined and the texture is smooth and lump-free. The vanilla extract is essential here, amplifying the pudding’s flavor and adding a warm, aromatic depth to the overall dessert.
Gradually pour in the cold milk while the mixer is running on a low speed. Continue blending until the mixture achieves a mostly smooth consistency; a few tiny lumps might remain, which is perfectly fine. The milk activates the instant pudding, transforming it into a thick, creamy base that will hold all the layers together beautifully. Cold milk helps the pudding set faster and firmer.
Finally, with a rubber spatula, gently fold the whipped topping into your pudding mixture. This folding technique is vital to maintain the light and airy volume of the whipped topping, ensuring the cake remains incredibly fluffy and not dense. Be careful not to overmix at this stage, as excessive agitation can deflate the mixture and alter its desired texture. The goal is a harmonious, cloud-like cream.
Step 3: Infuse with Funfetti Magic and Prepare the Pan
Carefully fold in the majority of your vibrant rainbow sprinkles, reserving a handful for garnishing the top later. Use a gentle hand to incorporate them evenly throughout the creamy pudding mixture. Excessive mixing can cause the colors from the sprinkles to bleed into the cream, which might dull their bright appearance, so a light touch is best here.
Consider the visual impact of your sprinkles; choose high-quality, non-bleeding varieties for the most stunning results. A good sprinkle blend will maintain its distinct colors even after being mixed into the moist pudding. This ensures that every slice of your Funfetti Icebox Cake will be a burst of joyous color, living up to its name.
Prepare an 8-inch springform pan by lining its bottom with a circle of parchment paper. This simple but effective step will make the cake incredibly easy to release from the pan once it’s chilled and set. The parchment acts as a non-stick barrier, ensuring a clean and perfect presentation when you serve your dessert.
Greasing the sides of the springform pan lightly with a neutral oil or non-stick spray before securing the parchment can also assist in a smooth release. This additional preparation ensures that no part of the cake sticks, preserving its beautiful layered structure. A perfectly released cake is a testament to careful preparation.
Step 4: Master the Art of Layering for Visual Appeal
Begin by spreading a generous half-cup of your prepared Funfetti pudding mixture evenly across the bottom of the parchment-lined springform pan. This initial layer serves as the sticky foundation, helping to anchor the first layer of cookies and prevent them from shifting. A smooth, even base is essential for a stable and beautiful cake structure.
Next, meticulously arrange a single layer of shortbread cookies directly on top of the pudding base. You may need to gently break some cookies into smaller pieces to fill any gaps, ensuring a snug, continuous layer. These shortbread cookies will soften as the cake chills, transforming into a tender, cake-like texture that is utterly delightful.
Once the cookie layer is complete, pour approximately one-third of the remaining Funfetti pudding mixture over the cookies and carefully smooth it out to cover them completely. This creates the first creamy filling, encasing the buttery shortbread. Distribute the pudding evenly to ensure consistency in every bite, fostering a balanced flavor and texture.
Repeat this layering sequence: a layer of cookies, followed by a layer of pudding. Continue this process until all of your pudding mixture and shortbread cookies have been used. Ensure that the final layer on top is a smooth, even spread of the Funfetti pudding, creating a pristine canvas for your final decorative touches. You should aim for approximately three layers of cookies and three layers of pudding, culminating with the final pudding top. Desserts like this are all about the beautiful layers!
Step 5: The Grand Finale – Chilling and Serving Your Delight
Once all the layers are assembled, gently sprinkle the reserved rainbow sprinkles generously over the top layer of pudding. This final flourish of sprinkles provides that signature vibrant and festive look, promising a celebration with every slice. The contrast of the bright colors against the creamy white pudding is truly eye-catching and inviting.
Now, the most critical step: chilling. Freeze the assembled Funfetti Icebox Cake Delight for a minimum of four hours, or ideally, refrigerate it overnight. The extended chilling time allows the cookies to soften completely, absorbing moisture from the pudding, which transforms their texture into a soft, cake-like consistency. It also gives the flavors ample time to meld and deepen, resulting in a more harmonious and delicious dessert. Think of it as a classic icebox cake principle.
If you chose to freeze your cake, remember to let it sit at room temperature for about 10-15 minutes before attempting to slice it. This brief resting period allows it to soften slightly, making it much easier to cut into clean, elegant slices without cracking. For refrigerated cakes, a quick moment on the counter is usually sufficient.
To serve, carefully remove the sides of the springform pan. Optionally, for an extra touch of elegance and visual appeal, garnish each slice or the entire cake with a dollop of fresh whipped cream and a few extra sprinkles. Serve immediately to enjoy its perfectly chilled, creamy, and delightful texture. For more fantastic dessert ideas, consider exploring our easy berry tart recipe, which complements various occasions.
Pro Tips for Funfetti Icebox Cake Delight
Ensure Cream Cheese is Softened: Always allow your cream cheese to come to full room temperature before beating. This prevents lumps and ensures a perfectly smooth, fluffy texture for your pudding base, which is crucial for the cake’s overall consistency. Cold cream cheese can lead to a grainy mixture that won’t meld well.
Gentle Folding is Key: When incorporating the whipped topping into the pudding mixture, use a light hand and a rubber spatula. Overmixing can deflate the whipped topping, resulting in a dense cake rather than the desired light and airy texture. The goal is to gently combine, preserving volume and fluffiness.
Patience with Chilling: Do not rush the chilling process; it is perhaps the most critical step for an icebox cake. Allowing the Funfetti Icebox Cake Delight to chill for the recommended minimum of four hours, or preferably overnight, allows the cookies to fully soften and the flavors to beautifully meld together. This patience guarantees a truly transformative texture.
Line Your Pan Properly: Always use parchment paper to line the bottom of your springform pan. This simple step makes removing the finished cake incredibly easy, ensuring a clean release and maintaining the integrity of your beautiful layers. A well-lined pan saves frustration and ensures a perfect presentation.
Choose Quality Sprinkles: Invest in high-quality rainbow sprinkles that are known to hold their color and not bleed excessively when mixed into moist ingredients. This ensures that your cake remains vibrant and visually appealing, maintaining that signature funfetti look. Bright, distinct colors enhance the joy of every bite.
Consider a Flavor Boost: For an extra layer of flavor, you can slightly moisten your shortbread cookies with a very light brush of milk or a complementary liqueur before layering. This can accelerate the softening process and infuse additional depth into the cookies. Just be careful not to make them soggy, a little goes a long way.
Garnish with Flair: Elevate your presentation by piping extra whipped cream elegantly around the edges of the cake or on individual slices just before serving. A final flourish of additional sprinkles on top will make the cake even more festive and irresistible. A beautiful garnish truly enhances the dessert experience.
Serving Suggestions for Funfetti Icebox Cake Delight
Decoration
Embrace a spectrum of colorful garnishes to complement your Funfetti Icebox Cake Delight. Beyond extra sprinkles, consider vibrant candied cherries, small colorful candies, or even edible glitter for an extra magical touch. A generous swirl of homemade whipped cream, piped elegantly, always adds a professional and inviting finish to each slice.
Fresh fruit provides a beautiful contrast and natural elegance. Arrange a few fresh raspberries, blueberries, or thinly sliced strawberries artfully around the base or on top of the whipped cream swirls. The natural colors and slight tartness of the fruit will beautifully balance the sweetness of the cake, creating a more sophisticated presentation.
Side Dishes
Pairing your Funfetti Icebox Cake Delight with a refreshing beverage is always a good idea. A light, chilled glass of milk or a simple iced tea can cleanse the palate beautifully, allowing the flavors of the cake to truly shine. For an adult gathering, consider a sparkling wine or a light sparkling drink to complement the sweet treat.
For those who enjoy a warm accompaniment, coffee or herbal tea makes an excellent choice. The slight bitterness of a freshly brewed cup of coffee or the soothing warmth of an herbal infusion provides a delightful counterpoint to the cake’s sweetness. This classic pairing creates a truly satisfying dessert experience, especially after a hearty dinner.
Creative Serving Ideas
Instead of a large cake, consider preparing individual Funfetti Icebox Delight parfaits in clear glasses or mason jars. Layer the pudding mixture, crumbled cookies, and sprinkles in small portions for a visually stunning and perfectly portioned dessert. These individual servings are excellent for parties, allowing guests to grab and enjoy with ease.
Transform the cake into a “dessert bar” by offering various toppings alongside it. Provide bowls of extra sprinkles, mini chocolate chips, chopped nuts (with allergy warnings), and different flavored whipped creams. This interactive approach encourages guests to customize their slice, adding an element of fun and personalization to the dessert experience. For more creative ideas, check out our Funfetti cookies!
Serve the cake as part of a celebratory brunch, offering a sweet counterpoint to savory dishes. Alongside quiches, fresh fruit platters, and perhaps some breakfast pastries, the vibrant Funfetti Icebox Cake can be a cheerful and unexpected addition. It brings a festive atmosphere to any morning or early afternoon gathering.
Preparation & Storage
Storing Leftovers
Proper storage is key to maintaining the delightful freshness and texture of your Funfetti Icebox Cake Delight. Any leftover cake should be transferred to an airtight container immediately after serving. This crucial step prevents the cake from drying out and absorbing any unwanted odors from the refrigerator, keeping it tasting fresh.
Place the airtight container in the refrigerator, where the cake will remain delicious for approximately 3 to 4 days. Ensure the lid is securely fastened to protect the creamy layers and prevent the sprinkles from losing their vibrant color. For best results, avoid placing it near strong-smelling foods. Following these steps ensures maximum enjoyment of every last slice.
Freezing
The Funfetti Icebox Cake Delight is remarkably freezer-friendly, allowing you to prepare it well in advance or save extra portions for later enjoyment. To freeze the entire cake, ensure it is completely set and well-chilled first. Then, wrap the cake tightly in several layers of plastic wrap, making sure to cover every exposed surface to prevent freezer burn.
For individual servings, pre-slice the cake and wrap each slice individually before placing them in an airtight freezer-safe container. This method allows for easy thawing of single portions whenever a craving strikes. Properly wrapped, the cake can be stored in the freezer for up to two months without significant loss of quality or flavor.
Remember to label your frozen cake with the date of freezing. This simple practice helps you keep track of its freshness and ensures you enjoy it within its optimal window. Freezing is a fantastic way to extend the life of this joyful dessert, ready for any spontaneous celebration.
Reheating
It is important to note that this is a no-bake cake, so “reheating” isn’t the correct term; rather, it’s about thawing to the perfect serving temperature. If your cake has been frozen, the best way to thaw it is slowly in the refrigerator overnight. This gradual thawing process helps to maintain the cake’s creamy texture and prevents any separation.
For a quicker thaw, you can leave frozen slices at room temperature for about 30 to 60 minutes. However, be mindful not to leave it out for too long, especially in warm environments, to avoid the creamy layers from becoming too soft. The key is to achieve a chilled, yet perfectly tender, consistency. Do not use a microwave for thawing, as this will drastically alter the delicate texture of the pudding and whipped topping, leading to a watery and unappetizing result.
Frequently Asked Questions
-
Can I prepare Funfetti Icebox Cake Delight several days in advance for a party? Yes, absolutely! This is one of the best features of icebox cakes. While a minimum of 4 hours of chilling is required, making it 24 to 48 hours in advance actually allows the flavors to deepen and the shortbread cookies to achieve a perfectly softened, cake-like texture. This significantly reduces stress on the day of your event, as the cake will be perfectly ready for slicing and serving. Just ensure it’s kept well-covered in the refrigerator.
-
What are the best substitutions if I need to make this recipe gluten-free or dairy-free? Creating a gluten-free or dairy-free version of this Funfetti Icebox Cake Delight is entirely possible with a few simple swaps. For a gluten-free option, the most crucial change is using certified gluten-free shortbread cookies; ensure all other ingredients (like pudding mix) are also verified gluten-free. For a dairy-free cake, opt for plant-based cream cheese alternatives, use a whipped topping made from coconut cream, and substitute cow’s milk with almond, oat, or soy milk. Always check ingredient labels carefully to ensure full compliance with dietary needs. You can learn more about ingredient sourcing by looking up “food ingredients” on Wikipedia.
-
How can I prevent the sprinkles from bleeding their color into the creamy layers? To minimize color bleeding from the sprinkles, there are a few important tips to follow. Firstly, choose high-quality, often “non-pareil” or “jimmie” style sprinkles, as these tend to hold their color better than softer, sugar-crystal types. Secondly, when folding the sprinkles into the pudding mixture, do so gently and quickly, avoiding excessive overmixing. The less agitation and moisture exposure, the better. Finally, chilling the cake promptly after assembly helps to set the layers quickly, reducing the time sprinkles are exposed to liquid. Also, reserve some dry sprinkles for the very top garnish, added just before serving. Check out our Pinterest board for more visual tips!