4 Ingredient Cheese and Bacon Rolls – Easy & Irresistible Treats

These 4 ingredient cheese and bacon rolls are an absolute game-changer for busy weeknights and leisurely weekend brunches alike. They deliver a burst of savory flavor with every bite, all while requiring minimal effort in the kitchen. Their tender, fluffy texture makes them incredibly satisfying and perfect for any occasion.
You’ll be amazed at how quickly these delightful rolls come together, proving that delicious homemade treats don’t need to be complicated. With just a handful of staple ingredients, you can create something truly special that everyone will adore. Get ready to impress yourself and your loved ones with this incredibly simple yet rewarding recipe.
Why You Will Love This Recipe
- Incredible Simplicity: With only four core ingredients, this recipe is remarkably easy to follow, making it perfect for beginner bakers and seasoned cooks alike.
- Speedy Preparation: From start to finish, these delicious rolls can be ready to enjoy in approximately 30 minutes, ideal for those days when time is of the essence.
- Melt-in-Your-Mouth Texture: The ingenious combination of Greek yogurt and self-raising flour results in rolls that are exceptionally soft, fluffy, and utterly delightful with every single bite.
- Remarkable Versatility: Whether served for a hearty breakfast, a satisfying lunch, or a delightful snack, these rolls shine, tasting equally wonderful warm or at room temperature.
- Irresistible Flavor Combination: The classic pairing of savory, crispy bacon and wonderfully gooey, melted cheese creates a universally loved taste sensation that appeals to all ages.
Ingredients You Need
The beauty of this recipe lies in its minimalist ingredient list, allowing the quality of each component to truly shine. Using fresh, good-quality bacon will impart a richer, smokier flavor, while a well-melted, good grating cheese ensures that delightful, gooey texture we all crave. These simple elements, when combined, create a truly harmonious and delicious result that speaks for itself.
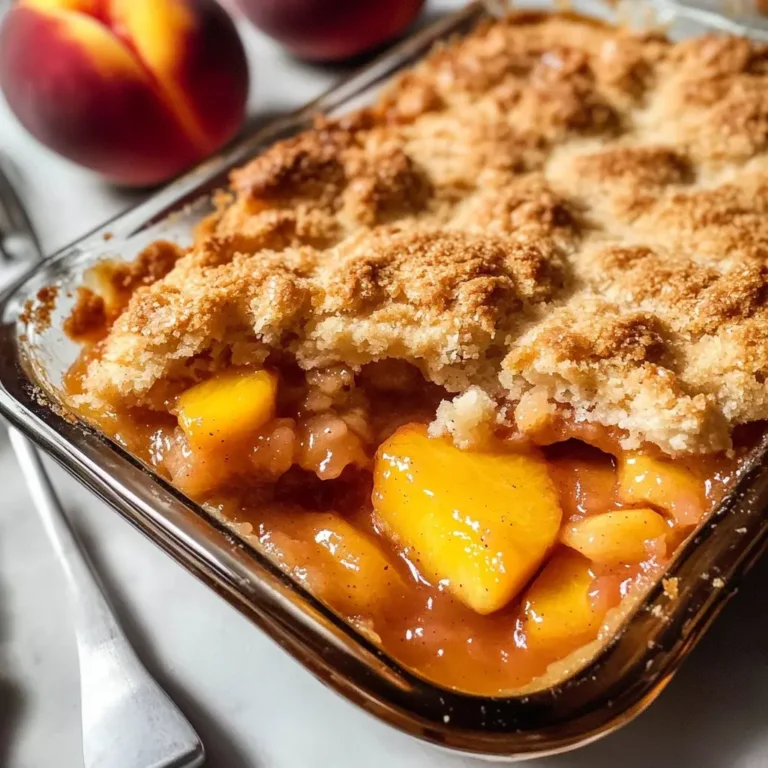
4 Ingredient Cheese and Bacon Rolls

Quick and easy 4 Ingredient Cheese and Bacon Rolls will quickly become a favorite in your home. These soft and fluffy buns are perfect for breakfast, lunch, or any snack time. With just four simple ingredients, you can whip up these delicious rolls in about 30 minutes. Their savory flavor and delightful texture make them a versatile addition to your recipe collection.
- 100 grams (½ cup) diced bacon
- 70 grams (½ cup) grated cheese
- 200 grams (¾ cup) Greek yogurt
- 150 grams (1 cup) self-raising flour
- Extra flour for kneading and rolling
- 1Preheat your oven to 200°C (390°F). Line a baking sheet with baking paper to prevent sticking.
- 2In a frying pan over medium heat, cook the diced bacon until it becomes crispy. Once done, remove it from heat and let it cool while you prepare the dough.
- 3In a medium-sized mixing bowl, combine the sifted self-raising flour and Greek yoghurt. Use a spoon to mix until the ingredients come together into a dough.
- 4Transfer the dough onto a floured surface. Knead gently until smooth. Avoid over-kneading; if it’s too sticky, add a little more flour until manageable.
- 5Divide the dough into four equal balls. Place them on the lined baking sheet, ensuring they slightly touch each other. Flatten each ball with your fingers gently.
- 6Top each roll with some cooked bacon followed by grated cheese. Add another layer of bacon on top for extra flavor.
- 7Place the baking sheet in your preheated oven. Bake for about 20 minutes or until golden brown and cooked through.
- 8Once baked, allow them to cool slightly before separating with a knife. Serve immediately while warm for maximum enjoyment!
Keywords: cheese, bacon, rolls, bread, quick, easy, snack, breakfast, lunch, German
The exact quantities for each ingredient are detailed within the accompanying recipe card, ensuring perfect proportions for your delicious rolls.
Variations
While the classic combination of cheese and bacon is undeniably delicious, there are numerous ways to put your own spin on these delightful rolls. Consider adding a pinch of garlic powder or onion powder to the dough for an extra savory depth. A sprinkle of dried herbs like chives or parsley can also introduce a fresh, aromatic note, elevating the flavor profile considerably.
For those seeking a spicier kick, incorporating a finely diced jalapeño or a dash of your favorite hot sauce into the dough or topping can provide a welcome warmth. Alternatively, for a hint of sweetness and tang, a small amount of finely chopped sun-dried tomatoes or a drizzle of balsamic glaze could offer a sophisticated twist on the traditional flavor.
If you’re looking for a completely different flavor profile, think about adding finely chopped olives or even a small amount of crumbled feta cheese for a Mediterranean-inspired variation. Experimentation is key, and these simple rolls provide a fantastic canvas for culinary creativity, allowing you to tailor them to your personal preferences or the specific tastes of your guests. Remember that even minor additions can significantly alter the final taste, so start small and build up to your perfect flavor combination.
How to Prepare 4 ingredient cheese bacon rolls
Step 1: Prepare Your Baking Station
The first crucial step in creating these delightful cheese and bacon rolls involves getting your baking environment ready. You’ll want to preheat your oven to a precise temperature of 200 degrees Celsius (which is equivalent to 390 degrees Fahrenheit). This ensures that your oven is at the optimal temperature when your rolls are ready to bake, leading to even cooking and that perfect golden-brown finish.
Simultaneously, prepare your baking sheet by lining it meticulously with baking paper. This protective layer is essential; it prevents the rolls from sticking to the baking sheet, which can be a common frustration and can lead to damaged rolls. Using baking paper also makes the post-baking cleanup process significantly easier, saving you valuable time and effort after you’ve enjoyed your delicious creations.
Step 2: Achieve Perfectly Crispy Bacon
Next, focus on preparing the star savory element: the bacon. Take your diced bacon and place it into a frying pan. Heat the pan over a medium heat setting; this allows the bacon to render its fat slowly and cook evenly without burning. Stir the bacon occasionally to ensure all sides become deliciously crispy and achieve that satisfying crunch.
Once the bacon has reached your desired level of crispiness, it’s time to remove it from the heat. Carefully drain off any excess rendered fat. Allow the crispy bacon bits to cool down on a paper towel or a separate plate while you proceed with the other steps of the recipe. This cooling period is important as hot bacon could potentially start to cook the dough prematurely or melt too much, affecting the final texture.
Step 3: Crafting the Dough Base
Now it’s time to bring together the core components of your roll dough. In a medium-sized mixing bowl, combine the self-raising flour with the Greek yogurt. It’s often beneficial to sift your flour beforehand to ensure it’s light and airy, though this is an optional step. Use a spoon or a spatula to begin mixing these two ingredients together.
Continue mixing until the ingredients start to form a cohesive dough. At this stage, the mixture might appear a bit shaggy or crumbly. The key is to keep mixing until everything just begins to come together into a rough ball of dough. Don’t worry about achieving a perfectly smooth consistency just yet; that will come in the next crucial step of kneading.
Step 4: The Art of Kneading
With your dough mixture partially formed, it’s time to develop its structure through gentle kneading. Transfer the dough from the mixing bowl onto a lightly floured surface. This prevents the dough from sticking to your countertop and makes it easier to work with. Begin to knead the dough gently, using the palms of your hands to push and fold the dough.
The goal here is to achieve a smooth, elastic texture. You should knead for a few minutes until the dough feels smooth and no longer overly sticky. If the dough continues to be too sticky for your liking, you can gradually add a tiny bit more flour, a teaspoon at a time, until it becomes manageable. However, it’s crucial to avoid over-kneading, as this can result in tough, dense rolls instead of the desired fluffy texture.
Step 5: Shaping Your Delicious Rolls
Once your dough is beautifully smooth and manageable, it’s time to divide and shape it into individual rolls. Take your kneaded dough and divide it into four equal portions. You can eyeball this or use a kitchen scale for ultimate precision. Roll each portion into a roughly ball shape.
Arrange these four dough balls onto your prepared baking sheet. It’s best to place them so they are slightly touching each other. This gentle contact during baking encourages them to rise upwards and bake together, creating a cohesive and attractive batch of rolls. Once they are positioned, gently flatten each ball slightly with your fingers. This creates a surface area for the delicious toppings you’ll add next.
Step 6: Loading Up the Flavor
This is where the magic truly happens, as you add the irresistible cheese and bacon toppings to your partially shaped rolls. Start by generously sprinkling some of the cooked, crispy bacon bits over the flattened surface of each roll. Ensure an even distribution of bacon for consistent flavor in every bite.
Following the bacon, add a good portion of your grated cheese over the top of the bacon on each roll. The heat from the bacon and the upcoming bake will melt the cheese into a glorious, gooey layer. For an extra burst of bacon flavor and texture, you can add another light layer of bacon on top of the cheese, creating a truly decadent experience.
Step 7: The Baking Transformation
Your cheese and bacon rolls are now ready for their transformation in the oven. Carefully place the baking sheet with the topped rolls into your preheated oven. Allow them to bake for approximately 20 minutes. The exact baking time can vary slightly depending on your oven’s performance and how densely packed they are.
Keep an eye on them during the last few minutes of baking. You’re looking for a beautiful golden-brown color on the tops of the rolls and around the edges. The cheese should be melted and perhaps slightly bubbly, indicating they are perfectly cooked through and ready to be enjoyed. The aroma filling your kitchen at this stage will be absolutely incredible.
Step 8: The Grand Finale: Serving Warm
As soon as your rolls emerge from the oven, they are almost ready to be savored. It’s important to allow them to cool for just a few minutes on the baking sheet. This brief cooling period allows them to set slightly, making them easier to handle and separate from each other if they’ve baked together.
Once they’ve cooled slightly, you can carefully separate them using a knife or spatula. The best way to enjoy these 4 ingredient cheese and bacon rolls is immediately while they are still warm. The warmth enhances the flavors, makes the cheese wonderfully gooey, and ensures the rolls are at their absolute softest and fluffiest. Serve them promptly and enjoy the delicious results of your simple culinary effort.
Pro Tips for 4 ingredient cheese bacon rolls
Use High-Quality Ingredients: The fewer ingredients a recipe has, the more each one counts. Opt for good-quality bacon with a nice balance of fat and meat for optimal crispiness and flavor. Similarly, choose a cheese that melts well and has a taste you love, such as a sharp cheddar or a blend.
Don’t Overwork the Dough: A common mistake when working with doughs like this is over-kneading. Knead just until the dough is smooth and cohesive. Over-developing the gluten can lead to tough, chewy rolls, so stop as soon as the dough feels right. This is key to achieving that signature fluffy texture.
Monitor Your Oven Closely: Ovens can be temperamental and vary significantly in their heating capabilities. It’s always a good idea to keep an eye on your rolls during the final stages of baking. Check them a few minutes before the recommended time to ensure they don’t over-bake and become dry or burnt. Adjust baking time as needed.
Embrace Flavor Additions: While the base recipe is fantastic, don’t be afraid to experiment with flavor enhancements. Consider adding finely chopped chives, a pinch of smoked paprika, or even a tiny bit of garlic powder to the dough. These small additions can elevate the complexity and appeal of the rolls without significantly altering the preparation process.
Serve Them Freshly Baked: These rolls are truly at their best when enjoyed warm, straight from the oven. The melted cheese is at its gooey peak, and the texture is at its softest and most delightful. While they are still perfectly edible at room temperature, their ultimate appeal is undeniably when served hot.
Serving Suggestions for 4 ingredient cheese bacon rolls
Decoration
To add a touch of visual appeal before serving, consider a light garnish. A sprinkle of fresh, finely chopped chives or parsley over the warm rolls can provide a pop of color and a hint of freshness. A very light dusting of paprika can also add a warm hue and a subtle smoky note, complementing the bacon flavor.
Side Dishes
These savory rolls are incredibly versatile and pair wonderfully with a variety of accompaniments. For a complete breakfast or brunch, consider serving them alongside a fresh fruit salad or a bowl of creamy Greek yogurt with a drizzle of honey. They also make a fantastic accompaniment to soups, such as a hearty lobster bisque or a comforting tomato soup.
A simple side salad with a light vinaigrette offers a refreshing contrast to the richness of the rolls. For a more substantial lunch or light dinner, they can be paired with potato wedges or sweet potato fries. The options are plentiful, allowing you to tailor the meal to your preference and the occasion. The rolls themselves are substantial enough to be a star, but excellent sides elevate the entire dining experience.
Creative Serving Ideas
Think outside the traditional mealtime box for these delightful rolls. They can be a perfect addition to a lunch platter, offering a warm and savory element. For a more casual get-together or party, serve them as an appetizer with a selection of dips. A spicy salsa, a cool sour cream and chive dip, or even a robust hummus could work wonderfully.
Consider them as a delightful twist on garlic bread, served alongside Italian dishes or pasta bakes. Their small, individual size makes them easy to grab and enjoy, making them ideal for picnics or potlucks. For a fun, deconstructed take, you could serve them alongside a small charcuterie board, allowing guests to mix and match the flavors. The inherent simplicity means they can adapt to almost any culinary theme or gathering you envision.
Preparation & Storage
Storing Leftovers
If by some chance you have leftover cheese and bacon rolls, proper storage is key to maintaining their quality. Once they have cooled down completely to room temperature, place them in an airtight container. This prevents them from drying out or absorbing unwanted odors from the refrigerator. Stored correctly, they should remain fresh and enjoyable for up to 3 days.
Freezing
For longer-term storage, these rolls freeze remarkably well. Ensure they are fully cooled before proceeding. Place the cooled rolls into a freezer-safe bag or an airtight container, removing as much air as possible before sealing. Properly packaged, they can be stored in the freezer for up to two months, providing a convenient stash for future cravings. They retain their texture and flavor quite well after freezing.
Reheating
Reheating is straightforward and helps bring back that delightful freshly-baked quality. The best method is often in the oven; preheat your oven to around 180°C (350°F) and place the rolls on a baking sheet for about 8-10 minutes, or until they are heated through. This method helps maintain their soft texture. If you’re in a real hurry, you can reheat them in the microwave for about 20-30 seconds per roll, but be aware that this can sometimes result in a slightly chewier texture.
Frequently Asked Questions
- Can I use different types of cheese besides the suggested ones?
Absolutely! The beauty of this recipe is its adaptability. While cheddar and mozzarella are excellent choices for their melting properties and familiar taste, feel free to explore other varieties. A sharp provolone can offer a more complex, nutty flavor, while a Monterey Jack brings a creamy, mild richness. Even a bolder cheese like a smoked gouda or a slightly crumbly feta can introduce intriguing new dimensions to the rolls. Just ensure the cheese you choose melts reasonably well to achieve that desirable gooey center.
- How can I customize my 4 Ingredient Cheese and Bacon Rolls to make them even more exciting?
Customization is where the fun truly begins with these versatile rolls. For an added aromatic complexity, consider incorporating finely chopped fresh herbs such as chives, parsley, or even a bit of rosemary directly into the dough or as part of the topping. If you enjoy a touch of heat, finely diced jalapeños or a dash of cayenne pepper can be mixed into the dough or sprinkled on top. For a different savory dimension, try adding a small amount of caramelized onions or a tablespoon of Dijon mustard to the dough mixture. Even a sprinkle of garlic powder or onion powder can significantly enhance the overall flavor profile, offering endless possibilities to suit your palate.
- Are these rolls suitable for freezing, and if so, what’s the best way to do it?
Yes, these 4 ingredient cheese and bacon rolls are indeed very well-suited for freezing, making them a fantastic make-ahead option. The key to successful freezing is ensuring the rolls are completely cooled down to room temperature after baking. Once cooled, arrange them in a single layer on a baking sheet and freeze them until solid, which usually takes about an hour. This prevents them from clumping together. After they are frozen solid, transfer them into an airtight freezer bag or a freezer-safe container, removing as much air as possible. This step helps to prevent freezer burn and maintain the quality of the rolls for up to two months. When you’re ready to enjoy them, you can reheat them using the methods described previously, and they will still taste delicious.