4th of July No-Bake Strawberry Cheesecake Flag Tart Easy Recipe for Busy Weeknights

The first time I made this 4th of July No-Bake Strawberry Cheesecake Flag Tart, it was a chaotic weeknight before a long weekend. I had a million things on my to-do list, zero energy to bake, and a craving for something festive but fuss-free, and this recipe delivered exactly that.
This tart has since become my go-to dessert for busy weeknights when I want to impress without the stress. Whether you’re throwing a last-minute BBQ or just want a sweet treat that screams summer, this no-bake strawberry cheesecake flag tart hits all the right notes, offering a refreshing alternative to heavy cakes or pies.
Why You Will Love This Recipe
- Super Quick & No-Heat Required: This dessert can be prepared in under 30 minutes, making it a true lifesaver on busy days, and the absence of an oven means no kitchen heat-up during summer.
- Impressive Presentation: The classic flag design, brought to life with fresh strawberries and blueberries, consistently earns compliments and creates a stunning visual centerpiece that suggests hours of effort.
- Light but Satisfying: The no-bake cheesecake filling is wonderfully creamy and smooth without feeling overly dense, providing a perfect balance that’s ideal for warmer weather.
- Flexible Ingredients: Many of the necessary components are likely already in your pantry, and the crust can easily be adapted for gluten-free diets or even substituted with store-bought options if time is extremely limited.
- Kid-Friendly Fun: Children often enjoy assisting with the arrangement of strawberries and blueberries, transforming the dessert into an engaging and memorable holiday activity.
Ingredients You Need
When selecting ingredients for this delightful tart, quality truly matters. Opt for the freshest fruits and full-fat dairy for the creamiest texture and richest flavor, ensuring each bite is a testament to simple, good ingredients. The beauty of this recipe lies in its straightforward approach, allowing the natural goodness of each component to shine through. You’ll find that most of these are common pantry staples, making it easy to whip up this treat on short notice.
4th of July No-Bake Strawberry Cheesecake Flag Tart
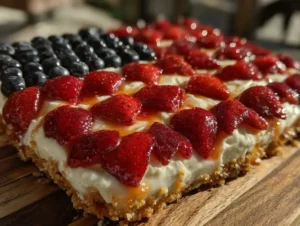
A festive and easy no-bake cheesecake tart with a graham cracker crust, creamy filling, and fresh strawberries and blueberries arranged like the American flag. Perfect for busy weeknights and summer celebrations.
- 1 ½ cups graham cracker crumbs (150g)
- 6 tablespoons unsalted butter, melted (85g)
- 2 tablespoons granulated sugar (25g)
- 16 ounces cream cheese, softened (450g)
- 1 teaspoon vanilla extract
- 1 cup heavy cream (240ml)
- About 2 cups fresh strawberries, hulled and sliced (300g)
- About 1 cup fresh blueberries (150g)
- 1Make the crust (10 minutes): In a medium bowl, combine graham cracker crumbs, granulated sugar, and melted butter. Mix until all crumbs are evenly moistened and the mixture clumps when pressed. Press the crumbs firmly and evenly into the bottom and up the sides of a 9-inch tart pan. Chill in the fridge for at least 10 minutes.
- 2Prepare the cheesecake filling (10 minutes): Beat the softened cream cheese with powdered sugar and vanilla extract until smooth and creamy. In a separate bowl, whip the heavy cream to soft peaks. Gently fold the whipped cream into the cream cheese mixture in two additions until combined.
- 3Assemble the tart (5 minutes): Spoon the filling into the chilled crust and smooth the top. Refrigerate for at least 1 hour to let the filling set.
- 4Decorate with fruit (5 minutes): Arrange sliced strawberries in horizontal rows across the tart to mimic the red stripes on the flag. Place blueberries in the upper left corner to create the blue field.
- 5Chill before serving (at least 30 minutes): Let the tart chill again after decorating so the fruit settles and everything stays firm.
Keywords: 4th of July, no-bake, cheesecake, strawberry tart, patriotic dessert, summer dessert, easy dessert, flag tart
- graham cracker crumbs: about 1 ½ cups (150g), forming the foundation of your delightful crust.
- unsalted butter: 6 tablespoons (85g), melted to bind the crumbs and add a subtle richness.
- granulated sugar: 2 tablespoons (25g), just a touch to enhance the crust’s sweetness without overpowering.
- cream cheese: 16 ounces (450g), softened to room temperature for a perfectly smooth and lump-free filling.
- powdered sugar: ¾ cup (90g), providing velvety sweetness that dissolves effortlessly into the filling.
- vanilla extract: 1 teaspoon, a classic addition that imparts warmth and depth to the cheesecake layer.
- heavy cream: 1 cup (240ml), whipped to soft peaks to lend an airy lightness to the creamy filling.
- fresh strawberries: about 2 cups (300g), hulled and sliced, representing the vibrant red stripes of the flag.
- fresh blueberries: about 1 cup (150g), the perfect size and color for the iconic blue field of the flag.
The precise quantities for each ingredient are conveniently detailed in the associated recipe card for your easy reference.
Variations
Once you’ve mastered the classic 4th of July flag tart, the possibilities for delicious adaptations are nearly endless. Consider a vibrant mixed berry medley, substituting some or all of the strawberries and blueberries with raspberries and blackberries for a stunningly colorful and equally patriotic dessert. The natural tartness of these berries complements the sweet cream cheese filling beautifully.
For those who enjoy a brighter flavor profile, incorporating the zest of a fresh lemon into the cream cheese mixture before whipping the cream adds a wonderfully zesty counterpoint. This citrus twist cuts through the richness, making the tart feel even lighter and more refreshing, especially on a warm summer day.
If you’re looking for textural interest, adding finely chopped toasted nuts like pecans or almonds to the graham cracker crust provides an delightful crunch. Alternatively, for a completely different flavor experience, you could even experiment with a chocolate cookie crust. Each variation offers a unique take on the beloved no-bake cheesecake concept.
You might also find inspiration in similar berry tart recipes that offer creative ways to use seasonal fruits. These recipes often share a similar philosophy of simple preparation and stunning visual appeal, making them perfect additions to your dessert repertoire.
For those seeking a healthier or more dietary-conscious option, adapting the crust to be gluten-free using crushed gluten-free graham crackers or a nut-based crust is a straightforward swap. This ensures everyone can enjoy a slice of this delightful patriotic treat, regardless of dietary needs.
How to Prepare no-bake strawberry cheesecake flag tart
Step 1: Crafting the Perfect Crust
Begin by gathering your crust ingredients: graham cracker crumbs, melted unsalted butter, and granulated sugar. In a medium-sized mixing bowl, combine these elements thoroughly until all the crumbs are evenly moistened and the mixture holds together when squeezed. This texture is crucial for a crust that won’t crumble apart when slicing.
Once the crumb mixture is ready, firmly and evenly press it into the bottom and up the sides of a 9-inch tart pan with a removable bottom. Utilizing the flat bottom of a glass or a measuring cup can help achieve a tightly packed, uniform layer. This firm pressing is essential for structural integrity.
After the crust has been formed, place the tart pan in the refrigerator to chill for at least 10 minutes. This crucial step allows the butter to solidify, helping the crust set and become more robust while you prepare the delectable cheesecake filling. A well-chilled crust is the first key to a perfect no-bake tart.
Step 2: Whipping Up the Creamy Filling
In a large mixing bowl, combine the softened cream cheese, powdered sugar, and vanilla extract. Using an electric mixer, beat these ingredients together until the mixture is completely smooth, creamy, and free of any lumps. This usually takes about 2 to 3 minutes, ensuring a luxuriously consistent filling.
In a separate, clean bowl, whip the heavy cream using your electric mixer until soft peaks form. Be careful not to over-whip; the cream should hold its shape but remain soft and billowy. Over-whipped cream can make the filling grainy, so aim for that perfect, light consistency.
Gently fold the whipped cream into the cream cheese mixture in two additions. Use a spatula and a careful, folding motion to incorporate the cream without deflating it. This technique preserves the airiness, ensuring a light and fluffy cheesecake filling that is wonderfully decadent yet not too heavy.
Step 3: Assembling the Tart Base
Retrieve the chilled crust from the refrigerator. Spoon the smooth, creamy cheesecake filling into the prepared graham cracker crust. Distribute the filling evenly, ensuring it reaches all the edges of the crust.
Use an offset spatula or the back of a spoon to gently smooth the top of the filling. Aim for a level surface, as this will provide a clean canvas for your patriotic fruit decoration. This step ensures a polished final appearance for your tart.
Once the filling is smoothed, place the tart back into the refrigerator. Allow it to chill for at least 1 hour to set properly. This chilling time is critical for the filling to firm up, making it easier to slice and serve without the filling oozing out.
Step 4: Decorating with Festive Flair
With the cheesecake filling nicely set, it’s time for the fun part: decorating! Arrange the sliced fresh strawberries across the top of the tart in neat, horizontal rows. These will form the iconic red stripes of the American flag, creating a vibrant visual impact.
Next, carefully place the fresh blueberries in the upper left corner of the tart. Create a distinct block of blue, symbolizing the stars on the flag. This contrast between the red strawberries and blue blueberries is what gives the tart its signature patriotic look.
Take your time to ensure the fruit is arranged pleasingly. A clean, organized pattern enhances the flag design, making the tart a true showstopper. Don’t be afraid to adjust the placement of the fruit until you are happy with the overall presentation of your edible flag.
Step 5: The Final Chill and Presentation
After the beautiful fruit decoration is complete, return the tart to the refrigerator for another chilling period. This final chill, of at least 30 minutes, allows the fruit to meld with the filling and ensures the entire tart is firm and sliceable. It also helps the colors remain vibrant.
This extended chilling ensures that when you cut into the tart, each slice will hold its shape perfectly, showcasing the layers of crust, creamy filling, and fresh fruit. Patience during this stage truly pays off in the final presentation and eating experience. You’ve created a stunning dessert ready to impress.
The total active preparation time for this tart is approximately 30 minutes, but the chilling time is essential for optimal results. This makes it an ideal dessert for any occasion, especially when you need something festive and delicious without the stress of baking.
Pro Tips for no-bake strawberry cheesecake flag tart
Don’t skip chilling the crust: Pressing it firmly and allowing it to chill in the refrigerator for at least 10 minutes is non-negotiable. This step ensures the crust firms up considerably, preventing it from crumbling when you slice the finished tart.
Room temperature cream cheese is your friend: If your cream cheese is too cold, you’ll struggle to achieve a smooth, lump-free filling. Allow it to sit on the counter for at least 30 minutes to reach room temperature; this makes it incredibly easy to beat into a velvety consistency.
Whip the cream to soft peaks, not stiff: For the lightest, airiest filling, whip your heavy cream to soft, billowy peaks. Over-whipped cream can lead to a grainy texture, whereas soft peaks fold in beautifully and maintain the filling’s creamy, delicate nature.
Pat your berries dry: Excess moisture from washed berries can seep into the crust, making it soggy. Gently pat your strawberries and blueberries dry with paper towels after rinsing them to maintain the crust’s delightful crispness.
Use a tart pan with a removable bottom: This specialized pan is a game-changer for easy tart removal. If you don’t have one, lining a regular pie plate with parchment paper that extends over the sides can help, but requires extra care when unmolding.
If not enough time to chill: For a quicker set, you can place the assembled tart in the freezer for about 20-30 minutes. Just be sure not to let it freeze solid; you want it firm, not icy.
Serving Suggestions for no-bake strawberry cheesecake flag tart
Decoration
The hallmark of this tart is its patriotic flag design, achieved with fresh, vibrant fruits. Arrange sliced strawberries in neat, horizontal rows across the surface to represent the stripes. In the upper left corner, create a solid block of fresh blueberries to symbolize the starry field. For an extra touch, a thin border of whipped cream around the edge can frame the design beautifully, adding a touch of elegance.
Side Dishes
While this tart is a complete dessert on its own, it pairs wonderfully with a light scoop of vanilla bean ice cream or a dollop of extra whipped cream. For a refreshing contrast, a small bowl of mixed berries or a simple fruit salad can complement the sweetness of the tart. A glass of chilled lemonade or sparkling cider also makes for a perfect accompaniment, enhancing the summery feel.
Creative Serving Ideas
Consider serving individual slices on small dessert plates adorned with a mint sprig or a dusting of powdered sugar. For a more casual gathering, you could present the entire tart on a decorative platter, allowing guests to serve themselves. If you’re feeling particularly festive, small American flags can be inserted into the tart as charming edible decorations.
This tart is also a fantastic candidate for a dessert bar at summer parties or picnics. Its easy-to-handle format and crowd-pleasing flavors make it a versatile addition to any celebratory spread. You could even serve it alongside other patriotic-themed treats for a truly memorable spread.
For a unique presentation, consider cutting the tart into smaller squares or strips, resembling mini cheesecake bars. This approach is excellent for larger crowds or when you want to offer a variety of smaller treats. It also makes for easy grab-and-go options for outdoor events.
Preparation & Storage
Storing Leftovers
To keep your delicious no-bake strawberry cheesecake flag tart fresh, store any leftovers loosely covered with plastic wrap or in an airtight container in the refrigerator. It’s important not to seal it too tightly if using plastic wrap, as condensation can form. The tart is best enjoyed within 3 days of preparation to maintain the optimal texture of the crust and filling.
Ensure that the fruit topping is still relatively intact when storing. If any sections have become slightly dislodged, you can gently reposition them before covering. The chilled environment helps to keep the cream cheese filling firm and the graham cracker crust from becoming too soft.
Individual slices can also be wrapped separately in plastic wrap or placed in small, individual containers. This is a great option for easy grab-and-go portions for lunches or snacks throughout the following days. Proper storage is key to enjoying this festive dessert over several days.
Freezing
This no-bake tart freezes remarkably well, making it an excellent candidate for make-ahead preparation. If you wish to freeze it, wrap the entire tart tightly in plastic wrap, followed by a layer of aluminum foil, to prevent freezer burn. It can be stored in the freezer for up to one month.
For the best results, it is recommended to freeze the tart *before* decorating it with the fresh fruit topping. Once you are ready to serve it, thaw the tart overnight in the refrigerator. Then, you can add the fresh strawberries and blueberries just before serving to ensure their vibrant appearance and crisp texture.
If freezing individual slices, wrap each slice tightly as described above. These will thaw more quickly in the refrigerator than the whole tart, usually within a few hours. This method is convenient for portion control and ensures you always have a festive treat on hand.
Reheating
Reheating is generally not necessary for this no-bake tart, as it is designed to be served chilled. In fact, attempting to reheat it would likely result in the melting of the filling and a loss of its intended texture. The beauty of this dessert lies in its cool, creamy, and refreshing nature.
However, if you’ve stored leftovers in the refrigerator and they feel a little too firm, you can allow them to sit at room temperature for about 10-15 minutes before serving. This brief resting period can soften the filling slightly, making it more pliable and enjoyable to eat. Avoid any prolonged periods at room temperature, as this can compromise the tart’s structure.
For those instances where the tart has been frozen and then thawed, it should be served directly from the refrigerator. The thawing process in the fridge naturally brings it back to the ideal serving temperature. Enjoying it chilled is paramount to experiencing its delightful creamy consistency and refreshing fruit topping.
Frequently Asked Questions
-
Can I make this tart ahead of time?
Absolutely! You can prepare the graham cracker crust and the creamy cheesecake filling up to two days in advance. Store both components separately, covered tightly, in the refrigerator. It is highly recommended to add the fresh strawberry and blueberry topping just before serving. This ensures the fruit remains vibrant and prevents the crust from becoming soggy due to moisture from the berries.
-
What if I don’t have a tart pan with a removable bottom?
Don’t worry if you lack a specialized tart pan. A standard 9-inch springform pan is an excellent substitute and will allow for easy removal of the tart. Alternatively, a regular 9-inch pie plate can also be used. For easier unmolding with a pie plate, line it generously with parchment paper, leaving enough overhang to lift the tart out cleanly after it has set.
-
Can I use frozen berries for the topping instead of fresh?
It is strongly advised against using frozen berries for the flag topping of this particular tart. Frozen berries tend to release a significant amount of moisture as they thaw, which can easily make the graham cracker crust soggy and compromise its texture. Fresh berries are crucial for maintaining the crispness of the crust and the vibrant appearance of the patriotic design. If fresh berries are unavailable, it’s better to postpone making the tart until you can get them.