The Best Baby Back Ribs Recipe

There is nothing quite as satisfying as biting into a rack of perfectly cooked, tender, and succulent baby back ribs. This signature dish brings a touch of classic American barbecue straight into your kitchen, providing a comforting meal that family members of all ages will genuinely adore. Whether you are hosting a summer backyard celebration or planning a cozy indoor dinner, these ribs are guaranteed to become a staple in your culinary repertoire.
Crafting the perfect rib dish at home can seem intimidating, but our foolproof approach ensures consistent, mouthwatering results every single time. By focusing on the essential techniques of slow cooking and balanced seasoning, you can achieve that sought-after restaurant quality with minimal stress. Prepare to impress your guests with this simple yet deeply flavorful dinner masterpiece.
Why You Will Love This Recipe
- Quick Preparation: Even though the cooking time is lengthy, the actual hands-on work takes just a few minutes of your time.
- Flavorful Rub: The custom blend of aromatic spices creates a complex crust that balances perfectly with the sweetness of your favorite sauce.
- Versatile Cooking Methods: You can effortlessly adapt this process to suit your oven, an outdoor grill, or even a slow cooker depending on your preference.
- Perfect for Gatherings: Since this recipe yields a generous amount, it is an excellent choice for feeding large crowds at parties or holiday events.
- Superior Tenderness: The slow-roasting technique ensures that the meat practically falls off the bone with every single bite.
Ingredients You Need
Achieving the best flavor starts with high-quality ingredients, specifically when it comes to selecting fresh racks of ribs. A thoughtful combination of dried herbs and spices serves as the foundation for the deep, smoky profile we want to achieve. Please note that the exact quantities for these components are conveniently listed in the recipe card below.
The Best Baby Back Ribs Recipe
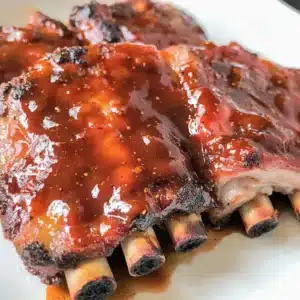
Indulge in the ultimate comfort food with The Best Baby Back Ribs Recipe, a delightful dish that brings tender, flavorful beef ribs to your table. Perfect for gatherings and family dinners, these ribs are seasoned with a rich blend of spices and coated in a mouthwatering barbecue sauce, ensuring every bite is fall-off-the-bone delicious.
- 2 (2 to 3 pound) racks of beef baby back ribs
- 1 cup favorite dry rub
- 1 cup favorite barbecue sauce
- 3 tablespoons oregano
- 3 tablespoons cumin
- 3 tablespoons smoked paprika
- 3 tablespoons parsley
- 3 teaspoons ground thyme
- 3 teaspoons onion powder
- 6 teaspoons garlic salt
- 3 teaspoons ground mustard
- 1Preheat your oven to 300°F (150°C). Remove the silver skin from the back of the ribs.
- 2In a mixing bowl, combine all dry rub ingredients. Generously coat both sides of each rib rack with the rub.
- 3Place racks on a baking sheet lined with aluminum foil and cover tightly with another layer of foil.
- 4Bake for about three hours until tender. If using a grill or slow cooker, adjust cooking times accordingly.
- 5Remove from the oven and brush barbecue sauce over each rack. Return to the oven uncovered for an additional 20 minutes.
- 6Let rest for a few minutes before slicing into portions and serve hot with extra barbecue sauce.
Keywords: baby back ribs, barbecue, ribs recipe, BBQ ribs, oven baked ribs
- beef baby back ribs: two racks weighing about 2 to 3 pounds each for optimal serving sizes.
- dry rub: one cup of your favorite blend or a custom mix of seasonings.
- barbecue sauce: one cup of your preferred brand, whether you like it sweet, tangy, or smoky.
- oregano: three tablespoons of dried leaves to provide an earthy base note.
- cumin: three tablespoons to add a warm, nutty depth to the spice profile.
- smoked paprika: three tablespoons for that signature barbecue color and mild smokiness.
- parsley: three tablespoons of dried flakes for a subtle, fresh herbal finish.
- ground thyme: three teaspoons to bring a classic aromatic quality to the meat.
- onion powder: three teaspoons for savory intensity throughout the rub.
- garlic salt: six teaspoons to balance the saltiness and punchy garlic flavor.
- ground mustard: three teaspoons to add a necessary tang that cuts through the fat.
- pepper: one-half teaspoon to provide a mild, spicy warmth to the overall flavor.
Variations
Vegan Adaptation: If you are cooking for plant-based guests, swap the pork or beef ribs for large chunks of king oyster mushrooms or firm jackfruit steaks. Use a liquid smoke and molasses-based rub to mimic the classic barbecue profile while maintaining a delicious, hearty texture that absorbs the spices beautifully.
Low Carb Option: To keep this meal keto-friendly, ensure your dry rub is free of added sugars or brown sugar fillers. Replace standard barbecue sauce with a sugar-free, tomato-based alternative that uses stevia or erythritol to keep the net carb count minimal while preserving the sticky, caramelized finish.
Spicy Kick: If you love heat, simply add two tablespoons of cayenne pepper or crushed red chili flakes to the dry rub mixture. You can also mix a small amount of habanero-infused hot sauce into your finishing barbecue glaze for an extra level of intensity that pairs perfectly with cooling lunch sides.
How to Prepare best baby back ribs recipe
Step 1: Prepare Your Ribs
The Foundation: Begin by preheating your oven to 300°F (150°C) to ensure a steady, low-temperature environment. Proper preparation of the meat is critical for both texture and flavor penetration during the long roasting process.
Removing the Membrane: Locate the thin, silvery membrane on the bone side of the ribs, often referred to as the silver skin. Carefully slide a butter knife under the membrane to loosen it, then use a paper towel to grip and pull it away firmly in one smooth motion.
Step 2: Apply Dry Rub
Mixing Spices: In a medium mixing bowl, whisk together your oregano, cumin, smoked paprika, parsley, thyme, onion powder, garlic salt, mustard, and pepper. Ensure the spices are thoroughly combined to avoid any clumps of concentrated seasoning on the meat.
Coating Evenly: Lay your rib racks on a clean surface and massage the rub generously over both sides of the meat. Be sure to press the spices firmly into the flesh so they adhere well during the long cooking time.
Step 3: Wrap Ribs
Sealing Moisture: Line a large baking sheet with heavy-duty aluminum foil to facilitate easier cleanup later. Place your seasoned rib racks on the foil and cover them tightly with another layer of foil, creating a sealed pocket that traps steam.
Checking the Seal: It is vital that the foil is crimped firmly around the edges of the ribs to prevent steam from escaping. This enclosed environment is the secret to achieving that buttery, fall-off-the-bone tenderness we all crave.
Step 4: Bake Low and Slow
The Patience Factor: Place the foil-wrapped ribs into your preheated oven and bake for approximately three hours. This slow-roasting duration allows the connective tissues in the ribs to break down completely without drying out the meat.
Alternative Methods: If you choose to use a slow cooker, follow the same prep steps but set the device to low for six to eight hours. For those using an outdoor grill, maintain a consistent temperature of 300°F using indirect heat to achieve similar results.
Step 5: Glaze with BBQ Sauce
Finishing Touch: Carefully remove the ribs from the oven and peel back the foil to reveal the tender, cooked meat. Brush a generous, even layer of your favorite barbecue sauce over the top of each rack.
Caramelizing: Return the ribs to the oven, leaving them uncovered this time, and bake for an additional 20 minutes. This final step caramelizes the sugars in the sauce, creating a sticky, glossy glaze that looks and tastes professional.
Step 6: Serve
Resting Phase: Once removed from the oven, let the ribs rest on a cutting board for at least 10 minutes. This resting time is crucial as it allows the juices to redistribute throughout the meat, ensuring every bite remains moist.
Portioning: Use a sharp chef’s knife to slice between the individual bones for easy serving. Offer extra sauce on the side for guests who prefer their ribs extra saucy, similar to the experience found in our breakfast-for-dinner gatherings.
Pro Tips for best baby back ribs recipe
Temperature Control: Always monitor your oven or grill temperature using a reliable thermometer rather than trusting the dial. Consistent low heat is the single most important factor in tenderizing tough cuts of meat.
Flavor Depth: For an even deeper flavor profile, try applying the dry rub to the ribs the night before and letting them sit in the refrigerator. This dry-brining technique allows the salt and spices to penetrate deeper into the fibers.
Don’t Rush the Rest: As mentioned in our steps, resting the meat is non-negotiable for success. If you cut into the ribs while they are piping hot, you will lose the valuable moisture that makes them tender.
Quality Sauce: If you have time, consider whisking a little apple cider vinegar or honey into your commercial barbecue sauce. This small addition brightens the profile and creates a more gourmet, balanced finish for your meal.
Pinterest Inspiration: For more visual guides and serving ideas, you can always visit our Pinterest page for curated collections of barbecue accompaniments.
Serving Suggestions for best baby back ribs recipe
Decoration
Garnish your serving platter with freshly chopped green onions or a sprinkle of toasted sesame seeds to add a pop of color. Serving the ribs on a bed of fresh watercress can also add an elegant touch that looks wonderful for photo opportunities.
Side Dishes
Classic coleslaw is the ultimate companion to smoky ribs because its acidity cuts right through the richness of the meat. Consider serving them alongside a hearty potato salad or some warm, buttery cornbread to round out the comfort food experience.
Creative Serving Ideas
Transform your ribs into a slider dish by pulling the meat off the bone and serving it on brioche buns with pickles. You might also want to try pairing your meal with something lighter, like a crisp garden salad, to create a well-balanced plate for your guests.
Preparation & Storage
Storing Leftovers
Place any remaining ribs in an airtight container or wrap them tightly in multiple layers of aluminum foil. Properly stored, these ribs will remain fresh and safe to eat in your refrigerator for up to four days.
Freezing
To freeze, wrap each rack securely in plastic wrap followed by a layer of foil to prevent freezer burn. They can be stored in the freezer for up to three months, making them perfect for pre-planned weekend meals.
Reheating
The best way to reheat ribs is in a 250°F oven, wrapped in foil with a tiny splash of water or broth to keep them moist. Avoid the microwave if possible, as it tends to make the meat rubbery rather than tender.
Frequently Asked Questions
- How do I know when my baby back ribs are done? You will know the ribs are ready when the meat has visibly shrunk away from the tips of the bones. When you gently twist a bone, it should feel loose and ready to pull away from the tender meat effortlessly.
- Can I customize this recipe with different spice levels? Absolutely, as this recipe is designed to be a flexible foundation for your own preferences. Feel free to increase the smoked paprika for more intensity or incorporate a pinch of cayenne if you want a spicy, lingering heat.
- What is the best way to keep the ribs from drying out during the baking process? The secret is keeping the ribs wrapped tightly in aluminum foil during the initial three-hour cooking phase. By sealing the packet, you trap all the natural juices and fats inside, effectively braising the ribs in their own flavor.