Bacon Ranch Pasta Salad

There is something truly comforting about a bowl of homemade creamy ranch pasta salad that brings back memories of sunny afternoons and festive backyard gatherings. This simple yet flavor-packed dish has become a staple in my kitchen because it perfectly balances savory, tangy, and hearty elements in every single bite.
Whether you are planning a busy weeknight meal or preparing to impress guests at an upcoming potluck, this recipe offers the ultimate convenience without sacrificing any quality. You will find that the creamy texture of the ranch-based sauce coats the pasta beautifully, creating a satisfying experience that appeals to both children and adults alike.
Why You Will Love This Recipe
- Quick Preparation: You can have this entire dish ready in under thirty minutes, making it an ideal choice for hectic schedules.
- Versatile Ingredients: This salad acts as a perfect canvas, allowing you to easily swap in different proteins or colorful vegetables based on what you have in your pantry.
- Crowd-Pleasing Flavors: The combination of zesty ranch dressing and mild, savory cheddar cheese creates a universally loved profile that disappears from the serving bowl quickly.
- Make-Ahead Friendly: Because the flavors actually develop and deepen while sitting in the refrigerator, this is one of the few lunch favorites that tastes even better the next day.
Ingredients You Need
To ensure the best possible outcome for your pasta salad, always focus on sourcing high-quality ingredients, such as fresh poultry and full-fat dairy, as they serve as the foundation for the final flavor. While the convenience of using pantry staples is a major benefit of this dish, the freshness of your mix-ins can make a significant difference in the overall texture. Please refer to the official dinner collection for specific quantity guidelines to ensure perfect results.
Creamy Ranch Pasta Salad
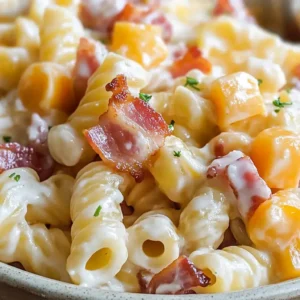
This easy Creamy Ranch Pasta Salad combines creamy ranch dressing with delicious pasta and chicken. Perfect for potlucks, barbecues, or as a simple weeknight side dish.
- 1 pound short cut pasta
- 1 ounce ranch dressing packet
- 1 cup mayonnaise
- 3/4 cup whole milk
- 1 pound chicken (or preferred meat substitute)
- 2 cups cubed cheddar cheese
- 1Cook the short cut pasta according to package directions in a large pot of boiling water until al dente. Drain and rinse under cold water.
- 2In a skillet over medium heat, cook diced chicken (or meat substitute) until fully cooked through. Drain on paper towels.
- 3In a mixing bowl, whisk together ranch dressing mix, mayonnaise, and whole milk until smooth.
- 4Combine the cooled pasta, cooked chicken, and cubed cheddar cheese in the bowl with the dressing mixture. Stir well to coat evenly.
- 5Chill in the refrigerator for at least one hour before serving.
Keywords: pasta salad, ranch, side dish, creamy, quick, easy, potluck
- short cut pasta: use varieties like rotini or penne which are designed to hold onto creamy sauces effectively.
- ranch dressing packet: this concentrated mix provides that signature zesty herb flavor that defines the entire salad.
- mayonnaise: choose a high-quality base to provide the necessary richness and silky mouthfeel for the dressing.
- whole milk: this is used to thin the dressing slightly, ensuring it coats the pasta evenly without becoming overly heavy or thick.
- chicken: diced and cooked until golden, this protein turns the salad into a much more substantial and filling main course.
- cubed cheddar cheese: sharp or mild cheese adds a delightful chew and a pop of savory flavor that complements the ranch perfectly.
Variations
The Vegan Twist: For those following a plant-based diet, you can easily substitute the chicken for roasted chickpeas and use high-quality vegan mayonnaise and dairy-free milk alternatives. Ensure your ranch seasoning packet is also labeled as vegan-friendly to keep the entire dish strictly plant-based.
The Low Carb Modification: If you are looking to reduce your carbohydrate intake, try swapping the traditional pasta for a base of roasted cauliflower florets or zucchini noodles. This creates a lighter version of the dish that still packs all the punchy, creamy flavors of the original ranch recipe.
The Gourmet Vegetable Addition: Elevate the nutritional profile by folding in finely diced bell peppers, crisp cucumbers, or even blanched broccoli florets for an extra layer of crunch. These additions not only provide vibrant color but also bring a freshness that cuts through the richness of the creamy dressing.
How to Prepare Creamy Ranch Pasta Salad
Step 1: Cook the Pasta
Start by filling a large stockpot with water and bringing it to a rolling boil over high heat. Once boiling, add a generous pinch of salt to the water to season the pasta from the inside out.
Add your chosen short cut pasta to the water, giving it a quick stir to prevent any sticking to the bottom of the pot. Cook the pasta according to the package instructions, aiming for that perfect al dente texture that offers a slight bite.
Once finished, drain the pasta immediately using a colander. Rinse the noodles under cold running water to stop the cooking process and cool them down quickly for the salad.
Step 2: Prepare the Chicken
While the pasta is cooling, heat a large non-stick skillet over medium heat with a light drizzle of oil. Dice your chicken breast into small, bite-sized cubes to ensure they distribute evenly throughout the salad later.
Place the chicken into the hot skillet, seasoning lightly with salt and pepper if desired. Cook the pieces thoroughly until they are golden brown on the outside and opaque all the way through.
Once fully cooked, remove the chicken from the skillet and let it rest briefly on paper towels to absorb any excess moisture or fat. This step ensures that your salad remains crisp and does not become greasy after combining all the components.
Step 3: Mix the Dressing
In a large mixing bowl that can comfortably hold all your ingredients, combine the ranch dressing mix with the mayonnaise. Using a whisk, blend these two until they are completely smooth and free of any large clumps.
Slowly pour in the whole milk while continuing to whisk the mixture consistently. You are looking for a consistency that is pourable yet thick enough to cling to the ridges of the pasta.
Taste the dressing at this stage to ensure the ranch flavor is balanced correctly. If you prefer a more intense flavor, you can add a pinch of additional dried dill or black pepper to suit your palate.
Step 4: Combine Ingredients
Take your cooled and rinsed pasta and add it directly into the mixing bowl containing your prepared dressing. Gently fold the pasta using a large spatula or wooden spoon until every piece is thoroughly coated.
Add the cooked chicken and the cubed cheddar cheese into the bowl. Be careful not to mash the cheese cubes as you stir, as you want them to remain distinct in the final dish.
Ensure that all the ingredients are distributed evenly throughout the bowl. If the salad looks a little too dry, you can add a splash more milk or a dollop of mayonnaise to regain the desired creamy texture.
Step 5: Chill and Serve
Cover the mixing bowl tightly with plastic wrap or transfer the salad to an airtight container. Place it in the refrigerator for at least one full hour to allow the flavors to marry.
The chilling time is essential because it allows the pasta to absorb some of the ranch dressing, making every bite incredibly flavorful. It also brings all the components to the same refreshing temperature.
Before you serve, give the salad one final, thorough toss. If the pasta has soaked up too much of the dressing while sitting, you can freshen it up with a tiny bit more ranch seasoning or a splash of water.
Pro Tips for Creamy Ranch Pasta Salad
The Importance of Rinsing: Never skip the cold water rinse for your pasta, as residual starch can cause the noodles to stick together in a gummy clump. Rinsing also brings the temperature down instantly, preventing the mayonnaise-based dressing from breaking or becoming oily.
Perfecting the Texture: If you find your salad feels a bit heavy, consider adding a tablespoon of apple cider vinegar or lemon juice to the dressing. This slight acidity brightens the entire dish and balances the richness of the dairy products perfectly.
The Resting Rule: While it is tempting to eat immediately, the magic truly happens during the resting phase. If you have the time, letting the salad sit for two or even three hours allows the herbs in the ranch mix to hydrate, resulting in a much more aromatic and bold flavor profile.
Mixing Strategy: Use a gentle hand when folding in the cheese and chicken to maintain the integrity of the pasta shape. A silicon spatula is your best friend here, as it allows you to scrape the bottom of the bowl effectively without damaging the ingredients.
Serving Suggestions for Creamy Ranch Pasta Salad
Decoration
Before serving, garnish your salad with a handful of freshly chopped chives or parsley to provide a vibrant pop of green color. A light sprinkle of extra black pepper or even some crispy bacon bits can add a final layer of sophistication to the presentation of the bowl.
Side Dishes
This dish works beautifully alongside a baked lemon chicken or a simple grilled vegetable platter. The creamy nature of the salad pairs well with acidic or charred foods, creating a balanced culinary experience for any breakfast-turned-brunch or casual lunch setting.
Creative Serving Ideas
For a fun party presentation, try serving the pasta salad in individual mason jars with a small wooden fork attached to the side. This makes the dish easy to transport for picnics and allows guests to grab their own portions without the need for serving spoons.
Preparation & Storage
Storing Leftovers
Place any remaining pasta salad into an airtight container and keep it in the coldest part of your refrigerator. It will stay delicious and safe to eat for up to three days, though the pasta may absorb more dressing over time.
Freezing
It is generally not recommended to freeze this pasta salad because the mayonnaise and dairy components tend to separate and become grainy upon thawing. Additionally, the texture of cooked pasta often degrades and becomes mushy once it has been frozen and defrosted.
Reheating
This dish is specifically designed to be enjoyed cold or at room temperature, so reheating is typically unnecessary. If you prefer to remove the chill, simply take it out of the refrigerator twenty minutes before you plan to serve it so the flavors can wake up.
Frequently Asked Questions
- Can I use different types of pasta for this salad? Yes, you can use any short-cut pasta such as bowtie, rotini, or orecchiette, as long as it has enough surface area to hold the dressing. For more inspiration on building versatile meals, check out these creative culinary ideas online.
- Is it possible to make the dressing ahead of time? You can definitely prepare the dressing mixture in a separate jar up to two days in advance. Just remember to keep it refrigerated and give it a good shake or stir before tossing it with your freshly cooked pasta and other ingredients.
- Why does my pasta salad become dry after sitting in the fridge? Pasta acts like a sponge and will naturally absorb liquids as it cools down, which is why the salad might look less creamy the next day. To remedy this, simply stir in a tablespoon of milk or a tiny bit more mayonnaise just before serving to restore that luscious, creamy consistency.