Irresistible Baked Italian Grinder Sandwiches for Family Fun

There’s something truly heartwarming about the smell of baked Italian Grinder Sandwiches wafting through the kitchen, beckoning everyone to gather around the table for a hearty meal. It all starts with the simple, tactile thrill of slicing open fresh, golden Italian sub rolls to reveal a treasure trove of savory deli meats and irresistibly gooey cheeses waiting to be toasted.
I first discovered this delightful recipe during a spirited weekend cook-off with friends, where we were all determined to impress each other with our culinary skills. These sandwiches became the undisputed star of the evening, blending the nostalgia of a classic sub shop with the comforting warmth of a home-cooked dinner. Whether you are browsing for a quick lunch or a robust dinner, this dish is guaranteed to satisfy even the most demanding appetites.
Why You Will Love This Recipe
- Satisfying Crunch: Every bite features a delightful crispy exterior that provides the perfect textural contrast to the gooey, melted cheese hidden inside.
- Highly Customizable: You can easily tailor the ingredients to suit your family’s specific tastes, whether that means swapping in turkey or adding extra roasted vegetables.
- Crowd-Pleasing Appeal: These sandwiches are the ultimate solution for gatherings, game days, or casual family meals because everyone naturally loves a warm, toasted sub.
- Flavor Explosion: Thoughtful layers of savory Italian meats and aromatic spices ensure a complex, high-quality burst of flavor with every single mouthful.
- Efficient Preparation: With simple assembly and a quick bake time, you will have a delicious, restaurant-style meal ready to serve in less than 30 minutes.
Ingredients You Need
To ensure the best result, always prioritize high-quality deli meats and fresh, crusty bread that can withstand the heat of the oven without becoming too soft. Using fresh herbs instead of dried ones can also add a vibrant, aromatic lift to the overall flavor profile of your sandwiches. You can find the specific measurements for every item listed below in the recipe card structure at the end of this guide.
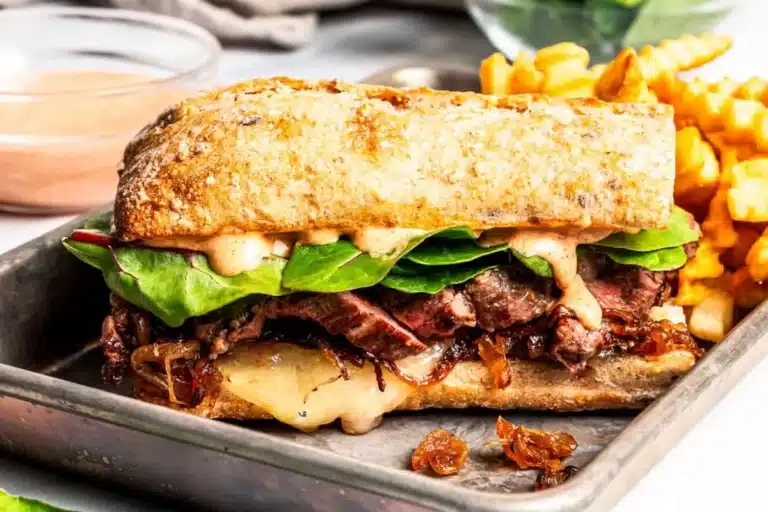
Baked Italian Grinder Sandwiches

These Baked Italian Grinder Sandwiches are a versatile, heartwarming comfort food. Featuring layers of savory deli meats, gooey melted cheeses, and a flavorful garlic-butter crust, they are the perfect crowd-pleasing meal for game days or family dinners.
- 4 Italian sub rolls (or hoagie rolls/baguettes)
- 4 tablespoons unsalted butter, melted
- 1 teaspoon garlic powder
- 1 teaspoon onion powder
- 1 teaspoon dried oregano
- 1 teaspoon dried basil
- 1 teaspoon red pepper flakes (optional)
- 1 teaspoon salt
- 1/2 teaspoon black pepper
- 6 ounces deli-sliced salami
- 6 ounces deli-sliced ham
- 6 ounces deli-sliced pepperoni
- 6 ounces deli-sliced mozzarella cheese
- 6 ounces deli-sliced provolone cheese
- 2 tablespoons grated Parmesan cheese
- 1 cup roasted red peppers, sliced
- 1/2 cup sliced black olives
- 1/2 cup banana peppers, sliced
- 1/4 cup fresh basil leaves
- 1Preheat your oven to 375°F (190°C).
- 2Slice the sub rolls in half lengthwise, keeping them hinged, and arrange on a baking sheet.
- 3In a small saucepan, melt the butter and whisk in garlic powder, onion powder, oregano, basil, red pepper flakes, salt, and pepper.
- 4Brush the butter mixture generously over the cut sides of the rolls.
- 5Layer the salami, ham, pepperoni, mozzarella, provolone, and a sprinkle of Parmesan on the rolls.
- 6Add roasted red peppers, black olives, banana peppers, and fresh basil leaves on top.
- 7Bake for 10–12 minutes until the cheese is melted and the bread is golden brown.
- 8Cool slightly before slicing and serving.
Keywords: Italian, Grinder, Sandwich, Baked, Comfort Food, Dinner
- italian sub rolls: provide a soft interior and crispy exterior when baked to perfection.
- unsalted butter: adds essential richness and helps achieve that signature golden, crunchy crust.
- garlic powder: infuses the bread with a deep, savory foundation that ties the sandwich together.
- onion powder: enhances the savory depth and pairs beautifully with the saltiness of the cured meats.
- dried oregano: introduces a classic Italian aroma while balancing the richness with its unique earthy note.
- dried basil: offers a slightly sweet, peppery flavor that complements the melted cheeses wonderfully.
- red pepper flakes: provides an optional touch of heat, which you can adjust based on your spice preference.
- salt and black pepper: crucial for enhancing the natural flavors of the meats and vegetables throughout the layers.
- deli-sliced salami: brings a rich, slightly spicy taste that is the heart of any authentic grinder.
- deli-sliced ham: adds a necessary touch of sweetness and subtle smokiness to create a balanced bite.
- deli-sliced pepperoni: offers a bold, tangy kick that is synonymous with traditional Italian-inspired cuisine.
- mozzarella and provolone cheese: create a luxurious, creamy, and sharp flavor profile that melts beautifully under the heat.
- grated parmesan cheese: adds a salty, savory crust to the top of the bread once it turns golden brown.
- roasted red peppers, olives, and banana peppers: provide a sweet, briny, and tangy contrast to the heavy meat and cheese layers.
Variations
Healthier Option: If you are looking to lighten things up, try using whole grain rolls to increase your daily fiber intake without sacrificing the structural integrity of the sandwich. You can also swap traditional meats for thinly sliced roasted turkey or grilled chicken breast for a leaner protein source.
Vegetarian Delight: Transform this recipe into a meatless feast by replacing all deli meats with a colorful array of roasted vegetables like zucchini, eggplant, and bell peppers. Top them with a generous amount of fresh mozzarella and a drizzle of balsamic glaze to maintain that dinner-worthy satisfaction.
Spicy Kick: For those who love bold heat, add pickled jalapeños or spicy giardiniera directly into the layers. You can also brush the bread with a bit of chili-infused oil before adding your favorite cheeses for a consistent, tongue-tingling experience.
How to Prepare Baked Italian Grinder Sandwiches
Step 1: Proper Oven Preparation
Preheat your oven: Set your oven to exactly 375°F (190°C) before you begin the assembly process. This ensures that the heat is consistent and ready to toast the bread the moment the sandwiches are placed inside.
Optimize heat distribution: Using the middle rack of your oven is generally the best approach for these sandwiches. This allows the heat to circulate effectively around the bread, ensuring that the top crust turns golden while the interior stays warm and gooey.
Step 2: Preparing the Rolls
The perfect slice: Use a high-quality serrated knife to cut your Italian sub rolls in half lengthwise, but be sure to leave a small “hinge” at the back. This clever trick keeps the contents securely inside the sandwich, preventing the meats from sliding out during the baking process.
Arrangement is key: Place your sliced rolls cut-side up on a large baking sheet. Spacing them out slightly will allow the hot air to toast the bread evenly, rather than letting the rolls steam against one another.
Step 3: Creating the Herb Butter
Melt the butter: In a small saucepan over low heat, gently melt your unsalted butter until it reaches a smooth consistency. This serves as the liquid carrier for your spices, helping them adhere perfectly to the soft interior of the bread.
Infuse the flavors: Whisk in your garlic powder, onion powder, oregano, basil, and a touch of salt and pepper until fully combined. Once the mixture is fragrant, brush it generously across the cut surfaces of each roll to ensure every bite is packed with savory seasoning.
Step 4: Layering for Maximum Flavor
Structural integrity: Begin your layering process by placing the salami, ham, and pepperoni on the bottom half of the bread. This creates a solid foundation that holds the moisture of the veggies and cheeses throughout the baking time.
The cheese melt: Drape your slices of mozzarella and provolone over the meat layers, ensuring full coverage to prevent the bread from drying out. A final sprinkle of grated Parmesan adds an extra layer of savory crunch that will brown beautifully in the oven.
Adding the toppings: Layer your roasted red peppers, black olives, and banana peppers on top of the cheese. Finally, finish with a handful of fresh basil leaves to add a bright, peppery aroma that cuts through the richness of the deli meats.
Step 5: Baking to Perfection
The golden standard: Carefully place your baking sheet into the preheated oven for 10 to 12 minutes. Keep a watchful eye on the sandwiches during the final minutes to prevent the bread from burning while ensuring the cheese has reached a bubbling, melted state.
Resting is essential: Once you pull the sheet from the oven, let the sandwiches sit for about two minutes before serving. This brief rest allows the cheese to set slightly, preventing it from running everywhere when you slice the grinders into individual portions.
Pro Tips for Baked Italian Grinder Sandwiches
Avoid Overcrowding: Always ensure there is at least one inch of space between each sandwich on your baking sheet. Proper airflow is the secret to achieving that coveted crispy crust rather than a soft, soggy roll.
The Right Tools: A sharp, serrated bread knife is your best friend when portioning these grinders. It allows you to saw through the crisp bread without squashing the delicate layers of meat and cheese inside.
Make-Ahead Convenience: If you are hosting, assemble the sandwiches earlier in the day and keep them refrigerated until just before baking. This helps you save precious time while ensuring your guests get a fresh, hot meal.
Moisture Control: If you are using juicy toppings like fresh tomatoes or excessive olives, pat them dry with a paper towel before adding them to the sandwich. This prevents excess liquid from soaking into the bread and compromising the texture.
Serving Suggestions for Baked Italian Grinder Sandwiches
Decoration
For a beautiful presentation, garnish your serving platter with extra fresh basil leaves and a few whole olives. You can also sprinkle a little extra Parmesan and a dash of red pepper flakes over the finished sandwiches to signal the vibrant, savory flavors contained within.
Side Dishes
These hearty sandwiches pair beautifully with a light, acidic side, such as a crisp green salad tossed in a lemon-herb vinaigrette. For a more indulgent meal, consider serving them alongside a small bowl of easy lobster bisque or some oven-roasted potato wedges.
Creative Serving Ideas
If you are serving these at a party, consider cutting the full-length grinders into smaller, two-inch mini-sandwiches for easy finger food. You can also serve them with a side of warm marinara or pesto sauce for dipping, which adds an extra layer of moisture and flavor to every bite.
Preparation & Storage
Storing Leftovers
If you happen to have leftovers, wrap each sandwich individually in aluminum foil or place them in an airtight container. They can be stored in the refrigerator for up to three days, though they are best enjoyed as soon as possible to maintain their texture.
Freezing
You can freeze unbaked sandwiches by wrapping them tightly in plastic wrap followed by a layer of heavy-duty foil. This prevents freezer burn and allows you to keep them on hand for up to three months, making a quick lunch an easy reality.
Reheating
To reheat, place your sandwiches in an oven preheated to 375°F (190°C) for 10 to 15 minutes. If starting from frozen, add an extra five minutes to the timer to ensure the center of the sandwich is completely warmed through and the cheese is melted.
Frequently Asked Questions
- What is the best way to ensure my bread stays crispy after adding toppings? The key is to create a barrier with the meat and cheese. By placing the deli meats directly against the bread and the vegetables on top of the cheese, you prevent the moisture from the peppers and olives from soaking into the roll.
- Can I make these sandwiches gluten-free? Absolutely! Simply use high-quality gluten-free sub rolls instead of traditional Italian bread. Ensure your deli meats are certified gluten-free, as some processed varieties may contain hidden fillers or additives that are not suitable for those with dietary restrictions.
- Why is it important to use a serrated knife when slicing the finished grinder? A standard chef’s knife will often crush the soft center of the bread before it cuts through the crust, leading to a messy sandwich. A serrated blade grips the crust and saws through it gently, preserving the layers and the overall presentation of your hard work.
If you enjoyed this recipe, check out our collection of easy meals at Pinterest for more inspiration. You might also love trying our baked lemon chicken for a lighter alternative or enjoying some funfetti cookies as a sweet finish to your Italian-themed feast. There is always a new flavor profile to explore in your own home kitchen!