Ultimate Santa Claus Dome Cakes
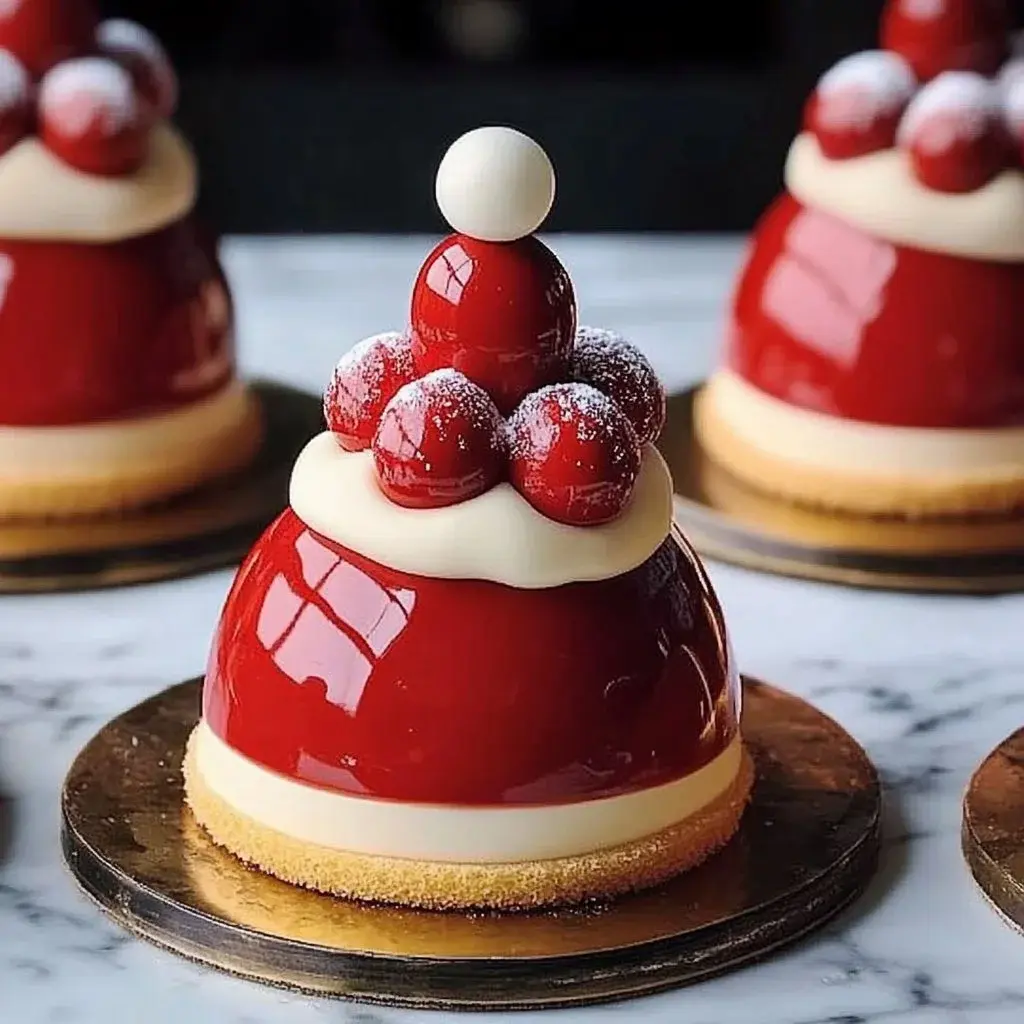
When it comes to festive desserts, nothing quite captures the holiday spirit like Santa Claus Dome Cakes. These delightful dome-shaped treats bring together the magic of Christmas and the joy of baking, promising an enchanting experience for everyone gathered around. Imagine a dessert that not only looks like a miniature Santa Claus but also tastes like a dream, with layers of rich chocolate cake and creamy fillings.
Santa Claus Dome Cakes aren’t just any ordinary treat; they are a celebration of flavors and creativity designed to bring smiles and festive cheer. They offer a unique way to indulge in the classic tastes of Christmas while adding a playful and visually appealing twist that kids and adults alike will adore. The vibrant red of the Santa hat, the fluffy white whipped cream, and the adorable chocolate decorations truly make these cakes a show-stopper for any holiday gathering.
Why You Will Love This Recipe
- Festive Design: Their charming Santa Claus appearance makes them an instant holiday favorite and a wonderful centerpiece for any festive table.
- Rich Chocolate Flavor: A deep, satisfying chocolate cake base combined with luscious chocolate ganache offers an indulgent experience with every bite.
- Creamy Mousse Filling: The light and airy mousse provides a delightful textural contrast to the cake and ganache, adding an extra layer of decadence.
- Customizable Decorations: While designed as Santa hats, the decorating process allows for creativity and personalization, making each dome cake uniquely yours.
- Memorable Baking Experience: These cakes are perfect for involving the whole family in the baking process, creating cherished holiday memories together in the kitchen.
Ingredients You Need
The key to creating these magical Santa Claus Dome Cakes lies in using high-quality ingredients that complement each other perfectly. From the rich cocoa powder that forms the base of our chocolate cake to the smooth, velvety ganache and the light, fluffy mousse, each component plays a vital role in the final delicious outcome. Ensuring your ingredients are fresh will significantly enhance the overall flavor and texture of these festive treats, making them a true delight for your taste buds.
Santa Claus Dome Cakes

Delightful dome-shaped chocolate cakes filled with rich ganache and mousse, decorated to resemble Santa Claus, perfect for holiday celebrations. This recipe is easy to make, visually stunning, and delivers a delicious chocolate flavor, making it a fantastic option for family gatherings and festive occasions.
- For the Cake:
- 2 cups all-purpose flour
- 1.5 cups granulated sugar
- 0.5 cups unsweetened cocoa powder
- 1 cup buttermilk (or almond milk/oat milk)
- 0.5 cups vegetable oil
- 3 large eggs (or flaxseed meal mixed with water for vegan option)
- 1 teaspoon vanilla extract
- 1 teaspoon baking powder
- 1 teaspoon baking soda
- 0.5 teaspoon salt
- For Filling and Decoration:
- 1 cup heavy cream (or coconut cream for dairy-free option)
- 0.5 cups powdered sugar
- 0.25 cups red gel food coloring (for decoration)
- Chocolate Ganache (for filling)
- Whipped cream (for decoration)
- Chocolate decorations (for eyes and buttons)
- 1Preparation: Gather all ingredients and preheat oven to 350°F (175°C). Grease dome cake molds.
- 2Mix Dry Ingredients: In a large bowl, combine flour, sugar, cocoa powder, baking powder, baking soda, and salt.
- 3Mix Wet Ingredients: Add buttermilk, vegetable oil, eggs, and vanilla extract to the dry mixture. Beat until smooth.
- 4Fill Molds: Divide batter evenly among greased dome molds, do not overfill.
- 5Bake: Bake for 20-25 minutes. Check for doneness with a toothpick.
- 6Cool Cakes: Cool in molds for 10 minutes, then transfer to a wire rack to cool completely.
- 7Prepare Mousse: Whip heavy cream until soft peaks form, then fold in powdered sugar.
- 8Fill Cakes: Once cooled, gently remove cakes from molds. Fill each dome with chocolate ganache and mousse.
- 9Decorate: Drizzle red gel food coloring on top for Santa's hat and decorate with whipped cream and chocolate decorations.
Keywords: Chocolate Cake, Christmas Treats, Festive Desserts, Holiday Baking, Santa Claus Dome Cakes, Mousse Cakes, Ganache Cakes, Easy Baking, Family Baking
These ingredients are readily available at most grocery stores, ensuring you can bring this holiday magic to life without any difficulty. A full list of precise quantities can be found within the linked recipe card above, guiding you through each step of the creation process with ease.
Variations
To cater to different tastes and dietary needs, Santa Claus Dome Cakes offer a delightful canvas for creative variations. Consider a “Winter Berry” twist by incorporating a swirl of raspberry or cranberry puree into the mousse filling for a tart counterpoint to the sweet chocolate.
For a sophisticated adult version, a hint of peppermint extract or a splash of Kahlua could be added to the chocolate ganache, transforming these festive treats into something more refined. This simple addition can elevate the dessert for holiday parties where a more mature palate is being catered to.
Another exciting variation could be a “Gingerbread Spice” adaptation. By infusing the cake batter with cinnamon, ginger, cloves, and nutmeg, you can transform the classic chocolate dome into a festive gingerbread delight. This adds a wonderfully warm and aromatic dimension that perfectly embodies the holiday season, offering a unique flavor profile that stands out.
How to Prepare Santa Claus Dome Cakes
Step 1: Gather and Prepare Your Baking Essentials
The first crucial step in crafting your Santa Claus Dome Cakes involves meticulous preparation of both your ingredients and your workspace. Ensure all your ingredients are measured precisely and at room temperature, as this significantly impacts the texture and consistency of your batter and fillings. Preheating your oven to the specified temperature, typically around 350°F (175°C), is vital for even baking.
Thoroughly grease your dome cake molds with butter or non-stick spray, paying special attention to any intricate details to prevent the cakes from sticking. This careful preparation will make the demolding process much smoother and preserve the beautiful dome shape of your festive creations. Having everything ready before you begin mixing ensures a seamless baking process and reduces the chances of errors.
It’s also wise to prepare any components that can be made ahead of time, such as the chocolate ganache for the filling. Allowing the ganache to cool and thicken to the right consistency before assembly will make it easier to handle and pipe into the cakes. Proper mise en place (everything in its place) is the cornerstone of successful baking, especially with intricate desserts like these.
Step 2: Crafting the Rich Chocolate Cake Base
Begin by combining all the dry ingredients for the chocolate cake in a large mixing bowl. This includes all-purpose flour, granulated sugar, unsweetened cocoa powder, baking powder, baking soda, and salt. Whisk these ingredients together thoroughly to ensure they are evenly distributed, which helps in creating a light and airy cake texture.
In a separate bowl, whisk together the wet ingredients: buttermilk, vegetable oil, large eggs, and vanilla extract. The oil contributes to the cake’s moisture, while the eggs act as a binder and leavening agent. Buttermilk adds a slight tang and tenderness, reacting with the baking soda to create a wonderfully fluffy crumb.
Gradually add the wet ingredients to the dry ingredients, mixing until just combined. Be careful not to overmix the batter, as this can develop the gluten too much, resulting in a tough cake. A few small lumps are perfectly acceptable; the goal is a smooth, homogenous batter that will bake into a delicious chocolate foundation for your dome cakes. The batter should have a pourable consistency.
Step 3: Baking the Delicate Dome Cakes
Once your batter is ready, carefully divide it evenly among the prepared dome cake molds. Fill each mold about two-thirds full to allow for the cake to rise during baking without overflowing. A uniform distribution of batter ensures that each dome bakes consistently and to the same size, which is important for aesthetic appeal and assembly.
Place the filled molds onto a baking sheet and transfer them into the preheated oven. Bake for approximately 20 to 25 minutes, or until a toothpick inserted into the center of a cake comes out clean, indicating it is fully cooked. The exact baking time may vary depending on your oven, so it’s essential to start checking for doneness around the 20-minute mark.
Overbaking can lead to dry cakes, while underbaking will result in a gooey center. Once baked, remove the cakes from the oven and allow them to cool in the molds for about 10 minutes before carefully inverting them onto a wire rack. This initial cooling period helps the cakes firm up slightly, making them easier to handle, while the wire rack allows for even air circulation, ensuring they cool completely without becoming soggy.
Step 4: Preparing the Creamy Mousse and Ganache
While the chocolate cake domes are cooling, it’s time to prepare the luxurious fillings that will make these cakes truly special. For the chocolate ganache, gently heat heavy cream until it just begins to simmer, then pour it over chopped high-quality dark or semi-sweet chocolate. Let it sit for a few minutes to melt the chocolate, then whisk until smooth and glossy. Allow this ganache to cool and thicken to a spreadable consistency; chilling it briefly can speed this up.
For the mousse, whip cold heavy cream in a clean, dry bowl until soft peaks form. Gradually add the powdered sugar, continuing to whip until stiff peaks form. Be careful not to over-whip, or you’ll end up with butter. This light and airy mousse will add a delightful contrast in texture and flavor to the denser cake and ganache.
Ensure both the ganache and mousse are at the correct consistency for easy handling. The ganache should be firm enough to hold its shape but soft enough to spread, while the mousse should be light and fluffy. These components are the heart of the dome cake’s deliciousness, so their preparation is just as important as the cake itself.
Step 5: Assembling and Decorating Your Santa Claus Creations
Once the chocolate cake domes are completely cool, it’s time for the fun part: assembly and decoration. Gently remove the cakes from their molds, ensuring their shape is intact. You might need to carefully trim the very bottom of the dome to create a flat surface if it rose unevenly, though this is often unnecessary if molds were well-greased.
Begin by filling the cavity of each dome cake. Spoon a generous amount of the prepared chocolate ganache into each cake, followed by a dollop of the fluffy mousse. You can create layers or swirls for added visual appeal and a more complex flavor profile. The goal is to fill the dome cavity generously, making sure there’s enough of both fillings to create a delightful surprise when bitten into.
Now, for the signature Santa Claus look, carefully drizzle or paint red gel food coloring over the top of each filled dome to create Santa’s hat. Follow this by piping or artfully spreading whipped cream around the base of the red “hat” to form Santa’s fluffy beard and trim. Add two small chocolate chips or chocolate candies for Santa’s eyes and a button or two on the “coat” area of the cake to complete the whimsical design. These details bring the Santa Claus character to life.
Step 6: Final Touches and Presentation
The final step in creating your enchanting Santa Claus Dome Cakes is adding those last decorative touches that truly make them festive and appealing. Ensure the whipped cream beard is full and fluffy, resembling Santa’s iconic beard, and that the red hat is a vibrant, eye-catching shade. Small edible glitter or a dusting of powdered sugar can mimic snow for an extra magical effect.
Before serving, it’s often beneficial to let the decorated cakes chill in the refrigerator for at least 30 minutes. This allows the whipped cream to set slightly and ensures all the components meld together beautifully, preventing any accidental smudging of the decorations. Chilling also enhances the refreshing taste of the dessert, especially if served during warmer holiday gatherings.
Present your finished Santa Claus Dome Cakes with pride at your holiday gathering. Their delightful appearance and delicious taste are sure to be a huge hit, bringing smiles and festive joy to all who partake. They are perfect as individual desserts, adding a whimsical touch to any holiday meal or party spread, making the celebration even more memorable and sweet.
Pro Tips for Santa Claus Dome Cakes
- Room Temperature Ingredients: Always use room temperature eggs and buttermilk for the cake batter. This ensures a smoother batter and a lighter, more evenly baked cake. Cold ingredients don’t emulsify as well.
- Don’t Overmix: Overmixing the cake batter can develop the gluten in the flour, leading to a tough, dense cake instead of a light and fluffy one. Mix until just combined.
- Cool Completely Before Filling: Ensure your chocolate cake domes are thoroughly cooled before you begin filling and decorating. Warm cakes can cause the ganache and mousse to melt, leading to a messy assembly and less appealing final product.
- High-Quality Chocolate: For the ganache, use good quality dark or semi-sweet chocolate. The better the chocolate, the richer and more decadent your ganache will be, significantly impacting the overall flavor profile.
- Piping Precision: If you’re piping the whipped cream beard and hat trim, use a star tip for a fluffy, textured look. Practice on parchment paper first if you’re new to piping to achieve the desired effect.
Serving Suggestions for Santa Claus Dome Cakes
Decoration
The decoration is what truly transforms these delicious chocolate domes into cheerful Santa Claus figures. The vibrant red gel food coloring creates Santa’s iconic hat, while meticulously piped whipped cream forms his fluffy white beard and the trim of his hat. Adding two small chocolate chips or candies for eyes and a couple of chocolate buttons on the cake’s “body” brings the character to life, making them instantly recognizable and utterly charming.
For an extra touch of holiday magic, consider dusting the plate or the cake itself with a light sprinkle of edible glitter or powdered sugar to mimic snow. This subtle addition can elevate the visual appeal, making your Santa Claus Dome Cakes even more enchanting. Remember, presentation is key, especially with a dessert designed to be a festive centerpiece.
Ensure the decorations are applied evenly and artistically. The goal is to create a visually appealing dessert that sparks joy and anticipation. These decorative elements are not just for show; they add to the overall sensory experience of enjoying the cake, making it a true holiday delight for both the eyes and the palate.
Side Dishes
To perfectly complement the rich chocolate and creamy sweetness of Santa Claus Dome Cakes, consider pairing them with a warm beverage. A steaming mug of hot chocolate, perhaps infused with a hint of peppermint or cinnamon, creates a cozy and festive flavor combination. Alternatively, a freshly brewed coffee, whether a classic roast or a festive holiday blend, can cut through the sweetness and enhance the chocolate notes.
For a contrasting texture and temperature, a scoop of high-quality vanilla bean ice cream or a light, creamy cheesecake provides a wonderful accompaniment. The cold, smooth ice cream melts beautifully into the cake, while cheesecake offers a complementary richness without overpowering the dome cake’s distinct flavors. These pairings enhance the dessert experience, offering a balanced and satisfying treat.
You might also consider serving them alongside a selection of other holiday treats, such as gingerbread cookies, shortbread, or fruit tarts, creating a dessert platter that offers a variety of flavors and textures. This allows guests to sample multiple delights, making your dessert table a true highlight of the festive celebration, ensuring there’s something for everyone to enjoy with their Santa Claus Dome Cakes.
Creative Serving Ideas
Elevate your Santa Claus Dome Cakes by presenting them in unique ways. Instead of placing them individually on plates, consider arranging them on a tiered dessert stand, creating a festive edible display that acts as a stunning centerpiece for your holiday table. This arrangement adds height and drama, making the cakes even more impactful.
For a more interactive experience, set up a “decorate-your-own-Santa-hat” station. Provide plain chocolate dome cakes and a variety of toppings like extra whipped cream, red sprinkles, mini chocolate chips, and edible markers. This allows guests, especially children, to get creative and personalize their own Santa Claus Dome Cake, turning dessert into a fun activity.
Another charming idea is to package individual dome cakes in clear cellophane bags tied with festive ribbon. These make for delightful party favors or thoughtful edible gifts for neighbors, friends, or colleagues. Presenting them this way adds a personal touch and allows guests to take a bit of holiday cheer home with them, ensuring the festive spirit lingers beyond the gathering.
Preparation & Storage
Storing Leftovers
If by chance you have any leftover Santa Claus Dome Cakes, proper storage is key to maintaining their delightful texture and flavor. The best way to store them is in an airtight container, placed in the refrigerator. This prevents them from drying out and protects them from absorbing any unwanted odors from other foods in the fridge.
When stored correctly in an airtight container in the refrigerator, these festive treats can typically last for 3 to 4 days. While they are best enjoyed within the first couple of days, this storage method ensures they remain enjoyable for a reasonable period. Always ensure the container is well-sealed to maximize freshness and prevent any potential spoilage.
Before serving any leftovers, it’s a good idea to let them sit at room temperature for about 15-20 minutes. This allows the flavors to mellow and the textures to become more appealing, as refrigeration can sometimes make cream-based desserts firm. This simple step can revive their deliciousness and make them seem freshly made.
Freezing
Santa Claus Dome Cakes also freeze remarkably well, making them an excellent option for preparing holiday treats in advance. To freeze them, it’s crucial to wrap each individual dome cake securely. First, wrap each cake tightly in plastic wrap, ensuring no air can get to it, and then follow this with a layer of aluminum foil for added protection against freezer burn.
Once individually wrapped, you can place the frozen dome cakes into a freezer-safe bag or container. Properly stored in this manner, they can maintain their quality in the freezer for up to one month. This advance preparation can significantly reduce stress during busy holiday periods, allowing you to have a festive dessert ready at a moment’s notice.
When you’re ready to enjoy your frozen Santa Claus Dome Cakes, the best method for thawing is to transfer them from the freezer directly to the refrigerator. Allow them to thaw slowly overnight. This gradual thawing process helps to preserve their delicate texture and prevents any sudden changes in temperature that could affect their quality. Avoid thawing them at room temperature for extended periods, as this can impact the integrity of the whipped cream and decorations.
Reheating
Reheating Santa Claus Dome Cakes is generally not recommended as they are best served cold or at room temperature, especially due to the mousse and whipped cream components. Microwaving them would likely cause the cream elements to melt and the cake to become soggy, ruining their intended texture and appearance.
Instead of reheating, focus on bringing them back to an optimal serving temperature after thawing. If the cakes have been refrigerated or frozen, allowing them to come to room temperature for about 20-30 minutes before serving can significantly improve their taste and texture. This gentle warming ensures the flavors are more pronounced and the cake is moist and tender.
If the whipped cream topping has deflated slightly after thawing, you can easily revive it. Simply whip a fresh batch of cold heavy cream with a little powdered sugar and a touch of vanilla extract until stiff peaks form, and then re-pipe or dollop it onto the cakes just before serving. This ensures the decorations look as fresh and appealing as when they were first made.
Frequently Asked Questions
-
Can I prepare the components of Santa Claus Dome Cakes ahead of time?
Yes, absolutely. You can bake the chocolate cake domes up to two days in advance and store them in an airtight container at room temperature. The chocolate ganache can also be made a day or two ahead and stored in the refrigerator; gently warm it if it becomes too firm before assembly. The mousse is best made closer to assembly time to ensure maximum fluffiness, but it can be prepared a few hours in advance and kept chilled. This advance preparation allows for a smoother and less stressful assembly process on the day you plan to serve them. -
What are the best substitutions for common ingredients if I have dietary restrictions or can’t find them?
For a gluten-free version, you can substitute the all-purpose flour with a good quality gluten-free all-purpose baking blend. For a dairy-free option, use almond milk or oat milk instead of buttermilk, coconut cream instead of heavy cream for the mousse, and ensure your chocolate for ganache is dairy-free. If you need to replace eggs, a common vegan substitute is a flax egg (one tablespoon of ground flaxseed mixed with three tablespoons of water, let sit for 5 minutes) per egg. These substitutions allow you to adapt the recipe to suit various dietary needs without compromising too much on flavor or texture. -
How can I ensure my Santa Claus Dome Cakes have a perfect dome shape and clean decorations?
To achieve a perfect dome shape, ensure you are using quality dome cake molds and greasing them thoroughly. Filling the molds evenly and not overfilling them is also crucial, as it allows the cake to rise properly without spilling over. For clean decorations, allow the cake domes to cool completely before filling and decorating. When applying the whipped cream for Santa’s beard, using a piping bag with a star tip can create a professional, fluffy look. Practice piping on parchment paper first if you’re new to it. Ensure your red gel food coloring is applied with a steady hand or a small brush for neatness.