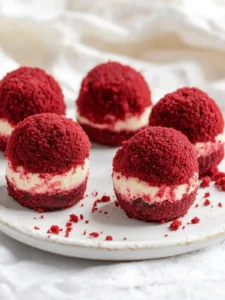
Irresistible Red Velvet Cheesecake Bites You’ll Love to Share

There’s something irresistibly decadent about sinking your teeth into a Red Velvet Cheesecake Bite. The moment you pop one into your mouth, the rich, velvety cake mingles with smooth cream cheese, creating an explosion of flavor that dances on your palate.
I stumbled into this creation during a weekend baking spree, determined to whip up something that would impress both my family and friends. After running into a box of red velvet cake mix tucked in the back of my pantry, inspiration struck! The beauty of these bites lies not only in their taste but also in their simplicity. They transform the classic dessert into a delightful, bite-sized treat that’s perfect for gatherings or an indulgent night in. Whether you’re looking to impress at the next potluck or enjoy a cozy evening on the couch, these bites offer a crowd-pleasing experience without all the fuss. So, let’s dive into the delightful world of Red Velvet Cheesecake Bites and see how easy it is to create your own deliciously irresistible dessert!
Why You Will Love This Recipe
- Irresistible Flavor: These treats offer a unique twist on classic red velvet and cheesecake, perfect for any gathering!
- Quick and Easy: With a straightforward process, they come together in no time, allowing you more moments to enjoy the company of loved ones.
- Decadent Texture: The rich cream cheese filling combined with the tender red velvet crumbs creates a taste sensation that will have everyone reaching for seconds.
- Versatile Treat: Great for parties, holidays, or just a sweet indulgence at home, these bites cater to all occasions!
- Stunning Presentation: Their vibrant color and charming size make them visually appealing, drawing guests in and making them perfect for sharing.
Ingredients You Need
To create these irresistible Red Velvet Cheesecake Bites, you’ll need just a few key ingredients that come together to form a truly delightful treat. The combination of moist red velvet cake and creamy cheesecake filling is what makes these bites so special. Using good quality ingredients will elevate the final taste and texture, ensuring a memorable dessert experience for everyone who tries them.
Red Velvet Cheesecake Bites
Irresistible Red Velvet Cheesecake Bites are a delightful twist on classic flavors, perfect for any occasion. This recipe offers a quick and easy way to create a decadent dessert that is both visually stunning and incredibly delicious.
- For the Cake: 1 box red velvet cake mix (follow instructions on packaging)
- For the Cream Cheese Filling: 8 ounces cream cheese (softened), 1/4 cup butter (softened), 1 cup powdered sugar, 1 teaspoon vanilla extract
- For the Coating: 1 cup graham crackers (crushed into fine crumbs)
- 1Cake Preparation: Preheat the oven to 350°F and prepare two 8-inch cake pans by lining or greasing them. Prepare the cake mix as instructed on the packaging and pour into the prepared pans. Bake until a toothpick inserted in the center comes out clean. Let cool completely. Crumble the cooled cake with your hands until it resembles coarse sand. If the cake is too moist, break it into chunks and bake on a lined baking sheet for 5-6 minutes to dry it out.
- 2Cream Cheese Filling: Mix the cream cheese, butter, and powdered sugar in a large bowl. Beat with an electric mixer until fluffy.
- 3Combine and Form Bites: Crush the graham crackers in a ziplock bag using a rolling pin until fine. Add the graham cracker crumbs and vanilla extract to the cream cheese mixture and stir until well mixed. Scoop out the cream cheese mixture using a 2 teaspoon cookie scoop and form into balls.
- 4Chill: Arrange the balls on a lined baking sheet or large plate and chill in the refrigerator for 1 hour to set.
- 5Coat and Serve: Coat the chilled cream cheese balls with the crumbled red velvet cake until fully covered. Adjust their shape by rolling them gently in your hands if needed. Serve immediately or keep them in the fridge until ready to enjoy.
Keywords: Red Velvet, Cheesecake, Bites, Dessert, Baking, Easy, Quick, Holiday, Party
- red velvet cake mix: a quick and easy base that gives the bites their signature flavor.
- cream cheese: ensures a rich, smooth filling that complements the cake crumbs beautifully.
- butter: brings creaminess and helps blend the filling to perfection.
- powdered sugar: sweetens the filling without leaving a gritty texture.
- vanilla extract: adds a warm, fragrant note that enhances the overall flavor.
- graham crackers: crushed into fine crumbs for a delightful texture and extra flavor boost as a coating.
Exact quantities for all ingredients are listed in the recipe card below.
Variations
Feel free to play with flavors and textures to create your perfect version of these yummy Red Velvet Cheesecake Bites! These small adjustments can lead to entirely new taste experiences while keeping the essence of the original recipe intact.
Gluten-Free Delight: For those with gluten sensitivities or celiac disease, this variation is a game-changer. Simply opt for a gluten-free red velvet cake mix and use gluten-free graham crackers for the coating. The result is a wonderfully delicious bite that everyone can enjoy without compromise. Your friends won’t even notice the difference; they’re that good!
Nutty Addition: To introduce a delightful crunch and a new layer of flavor, consider stirring in finely chopped walnuts or pecans directly into the cream cheese filling. This adds a wonderful textural contrast to the creamy, smooth filling, making each bite even more interesting and satisfying. The subtle nuttiness complements the red velvet beautifully.
Chocolate Drizzle Magic: Elevate the decadence by melting some semi-sweet or dark chocolate and drizzling it artistically over the finished bites. This extra touch of chocolate richness pairs exceptionally well with the red velvet and cheesecake flavors, making these treats even more irresistible. It’s a simple step that makes a big visual and taste impact.
Peppermint Twist for the Holidays: During the festive holiday season, infuse the cream cheese filling with a few drops of peppermint extract. This adds a delightful, refreshing twist that perfectly complements the warmth of red velvet, creating a wonderfully seasonal and festive treat. It’s a subtle change that makes a big difference in flavor.
Spicy Kick for the Bold: For those who enjoy a subtle warmth or complexity in their desserts, add a pinch of cayenne pepper or a touch of espresso powder to the cream cheese mixture. These additions don’t necessarily make the bites spicy but rather enhance the sweetness and add an intriguing depth to the overall flavor profile. It’s a surprising element that really works.
Fruit Fusion Fun: Incorporate small, diced pieces of fresh strawberries or raspberries directly into the cream cheese filling. This not only adds a burst of fresh fruitiness and a beautiful visual contrast to the red crumbs but also brings a lovely tartness that balances the sweetness. These fruit-infused bites are incredibly refreshing.
Vegan Option: Yes, you can absolutely make these Red Velvet Cheesecake Bites vegan! Substitute the traditional cream cheese with a good quality vegan cream cheese and use a plant-based butter alternative. Many vegan graham crackers are also available, ensuring you can enjoy these delightful bites without any dairy.
How to Prepare Red Velvet Cheesecake Bites
Step 1: Bake and Cool the Red Velvet Cake
Begin by preheating your oven to 350°F (175°C). This initial step is crucial for ensuring even baking of the red velvet cake, which forms the delightful outer layer of your bites. Prepare two 8-inch cake pans by either lining them with parchment paper or greasing them thoroughly. This preparation step ensures that the cake will release effortlessly after baking, preventing any frustrating sticking issues.
Next, prepare the red velvet cake mix precisely as instructed on its packaging. This usually involves adding eggs, oil, and water according to the box directions. Carefully pour the prepared batter evenly into the two prepared cake pans, ensuring that the batter is distributed to create layers of similar thickness. Once the batter is in the pans, place them into the preheated oven to bake.
Bake the cakes until a toothpick or a thin knife inserted into the center comes out clean, indicating that the cake is fully cooked through. The baking time will typically be around 25-35 minutes, but it’s always best to check for doneness. Once baked, remove the cakes from the oven and allow them to cool completely in their pans. It is essential for the cakes to be thoroughly cooled before proceeding to the next step.
After the cakes have cooled completely, it’s time to transform them into the signature red velvet crumbs. Gently crumble the cooled red velvet cake with your hands until it resembles coarse sand. Don’t worry if there are a few slightly larger pieces; these will add interesting texture. If you find that your cake is too moist to crumble effectively, you can break it into smaller chunks and spread them on a lined baking sheet.
To dry out a slightly too-moist cake, place the baking sheet with the cake chunks into the preheated oven (still at 350°F) for about 5-6 minutes. Keep a close eye on it to prevent burning; the goal is just to dry it out slightly so it crumbles nicely. Once dried, remove it from the oven and let it cool completely before proceeding. This dried crumb mixture will be used to coat your cheesecake bites later on.
Step 2: Create the Creamy Cheesecake Filling
In a large mixing bowl, combine the softened cream cheese, softened butter, and powdered sugar. Using softened ingredients is key to achieving a smooth, lump-free filling. The cream cheese and butter should be at room temperature, making them easy to cream together without any resistance. This creates the perfect base for your luscious cheesecake filling.
Beat these ingredients together using an electric mixer on medium speed. Continue to beat until the mixture is light, fluffy, and well combined. You’re looking for a consistency that praises the taste buds with its creamy smoothness. Scrape down the sides of the bowl periodically to ensure that all the ingredients are incorporated evenly into the mixture. This step is vital for creating the decadent cheesecake component of your bites.
Once the cream cheese mixture is wonderfully fluffy, add the vanilla extract. Stir or beat on low speed just until the vanilla extract is fully incorporated. Be careful not to overmix at this stage, as overbeating can sometimes lead to a less desirable texture in the final product. The vanilla extract adds a beautiful aroma and a warm, comforting flavor that enhances the overall profile of your Red Velvet Cheesecake Bites. This filling is the heart of your treat.
Step 3: Combine Filling and Coat with Crumbs
Now, prepare your graham cracker crumbs for coating the cheesecake balls. You can achieve this by placing graham crackers into a ziplock bag and using a rolling pin to crush them into fine crumbs. Alternatively, a food processor can be used for a quicker and more consistent result. Aim for a texture that resembles coarse sand, which will adhere well to the cheesecake balls.
Add these finely crushed graham crackers to the cream cheese mixture. Along with the graham crackers, incorporate the vanilla extract if you haven’t already added it in the previous step. Stir these ingredients together until they are thoroughly combined. The mixture will become quite thick and cohesive, ready to be shaped into balls.
Using a 2-teaspoon cookie scoop, portion out the cream cheese mixture. This ensures that all your bites will be a uniform size, which is pleasing both visually and for consistent eating. Roll each portion between your hands to form smooth, compact balls. Arrange these formed balls on a large plate or a baking sheet lined with parchment paper.
Place the baking sheet or plate containing the cream cheese balls into the refrigerator. Allow them to chill for at least 1 hour. This chilling period is crucial; it helps the balls firm up, making them much easier to handle and coat without them becoming sticky or misshapen. Patience here will lead to a much cleaner and more professional-looking final product.
Once the cream cheese balls are nicely chilled and firm, it’s time to coat them. Take each chilled ball and gently roll it in the prepared crumbled red velvet cake until it is fully covered. Ensure that all sides of the cream cheese ball are evenly coated with the vibrant red crumbs. You can adjust their shape by gently rolling them between your hands after coating, if needed, to achieve a perfectly round bite.
Arrange the coated Red Velvet Cheesecake Bites back onto the parchment-lined baking sheet or plate. At this point, they are ready to be served immediately, offering a delightful treat. Alternatively, you can keep them in the refrigerator until you are ready to enjoy them. This chilling period also helps the coating adhere more firmly and allows the flavors to meld beautifully.
Step 4: Chill and Set the Bites
The crucial step of chilling the formed cheesecake balls before coating them cannot be overstated. This time in the refrigerator allows the cream cheese and butter to firm up considerably. Without this chilling period, the cream cheese mixture would be too soft and sticky to handle effectively when you attempt to roll it in the red velvet cake crumbs. The result would be messy, unevenly coated bites.
An hour in the refrigerator is typically sufficient, but if your kitchen is particularly warm, you might consider an additional 15-30 minutes. The goal is for the balls to be firm to the touch, holding their shape without yielding easily to pressure. This firmness is what prevents the coating from falling off and ensures that each bite maintains its intended spherical form. It’s a simple but vital step for success.
Once coated, it’s beneficial to chill the finished Red Velvet Cheesecake Bites again, though for a shorter duration. This brief second chill helps to set the coating and further firm up the entire bite. It ensures that the red velvet crumbs adhere perfectly to the creamy interior and that the overall texture is cohesive. This final chill allows the flavors to meld together beautifully.
Serving these bites cold directly from the refrigerator is often the most enjoyable way to experience them. The coolness enhances the creamy texture of the cheesecake filling and provides a refreshing contrast to the cake crumbs. This second chill, even just for 15-30 minutes after coating, really elevates the final presentation and taste of your Red Velvet Cheesecake Bites, making them truly irresistible.
Step 5: Optional Finishing Touches
For an extra touch of indulgence and visual appeal, consider adding a drizzle of melted chocolate over the finished Red Velvet Cheesecake Bites. Dark chocolate, milk chocolate, or even white chocolate can be used, depending on your preference and what complements the red velvet and cheesecake flavors best. Melt the chocolate gently over a double boiler or in the microwave in short intervals, stirring until smooth.
Using a fork or a piping bag with a fine tip, drizzle the melted chocolate over the coated bites. Create a pattern that you find appealing, whether it’s thin lines, a zig-zag, or a more abstract design. This adds another layer of flavor and a sophisticated look to your homemade treats, making them look professionally crafted.
If you’re serving these bites immediately, the chocolate drizzle will set relatively quickly as it cools. If you plan to store them for a bit, the chocolate coating helps to seal in the freshness. This optional step transforms already delicious bites into something truly spectacular, perfect for special occasions or when you want to impress your guests with minimal extra effort. It’s a small detail that makes a big statement.
Another delightful option is to garnish the bites with a tiny dollop of whipped cream or a single fresh raspberry or strawberry slice just before serving. This adds a pop of color and a touch of freshness that contrasts beautifully with the rich flavors of the red velvet and cheesecake. It’s a quick way to make your presentation even more elegant and appealing. These finishing touches are what turn a good dessert into a great one.
You can also experiment with edible glitter or gold dust for a truly glamorous presentation, especially for parties or holidays. A light dusting can add a magical shimmer that catches the light beautifully. Whatever optional touches you decide to add, remember that they are enhancements to an already delicious base recipe, designed to make your Red Velvet Cheesecake Bites even more special and memorable for your guests. Enjoy the creative process!
Step 6: Serve and Enjoy
Your Red Velvet Cheesecake Bites are now ready to be savored! Whether you’ve opted for the optional chocolate drizzle or kept them simple, they are a delightful treat that’s sure to impress. Serve them chilled directly from the refrigerator for the best texture and flavor experience. The cool creaminess of the cheesecake filling combined with the slightly chewy red velvet crumbs is simply divine.
These bites are perfectly portioned, making them ideal for parties, potlucks, or as a special indulgence with your morning coffee or afternoon tea. Their vibrant red color makes them a festive addition to any celebration, from Valentine’s Day to holiday gatherings. They are a fantastic way to bring a touch of joy and sweetness to any occasion, no matter how big or small.
Share these delightful morsels with friends and family, and watch as they disappear quickly! The joy of making and sharing homemade treats like these is unparalleled. They are a testament to how simple ingredients and a bit of effort can create something truly magical and delicious. Enjoy every single bite of this decadent creation!
Pro Tips for Red Velvet Cheesecake Bites
Quality Ingredients Matter: Always start with fresh, high-quality ingredients. Using softened cream cheese and butter at room temperature ensures a perfectly smooth and creamy filling. This foundational step significantly impacts the final texture and flavor, making it worth the extra attention.
Don’t Overmix the Filling: When beating the cream cheese, butter, and powdered sugar, stop once the mixture is light and fluffy. Overmixing can incorporate too much air, which might lead to a texture that is too airy or even slightly crumbly after chilling. Aim for smooth and cohesive, not excessively aerated.
Chill Time is Crucial: Ensure the cream cheese balls are adequately chilled for at least one hour before coating. This step prevents the filling from becoming sticky and difficult to handle, allowing for a clean, even coating of the red velvet cake crumbs. Patience here will yield much neater results.
Crumb Consistency is Key: For the red velvet cake crumbs, aim for a texture resembling coarse sand. If the crumbs are too dry, they may not adhere well; if they are too moist, the bites might become sticky. You can adjust the dryness by briefly toasting them if needed, or adding a touch more cake mix if too wet.
Perfect Coating Technique: When rolling the chilled cream cheese balls in the red velvet crumbs, ensure all sides are fully covered. Gently press the crumbs onto the balls to help them adhere securely. This not only enhances the visual appeal with the vibrant red color but also ensures you get that signature red velvet flavor with every bite.
Make Ahead Convenience: These bites are excellent candidates for making ahead. Prepare the cake and crumble it, and make the cream cheese filling separately. Store them in airtight containers in the refrigerator. Assemble and coat the bites closer to serving time for optimal freshness and texture. This makes them ideal for busy hosts.
Serving Suggestions for Red Velvet Cheesecake Bites
Decoration
The vibrant red color of these bites is already a stunning visual. For an extra touch of elegance, consider a delicate drizzle of melted white or dark chocolate. A few edible gold or silver sprinkles can add a festive sparkle, making them perfect for special occasions. A tiny dollop of whipped cream or a miniature mint leaf perched atop each bite also offers a beautiful, fresh contrast.
Side Dishes
To balance the richness of the cheesecake bites, pair them with fresh, bright flavors. A simple bowl of mixed fresh berries like raspberries, strawberries, and blueberries provides a refreshing counterpoint. A light and airy whipped cream or a small scoop of vanilla bean ice cream also complements the creamy texture beautifully. For a more sophisticated pairing, a small glass of espresso or a rich coffee enhances the dessert flavors.
Creative Serving Ideas
Present these Red Velvet Cheesecake Bites on a tiered dessert stand for a show-stopping centerpiece at parties. Arrange them artfully on a platter surrounded by fresh fruit. You could also serve them in mini cupcake liners for individual portions that are easy to grab and enjoy. For a themed party, consider arranging them to form a larger shape, like a heart for Valentine’s Day or a festive wreath for the holidays.
Preparation & Storage
Storing Leftovers
To keep your delicious Red Velvet Cheesecake Bites fresh and delightful, store any leftovers in an airtight container. Place the container in the refrigerator. They will maintain their best quality and taste for up to 3 days when stored properly. Ensure the container is sealed tightly to prevent them from drying out or absorbing other odors from the fridge.
Freezing
For longer-term storage, these bites freeze exceptionally well. Arrange the completed bites in a single layer on a baking sheet lined with parchment paper. Place the baking sheet in the freezer until the bites are firm to the touch. This step prevents them from sticking together. Once frozen solid, transfer the firm bites into a freezer-safe ziplock bag or an airtight container, removing as much air as possible before sealing. They can be stored in the freezer for up to 1 month.
Reheating
When you’re ready to enjoy frozen Red Velvet Cheesecake Bites, the thawing process is simple. For the best results, transfer the frozen bites from the freezer to the refrigerator and let them thaw overnight. If you’re short on time, you can allow them to sit at room temperature for about 30-60 minutes, though they are best enjoyed when still slightly chilled. They can be served cold or at room temperature for optimal flavor and texture.
Frequently Asked Questions
-
How do I know if my red velvet cake mix is fresh, and what happens if I use stale mix?
To ensure your Red Velvet Cheesecake Bites turn out wonderfully, it’s essential to use fresh ingredients. Always check the expiration date printed on the box of your red velvet cake mix. If the mix looks clumpy, has an unusual odor, or seems dull in color, it’s likely past its prime and won’t yield the best results. Using stale cake mix can lead to a less flavorful and potentially dry or gummy texture in your crumbled coating, significantly impacting the overall quality of your cheesecake bites.
-
What’s the best way to prevent the cream cheese filling from becoming too soft or melting when I roll it in the cake crumbs?
The key to preventing a soft or melting cream cheese filling during the coating process lies in proper chilling. Ensure the cream cheese balls are thoroughly chilled in the refrigerator for at least one full hour before you attempt to coat them. This step firms up the butter and cream cheese mixture significantly, making it easy to handle and coat. If you live in a particularly warm climate or your kitchen tends to be warm, consider an extended chilling time or even a brief second chill after coating to ensure they hold their shape perfectly.
-
Can I make these Red Velvet Cheesecake Bites entirely ahead of time for a party, and if so, what’s the best approach?
Absolutely! These Red Velvet Cheesecake Bites are a fantastic make-ahead treat. You can bake the red velvet cake and crumble it up to 2-3 days in advance and store the crumbs in an airtight container at room temperature. The cream cheese filling can also be prepared up to 2 days ahead and stored in an airtight container in the refrigerator. Assemble and coat the bites the day before your event, then store them in an airtight container in the refrigerator. Chilling them overnight helps the flavors meld beautifully and ensures they are perfectly set for serving. This makes party preparation significantly less stressful.