Blackstone Grilled Kielbasa and Tortellini: An Incredible Ultimate Recipe

Welcome to a culinary adventure that promises bold flavors and effortless preparation. This recipe is designed to bring a unique twist to your table, combining beloved ingredients in an unexpected yet harmonious way. Get ready to experience the magic of Blackstone grilling with the savory goodness of kielbasa and the comforting embrace of tortellini.
Imagine a meal that’s not only incredibly delicious but also remarkably simple to create, perfect for those busy weeknights or relaxed weekend gatherings. This dish is a testament to how simple techniques can unlock complex and satisfying tastes, making it an instant favorite for home cooks of all skill levels.
Why You Will Love This Recipe
- Quick Preparation: This entire meal comes together in approximately 35 minutes, making it an ideal solution for weeknight dinners when time is of the essence.
- Flavorful Combination: The smoky, savory notes of grilled kielbasa perfectly complement the tender, cheesy tortellini and vibrant vegetables, creating a symphony of tastes and textures.
- Easy Cleanup: Utilizing the Blackstone grill for most of the cooking process significantly reduces the number of dishes you’ll need to wash afterward, a true win for any busy cook.
- Customizable Ingredients: This recipe serves as a fantastic base, allowing you to easily swap vegetables, adjust seasonings, or even try different types of pasta to suit your personal preferences and what you have on hand.
- Impressive Presentation: Despite its ease of preparation, the colorful ingredients and the char marks from the grill give this dish an attractive, restaurant-worthy appearance that is sure to impress.
Ingredients You Need
The foundation of any exceptional dish lies in the quality of its ingredients. For this Blackstone Grilled Kielbasa and Tortellini recipe, we’re focusing on fresh, flavorful components that will come alive on the hot griddle. Choosing good quality kielbasa, vibrant bell peppers, and a delicious cheese tortellini will elevate the entire experience. Remember, the simplicity of this dish allows each ingredient to shine.
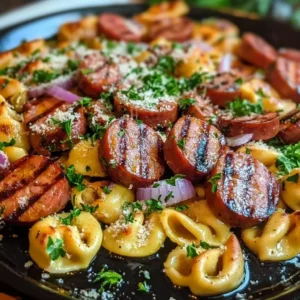
Blackstone Grilled Kielbasa and Tortellini
Enjoy this quick and delicious Blackstone Grilled Kielbasa and Tortellini: An Incredible Ultimate Recipe that will impress your family tonight!
- 1 lb chicken or beef kielbasa, sliced
- 1 lb cheese tortellini (fresh or frozen)
- 2 cups bell peppers, diced
- 1 cup red onion, diced
- 3 cloves garlic, minced
- 1 tablespoon olive oil
- 1 teaspoon Italian seasoning
- Salt and pepper to taste
- 1Preheat your Blackstone grill over medium-high heat for 5 minutes.
- 2Boil salted water in a pot and cook tortellini according to package instructions; drain and set aside.
- 3In a mixing bowl, combine bell peppers, red onion, garlic, olive oil, Italian seasoning, smoked paprika, salt, and pepper.
- 4Grill sliced kielbasa for 3-4 minutes until browned.
- 5Add seasoned vegetables to the grill alongside the kielbasa; grill for another 5-7 minutes until tender.
- 6Toss in the drained tortellini; mix well and heat through for 2-3 minutes.
- 7Adjust seasoning to taste before serving.
Keywords: Kielbasa, Tortellini, Blackstone Grill, Grilled, One-Pan, Easy Dinner, Weeknight Meal
The specific quantities for each ingredient are detailed within the recipe card for your convenience.
Variations
Exploring variations of this Blackstone Grilled Kielbasa and Tortellini can lead to exciting new flavor profiles and dietary accommodations. Consider a vibrant vegetarian adaptation by replacing the kielbasa with a plant-based sausage alternative or even hearty chunks of seasoned halloumi cheese.
For those following a lower-carbohydrate lifestyle, omitting the tortellini and doubling down on a colorful medley of grilled vegetables like zucchini, cherry tomatoes, and asparagus would be a delicious swap. You could also incorporate a protein like grilled chicken breast or shrimp.
Another delightful approach involves infusing different flavor profiles. Think about adding a splash of balsamic glaze towards the end of cooking, or perhaps incorporating a spicy kick with diced jalapeños and a sprinkle of red pepper flakes. Experimenting with various herbs like fresh basil or rosemary can also dramatically change the aroma and taste.
How to Prepare Blackstone Grilled Kielbasa and Tortellini
Step 1: Prepare Your Workspace and Grill
The initial step to culinary success involves setting up your cooking environment. Ensure your Blackstone grill is clean and ready for action. Turn on your Blackstone grill to a medium-high heat setting, allowing it to preheat thoroughly for at least 5 to 10 minutes. This crucial step ensures that the griddle surface is hot enough to achieve that desirable sear on the kielbasa and properly cook the vegetables.
While the grill is heating, take this opportunity to gather all your prepped ingredients. Having everything measured, chopped, and ready to go in separate bowls or containers will make the cooking process seamless. This mise en place approach is key to executing a recipe efficiently, especially when working with the dynamic heat of a griddle.
Step 2: Par-Cook the Tortellini
Before the tortellini hits the grill, it needs a brief stint in boiling water to ensure it’s perfectly tender. Bring a large pot of generously salted water to a rolling boil over high heat. Carefully add the cheese tortellini to the boiling water. Cook them according to the package directions, which is typically around 3 to 5 minutes for fresh tortellini or slightly longer for frozen.
The goal here is to cook the tortellini until they are al dente – tender but still with a slight bite. Overcooking at this stage will result in mushy pasta on the grill. Once cooked to your liking, drain the tortellini thoroughly in a colander, allowing all excess water to escape. Set them aside momentarily, ready to join the other ingredients on the grill.
Step 3: Season and Prepare the Vegetables
In a spacious mixing bowl, combine your diced bell peppers and red onion. Add the minced garlic, which will release its pungent aroma and flavor as it heats up on the Blackstone. Drizzle the vegetables generously with olive oil, ensuring each piece is lightly coated. This oil acts as a catalyst for flavor, helping the seasonings adhere and promoting even caramelization on the grill.
Now, introduce the dried seasonings to the vegetable mixture. Sprinkle in the Italian seasoning for an aromatic herbaceousness and the smoked paprika for a subtle smoky depth and a touch of color. Season generously with salt and freshly ground black pepper according to your taste preferences. Toss all the ingredients together thoroughly until the vegetables are evenly coated with the oil and seasonings. This ensures every bite of your grilled vegetables will be bursting with flavor.
Step 4: Grill the Kielbasa
Arrange the sliced kielbasa in a single layer directly onto the preheated Blackstone grill. Allow the kielbasa to sear and develop a beautiful, golden-brown crust on each side. This grilling process will render some of its fat, adding an irresistible savory depth to the dish and creating those appealing char marks. Flip the kielbasa slices periodically with a spatula or tongs to ensure even cooking and browning on all surfaces.
Grill the kielbasa for approximately 3 to 4 minutes per side, or until it reaches your desired level of crispness and color. The heat of the Blackstone grill will quickly bring out the smoky and savory notes inherent in the sausage. Once the kielbasa is beautifully browned and slightly crisped, carefully push it to one side of the grill to make room for the vegetables, keeping it warm.
Step 5: Grill the Seasoned Vegetables
Now, it’s time to introduce the seasoned vegetables to the hot Blackstone griddle. Spread the prepared bell pepper and onion mixture onto the cleared side of the grill, adjacent to the kielbasa. Allow the vegetables to cook undisturbed for a few minutes to begin caramelizing and softening. Their natural sugars will start to release, creating a delightful sweetness.
Stir the vegetables occasionally using your spatula or tongs to promote even cooking and prevent any sticking or burning. Continue grilling the vegetables for about 5 to 7 minutes, or until they are tender-crisp and have developed attractive char marks. You want them to be cooked through but still retain a slight bite, adding a pleasant textural contrast to the dish. The aroma of the grilling vegetables, mingled with garlic and spices, will be incredibly enticing.
Step 6: Combine and Heat Through
With the kielbasa seared and the vegetables tender-crisp, it’s time to bring everything together. Add the drained, par-cooked tortellini directly onto the Blackstone grill, mingling them with the kielbasa and vegetables. Use your spatula and tongs to gently toss all the ingredients together. Ensure the tortellini, kielbasa, and vegetables are well combined, allowing their flavors to meld beautifully on the hot griddle.
Continue to heat everything through for an additional 2 to 3 minutes, stirring gently. This brief period allows the tortellini to absorb some of the savory juices from the kielbasa and vegetables, and ensures all components are warmed evenly. The gentle tossing prevents the tortellini from sticking and helps distribute the delicious flavors throughout the entire dish, making it a cohesive and satisfying meal.
Step 7: Final Seasoning Adjustment
Before removing the dish from the heat, it’s essential to perform a taste test. Carefully sample a bit of the kielbasa, tortellini, and vegetable mixture to assess the seasoning. Use this opportunity to adjust the salt and pepper levels if necessary, adding a touch more of either to perfectly suit your palate. You might also find that a pinch more Italian seasoning or smoked paprika could further enhance the flavor profile.
Don’t be afraid to experiment with additional spices at this stage if you feel the dish needs a little something extra. Perhaps a dash of garlic powder for more intensity, or a sprinkle of red pepper flakes for a hint of heat. Achieving the perfect balance of flavors is crucial for a truly memorable meal, and this final seasoning check ensures that every bite is as delicious as possible.
Step 8: Garnish and Serve
Once you are satisfied with the seasoning, carefully remove the Blackstone Grilled Kielbasa and Tortellini from the grill. Transfer the entire mixture onto a large serving platter or into individual bowls. For a burst of freshness and vibrant color, generously sprinkle the dish with freshly chopped parsley. The bright green herbs add visual appeal and a subtle herbaceous note that complements the richness of the other ingredients.
For an optional touch of indulgence and classic Italian flavor, consider topping the dish with a scattering of grated Parmesan cheese. The salty, nutty notes of the Parmesan will melt slightly into the warm ingredients, adding another layer of deliciousness. Serve immediately and enjoy this incredibly flavorful and satisfying meal.
Pro Tips for Blackstone Grilled Kielbasa and Tortellini
Don’t Overcook the Tortellini: Remember that the tortellini will continue to cook slightly on the grill. Aim for al dente when boiling to avoid a mushy texture. This is a crucial step for maintaining the integrity of the pasta.
High Heat is Your Friend: For that signature Blackstone sear, ensure your grill is sufficiently preheated. Medium-high heat is ideal for both caramelizing the vegetables and crisping the kielbasa without burning them too quickly.
Season Generously: The Blackstone grill can handle bold flavors. Don’t be shy with your seasonings, salt, and pepper. Tasting and adjusting before serving is key to a well-balanced dish.
Keep it Moving (Smartly): While you want some char, constantly stirring the vegetables will ensure even cooking and prevent burning. For the kielbasa, a few flips are sufficient to get a good crust.
Fresh Herbs Make a Difference: The final flourish of fresh parsley or even a sprinkle of fresh basil adds a wonderful brightness and visual appeal that elevates the dish. It’s a simple step with a significant impact.
Serving Suggestions for Blackstone Grilled Kielbasa and Tortellini
Decoration
Elevate the visual appeal of your Blackstone Grilled Kielbasa and Tortellini with thoughtful garnishes. A generous sprinkle of freshly chopped parsley is a classic choice, adding a vibrant green contrast. For a richer presentation, consider a dusting of grated Parmesan cheese, which will melt slightly into the warm ingredients. Thinly sliced green onions can also offer a mild oniony bite and a pop of color.
Side Dishes
To create a complete and satisfying meal, consider pairing your kielbasa and tortellini with complementary side dishes. A simple garden salad with a light vinaigrette offers a refreshing counterpoint to the richness of the main dish. Steamed or roasted broccoli or green beans provide a healthy dose of vegetables and a pleasing crunch.
For a heartier meal, consider serving it alongside crusty garlic bread, perfect for soaking up any delicious juices. Alternatively, a scoop of fluffy quinoa or a light pasta salad can add substance and variety. The key is to choose sides that balance the flavors and textures of the main course without overpowering it.
Creative Serving Ideas
Beyond traditional plating, think about serving this dish in fun and unique ways. Consider spooning the mixture into small, individual cast-iron skillets for a rustic, oven-finished presentation. Another idea is to use large, hollowed-out bell peppers as edible bowls, stuffing them with the kielbasa and tortellini mixture before a final warm-up.
For a more casual, picnic-style approach, serve portions in sturdy disposable bowls, perhaps with a skewer of grilled cherry tomatoes alongside. You could also create appetizer portions by serving the mixture in small tasting spoons, garnished with a tiny sprig of fresh herb. These creative touches can make your meal memorable for any occasion.
Preparation & Storage
Storing Leftovers
Once the Blackstone Grilled Kielbasa and Tortellini has cooled down completely, transfer any leftovers into an airtight container. This is essential to maintain freshness and prevent the absorption of other odors in the refrigerator. Storing it properly will ensure the flavors remain vibrant for subsequent meals.
Leftovers can be safely stored in the refrigerator for up to 3 to 4 days. It’s always a good practice to label your containers with the date of storage, so you can keep track of their freshness. Ensure the container is sealed tightly to prevent any moisture loss or gain.
Freezing
If you have a larger batch or want to prepare for future meals, freezing is an excellent option. Allow the cooked dish to cool completely before portioning it into freezer-safe containers or heavy-duty freezer bags. Removing as much air as possible from the packaging will help prevent freezer burn.
For best quality, it’s recommended to consume frozen Blackstone Grilled Kielbasa and Tortellini within 2 to 3 months. While it may remain safe to eat beyond this period, the texture and flavor might degrade over time. Ensure the containers are well-sealed to protect the dish from the harsh freezer environment.
Reheating
Reheating this dish is straightforward and can be done using several methods. For best results, especially to retain some of the grilled texture, using the oven is recommended. Preheat your oven to 350°F (175°C), place the leftovers in an oven-safe dish, cover with foil, and heat for about 15-20 minutes, or until thoroughly warmed through.
If you’re short on time, the microwave is a convenient option. Transfer a portion to a microwave-safe bowl, cover it loosely, and heat on medium power for 2-3 minutes, stirring halfway through to ensure even heating. For a stovetop method, add a splash of water or broth to a skillet over medium heat, add the leftovers, and cook for 5-7 minutes, stirring occasionally until hot.
Frequently Asked Questions
-
What is the best way to ensure the tortellini doesn’t become mushy on the grill?
The key to preventing mushy tortellini is a two-step process. First, when boiling the tortellini, cook them only until they are al dente – tender with a slight chew. They should not be fully soft at this stage, as they will continue to cook on the grill. Second, drain them thoroughly after boiling to remove all excess water, which can make them waterlogged and prone to overcooking.
-
Can I substitute kielbasa with other types of sausage, and how might that affect the flavor?
Absolutely! This recipe is very versatile, and other sausages can work wonderfully. Using a spicy Italian sausage will introduce a different kind of heat and herbaceousness. A smoked chicken or turkey sausage offers a lighter flavor profile while still providing a smoky element. The primary difference will be in the fat content and specific seasoning blends of the sausage, which will subtly alter the final taste of the dish. For example, a fattier sausage might render more grease on the grill, contributing to the overall richness.
-
How can I make this Blackstone Grilled Kielbasa and Tortellini recipe spicier or milder?
To make the dish spicier, you can incorporate finely diced jalapeños or serrano peppers along with the other vegetables during the grilling process. Adding a pinch of red pepper flakes to the vegetable seasoning mix, or a dash of your favorite hot sauce during the final tossing stage, will also boost the heat. For a milder version, simply omit any spicy elements and ensure you’re using sweet bell peppers and a less pungent onion. You can also control the amount of garlic used to suit your preference.