Chicken, Steak, or Shrimp Fajitas
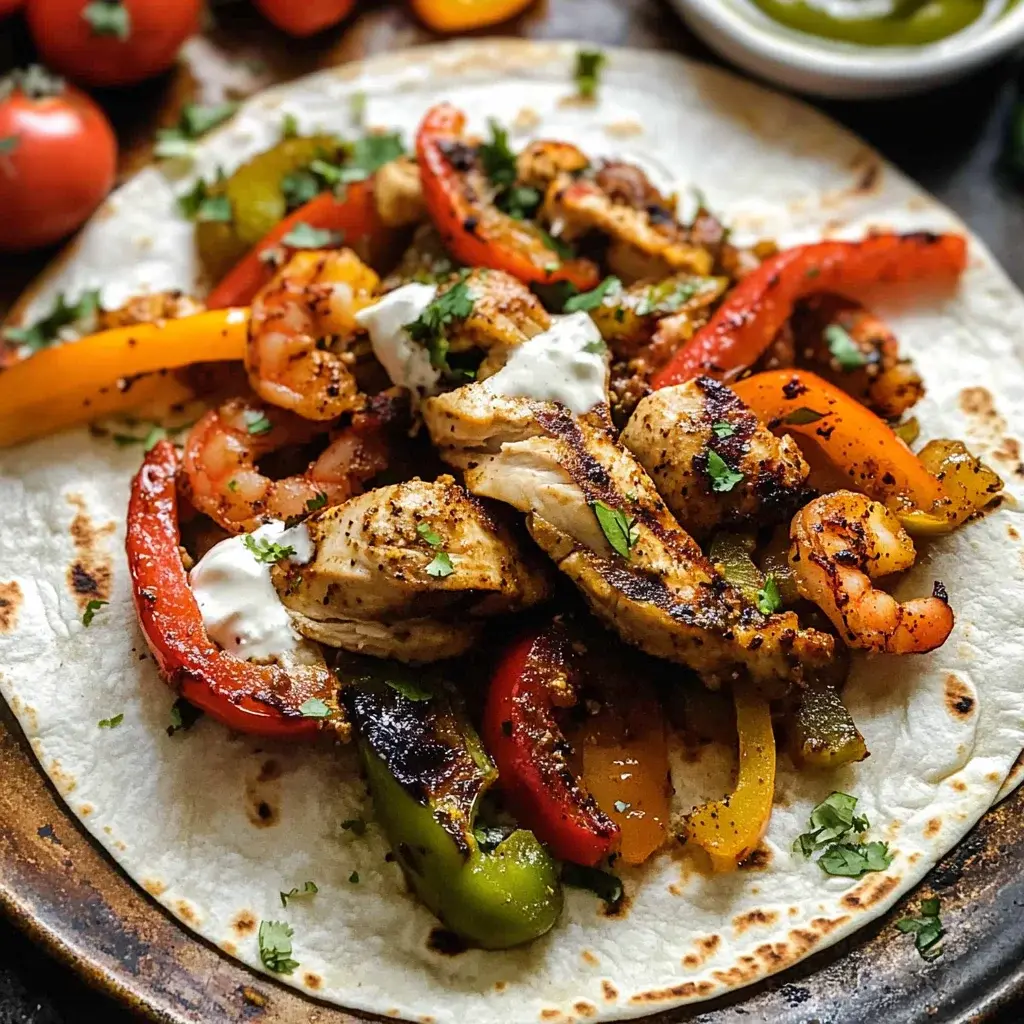
Fajitas are a culinary adventure, a vibrant explosion of flavors and textures that brings the spirit of Mexican cuisine right to your kitchen. Imagine the sizzle of marinated protein meeting the smoky kiss of the grill, mingling with the sweet char of perfectly cooked peppers and onions. This dish isn’t just a meal; it’s an experience, designed for sharing and customization, making every bite a personal triumph.
Whether you opt for tender chicken, succulent steak, or succulent shrimp, the foundation of exceptional fajitas lies in the quality of ingredients and the art of preparation. This recipe guides you through creating a dish that is both deeply satisfying and delightfully easy to assemble, perfect for weeknight dinners or lively weekend gatherings. Get ready to transform simple ingredients into a fiesta of taste.
Why You Will Love This Recipe
- Quick Preparation: Enjoy a delicious and complete meal ready in just over an hour, making it ideal for busy weeknights when time is of the essence.
- Customizable Protein: Tailor your fajitas precisely to your preferences by choosing chicken, steak, or shrimp, or even mixing them for a surf-and-turf experience.
- Authentic Homemade Seasoning: Forget store-bought mixes; our easy-to-make seasoning blend infuses the protein with bold, classic fajita flavors using simple, wholesome ingredients.
- Vibrant Grilled Vegetables: The combination of colorful bell peppers and sweet onions, grilled to tender perfection with a slight char, adds essential freshness and visual appeal.
- Interactive and Fun Dining: Fajitas are inherently social, allowing everyone at the table to build their own perfect tortilla wrap, fostering a fun and engaging mealtime atmosphere.
- Perfect for Meal Prep: Cooked fajita fillings store beautifully, making them an excellent option for preparing healthy and delicious lunches or dinners in advance for the week.
Ingredients You Need
Crafting outstanding fajitas begins with selecting fresh, high-quality ingredients that promise optimal flavor and texture. The beauty of this dish lies in its simplicity, allowing the natural taste of the protein and vegetables to shine through, enhanced by a thoughtfully crafted seasoning blend. Ensuring you have the right components is the first step towards a truly memorable culinary experience that will delight your senses.
Chicken, Steak, or Shrimp Fajitas

Grilled Chicken, Steak, or Shrimp Fajitas are a flavorful and satisfying dish perfect for any occasion. With easy homemade seasoning and vibrant grilled vegetables, this recipe is a crowd-pleaser for family dinners, casual get-togethers, or even meal prep for the week. Enjoy the smoky taste and fresh ingredients that come together in a warm tortilla for a delightful experience.
- 1 ½ lbs steak (flank, rump, or skirt), chicken, or large shrimp (uncooked, peeled, deveined)
- 1 teaspoon chili powder
- 1 teaspoon ground cumin
- 1/2 teaspoon smoked paprika
- 1/2 teaspoon dried oregano
- 3 cloves garlic (minced)
- Juice from 1 lime
- 2 tablespoon oil (canola or olive oil)
- 1 teaspoon kosher salt
- 1/2 teaspoon fresh ground black pepper
- 1/4 teaspoon liquid smoke (optional)
- 3 bell peppers (red, yellow, orange, or green; seeded and sliced into strips)
- 1 large red or yellow onion (sliced into strips)
- Warm flour tortillas
- Salsa or pico de gallo
- Guacamole
- Sour cream
- Cilantro (for garnish)
- 1In a gallon-size resealable bag, combine 1 tablespoon of oil with chili powder, cumin, paprika, minced garlic, oregano, lime juice, salt, and pepper. Add your choice of protein to the bag. Seal it tightly and toss to coat. Allow it to marinate in the refrigerator for 30 minutes to 3 hours.
- 2In another gallon-size resealable bag, add sliced bell peppers and onion. Season with a pinch of salt and pepper along with the remaining tablespoon of oil. Shake gently to coat and set aside.
- 3Remove the marinated protein from the fridge about 20 minutes before cooking. Preheat your grill to medium-high heat. Lightly grease grates with oil. If using a stove, heat a heavy pan with some oil over medium-high heat. Cook chicken or steak for a few minutes on each side until done (chicken should reach an internal temperature of 165 degrees; steak should be medium rare). For shrimp, cook on a grill pan or cast iron pan for about 2-4 minutes per side until pink.
- 4In a cast iron pan or grill pan over medium-high heat on the grill or stovetop, add the seasoned vegetables. Cook while tossing occasionally until charred but still tender.
- 5Serve grilled protein in warm tortillas topped with grilled vegetables. Add your choice of salsa or pico de gallo, guacamole, sour cream, and garnish with cilantro.
Keywords: Fajitas, Chicken Fajitas, Steak Fajitas, Shrimp Fajitas, Mexican, Grilled, Dinner, Easy, Quick, Customizable
Quantities for each ingredient can be found within the detailed recipe card. These are the core components that will come together to create your delicious fajitas.
Variations
Exploring variations of this classic dish can introduce exciting new dimensions of flavor and cater to diverse dietary needs. Consider adapting the protein or vegetable components to suit specific tastes and preferences, ensuring everyone can enjoy a delicious fajita experience tailored just for them.
Vegan Fajitas: For a fantastic vegetarian or vegan option, substitute the meat with hearty chunks of firm tofu or tempeh, ensuring they are pressed well to remove excess moisture. Marinate them in the same spice blend, perhaps adding a touch more lime juice or a pinch of smoked paprika for extra depth. You can also incorporate other vegetables like zucchini, mushrooms, or even sweet potatoes into the mix for added texture and nutrients, making for a robust and satisfying plant-based meal.
Low-Carb Fajita Bowls: Eliminate the tortillas entirely for a light and healthy low-carb meal. Serve the grilled protein and vegetables over a bed of crisp lettuce or spinach. Top with generous dollops of guacamole, salsa, and a sprinkle of fresh cilantro for a refreshing and filling salad. This approach focuses on the vibrant flavors of the fajita filling while keeping the carbohydrate count significantly lower, perfect for those following a ketogenic or low-carb lifestyle.
Spicy Shrimp Fiesta: Amp up the heat by using jumbo shrimp as your protein and introducing a spicy element to the marinade. Add a pinch of cayenne pepper or a finely minced jalapeño to the seasoning mix for an extra kick. Consider serving with a fiery habanero salsa or a drizzle of sriracha crema to complement the sweetness of the shrimp and the charred vegetables. This variation is designed for those who crave a bolder, more intense flavor profile that truly ignites the palate.
How to Prepare Chicken Steak or Shrimp Fajitas
Step 1: Marinate the Protein
Begin by preparing your chosen protein for its flavorful transformation. In a large, resealable bag, combine the olive or canola oil with the chili powder, ground cumin, smoked paprika, dried oregano, minced garlic, and the juice from one fresh lime. This aromatic blend forms the heart of your fajita seasoning, infusing the protein with classic Southwestern notes.
Add your selected protein—be it chicken breast or thighs, flank steak or skirt steak, or large, peeled, and deveined shrimp—to the bag. Seal the bag tightly, ensuring all air is expelled to create a vacuum-like seal. Gently toss and massage the bag to ensure every piece of protein is thoroughly coated with the vibrant marinade. This step is crucial for allowing the flavors to penetrate deeply, tenderizing the meat and building a robust taste foundation.
Place the sealed bag in the refrigerator to marinate. For optimal flavor development, aim for at least 30 minutes. However, for an even more intense taste experience, you can let it marinate for up to 3 hours. Steaks and chicken benefit from longer marinating times, while shrimp, being more delicate, are best marinated for a shorter period, typically no more than 30-60 minutes, to prevent their texture from becoming mushy.
Step 2: Prepare the Vegetables
While your protein is busy absorbing those delicious flavors, it’s time to turn your attention to the colorful ensemble of vegetables that will accompany your fajitas. Take your bell peppers, ensuring they are seeded and sliced into uniform strips. The variety of colors—red, yellow, orange, and green—not only makes for a visually stunning dish but also offers a range of subtle sweetness and texture.
Next, prepare your large red or yellow onion by slicing it into similarly sized strips, mimicking the shape of the bell peppers. In a separate large resealable bag, combine these prepared vegetable strips. Drizzle them with the remaining tablespoon of olive or canola oil, and add a small pinch of salt and freshly ground black pepper. This light seasoning enhances their natural sweetness and helps them achieve a beautiful char when cooked.
Gently shake the bag to ensure the oil and seasonings are evenly distributed across all the vegetable pieces. Set this bag aside at room temperature, allowing the vegetables to mingle with the seasonings while you prepare to cook the protein. Properly prepared vegetables are key to achieving that perfect tender-crisp texture that is characteristic of authentic fajitas, offering a delightful contrast to the tender meat.
Step 3: Cook the Protein
About 20 minutes before you plan to start cooking, retrieve the marinated protein from the refrigerator. Allowing it to come closer to room temperature helps ensure more even cooking, preventing the outside from overcooking before the inside is ready. This small step can make a significant difference in the final texture and juiciness of your protein.
For Grilling: Preheat your grill to a medium-high heat setting. Once the grill is hot, lightly grease the grates with a bit of oil to prevent sticking. This step is crucial for achieving those desirable char marks and ensuring a clean release of the protein from the grill surface. A well-preheated grill is essential for searing the protein quickly, locking in its juices and flavor.
For Stovetop Cooking: If you don’t have a grill, a heavy-bottomed skillet, such as cast iron, works wonderfully. Heat a tablespoon of oil over medium-high heat until it shimmers. You want the pan to be sufficiently hot to sear the protein effectively, creating a beautiful crust. Avoid overcrowding the pan, as this can lead to steaming rather than searing, which will result in less flavorful and less appealing protein.
Now, carefully add your marinated protein to the hot grill or skillet. Cook chicken or steak for approximately 4-6 minutes per side, depending on the thickness, until it is cooked through and reaches your desired level of doneness. For chicken, ensure an internal temperature of 165°F (74°C) is reached for safety. Steak can be cooked to medium-rare, medium, or well-done according to your preference, typically requiring less time than chicken. Shrimp, being more delicate, cook very quickly; grill or pan-sear them for only 2-4 minutes per side, just until they turn opaque and pink, ensuring they don’t become rubbery.
Step 4: Grill the Vegetables
With your protein cooked and set aside to rest briefly, it’s time to bring the vibrant vegetables to life on the heat. If you used a grill, you can transfer the seasoned vegetables directly onto the grates. If you’re cooking indoors, use the same skillet you used for the protein, or a clean cast-iron pan or grill pan, ensuring it’s heated over medium-high heat on your stovetop.
Add the oil-coated, seasoned bell pepper and onion strips to the hot pan or grill. Cook them while tossing them occasionally to ensure even cooking and charring. You are looking for them to become tender-crisp, meaning they are cooked through but still retain a slight bite. The heat should be high enough to develop those desirable smoky, slightly caramelized edges without turning the vegetables to mush.
Continue cooking for about 5-8 minutes, depending on the heat and how soft you prefer your vegetables. The goal is to achieve a beautiful char on some of the edges, which adds a wonderful depth of flavor and visual appeal. Properly grilled vegetables are a cornerstone of great fajitas, providing sweetness, a hint of bitterness from the char, and a satisfying texture that complements the protein perfectly. Once they reach your desired tenderness and have a nice char, remove them from the heat.
Step 5: Assemble Your Fajitas
The moment of truth has arrived – it’s time to bring all the delicious components together to create your perfect fajita. Begin by gently warming your flour tortillas. You can do this by briefly heating them on a dry skillet, directly over a low gas flame (with caution), or wrapping them in a slightly damp paper towel and microwaving them for about 30 seconds. Warm tortillas are more pliable and enhance the overall fajita experience.
Slice your cooked chicken or steak into strips, if you haven’t already. If you cooked shrimp, they are usually left whole for easy assembly. Place a portion of the sliced protein onto a warm tortilla. This is where the customization truly begins, allowing each person to build their ideal wrap. The aroma of the grilled ingredients should be absolutely intoxicating at this stage.
Next, generously top the protein with the beautifully charred and tender grilled vegetables. Pile them on to your liking, ensuring a good balance of peppers and onions with your chosen protein. The colorful medley of vegetables adds both visual appeal and a burst of fresh flavor to every bite. This layered approach creates a delightful mix of textures and tastes within each tortilla.
Finally, invite your guests or yourself to add their favorite accompaniments. Offer a variety of toppings such as fresh salsa or pico de gallo for a zesty kick, creamy guacamole for richness, a dollop of cooling sour cream to balance the heat, and a sprinkle of fresh cilantro for a bright, herbaceous finish. These additions are not just garnishes; they are integral parts of the fajita experience, elevating the dish with layers of complementary flavors and textures. Serve immediately and enjoy the fruits of your culinary labor.
Pro Tips for Chicken Steak or Shrimp Fajitas
Elevating your fajita game is all about mastering a few key techniques that ensure maximum flavor and perfect texture every time. Paying attention to these details can transform a good fajita into an extraordinary one, impressing both yourself and your guests with your culinary prowess.
Don’t Skimp on the Marinade Time: The marinade is where the magic begins. For steak and chicken, allowing at least 30 minutes is good, but marinating for 2-3 hours, or even overnight for steak, will result in profoundly more tender and flavorful meat. For shrimp, a shorter marinating time of 20-30 minutes is sufficient to prevent them from becoming tough.
Achieve a Searing Hot Pan or Grill: A common mistake is not preheating the cooking surface sufficiently. A screaming hot grill or skillet is essential for achieving that desirable char and quick sear on your protein and vegetables. This process locks in juices and develops a rich, caramelized flavor profile that is characteristic of authentic fajitas.
Cook in Batches if Necessary: Resist the temptation to overcrowd your pan or grill. Overcrowding lowers the cooking temperature, leading to steaming instead of searing, which results in pale, less flavorful meat and soggy vegetables. Cook your protein and vegetables in batches if needed to ensure they all get direct contact with the hot surface for optimal browning and flavor development.
Rest Your Cooked Meats: Once your chicken or steak is cooked, let it rest for about 5-10 minutes before slicing. This crucial step allows the juices to redistribute throughout the meat, ensuring it remains moist and tender when sliced. Cutting into meat immediately after cooking will cause those precious juices to run out, leaving the meat dry and less flavorful.
Fresh is Best for Toppings: While pre-made salsas and guacamole are convenient, using fresh ingredients for your toppings makes a noticeable difference. Chop ripe tomatoes, onions, cilantro, and jalapeños for a vibrant pico de gallo, and mash ripe avocados with lime juice and salt for an incredibly fresh guacamole. These fresh elements brighten the entire dish and provide a beautiful contrast to the rich, savory fajita filling.
Serving Suggestions for Chicken Steak or Shrimp Fajitas
Decoration
Presentation is key to making your fajita spread feel festive and inviting. Garnish the platters of cooked protein and vegetables with generous handfuls of freshly chopped cilantro. A scattering of lime wedges on the side adds both visual appeal and a fresh citrus aroma, encouraging diners to add a squeeze of brightness to their wraps.
Consider adding a vibrant dollop of pico de gallo or a rich, creamy guacamole to the center of the serving platter for a colorful focal point. For an extra touch of visual flair and a hint of heat, thinly sliced jalapeños can be artfully arranged. These decorative elements not only enhance the aesthetic appeal but also signal the fresh, flavorful ingredients waiting to be enjoyed.
Side Dishes
Complement your fajitas with classic Mexican-inspired side dishes that enhance the overall dining experience. Fluffy Mexican rice, infused with tomato and spices, provides a comforting and absorbent base for any stray fajita fillings. Creamy refried beans offer a hearty and protein-rich accompaniment that is essential for an authentic meal.
For a lighter, refreshing option, a crisp corn salad tossed with lime juice, red onion, and cilantro adds a delightful sweetness and tang. Grilled corn on the cob, brushed with butter and lime, brings a smoky, sweet element that pairs beautifully with the charred fajita ingredients. Tortilla chips served with extra salsa and guacamole are always a welcome addition for those who enjoy a crunchy starter or extra dips.
Creative Serving Ideas
Beyond the traditional tortilla wrap, there are many inventive ways to serve your delicious fajita filling. Create vibrant fajita salad bowls by serving the seasoned protein and vegetables over a bed of crisp romaine lettuce or mixed greens, topped with your favorite salsa and a drizzle of avocado dressing. This offers a lighter, healthier alternative that is equally satisfying.
For a fun, interactive experience, set up a “fajita bar” where guests can assemble their own creations. Include a wide array of toppings like shredded cheese, pickled onions, black olives, and various hot sauces. You could even offer different types of tortillas, such as whole wheat or corn, to cater to diverse preferences and dietary needs, making the meal a truly personalized culinary journey.
Preparation & Storage
Storing Leftovers
Should you be fortunate enough to have any delicious fajita filling left over, proper storage is key to maintaining its quality and flavor. Allow the cooked protein and vegetables to cool down to room temperature before transferring them to airtight containers. It’s often best to store the protein and vegetables separately to prevent the protein from becoming soggy, especially if it’s steak or chicken.
These containers can then be stored in the refrigerator for up to 3 days. Ensure the containers are sealed tightly to prevent any air exposure, which can lead to premature spoilage or the absorption of other odors from your refrigerator. Properly stored leftovers are a testament to a well-made dish, ready to be enjoyed again.
Freezing
Fajita fillings also freeze remarkably well, making them an excellent candidate for advance meal preparation. Once the cooked protein and vegetables have cooled completely, transfer them into freezer-safe bags or airtight containers. It’s advisable to portion them into servings that you anticipate using at one time to make reheating more convenient and efficient.
Press out as much air as possible before sealing the bags or containers to minimize the risk of freezer burn. Properly packaged fajita leftovers can be stored in the freezer for up to 2 months, maintaining good quality. This is a fantastic way to have a delicious, homemade meal ready to go at a moment’s notice, saving you time on busy days.
Reheating
Reheating your fajita leftovers is straightforward and can be done using several methods, depending on your preference and available equipment. The goal is to warm the ingredients thoroughly without compromising their texture or flavor, aiming to recapture the essence of the freshly cooked dish.
Oven: For the most even reheating, preheat your oven to 350°F (175°C). Spread the fajita filling in a single layer on a baking sheet or in an oven-safe dish. Cover loosely with foil to prevent drying out. Heat for approximately 10-15 minutes, or until the filling is heated through. This method is excellent for restoring a bit of crispness to any vegetables.
Microwave: If you’re short on time, the microwave is a quick option. Place the leftovers in a microwave-safe dish, cover it with a lid or microwave-safe plastic wrap, leaving a small vent for steam. Heat in 1-minute intervals, stirring between each, until the filling is hot and steaming. Be mindful not to overheat, as this can make the protein tough.
Stovetop: A skillet is another great way to reheat fajita filling, especially if you want to bring back a slight char. Heat a tablespoon of oil in a skillet over medium heat. Add the cooled filling and cook for about 5-7 minutes, stirring occasionally, until it’s heated through. This method can help revive some of the texture of the grilled ingredients.
Frequently Asked Questions
-
Can I use different cuts of steak or types of chicken for my fajitas? Absolutely! While flank, skirt, or rump steak are excellent choices for their flavor and texture when grilled, other tender cuts like sirloin can also be used. For chicken, boneless, skinless thighs are often preferred for their moisture and tenderness, but chicken breast works wonderfully too, just be mindful not to overcook it. Experimenting with different proteins can lead to delightful variations and cater to personal taste preferences, making the fajita experience endlessly adaptable to your liking.
-
How can I make my chicken or steak fajitas spicier? To inject more heat into your fajitas, you have several excellent options. You can increase the amount of chili powder in the marinade, or for a more direct heat, add finely minced fresh jalapeños or serrano peppers to the vegetable mix during cooking. Consider incorporating a pinch of cayenne pepper or red pepper flakes into the protein marinade for a consistent warmth throughout. Finally, serving with a selection of spicier salsas, such as a chipotle salsa or a fiery habanero sauce, allows individuals to customize their heat level with each bite.
-
What are the best vegetables to include in fajitas besides peppers and onions? While bell peppers and onions are classic for a reason, the world of fajita vegetables is vast and exciting! Consider adding sliced mushrooms, which absorb flavors beautifully and offer a meaty texture, or zucchini and yellow squash, which grill up nicely and add a subtle sweetness. Corn kernels, either fresh or frozen and lightly charred, bring a delightful pop of sweetness and texture. For a touch of earthiness, thinly sliced sweet potatoes or even asparagus spears can be fantastic additions, providing a unique flavor profile and diverse nutritional benefits to your fajita ensemble.