Irresistibly Chewy Banana Mochi Bread Recipe You'll Love

As the sun peeked through my kitchen window, I felt an irresistible urge to whip up something unique to brighten my day. Enter my latest obsession: Banana Mochi Bread. This delightful recipe beautifully marries the sweet, mellow flavors of ripe bananas with the unexpected chewiness of mochi, all topped off with toasty coconut and crunchy walnuts.
Not only is it gluten-free, dairy-free, and vegan, but it also makes for a quick, satisfying snack or a perfect partner to your morning coffee. With every mouthful, you’ll experience a comforting fusion of textures and tastes that will keep you coming back for more. So, who’s ready to elevate their baking game with this delightful treat?
Why You Will Love This Recipe
- Effortless Preparation: This recipe requires minimal fuss, making it perfect for busy bakers looking for a delicious yet simple treat. You’ll be amazed at how quickly it comes together.
- Unique Texture: Experience the delightful chewiness that mochi is known for, perfectly balanced with the soft texture of banana bread. This combination is truly a revelation for your taste buds.
- Dietary Friendly: Enjoy this wonderful bread knowing it’s naturally gluten-free, dairy-free, and vegan, catering to a wide range of dietary needs without compromising on flavor or enjoyment.
- Versatile Enjoyment: Whether served as a breakfast pastry, an afternoon snack, or even a light dessert, this Banana Mochi Bread fits every occasion beautifully. Its adaptability makes it a kitchen staple.
- Aromatic Delight: The combination of ripe bananas, warm spices, and toasty coconut creates an incredibly inviting aroma as it bakes, filling your home with a comforting and delicious scent.
Ingredients You Need
The foundation of an exceptional Banana Mochi Bread lies in the quality of its ingredients. Selecting ripe, fragrant bananas and the finest glutinous rice flour will significantly enhance the final texture and taste. Each component plays a crucial role in achieving that signature chewy consistency and delightful banana flavor we all crave. Careful attention to ingredient freshness and type will ensure a truly memorable baking experience.
Chewy Banana Mochi Bread
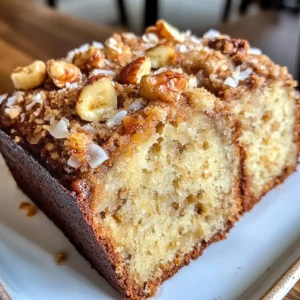
This delightful recipe beautifully marries the sweet, mellow flavors of ripe bananas with the unexpected chewiness of mochi, all topped off with toasty coconut and crunchy walnuts. It's gluten-free, dairy-free, and vegan, making it a quick, satisfying snack or a perfect partner to your morning coffee. Experience a comforting fusion of textures and tastes that will keep you coming back for more.
- 3 medium Ripe Bananas (Very ripe for best flavor)
- 1 cup Glutinous Rice Flour (Essential for mochi texture)
- 1/2 cup Sugar (Adjust based on sweetness preference)
- 1 tsp Baking Powder (Ensure it’s fresh)
- 1/4 tsp Salt (Enhances overall flavor)
- 1 cup Coconut Milk (Can substitute with dairy-free milk)
- 1/4 cup Avocado Oil (Can swap for melted coconut oil)
- 1 tsp Vanilla Extract (Enhances overall taste)
- 1/2 cup Chopped Walnuts (Toast for better flavor)
- 1/2 cup Toasted Coconut Flakes (Toast carefully to prevent burning)
- 1Preheat your oven to 350°F (175°C) and prepare a 9x9 inch baking dish by greasing or lining it.
- 2In a large mixing bowl, combine glutinous rice flour, sugar, baking powder, and salt. Whisk to blend evenly.
- 3In a separate bowl, mash very ripe bananas until smooth. Add coconut milk, avocado oil, and vanilla extract. Mix until creamy.
- 4Pour the banana mixture into the bowl of dry ingredients. Fold with a spatula until just combined. The batter will be thick and sticky.
- 5Gently fold in the chopped walnuts.
- 6Spread the batter evenly in the prepared baking dish.
- 7Bake for 40-45 minutes, or until a toothpick inserted comes out clean.
- 8While the bread bakes, toast the coconut flakes in a dry skillet over medium heat, stirring frequently for 4-5 minutes until golden brown.
- 9Allow the Banana Mochi Bread to cool completely in the dish before slicing.
- 10Sprinkle the toasted coconut flakes on top before serving.
Keywords: banana mochi bread, chewy, gluten-free, dairy-free, vegan, snack, dessert, breakfast
- ripe bananas: extremely ripe bananas are key for maximum sweetness and moisture; look for ones with plenty of brown spots or that are mostly brown.
- glutinous rice flour: this is essential for the chewy, mochi-like texture; do not substitute with regular rice flour as the outcome will be very different.
- sugar: adjust the amount according to your personal preference for sweetness; a standard granulated sugar works perfectly here.
- baking powder: ensure it is fresh to guarantee proper leavening and a light yet chewy texture in the final bake.
- salt: a small amount of salt is crucial for balancing the sweetness and enhancing all the other flavors present in the bread.
- coconut milk: this provides creaminess and moisture; any unsweetened dairy-free milk can be used as a substitute if coconut is not preferred.
- avocado oil: a neutral oil that adds moisture and tenderness; melted coconut oil or a light vegetable oil are good alternatives.
- vanilla extract: a classic flavor enhancer that complements the banana and adds a warm aromatic note to the bread.
- chopped walnuts: for a delightful crunch and nutty flavor; toasting them beforehand will bring out their best taste.
- toasted coconut flakes: these are used as a topping to add texture and a complementary coconut flavor.
The precise quantities for these ingredients are detailed within the accompanying recipe card.
Variations
To customize your Banana Mochi Bread, consider adding a handful of fresh blueberries or raspberries directly into the batter before baking. These berries will burst with flavor as the bread bakes, creating delightful pockets of fruity sweetness. The slight tartness of the berries provides a wonderful contrast to the sweet banana and chewy mochi.
For those who adore chocolate, folding in a generous amount of dark chocolate chips into the batter is a game-changer. As the bread bakes, the chocolate chips will melt, creating gooey, decadent pockets that elevate this treat to pure indulgence. This variation transforms the bread into a rich dessert perfect for satisfying any sweet craving.
If you’re looking for a more complex flavor profile, a pinch of ground cinnamon, nutmeg, or even cardamom can be added to the dry ingredients. These warm spices infuse the bread with an aromatic depth, perfect for cozy autumn or winter days. They beautifully complement the banana and enhance the overall comforting nature of this bake.
How to Prepare Banana Mochi Bread Recipe
Step 1: Prepare Your Baking Environment
Begin the process of creating your delicious Banana Mochi Bread by preheating your oven to precisely 350 degrees Fahrenheit (175 degrees Celsius). This crucial first step ensures that your bread bakes evenly from the moment it enters the oven, developing that perfect golden crust. Simultaneously, prepare a standard 9×9 inch baking dish by generously greasing its interior surfaces.
Alternatively, you can line the baking dish with parchment paper, extending the edges slightly to create easy handles for lifting the finished bread out once it has cooled. Proper preparation of the baking vessel prevents sticking and ensures your efforts are rewarded with a beautifully presented loaf. This attention to detail at the outset sets the stage for a successful bake and effortless serving.
Step 2: Combine the Dry Foundations
In a sufficiently large mixing bowl, meticulously combine the glutinous rice flour, granulated sugar, baking powder, and salt. Use a whisk to ensure these dry ingredients are thoroughly integrated, creating a uniform mixture free from lumps. This uniform distribution is vital for achieving consistent texture and ensuring the leavening agents are spread evenly throughout the batter.
The glutinous rice flour is the key to the signature chewy texture, while the baking powder will provide the necessary lift. Taking the time to whisk these components together ensures that every bite of your Banana Mochi Bread will have the desired chewy and tender quality. A well-mixed dry base contributes significantly to the overall success of the bread’s structure and mouthfeel.
Step 3: Create the Luscious Banana Mixture
In a separate, medium-sized bowl, take your very ripe bananas and mash them thoroughly with a fork or a potato masher until they achieve a smooth, lump-free consistency. The ripeness of the bananas is paramount, as it significantly impacts the sweetness and moisture content of the final bread. Mash them until they are as close to a puree as possible.
To this smooth banana base, add the creamy coconut milk, the neutral avocado oil, and the aromatic vanilla extract. Whisk these wet ingredients together until they are completely combined and form a uniform, slightly emulsified liquid. This mixture is where much of the bread’s moisture and foundational flavor will originate, so ensuring it’s well-blended is key.
Step 4: Marry the Wet and Dry Components
Now, it’s time to bring together the two prepared mixtures. Gently pour the wet banana mixture from Step 3 into the large bowl containing the dry ingredients from Step 2. Using a spatula, begin to fold the wet ingredients into the dry ingredients. Continue this process only until the ingredients are just combined, and you no longer see streaks of dry flour.
It is important not to overmix at this stage; a few small lumps in the batter are perfectly acceptable and often desirable for achieving the perfect mochi-like texture. The batter will naturally be quite thick and sticky, which is exactly what you want. This sticky consistency is the hallmark of mochi-style baking and ensures that delightful chewiness.
Step 5: Introduce the Crunchy Element
Gently fold the chopped walnuts into the thick, sticky batter. Use your spatula to incorporate them throughout the mixture without overworking the batter. The goal here is to distribute the walnuts evenly so that each slice of Banana Mochi Bread offers a satisfying crunch. Overmixing can develop the gluten in the flour and negatively impact the mochi texture.
Ensure that the walnuts are nestled within the batter, providing textural contrast to the chewy bread. If you prefer, you can lightly toast the walnuts before adding them; this process significantly enhances their nutty flavor and aroma, adding another layer of complexity to the final product. This step adds a delightful textural element that complements the chewiness beautifully.
Step 6: Bake to Golden Perfection
Once the batter is thoroughly, yet gently, mixed with the walnuts, spread it evenly into your prepared 9×9 inch baking dish. Use your spatula to smooth the top of the batter, ensuring an even layer for consistent baking. Place the dish into the preheated oven to begin the baking process.
Bake for approximately 40 to 45 minutes, or until a toothpick inserted into the center of the bread comes out clean. This test indicates that the interior of the bread is cooked through. Keep an eye on the bread towards the end of the baking time, as oven temperatures can vary. A perfectly baked Banana Mochi Bread will have a beautiful golden-brown hue on top and a wonderfully chewy center.
Step 7: Prepare the Irresistible Topping
While your Banana Mochi Bread is baking, turn your attention to preparing the crunchy coconut topping. Take the specified amount of coconut flakes and place them into a dry skillet over medium heat. It is essential to stir the coconut flakes frequently to prevent them from burning, as they can turn from golden to burnt very quickly.
Continue to toast the coconut flakes, stirring constantly, for about 4 to 5 minutes. You are looking for a beautiful, even golden-brown color and a wonderfully toasted aroma. This process intensifies the coconut flavor and adds a delightful crispness that will perfectly complement the soft, chewy bread. Be vigilant during this step, as burnt coconut is bitter.
Step 8: The Grand Finale: Cool and Adorn
Once the Banana Mochi Bread has finished baking and a toothpick comes out clean, carefully remove the baking dish from the oven. Allow the bread to cool completely within the dish on a wire rack. This cooling period is absolutely crucial; it allows the mochi structure to set properly, ensuring the best chewy texture and making it easier to slice.
Rushing this step can result in a bread that is too soft or sticky to cut cleanly. Once the bread has reached room temperature, generously sprinkle the toasted coconut flakes evenly over the top surface. Finally, slice the cooled bread into squares or desired portions and serve. The contrast between the warm, chewy bread and the crunchy, toasted coconut is pure delight.
Pro Tips for Banana Mochi Bread Recipe
The Ripeness Factor: Always opt for the ripest bananas you can find for this recipe. Those heavily speckled or almost entirely brown bananas possess the highest sugar content and most intense banana flavor, which translates directly into a sweeter and more aromatic bread. Don’t be tempted to use underripe bananas; they simply won’t deliver the same depth of flavor and sweetness. The riper, the better is the golden rule here.
Gentle Mixing is Key: When combining the wet and dry ingredients, remember that less is more. Overmixing can lead to a dense, tough bread rather than the desired chewy texture. It is perfectly acceptable, and often beneficial, to have a few small lumps remaining in the batter. Focus on just bringing the ingredients together until they are incorporated.
Watch the Heat on Coconut: Toasting coconut flakes requires vigilance. They are prone to burning very quickly due to their low moisture content and high fat. Keep the heat at a medium level and stir them almost constantly. A beautiful golden brown is the goal; anything darker may result in a burnt, bitter flavor that detracts from the bread.
Patience with Cooling: The cooling process is non-negotiable for achieving the optimal mochi texture. Allowing the bread to cool completely in the pan ensures that the interior structure sets up properly. Attempting to slice it while warm can result in a gummy, difficult-to-handle texture. Let it rest, and the chewiness will emerge.
Airtight Storage for Freshness: To maintain the delightful chewiness and moisture of your Banana Mochi Bread, it’s essential to store it properly. Once cooled, transfer any leftovers to an airtight container. This simple step prevents the bread from drying out, ensuring it remains enjoyable for up to three days at room temperature.
Serving Suggestions for Banana Mochi Bread Recipe
Decoration
Elevate the visual appeal of your Banana Mochi Bread by adding a sprinkle of extra toasted coconut flakes just before serving. For a touch of elegance, a delicate drizzle of melted dark chocolate or a swirl of rich caramel sauce can transform this simple bread into a more sophisticated dessert. A few fresh banana slices or a dusting of powdered sugar also add a charming finishing touch.
Side Dishes
This Banana Mochi Bread pairs wonderfully with a variety of beverages. A steaming cup of freshly brewed coffee or a fragrant herbal tea makes for a delightful morning or afternoon treat. For a richer experience, consider serving it alongside a scoop of creamy vanilla bean ice cream or a dollop of dairy-free whipped cream. A side of fresh berries also offers a refreshing counterpoint to its sweetness.
Creative Serving Ideas
Cut the cooled Banana Mochi Bread into small, bite-sized squares and arrange them on a decorative platter for a party or gathering. These squares are perfect for a tea party or as an accompaniment to a light brunch spread. For a more indulgent dessert option, warm a slice slightly and top it with a spoonful of your favorite fruit compote or a drizzle of maple syrup.
Preparation & Storage
Storing Leftovers
To keep your delicious Banana Mochi Bread fresh and wonderfully chewy, store any leftovers in an airtight container at room temperature. This method is ideal for preserving its texture and moisture for up to three days. Ensure the container is well-sealed to prevent air from drying out the bread and affecting its delightful mochi quality.
Freezing
For longer-term storage, slicing the Banana Mochi Bread into individual portions before freezing is highly recommended. Lay the slices in a single layer on a baking sheet lined with parchment paper and freeze until solid. Once frozen, transfer the slices into a heavy-duty zip-top bag, removing as much air as possible to prevent freezer burn. Frozen slices can last for up to a month and can be thawed as needed.
Reheating
To enjoy frozen Banana Mochi Bread, the best method is to allow it to thaw overnight in the refrigerator. Once thawed, you can gently reheat individual slices. A quick 20-second zap in the microwave will often suffice to warm it through and restore some of its soft texture. Alternatively, you can warm it in a preheated oven at a low temperature for a few minutes until heated through.
Frequently Asked Questions
-
What kind of bananas are best for Banana Mochi Bread, and why?
For the absolute best flavor and sweetness, it is highly recommended to use very ripe bananas that are heavily speckled or have a majority brown peel. These bananas have broken down sugars and a more concentrated banana essence, which directly contributes to a sweeter, more flavorful, and moist mochi bread. Underripe bananas will result in a less sweet and less aromatic outcome.
-
My Banana Mochi Bread came out too dense; what could have gone wrong?
A dense texture in Banana Mochi Bread often stems from overmixing the batter. When the wet and dry ingredients are combined too vigorously, it can develop the glutinous rice flour too much, leading to a heavier crumb. It’s crucial to fold gently until just combined, and don’t be alarmed by a few lumps. Additionally, ensure your baking powder is fresh; an old leavening agent won’t provide adequate lift.
-
Can I make this Banana Mochi Bread ahead of time, and how should I store it?
Absolutely, this recipe is fantastic for making ahead! You can store cooled Banana Mochi Bread in an airtight container at room temperature for up to 3 days, which is perfect for snacks. If you need to store it for longer, refrigeration can extend its freshness for up to a week, though it might slightly alter the texture; always wrap it tightly. For even longer storage, freezing individual slices is an excellent option.