Secretly Healthier Chocolate Mousse: Tempting and Easy Delight

Indulge in the rich and creamy pleasure of Secretly Healthier Chocolate Mousse, a decadent dessert that satisfies your sweet tooth without the guilt. This delightful treat features a unique blend of Greek yogurt and dark chocolate, offering a luscious texture while significantly reducing calories. Perfect for any occasion—from festive gatherings to cozy weeknights—this mousse is both easy to prepare and versatile.
With just a handful of wholesome ingredients and simple steps, you can create a nutritious dessert that your friends and family will adore. Plus, it’s ideal for make-ahead planning, allowing you to focus on enjoying the moment. This recipe is a testament to the fact that healthy eating doesn’t mean sacrificing deliciousness.
Why You Will Love This Recipe
- Healthier Ingredients: This mousse thoughtfully swaps heavy cream for protein-rich Greek yogurt, significantly reducing calories and fat while boosting the nutritional profile without compromising on the rich, decadent flavor and texture.
- Effortless Preparation: Designed for simplicity, this dessert comes together in just a few straightforward steps, making it an ideal choice for novice cooks and busy individuals alike who desire a gourmet treat with minimal fuss.
- Customizable Flavor: The use of dark chocolate allows for a wonderfully adaptable flavor base, enabling you to adjust the intensity and sweetness to perfectly match your personal preferences, ensuring a truly bespoke dessert experience.
- Perfect for Any Occasion: Whether you are hosting an elegant dinner party, celebrating a special holiday, or simply seeking a comforting weeknight treat, this versatile chocolate mousse seamlessly fits every scenario, impressing guests and satisfying cravings.
- Make-Ahead Convenience: Enjoy the luxury of preparing this delicious mousse several days in advance, which is incredibly beneficial for entertaining, as it frees up your time to mingle with guests and reduces last-minute kitchen stress.
Ingredients You Need
The secret to an extraordinary Secretly Healthier Chocolate Mousse lies in the quality of its ingredients. Opting for the freshest, highest-quality components will undoubtedly elevate the final texture and depth of flavor. Even simple additions can transform the ordinary into the extraordinary.
Secretly Healthier Chocolate Mousse
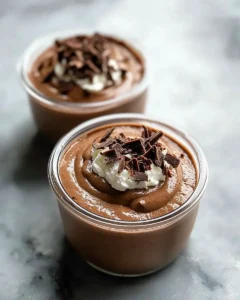
Indulge in the rich and creamy pleasure of Secretly Healthier Chocolate Mousse, a decadent dessert that satisfies your sweet tooth without the guilt. This delightful treat features a unique blend of Greek yogurt and dark chocolate, offering a luscious texture while significantly reducing calories. Perfect for any occasion—from festive gatherings to cozy weeknights—this mousse is both easy to prepare and versatile. With just a handful of wholesome ingredients and simple steps, you can create a nutritious dessert that your friends and family will adore. Plus, it's ideal for make-ahead planning, allowing you to focus on enjoying the moment.
- 3 large eggs, separated into yolks and whites
- 3/4 cup plain non-fat Greek yogurt
- 1/4 cup light brown sugar
- 2 tablespoons flour
- Pinch of fine sea salt
- 1 1/2 cups dark chocolate chips
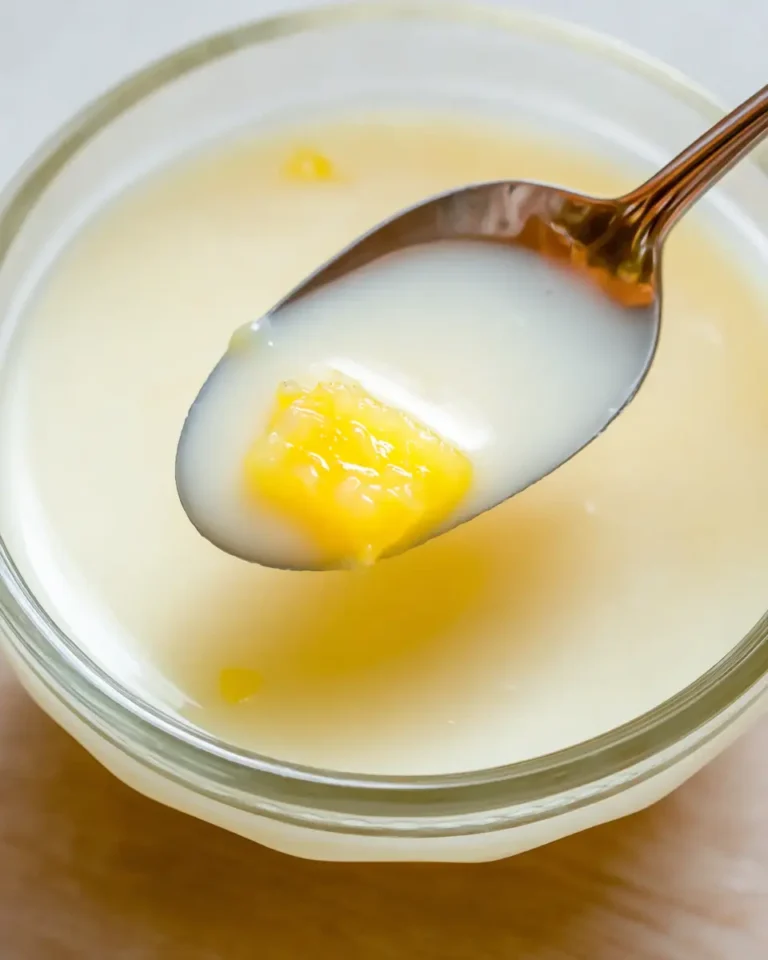
- 1In a small saucepan, whisk together egg yolks, Greek yogurt, brown sugar, flour, and sea salt. Place over low heat and cook, stirring constantly, for 5 minutes or until the mixture has thickened slightly.
- 2Remove the saucepan from heat and allow to cool slightly for about 2 minutes. Add the chocolate chips and stir until they melt into the egg yolk mixture. Set aside to cool completely.
- 3In a standing mixer, whip egg whites to stiff peaks. Gradually drizzle in the melted chocolate mixture while gently folding to keep the egg whites fluffy.
- 4Pour mousse into 8 small ramekins. Refrigerate for at least 2 hours (up to 5 days) before serving!
Keywords: chocolate mousse, healthy dessert, greek yogurt, easy dessert, make ahead, vegetarian dessert, gluten-free option (if flour is substituted)
- eggs: large eggs, separated into yolks and whites, form the structural base and creamy richness.
- greek yogurt: plain non-fat Greek yogurt provides the essential creamy texture and healthy protein boost.
- light brown sugar: adds a subtle caramel note and sweetness that complements the dark chocolate.
- flour: a small amount of all-purpose flour helps to thicken the mixture slightly, contributing to the mousse’s body.
- fine sea salt: a pinch enhances the chocolate flavor and balances the sweetness, bringing out the best in every ingredient.
- dark chocolate chips: high-quality dark chocolate is crucial for that deep, luxurious chocolate flavor that defines this mousse.
The precise quantities for each ingredient are readily available in the provided recipe card, ensuring you have all the necessary details for a perfect outcome.
Variations
While the classic Secretly Healthier Chocolate Mousse is undeniably divine, its inherent versatility opens doors to exciting variations that cater to diverse dietary needs and flavor preferences. These adaptations allow everyone to enjoy this delightful dessert.
Vegan Delight: For a completely vegan iteration, the substitution of eggs is key. Silken tofu or a blend of avocado and cocoa powder can be used to achieve a similar creamy texture. The Greek yogurt can be replaced with a rich, unsweetened plant-based yogurt, such as coconut or soy. Ensure your dark chocolate is also dairy-free. This approach delivers a wonderfully rich and satisfying mousse without any animal products.
Low-Carb Indulgence: To cater to a low-carbohydrate lifestyle, the sugar content can be significantly reduced or replaced with a keto-friendly sweetener like erythritol or stevia. The amount of dark chocolate, which naturally contains some carbohydrates, might need slight adjustment depending on your specific carb targets. This variation ensures that those managing their carbohydrate intake can still partake in this luscious dessert.
Flavor Infusions: Elevate the basic chocolate profile with thoughtful additions. A teaspoon of high-quality espresso powder can deepen the chocolate flavor, creating a mocha-like mousse. Alternatively, a few drops of pure peppermint extract or a hint of orange zest can introduce sophisticated flavor dimensions. These small additions can transform the mousse into something truly unique and memorable, perfect for adventurous palates.
How to Prepare secretly healthier chocolate mousse
Step 1: Prepare the Yolky Base
Begin by gathering your ingredients for the foundational mixture. In a small, reliable saucepan, you will combine the egg yolks with the plain non-fat Greek yogurt. This creamy yogurt serves as the healthy heart of the mousse, replacing some of the traditional heavy cream. Whisk these together thoroughly until they are well incorporated and free from any lumps.
Next, introduce the light brown sugar to this mixture. The brown sugar not only provides sweetness but also a subtle caramel undertone that beautifully complements the dark chocolate. Whisk it in until it’s fully dissolved. Then, carefully add the all-purpose flour. This small amount of flour acts as a gentle thickener, ensuring your mousse achieves that perfect, luxurious consistency without being heavy. Finally, a pinch of fine sea salt is added; this crucial ingredient amplifies the chocolate’s flavor and balances the overall sweetness, making the dessert more complex and enjoyable.
Place the saucepan over very low heat. Continuous stirring is absolutely essential during this stage to prevent any scorching or uneven cooking of the egg yolks. You will gently cook this mixture for approximately five minutes. During this time, you will notice the mixture gradually thickening. It should reach a consistency that coats the back of a spoon lightly. Avoid boiling; the goal is a gentle warming and thickening process. Once it has achieved the desired slight thickness, immediately remove the saucepan from the heat source. This careful temperature control ensures the eggs cook safely without scrambling, and the flour fully integrates.
Step 2: Melt and Incorporate the Chocolate
Once the yolky base has been gently heated and slightly thickened, remove the saucepan from the heat. It is important to allow the mixture to cool for a brief period, approximately two minutes. This short cooling phase prevents the residual heat from shocking or damaging the delicate dark chocolate chips when they are introduced. It ensures a smoother melting process and preserves the integrity of the chocolate’s flavor profile.
After this brief cooling interval, add the 1 1/2 cups of dark chocolate chips directly into the warm, thickened base. The residual warmth from the mixture will be sufficient to begin the melting process. Stir the chocolate chips into the base continuously and gently. You will witness the chips gradually transforming into a smooth, glossy liquid, seamlessly blending with the egg yolk and yogurt mixture. Continue stirring until all the chocolate is completely melted and fully incorporated, creating a rich, homogenous chocolate base.
Once the chocolate is fully melted and the mixture is smooth and uniformly chocolatey, set the saucepan aside. This rich chocolate base needs to cool down considerably before it can be combined with the whipped egg whites. Allowing it to reach room temperature, or even slightly cooler, is crucial. If the chocolate mixture is too warm, it will deflate the air from the whipped egg whites, resulting in a denser mousse. Ensure it cools sufficiently, which may take about 15-20 minutes, stirring occasionally to prevent a skin from forming and to speed up the cooling.
Step 3: Whip Egg Whites to Stiff Peaks
In the clean bowl of a standing mixer, or using a hand mixer with a large bowl, begin whipping the 3 large egg whites. Ensure the bowl and whisk attachment are impeccably clean and free from any traces of grease or yolk. Even a tiny amount of fat can prevent the egg whites from reaching their full volume and stiff peaks. Start the mixer on a medium speed and continue whipping until the egg whites become foamy and opaque, resembling soft clouds.
As the egg whites start to form soft peaks, gradually increase the mixer’s speed to medium-high. Continue whipping until the peaks that form on the whisk are firm and stand up straight when the whisk is lifted. These are known as “stiff peaks.” Be careful not to overbeat the egg whites, as they can become dry and grainy, which will also negatively impact the mousse’s texture. The ideal consistency is glossy and holds its shape firmly.
Once the egg whites have achieved stiff peaks, it’s time to carefully incorporate the cooled chocolate mixture. This step requires a delicate touch to maintain the airy volume of the whipped egg whites. Add about one-third of the cooled chocolate mixture to the whipped egg whites. Using a spatula, gently fold the chocolate into the egg whites using an under-and-over motion. This process is called “folding” and is designed to incorporate the heavier chocolate mixture without knocking out too much air. Continue folding until just combined, then add the remaining chocolate mixture in two more additions, folding gently after each until no white streaks remain.
Step 4: Combine and Fold with Care
This is a pivotal stage where the airy texture of the mousse is meticulously created. After the egg whites have been whipped to stiff peaks and the chocolate mixture has cooled adequately, it’s time for them to meet. You will be gently folding these two components together, a technique that preserves the air incorporated into the egg whites, which is essential for a light and fluffy mousse.
Begin by adding approximately one-third of the cooled chocolate mixture to the bowl containing the whipped egg whites. Using a large, flexible spatula, begin the folding process. Start by cutting down through the center of the mixture, then scooping under the egg whites from the side and bringing them up and over the chocolate. Rotate the bowl slightly after each fold. The goal is to gently combine the ingredients without vigorous stirring, which would deflate the egg whites.
Once that first addition of chocolate is mostly incorporated, add another third of the chocolate mixture, and repeat the gentle folding process. Continue until you have added all the chocolate mixture and the entire batter is a uniform, rich chocolate color. It is important to stop folding as soon as no white streaks of egg white are visible; over-folding can still lead to a loss of airiness. The resulting mixture should be light, airy, and luxuriously smooth, a testament to your careful technique.
Step 5: Portion and Chill for Perfect Setting
With your beautifully combined and airy chocolate mousse mixture ready, the next step is to divide it into individual serving portions. You will need about 8 small ramekins for this. Using your spatula, carefully spoon the mousse mixture into each ramekin. Aim for even distribution so that each serving is roughly the same size, ensuring a consistent dessert experience for everyone.
Gently tap the bottom of each ramekin on the countertop once or twice after filling. This simple action helps to settle the mousse and eliminate any large air pockets, contributing to a smoother final texture. It also ensures that the top surface of the mousse is relatively even, making for a more aesthetically pleasing presentation once chilled and ready to serve. Take your time during this portioning process to ensure neatness.
Once all the ramekins are filled and gently settled, they must be chilled. Cover each ramekin loosely with plastic wrap. This prevents the mousse from absorbing any odors from the refrigerator and also stops a skin from forming on the surface. Place the ramekins in the refrigerator and allow them to chill for a minimum of 2 hours. For the best texture and flavor development, chilling for longer, up to 5 days, is perfectly acceptable and recommended if you are preparing it in advance for guests. The chilling time allows the mousse to set properly, developing its signature creamy, melt-in-your-mouth consistency.
Step 6: Garnish and Serve Your Masterpiece
After the Secretly Healthier Chocolate Mousse has had ample time to chill and set, it is ready to be transformed into a visually appealing dessert. While the mousse itself is inherently delightful, a few thoughtful garnishes can elevate its presentation from delicious to truly spectacular. Consider the aesthetic appeal you wish to achieve; simple elegance often works best.
A classic and incredibly effective garnish is a dollop of freshly whipped cream. Use heavy cream whipped with a touch of powdered sugar and vanilla extract until it forms soft peaks. A generous swirl or quenelle of this light, airy cream on top of the rich chocolate mousse provides a beautiful visual contrast and a delightful textural difference. Alternatively, you could opt for a sprinkle of fine chocolate shavings or curls. Using a vegetable peeler on a good quality dark chocolate bar can create elegant curls that echo the mousse’s primary flavor.
For added color and freshness, consider garnishing with a few fresh berries. Raspberries, with their vibrant red hue and slightly tart flavor, pair exceptionally well with dark chocolate. A small sprig of fresh mint can also introduce a refreshing aroma and a pop of green color, offering a lovely sensory experience. Another creative touch could be a very light dusting of cocoa powder or a single, delicate chocolate-covered strawberry placed artfully on top. These final touches transform your homemade mousse into a dessert worthy of any fine dining establishment.
Pro Tips for secretly healthier chocolate mousse
Use Room Temperature Eggs: For optimal volume when whipping egg whites, ensure they are at room temperature. Cold eggs don’t incorporate as much air, which is crucial for a light and fluffy mousse texture. Allowing them to sit out for about 30 minutes before separating and whipping makes a significant difference.
Melt Chocolate Gently: When melting the dark chocolate chips, low and slow is the mantra. Whether you use a double boiler or microwave in short intervals, avoid high heat. Overheating can cause chocolate to seize, resulting in a grainy or clumpy texture that will mar your mousse.
Fold with Patience: The key to a truly airy mousse lies in the folding technique. Be gentle and deliberate when combining the chocolate mixture with the whipped egg whites. Stop folding as soon as no streaks of white remain to maintain as much air as possible for that signature light consistency.
Chill Thoroughly: Don’t be tempted to serve the mousse too early. Adequate chilling time, at least two hours, is non-negotiable for the mousse to set properly and achieve its characteristic creamy, smooth texture. Overnight chilling often yields even better results.
Quality Matters: The flavor of your mousse is heavily dependent on the quality of the dark chocolate you use. Opt for a good-quality dark chocolate, preferably with a cocoa percentage between 60-70%, for the richest and most satisfying chocolate flavor without excessive sweetness.
Serving Suggestions for secretly healthier chocolate mousse
Decoration
Elevating the visual appeal of your Secretly Healthier Chocolate Mousse can be as simple as adding a few artistic touches. A dollop of freshly whipped cream, made from heavy cream and a touch of sweetener, offers a classic and elegant contrast in texture and color. For a more sophisticated look, consider dusting the top with a fine layer of unsweetened cocoa powder or creating delicate chocolate shavings using a vegetable peeler against a high-quality dark chocolate bar.
Fresh berries are another fantastic option, providing vibrant pops of color and a hint of tartness that complements the rich chocolate. Think jewel-like raspberries, bright strawberries, or even plump blueberries. A single sprig of fresh mint can add a touch of green and an inviting aroma, making the dessert even more enticing. These decorative elements not only please the eye but also enhance the overall sensory experience of enjoying your healthier mousse.
Side Dishes
Complementing your Secretly Healthier Chocolate Mousse with carefully chosen side dishes can create a balanced and memorable dessert course. A simple fruit salad featuring seasonal fruits like melon, grapes, and kiwi can offer a refreshing and palate-cleansing counterpoint to the rich chocolate. The natural sweetness and slight acidity of the fruits cut through the density of the mousse beautifully.
For those who enjoy a deeper dive into chocolate, consider pairing the mousse with a few perfectly ripe chocolate-dipped strawberries. This echoes the primary flavor profile while adding an extra layer of indulgence and visual appeal. Alternatively, a small selection of crisp, buttery shortbread cookies provides a delightful textural contrast, their slight saltiness balancing the sweetness of the mousse.
A small serving of artisanal cheese, particularly a mild brie or a creamy mascarpone, can offer an unexpected yet delightful savory dimension. The creaminess of the cheese harmonizes with the mousse, while its savory notes provide an intriguing counterpoint. Finally, a small scoop of high-quality vanilla bean ice cream alongside the chocolate mousse offers a classic pairing that is always a crowd-pleaser, providing a cool, creamy base that softens the richness.
Creative Serving Ideas
Beyond traditional ramekins, think outside the box for presentation. Individual shot glasses filled with the mousse can create elegant, bite-sized portions perfect for parties or as an after-dinner treat. Layering the mousse with a crumbled dark chocolate cookie base or a few fresh raspberries at the bottom of the glass adds both flavor and visual interest, creating a parfait-like effect.
Consider serving the mousse in small, clear dessert bowls that allow the rich color to shine through. A light drizzle of raspberry coulis or a thin swirl of caramel sauce over the top can add an extra flourish of flavor and artistry. For a more rustic presentation, you could serve the mousse in miniature tart shells or even hollowed-out chocolate cups, further enhancing the chocolate theme.
Another unique approach is to create a “mousse bar” where guests can customize their own dessert. Offer a selection of toppings like toasted nuts (pistachios, almonds), mini chocolate chips, shredded coconut, and a variety of fruit compotes. This interactive element allows everyone to personalize their treat, making the dessert experience more engaging and memorable for all your guests. This also caters to varied preferences and dietary needs effectively.
Preparation & Storage
Storing Leftovers
Proper storage is essential to maintain the delightful texture and flavor of your Secretly Healthier Chocolate Mousse. If you happen to have any leftovers, the key is to keep them protected from air and moisture. The best method is to transfer any uneaten mousse into an airtight container. This prevents the mousse from drying out and also stops it from absorbing any unwanted odors from other foods in the refrigerator.
Ensure the container is a good fit, minimizing the amount of air trapped inside. For individual servings that were not fully consumed, simply cover the original ramekin tightly with plastic wrap or aluminum foil. This helps to preserve the individual portions. When stored correctly in the refrigerator, the mousse will remain at its best quality for up to 5 days. However, for optimal taste and texture, it is always recommended to consume it within the first 2-3 days after preparation.
Freezing
While this Secretly Healthier Chocolate Mousse is undeniably best enjoyed fresh or within a few days of refrigeration, freezing is a viable option if you need to store it for a longer period. Keep in mind that freezing and thawing can slightly alter the texture, potentially making it a bit less airy than when it was freshly made. However, it will still be a delicious treat.
To freeze the mousse, first ensure it is in individual portions or a suitable freezer-safe container. Spoon the mousse into individual airtight containers or cover the ramekins very securely with plastic wrap, followed by a layer of aluminum foil to prevent freezer burn. Label the container with the date. Properly frozen mousse can last for up to 1 month. Avoid freezing for longer periods, as quality can degrade significantly.
Reheating
If you have frozen your Secretly Healthier Chocolate Mousse, it will need to be thawed before serving. The most recommended method for reheating or thawing is to simply move the frozen mousse from the freezer to the refrigerator. Allow it to thaw completely in the refrigerator for several hours, or preferably overnight. This slow thawing process helps to preserve the texture as much as possible and allows the mousse to re-firm gently.
Once thawed in the refrigerator, the mousse should regain much of its original consistency. You can serve it directly from the fridge. Avoid any rapid reheating methods like microwaving directly, as this can cause the delicate structure to break down and become watery. If the thawed mousse seems slightly softer than desired, you can briefly re-chill it for an additional 30 minutes to an hour before serving. Gentle handling throughout the thawing process is key.
Frequently Asked Questions
-
Can I use different types of chocolate for this recipe?
Absolutely! While the recipe calls for dark chocolate chips, you can certainly experiment with other chocolate varieties. Using milk chocolate will result in a sweeter, creamier mousse with a less intense chocolate flavor. White chocolate will yield an even sweeter and lighter-colored mousse, though it may require adjusting the sweetness of the overall recipe as white chocolate contains more sugar. Keep in mind that the cocoa content significantly impacts the final flavor and texture, so darker chocolates generally provide a richer, more complex taste that pairs exceptionally well with the healthier base.
-
How do I make this dessert dairy-free and suitable for vegans?
Creating a dairy-free and vegan version of this Secretly Healthier Chocolate Mousse is entirely achievable with a few key substitutions. For the Greek yogurt, opt for a thick, unsweetened plant-based yogurt, such as coconut yogurt, soy yogurt, or almond yogurt. Ensure your chosen plant-based yogurt has a good consistency to mimic the creaminess of dairy yogurt. The dark chocolate chips must also be checked to ensure they are dairy-free; many high-quality dark chocolates are, but it’s always wise to read the ingredients list. The eggs can be substituted using a combination of silken tofu or a ripe avocado blended until smooth to provide the necessary richness and binding properties, although this will alter the texture slightly and may introduce subtle flavors from the substitute.
-
Can I add other flavors or extracts to my Secretly Healthier Chocolate Mousse?
The base recipe for this chocolate mousse is wonderfully adaptable, making it an excellent canvas for a variety of flavor enhancements. A teaspoon of high-quality instant espresso powder, dissolved in a tablespoon of warm water before being added to the chocolate mixture, will intensify the chocolate flavor and create a delightful mocha note. A few drops of pure vanilla extract are a classic addition that enhances the overall sweetness and complexity. For a hint of warmth, a pinch of cinnamon or chili powder can be intriguing. Mint extract, orange zest, or a touch of almond extract can also be added to create distinctly different flavor profiles, transforming the mousse into something truly unique and exciting for your palate.