Glazed Pineapple Juice Bundt Cake
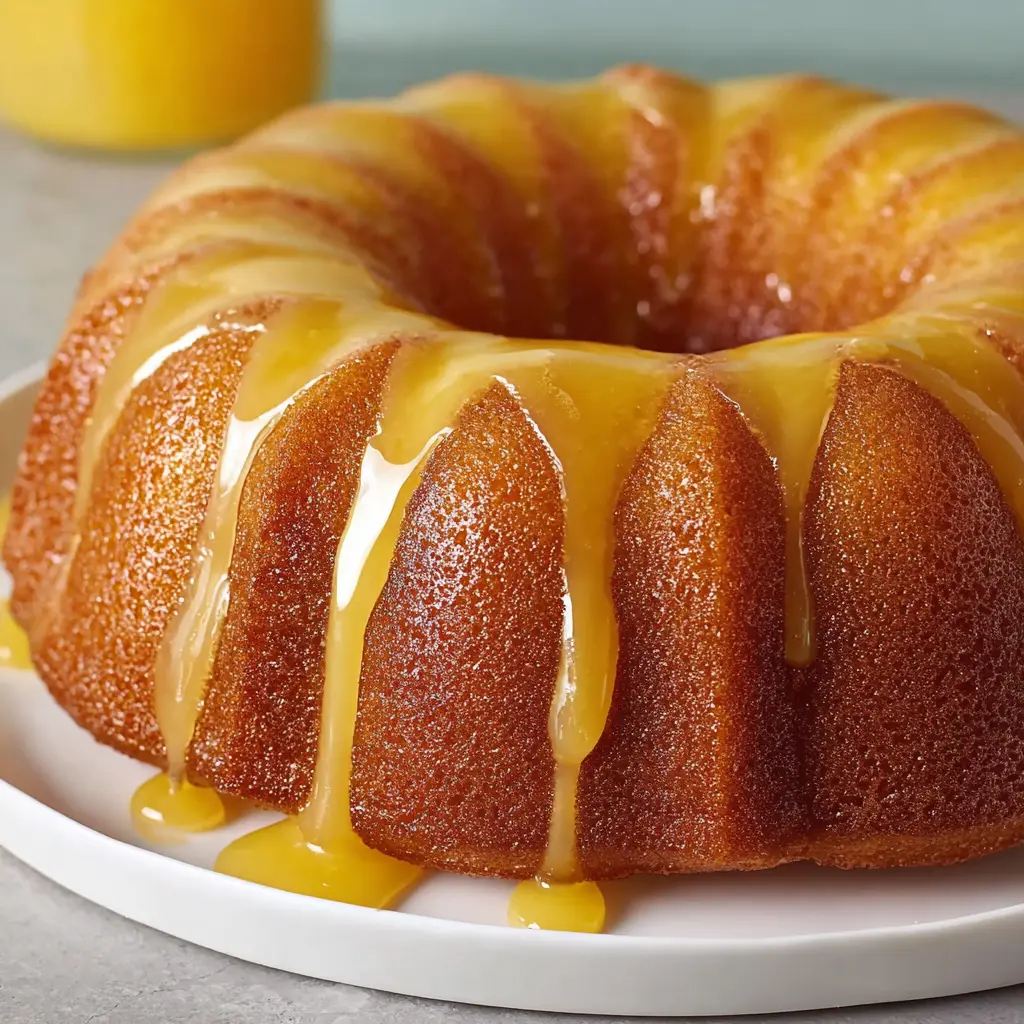
The scent of warm pineapple and buttery sweetness is an invitation to pure comfort. This Pineapple Juice Cake is a testament to how simple ingredients can transform into something truly spectacular. It’s the kind of dessert that doesn’t demand hours in the kitchen but delivers an impressive, crowd-pleasing result every single time.
Imagine a moist, tender crumb infused with the bright, tropical essence of pineapple, all enrobed in a luscious, syrupy glaze. This cake is the perfect companion for any occasion, from casual family gatherings to more festive celebrations, offering a delightful balance of ease and exquisite flavor that will leave everyone asking for seconds.
Why You Will Love This Recipe
- Effortless Elegance: This cake appears far more complex than it is, using a cake mix as a base to ensure consistent results and minimal fuss, making it ideal for bakers of all skill levels.
- Incredible Moisture: The generous use of pineapple juice not only infuses the cake with a vibrant tropical flavor but also contributes significantly to its remarkably moist and tender texture, preventing any hint of dryness.
- Quick Assembly: From mixing the batter to pouring the glaze, the entire process is designed for speed, allowing you to create a delicious homemade-quality dessert without spending all day in the kitchen.
- Versatile Appeal: Its delightful taste and appealing presentation make it suitable for a wide range of events, from a simple afternoon tea to a centerpiece for holiday gatherings, consistently delighting guests.
- Naturally Flavorful: The inherent sweetness and tang of pineapple juice provide a refreshing counterpoint to the rich, buttery glaze, creating a perfectly balanced flavor profile that is both comforting and exciting.
Ingredients You Need
Crafting this exquisite Pineapple Juice Cake relies on selecting fresh, high-quality ingredients to ensure the best possible flavor and texture. The simplicity of the ingredient list is deceptive, as each component plays a crucial role in developing the cake’s signature moistness and tropical zest. Using room-temperature eggs, for instance, is a small but significant step that aids in creating a smoother, more uniform batter, which translates directly into a finer crumb structure in the final baked good.
Pineapple Juice Cake
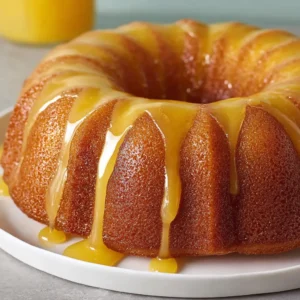
A tender Bundt cake prepared with yellow cake mix, pineapple juice, eggs, and vegetable oil, then saturated with a buttery pineapple glaze for a moist, richly flavored finish. This cake is quick to make, moist, and bursting with tropical flavor, perfect for any occasion.
- 1 package yellow cake mix
- 4 large eggs, room temperature
- 3/4 cup pineapple juice
- 3/4 cup vegetable oil
- 4 tablespoons butter, melted
- 3/4 cup pineapple juice
- 2 cups confectioners’ sugar
- 1Preheat oven to 350°F (175°C). Grease and flour a Bundt pan thoroughly.
- 2In a large bowl, combine cake mix, eggs, 3/4 cup pineapple juice, and vegetable oil. Mix until just combined; do not overmix.
- 3Pour batter into the prepared Bundt pan and smooth the top.
- 4Bake for 28-32 minutes, or until a toothpick inserted near the center comes out clean.
- 5Let cake rest in the pan for 10-15 minutes.
- 6While the cake cools, prepare the glaze: whisk together melted butter, 3/4 cup pineapple juice, and confectioners’ sugar until smooth and pourable.
- 7Poke holes over the warm cake while it is still in the pan. Slowly pour about three-quarters of the glaze over the top, allowing it to soak in. Let stand for 15 minutes.
- 8Invert the cake onto a serving plate. Finish with the remaining glaze.
Keywords: Pineapple Juice Cake, Bundt cake, easy cake, moist cake, tropical cake, cake mix cake, dessert
- yellow cake mix: provides a reliable and easy foundation for the cake’s structure and sweetness, saving time and ensuring a consistent texture.
- large eggs: essential for binding the ingredients together, adding richness, and contributing to the cake’s overall tender crumb.
- pineapple juice: the star ingredient, it infuses the cake with a bright, tropical flavor and provides crucial moisture, keeping the cake incredibly soft.
- vegetable oil: ensures the cake remains wonderfully moist and tender, even after the glaze has been applied and soaked in.
- butter: used in the glaze, it adds a rich, smooth depth of flavor and contributes to a luxurious, melt-in-your-mouth finish.
- confectioners’ sugar: transforms the liquid ingredients into a pourable, sweet glaze that drapes beautifully over the cake and firms slightly as it cools.
Specific quantities for these ingredients can be found within the provided recipe card.
Variations
Elevating this already delightful Pineapple Juice Cake can be achieved through a few simple yet impactful variations, allowing you to tailor its flavors and dietary suitability to your preferences. Each modification aims to enhance the existing tropical charm or adapt it for specific needs.
For those seeking a completely plant-based option, a vegan adaptation is readily achievable. Simply substitute the eggs with a flax egg (1 tablespoon ground flaxseed mixed with 3 tablespoons water, allowed to sit for 5 minutes) or a commercial egg replacer, ensuring they are brought to room temperature. The butter in the glaze can be swapped for a high-quality vegan butter alternative, which typically mimics the richness and texture of dairy butter. The yellow cake mix itself may contain dairy or eggs, so checking the label or opting for a vegan-certified cake mix is crucial for a truly vegan result. This ensures that the cake remains moist and flavorful while adhering to vegan principles.
A low-carb or keto-friendly version presents a more involved, yet rewarding, challenge. This would necessitate replacing the standard yellow cake mix with a carefully formulated keto-friendly cake mix or creating a blend from scratch using almond flour, coconut flour, and a sugar substitute like erythritol or monk fruit. The pineapple juice, being high in natural sugars, would need to be replaced with a concentrated pineapple flavoring extract and perhaps a small amount of a low-carb liquid like unsweetened almond milk to maintain batter consistency. The confectioners’ sugar in the glaze would also be substituted with a keto-friendly powdered sweetener. Careful testing of liquid ratios would be paramount to achieve the desired moistness and cake-like texture.
Another exciting avenue for variation involves incorporating complementary flavors directly into the batter or glaze. Consider adding a teaspoon of finely grated lime or lemon zest to the cake batter for an extra layer of citrus brightness that pairs wonderfully with pineapple. A pinch of ground ginger or cinnamon can also introduce a warm, subtly spiced undertone that complements the tropical fruit. For the glaze, a tablespoon of finely shredded unsweetened coconut could be stirred in for added texture and flavor, leaning further into a tropical paradise theme. These subtle additions can transform the familiar cake into a new culinary adventure.
How to Prepare Pineapple Juice Cake
Step 1: Preparing the Pan and Oven
Begin by preheating your oven to a steady 350°F (175°C). This ensures that the oven is at the optimal temperature from the moment the cake batter enters, promoting even baking and a beautiful golden-brown crust. It’s essential to get this step right for consistent baking results.
Concurrently, you must meticulously grease a standard Bundt pan. This is arguably one of the most critical steps for ensuring your cake releases cleanly and retains its beautiful shape. Use a generous amount of softened butter or non-stick baking spray, making sure to thoroughly coat every single crevice, nook, and cranny of the pan. Pay special attention to the intricate details of the decorative molds and the central tube, as these are the areas where cakes are most likely to stick.
A well-greased pan, perhaps even dusted lightly with flour after greasing, creates a barrier between the cake batter and the metal. This barrier prevents the delicate crumb from adhering to the pan’s surface during baking and cooling, guaranteeing a flawless presentation when you invert the cake onto your serving platter. The effort invested here directly translates into the cake’s aesthetic appeal and ease of handling after baking.
Step 2: Mixing the Cake Batter
In a large mixing bowl, combine the dry yellow cake mix with the specified amount of eggs. Ensure the eggs are at room temperature; this helps them emulsify more smoothly into the batter, creating a more homogenous mixture. Incorporate the pineapple juice, which brings its unique flavor and moisture, and the vegetable oil, which guarantees a tender and moist crumb.
Stir these ingredients together using a whisk or an electric mixer on a low speed. The goal here is to mix just until the ingredients are combined and no dry streaks of cake mix remain. Overmixing can develop the gluten in the flour too much, leading to a tougher, less tender cake. A few small lumps are perfectly acceptable and often preferable to an overworked batter.
The batter should look smooth and relatively thick, with a rich, creamy consistency. The pineapple juice should be fully incorporated, contributing to the batter’s liquid content and its subtle fruity aroma. Once the batter is ready, it should be immediately transferred to the prepared Bundt pan to prevent any premature setting or gluten development.
Step 3: Baking the Cake
Carefully pour the mixed batter into the prepared Bundt pan, distributing it evenly. Use a spatula to gently spread the batter to the edges of the pan, ensuring it fills all the decorative details. A smooth, level top will help the cake bake more evenly.
Place the Bundt pan in the preheated oven, ideally in the center rack for the most uniform heat circulation. Bake for approximately 28 to 32 minutes. The exact baking time can vary depending on your oven, so it’s important to monitor the cake as it bakes. You’re looking for a beautiful golden-brown color on the exterior.
To test for doneness, insert a wooden toothpick or a thin skewer into the thickest part of the cake, avoiding any deep crevices. If the toothpick comes out clean, or with just a few moist crumbs attached (not wet batter), the cake is perfectly baked. If it still has wet batter, continue baking for a few more minutes and test again. Allowing the cake to bake through ensures it will be fully cooked and structurally sound for glazing.
Step 4: Cooling and Initial Resting
Once the cake is perfectly baked, carefully remove the Bundt pan from the oven. Place the hot pan on a wire cooling rack. This initial cooling period is crucial for allowing the cake to set slightly and begin to pull away from the sides of the pan without becoming too brittle or too cool to absorb the glaze effectively.
Let the cake rest undisturbed in the Bundt pan for approximately 10 to 15 minutes. During this time, the internal structure of the cake firms up just enough. This brief period of rest is a delicate balance; it allows the cake to become stable enough for inversion while still retaining enough warmth to readily absorb the sugary glaze that will be poured over it shortly.
The gentle heat retained by the cake helps to create micro-channels and draw the glaze deeper into the crumb, ensuring that every bite is infused with the sweet, buttery pineapple flavor. Do not be tempted to invert the cake immediately after taking it out of the oven, as it will likely be too fragile and could break apart. Conversely, letting it cool for too long in the pan can cause the glaze to harden prematurely or the cake to stick.
Step 5: Preparing the Glaze
While the cake is undergoing its initial rest in the pan, it’s time to prepare the luscious glaze. In a medium-sized bowl, combine the melted butter. Ensure the butter is fully melted but not browned, as this can impart an unwanted nutty flavor. Add the 3/4 cup of pineapple juice to the melted butter; this forms the liquid base for our syrupy topping.
Next, gradually whisk in the 2 cups of confectioners’ sugar. It’s best to add the sugar in batches, whisking thoroughly after each addition. This method prevents lumps from forming and ensures a smooth, homogenous glaze. Continue whisking until the mixture is completely smooth, glossy, and has a pourable consistency. If the glaze seems too thick, you can add a tiny splash more pineapple juice (a teaspoon at a time) until it reaches your desired consistency. If it’s too thin, a little more confectioners’ sugar can be added.
The goal is a glaze that is thick enough to coat the cake beautifully but thin enough to drizzle and soak into the holes you will create. This balance is key to achieving the signature moistness and rich flavor of the Pineapple Juice Cake. The glaze should have a pale, creamy appearance, reflecting the sweet pineapple flavor it carries.
Step 6: Glazing and Finishing
Once the cake has rested in the pan for its allocated 10-15 minutes, it’s time for the magic of the glaze. While the cake is still warm and in its pan, use a fork, a skewer, or a thin knitting needle to carefully poke holes all over the surface of the cake. Make sure to poke down into the cake to create channels for the glaze to seep into. These small perforations are essential for maximizing the glaze absorption.
Slowly and deliberately, pour about three-quarters of the prepared glaze evenly over the top of the cake, allowing it to drip down the sides and fill the poked holes. The warmth of the cake will encourage the glaze to absorb into the crumb, infusing it with moisture and sweetness. Let the cake stand for another 15 minutes in the pan, allowing ample time for this initial glaze absorption to occur.
After this second resting period, carefully invert the Bundt pan onto a serving plate or cake stand. If you’ve greased your pan properly, the cake should release cleanly. If any part seems stuck, gently tap the bottom and sides of the pan. Once inverted, spoon or drizzle the remaining glaze over the top and sides of the cake, allowing it to cascade down the ridges, creating a beautiful, finished look. Allow the glaze to set slightly before slicing and serving.
Pro Tips for Pineapple Juice Cake
Achieving the Perfect Crumb: To ensure your Pineapple Juice Cake is exceptionally tender and light, resist the urge to overmix the batter. Mix only until the ingredients are just combined. Overworking the batter develops gluten, which can result in a dense, tough cake texture. A few small lumps are perfectly acceptable and a sign of a well-handled batter, leading to a superior crumb.
Mastering the Glaze Absorption: The secret to a supremely moist cake lies in the glaze application. Pour the glaze slowly in stages over the warm cake while it’s still in the pan. This methodical approach gives the warm cake crumb sufficient time to absorb the syrup, allowing it to penetrate deeply rather than simply running off the sides. Patience here yields a cake that is delightfully saturated with flavor.
The Importance of Resting: After the cake has been glazed and inverted, allow it to rest for a little while before slicing. This crucial resting period allows the syrup to settle evenly throughout the cake’s interior and for the crumb to firm up slightly. A brief rest ensures that your slices hold their shape beautifully and are perfectly moist, without the glaze becoming overly sticky or runny when cut.
Ingredient Temperature Matters: Always ensure your eggs are at room temperature before adding them to the cake batter. Room-temperature eggs emulsify more easily with the other ingredients, creating a smoother, more uniform batter. This leads to a finer cake crumb and a more consistent texture throughout the finished product. It’s a small detail that makes a significant difference.
Bundt Pan Perfection: The success of a Bundt cake often hinges on its presentation. Grease your Bundt pan meticulously and thoroughly, paying extra attention to all the intricate details and the central tube. A well-greased pan is your best defense against a cake sticking, ensuring that when you invert it, the beautiful shape is preserved without any pieces left behind. Consider using a baking spray specifically designed for cakes, or a combination of shortening and flour.
Serving Suggestions for Pineapple Juice Cake
Decoration
The Pineapple Juice Cake is beautiful in its simplicity, but a few decorative touches can elevate its visual appeal for any occasion. A dusting of confectioners’ sugar, sifted through a fine-mesh sieve, creates a delicate, snowy finish that contrasts elegantly with the golden glaze. For a more tropical flourish, consider arranging a few thin slices of fresh pineapple or small, maraschino cherries around the base of the cake or on top.
To add texture and color, a sprinkle of toasted shredded coconut over the still-wet glaze provides a delightful crunch and enhances the tropical theme. Edible flowers, such as violets or pansies, can also offer a sophisticated and colorful garnish, particularly for special celebrations. If you’ve prepared a slightly thicker glaze, piping simple swirls or patterns onto the top of the cake can add an extra layer of artistry. The key is to complement the cake’s flavor without overwhelming its natural charm.
Side Dishes
The moist, sweet, and slightly tangy profile of Pineapple Juice Cake makes it incredibly versatile when it comes to accompaniments. A dollop of lightly sweetened whipped cream is a classic and simple pairing, its cool creaminess providing a perfect counterpoint to the cake’s warmth and sweetness. This addition softens the overall sweetness and allows the pineapple flavor to shine through even more vibrantly.
For those who enjoy a brighter, fresher element, serving the cake with a small side of fresh pineapple chunks or slices is an excellent choice. This amplifies the tropical essence and adds a refreshing contrast. Alternatively, a small scoop of vanilla bean or coconut ice cream can transform a simple slice into a decadent dessert experience, its cold creaminess melting beautifully into the warm cake and glaze. The subtle notes of vanilla or coconut enhance the overall tropical symphony of flavors.
Creative Serving Ideas
Beyond the traditional slice, this Pineapple Juice Cake lends itself to several creative serving presentations. Consider cutting individual portions and serving them warm with a drizzle of extra glaze or a spoonful of crème anglaise for an elegant plated dessert. For a brunch setting, small wedges or even bite-sized cubes can be served alongside other breakfast pastries or fruit salads, making it a delightful addition to a buffet.
Another fun idea is to deconstruct the cake slightly. Crumble a piece of the cake and serve it layered in parfait glasses with whipped cream and perhaps some fresh berries or diced mango. This creates a visually appealing and interactive dessert experience. For a festive gathering, you could even use small, decorative cookie cutters to shape pieces of the cake after it has cooled, creating whimsical shapes that are especially appealing to children. The adaptability of this cake means it can fit into many different dining scenarios.
Preparation & Storage
Storing Leftovers
Once your Pineapple Juice Cake has been completely cooled, proper storage is essential to maintain its delightful moisture and flavor. Cover the cake tightly with plastic wrap or transfer it to an airtight container. This prevents the cake from drying out and absorbing any odors from the refrigerator or pantry. If stored at room temperature in a cool kitchen (ideally below 70°F or 21°C), the cake can typically remain fresh for up to 2 days. Its glaze helps to seal in moisture, extending its shelf life naturally.
For longer storage, refrigerating the cake is recommended. In the refrigerator, well-covered, the Pineapple Juice Cake can last for up to 5 days. The cooler temperature helps to slow down any spoilage processes, ensuring that the cake remains safe and palatable for a longer period. It’s important to remember that while refrigeration helps preserve the cake, it can sometimes slightly firm up the glaze and crumb. This is easily remedied before serving, as discussed in the reheating section.
The inherent moistness of this cake, thanks to the pineapple juice and glaze, means it tends to stay pleasantly soft rather than becoming dry and crumbly. Even after several days, each slice should retain a good deal of its original tenderness and flavor. Always check for any signs of spoilage before consuming leftovers, though its rich glaze offers good protection.
Freezing
Freezing is an excellent option for preserving this Pineapple Juice Cake for future enjoyment or for preparing ahead of busy events. For best results, it’s advisable to freeze the cake either whole or in individual slices. Ensure the cake is completely cool before wrapping. Wrap the cake or slices tightly in several layers of plastic wrap, followed by a final layer of aluminum foil or by placing them inside a freezer-safe bag or container.
Properly wrapped, the Pineapple Juice Cake can be stored in the freezer for up to 2 months. This freezing method protects the cake from freezer burn and maintains its quality. Freezing is ideal for maintaining the cake’s texture and flavor profile over an extended period, making it a convenient make-ahead dessert option. When ready to use, the thawing process is straightforward and ensures the cake is ready to be enjoyed.
The dense crumb and rich glaze of this cake are quite resilient to the freezing and thawing process, meaning you can enjoy a delicious homemade cake even weeks after baking. This makes it perfect for unexpected guests or simply for having a treat readily available. Just remember to thaw it properly to retain its best qualities.
Reheating
When you’re ready to enjoy your stored or frozen Pineapple Juice Cake, a little reheating can bring back its fresh-baked warmth and soften the glaze. If the cake has been refrigerated, allow it to sit at room temperature for about 20-30 minutes before serving to take the chill off. This brief period helps the crumb soften and the glaze to become slightly more pliable, enhancing its texture and flavor.
For a truly warm and comforting experience, or when serving slices directly from the refrigerator or freezer, brief microwaving is the most effective method. Place a slice of cake on a microwave-safe plate and heat it for approximately 10 to 15 seconds on a medium power setting. This short burst of heat is usually enough to soften the crumb and slightly loosen the glaze, making the cake wonderfully warm and moist without overcooking it. Be cautious not to overheat, as this can dry out the cake.
If reheating a larger portion or the whole cake that was frozen, it’s best to thaw it overnight in the refrigerator first. Then, you can warm individual slices as described, or gently warm the entire cake at a very low oven temperature (around 250°F or 120°C) for about 10-15 minutes, until just warmed through. This allows the heat to penetrate evenly. Serve immediately after reheating for the best texture and flavor.
Frequently Asked Questions
-
Can I make this cake a day ahead of time?
Absolutely, and it’s often recommended to do so! This Pineapple Juice Cake actually benefits from a little resting time after glazing. Once the glaze has had a chance to soak into the crumb and the cake has fully cooled, the flavors meld together beautifully, and the crumb remains wonderfully moist for serving the next day. It’s the perfect make-ahead dessert for parties or busy schedules, as it tastes just as delicious, if not better, when allowed to sit for several hours.
-
Why is the glaze poured on while the cake is still warm?
The reason for pouring the glaze over a warm cake, rather than a completely cooled one, is to maximize absorption and achieve that signature moist texture. A warm cake has a more porous structure that readily draws in the liquid glaze, allowing it to seep deep into the crumb. This process infuses every part of the cake with the sweet, buttery pineapple flavor, rather than just coating the surface. If poured onto a cold cake, the glaze would likely set on top, creating a harder shell and missing out on that delightful, saturated interior.
-
Can I use bottled or canned pineapple juice, and does it need to be unsweetened?
Yes, you can certainly use bottled or canned pineapple juice for this recipe. A standard, unsweetened pineapple juice works best as it provides a clean, bright pineapple flavor without adding excessive sweetness or competing artificial flavors that could alter the cake’s intended taste balance. While some slightly sweetened juices might be acceptable in a pinch, opting for plain or 100% pineapple juice will yield the most consistent and authentic results, allowing the pure pineapple essence to shine through in both the cake and its glaze.