Coconut Cake with Raspberry Filling
This recipe for coconut cake with raspberry filling offers a delightful balance of flavors and textures that is perfect for any occasion. The tender, moist coconut cake layers provide a subtle sweetness, beautifully complemented by the vibrant, slightly tart raspberry filling. A smooth, tangy cream cheese frosting then ties all these elements together, creating a dessert that feels both sophisticated and comforting. It’s a testament to how simple ingredients and thoughtful preparation can yield truly spectacular results, making this cake a guaranteed crowd-pleaser.
Whether you’re a seasoned baker or just starting out, this cake is designed to be approachable, delivering bakery-quality results without an overwhelming amount of effort. The use of cake mix and pudding ensures consistently soft layers, while the fresh raspberry filling brings a burst of natural fruitiness and a gorgeous visual appeal. This combination ensures that every slice is a memorable experience, packed with tropical coconut notes and a bright berry tang.
Why You Will Love This Recipe
- Effortless Elegance: Achieves a stunning, professional-looking cake with a manageable baking process, perfect for special events.
- Flavor Harmony: The sweet, mild coconut is perfectly balanced by the zesty, vibrant raspberry filling and a rich cream cheese frosting.
- Moist & Tender Layers: Utilizes key ingredients like coconut milk and pudding mix to ensure every cake layer remains exceptionally soft and moist.
- Make-Ahead Convenience: Many components, particularly the raspberry filling and cake layers, can be prepared in advance, simplifying assembly on the day of serving.
- Customizable Appeal: Easily adaptable with different berry fillings or frosting textures, allowing for personal touches and variations.
Ingredients You Need
The success of this coconut cake hinges on using quality ingredients, especially for the star components like the coconut and raspberries. Opting for full-fat coconut milk will impart a richer flavor and creamier texture to the cake layers, making them incredibly moist. Similarly, using ripe, flavorful raspberries ensures the filling bursts with delightful tanginess. Don’t underestimate the power of fresh ingredients in elevating this dessert from good to truly exceptional, providing a depth of flavor that artificial substitutes simply cannot match.
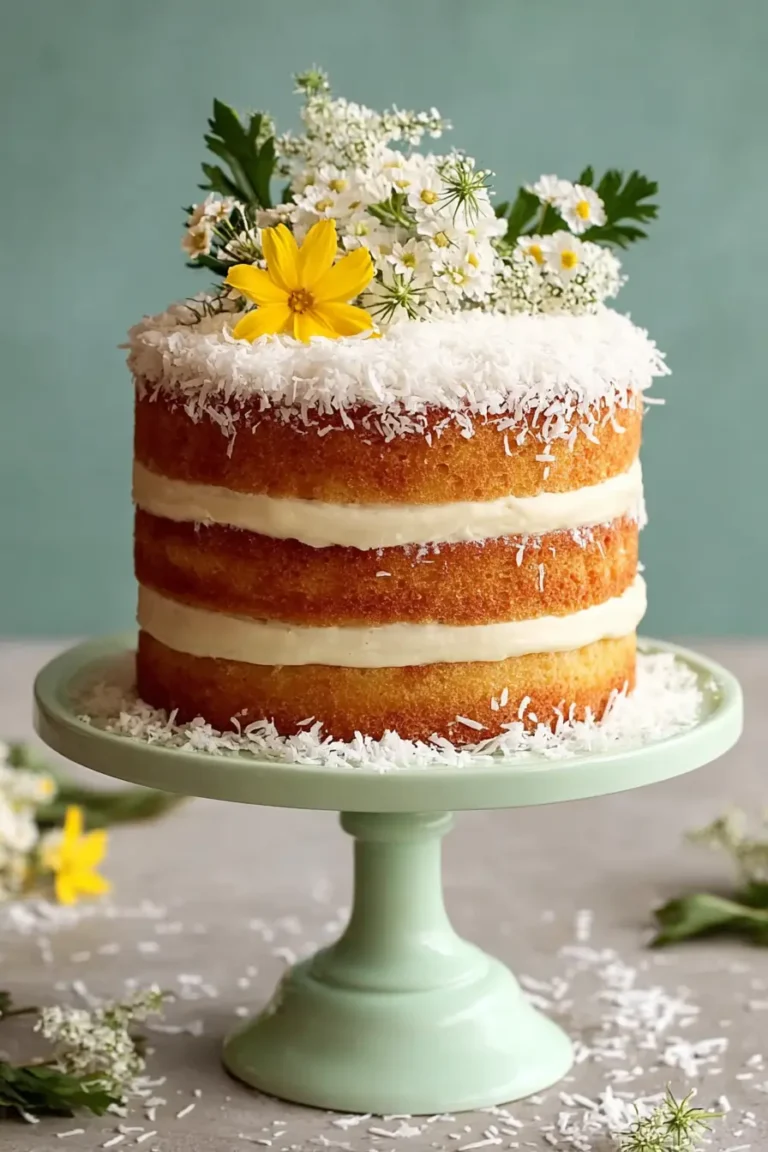
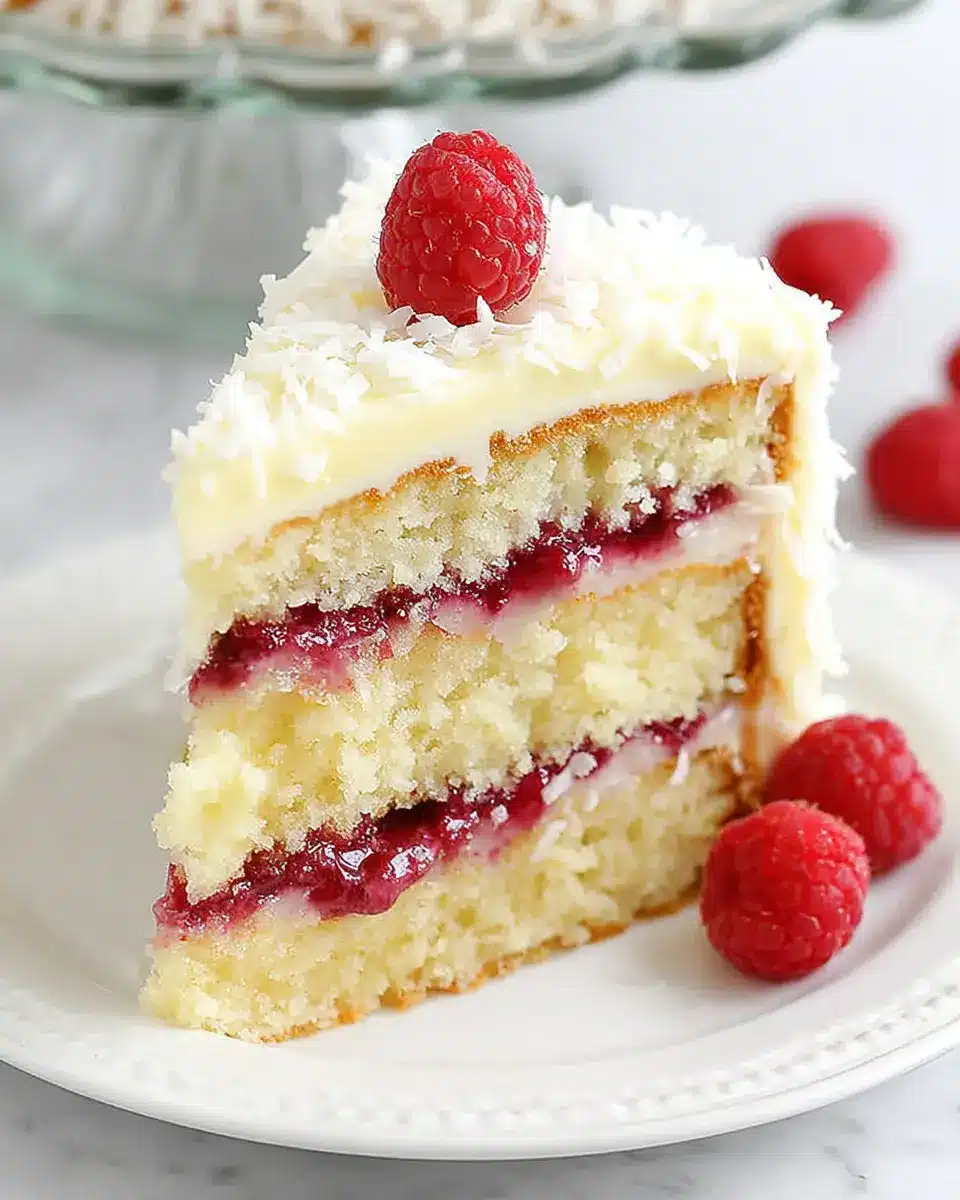
Creamy Coconut Cake with Raspberry Filling

A tender coconut cake layered with a vibrant raspberry filling and finished with a smooth cream cheese frosting. Toasted coconut on the exterior adds texture and a polished presentation.
- For the Raspberry Filling: 2 cups raspberries (fresh or frozen and thawed), 1/4 cup granulated sugar, 2 teaspoons lemon juice, 1 1/2 tablespoons cornstarch, 1 1/2 tablespoons water, 1/4 teaspoon vanilla extract
- For the Cake: 4 large eggs, 1 package yellow cake mix, 1 small package vanilla instant pudding mix, 1/2 cup canola oil, 1 cup full-fat unsweetened coconut milk (stirred before measuring), 1 1/2 cups shredded coconut
- For the Cream Cheese Frosting: 12 ounces full-fat cream cheese (softened), 3/4 cup unsalted butter (room temperature), 6 cups icing sugar (sifted), 1 teaspoon vanilla essence, 1 to 2 tablespoons unsweetened coconut milk, 1 small pinch of salt
- For the Garnish: 1 cup toasted coconut flakes
- 1Prepare the Raspberry Filling: Place raspberries, sugar, and lemon juice in a saucepan. Cook over low-medium heat until berries soften and mixture thickens, about 8-10 minutes. In a small bowl, stir cornstarch and water until smooth. Pour slurry into raspberry mixture and cook for 2-3 minutes until thickened. Remove from heat, stir in vanilla, and cool completely.
- 2Prepare the Cake Pans: Preheat oven to 325°F (163°C). Line the bases of three 8-inch round cake pans with parchment paper, coat with cooking spray.
- 3Make the Cake Batter: In a large bowl, combine cake mix, pudding mix, eggs, coconut milk, and canola oil. Beat on medium speed for about 2 minutes until smooth. Fold in shredded coconut.
- 4Bake the Cake Layers: Divide batter evenly among prepared pans. Bake for 22-25 minutes, until centers spring back lightly. Let layers rest in pans for 15-30 minutes, then turn onto a wire rack to cool completely.
- 5Prepare the Frosting: Beat softened cream cheese and butter until smooth. Gradually add icing sugar, then blend in vanilla essence, coconut milk, and salt. Beat until light and combined. Adjust consistency as needed.
- 6Toast the Coconut Flakes: Melt 1 teaspoon of butter in a frying pan over low-medium heat. Add coconut and stir frequently until lightly golden. Transfer to paper to cool.
- 7Assemble the Cake: Place one cake layer on a serving stand. Spread a thin layer of frosting, then pipe a border around the edge. Spoon raspberry filling inside the border. Repeat with the second layer. Top with the final cake layer (upside down).
- 8Crumb Coat and Chill: Spread a thin crumb coat of frosting over the entire cake. Chill for 10-15 minutes.
- 9Finish Frosting and Garnish: Cover the chilled cake with the remaining frosting. Press toasted coconut flakes over the outside of the cake.
Keywords: Coconut Cake, Raspberry Filling, Cream Cheese Frosting, Bakery-Style Cake, Celebration Cake, German Dessert, Vegetarian Cake
- raspberries: fresh or frozen and thawed, these provide the vibrant, tart counterpoint to the sweet cake and frosting.
- granulated sugar: sweetens the raspberry filling just enough to enhance its natural fruitiness without making it overly cloying.
- lemon juice: adds a bright acidity that cuts through the sweetness and intensifies the raspberry flavor, keeping it fresh and lively.
- cornstarch: a common thickening agent that ensures the raspberry filling holds its shape between the cake layers, preventing a runny mess.
- water: mixed with cornstarch to create a smooth slurry that will evenly thicken the raspberry filling.
- vanilla extract: a touch of vanilla in the filling rounds out the fruity notes and adds a subtle layer of warmth.
- yellow cake mix: forms the foundation of our cake layers, providing a convenient and reliable base for a tender crumb.
- vanilla instant pudding mix: contributes significantly to the cake’s moisture and tenderness, creating a wonderfully soft texture.
- eggs: bind the cake batter together and contribute to its structure and richness, ensuring fluffy layers.
- canola oil: keeps the cake layers incredibly moist and tender, even after chilling, thanks to its neutral flavor and liquid properties.
- full-fat unsweetened coconut milk: the key ingredient for infusing the cake layers with authentic coconut flavor and a luxurious, creamy texture.
- shredded coconut: adds delightful texture and an intensified coconut presence within the cake batter itself.
- full-fat cream cheese: the essential base for the frosting, providing its signature tangy flavor and smooth, rich consistency.
- unsalted butter: softens the cream cheese, adds richness to the frosting, and contributes to its spreadable, creamy texture.
- icing sugar: the primary sweetener for the frosting, also helping to achieve a thick, luscious, and pipeable consistency.
- vanilla essence: enhances the overall flavor profile of the frosting, adding a classic bakery aroma and taste.
- unsweetened coconut milk: used sparingly in the frosting to adjust consistency without diluting its flavor too much.
- salt: a tiny pinch in the frosting balances the sweetness and amplifies the other flavors, making the overall taste more complex.
- toasted coconut flakes: provides a beautiful textural contrast, a nutty aroma, and a visually appealing finish to the cake’s exterior.
The precise quantities for these ingredients are detailed within the recipe card provided.
Variations
For those seeking a completely plant-based option, a vegan rendition of this coconut cake is entirely achievable. Simply substitute the eggs in the cake batter with a flax egg (1 tablespoon ground flaxseed mixed with 3 tablespoons water, let sit for 5 minutes) or a commercial egg replacer, and ensure your cake mix and pudding mix are dairy-free. For the cream cheese frosting, use a high-quality vegan cream cheese and vegan butter alternative. The raspberry filling typically contains no animal products, making it naturally vegan.
A delightful low-carb adaptation can also be made by substituting the yellow cake mix with a blend of almond flour and coconut flour, along with a low-carb sweetener like erythritol or xylitol, and using sugar-free pudding mix. The raspberry filling can be sweetened with a sugar substitute, and the cream cheese frosting can be made using a low-carb sweetener instead of icing sugar. This allows for indulgence without the sugar spikes, making it suitable for those managing their carbohydrate intake.
To introduce even more flavor complexity, consider infusing the coconut milk used in the cake batter with a pandan leaf before adding it to the dry ingredients. This aromatic leaf, common in Southeast Asian cuisine, imparts a subtle, nutty, and floral note that pairs wonderfully with coconut. You could also experiment with adding a touch of lime zest to the cream cheese frosting for an extra citrusy zing, or swirl a different berry puree, like blueberry or strawberry, into the raspberry filling for a mixed berry delight.
How to Prepare coconut cake with raspberry filling
Step 1: Crafting the Vibrant Raspberry Filling
Begin by creating the jewel-toned raspberry filling, which will be the heart of your cake’s fruity brilliance. In a medium saucepan, combine the raspberries, granulated sugar, and fresh lemon juice. These ingredients are crucial for developing the filling’s signature sweet-tart flavor profile. Gentle cooking over medium-low heat allows the raspberries to break down, releasing their juices and forming a wonderfully jammy consistency.
As the raspberries cook, they will soften and release their natural pectin, contributing to the thickening process. Stirring occasionally prevents sticking and ensures even cooking. Once the mixture has achieved a jam-like consistency, typically around 8-10 minutes, it’s time to prepare the thickening slurry. This slurry is a critical step to ensure the filling will set properly between the cake layers and not leak out during assembly or serving.
In a small bowl, whisk together the cornstarch and water until a smooth, lump-free paste forms. This ensures the cornstarch disperses evenly within the hot raspberry mixture, preventing any starchy pockets. Gradually pour this cornstarch slurry into the simmering raspberry mixture while stirring continuously. Continue to cook for another 2-3 minutes, or until the filling thickens considerably and coats the back of a spoon. You want it to be thick enough to hold its shape when spooned, similar to a thick jam or compote. Finally, stir in the vanilla extract to add a subtle layer of warmth and depth, then transfer the filling to a bowl. It is imperative to let this filling cool completely, preferably in the refrigerator, before you attempt to assemble the cake. Cooling it thoroughly is key to preventing it from melting the frosting or causing the cake layers to slide during assembly.
Step 2: Preparing the Cake Pans for Flawless Layers
Proper pan preparation is a silent hero in achieving beautiful, intact cake layers, especially with tender cakes like this one. For this recipe, you will need three 8-inch round cake pans. Begin by carefully lining the bottom of each pan with a circle of parchment paper. This acts as an initial barrier, preventing the cake from sticking directly to the metal pan’s surface, which can often be the trickiest part. Ensure the parchment paper fits snugly against the base.
After lining the bottoms, lightly grease the inside of each pan, including the sides, with cooking spray or softened butter. Be generous enough to coat the entire surface, ensuring no dry spots are left. Once greased, a light dusting of flour can be added, tapping out any excess. This combination of parchment paper and greasing creates a non-stick surface that will allow the delicate cake layers to release cleanly after baking. This meticulous preparation is vital because these cake layers are incredibly soft and moist; any sticking can result in torn edges or crumbled pieces, making assembly much more challenging and less aesthetically pleasing.
Allowing the pans to be ready before you even start making the batter streamlines the entire baking process. Once the batter is prepared, it should be divided and baked promptly to prevent it from sitting too long and affecting its final texture. This step, though seemingly simple, plays a crucial role in the overall success and presentation of your finished coconut cake with raspberry filling, ensuring each component is perfect for assembly.
Step 3: Creating the Tender Coconut Cake Batter
Now it’s time to bring together the ingredients that will form the tender, coconut-infused cake layers. In a large mixing bowl, combine the contents of the yellow cake mix and the vanilla instant pudding mix. These two dry ingredients form the base of our cake, providing structure and essential moisture. Add the eggs, which act as binders and enrich the batter, and the canola oil, which guarantees an exceptionally moist crumb.
Pour in the full-fat unsweetened coconut milk; ensure it’s stirred well before measuring if it has separated, as this liquid is key to achieving that signature coconut flavor and luxurious texture. Using a stand mixer fitted with a paddle attachment or a hand mixer, beat these ingredients on medium speed for approximately two minutes. The goal is to achieve a perfectly smooth, homogenous batter with no dry pockets or lumps. The mixture should look silky and well-emulsified at this stage.
Once the batter is smooth and fully combined, gently fold in the shredded coconut. Use a spatula to incorporate the shredded coconut, mixing just until it’s evenly distributed throughout the batter. Be careful not to overmix at this stage, as overmixing can develop the gluten in the flour too much, resulting in a tougher cake. The shredded coconut will add both texture and an intensified coconut aroma and flavor to the cake layers.
Step 4: Baking and Cooling the Delicate Cake Layers
With the batter prepared and the pans ready, it’s time to bake the cake layers to golden perfection. Divide the batter evenly among the three prepared 8-inch cake pans. To ensure consistency and even baking, you can use a kitchen scale to measure the batter in each pan; aiming for approximately 13.75 ounces (or 390 grams) per pan is a good guideline. Smooth the tops of the batter in each pan with your spatula to create a relatively flat surface, which aids in even rising during baking.
Preheat your oven to 325°F (163°C). This slightly lower temperature is ideal for baking delicate cakes, as it allows them to cook through gently without over-browning the exterior before the interior is done. Bake the layers for 22 to 25 minutes. You’ll know they are ready when the centers spring back lightly when gently touched and the edges are just beginning to turn a pale golden brown. Avoid overbaking, as this can lead to dry cake layers.
Once baked, allow the cake layers to rest in their pans on a wire rack for about 15 to 30 minutes. This brief resting period allows the cakes to firm up slightly, making them easier to handle. After resting, carefully invert each pan onto the wire rack to release the cake layers. Gently peel off the parchment paper from the bottom of each layer. It is absolutely crucial that the cake layers cool completely on the wire rack before you attempt to assemble the cake. Warm cake layers are fragile and will likely crumble or cause the frosting to melt, compromising the final structure and appearance of your beautiful coconut cake.
Step 5: Whipping Up the Luscious Cream Cheese Frosting
While the cake layers are cooling, turn your attention to crafting the heavenly cream cheese frosting, which provides the essential tangy and rich component of this dessert. In a large mixing bowl, combine the softened cream cheese and room-temperature unsalted butter. Ensure both are at the correct temperature to facilitate a smooth, creamy texture. Using a stand mixer with a paddle attachment or a hand mixer, beat these two ingredients together on medium speed until they are completely smooth and well-combined, with no lumps of cream cheese or butter remaining visible.
Gradually add the sifted icing sugar to the cream cheese and butter mixture. Sifting the icing sugar is an important step as it removes any lumps, ensuring a perfectly smooth and velvety frosting. Add it in batches, beating on low speed after each addition until just incorporated. Once all the icing sugar has been added and the frosting is beginning to thicken, incorporate the vanilla essence. This classic flavoring adds a wonderful aroma and depth to the frosting, complementing the coconut and raspberry beautifully.
Next, add one to two tablespoons of unsweetened coconut milk. This liquid helps to achieve the perfect consistency for spreading and piping. Add it gradually, tasting and adjusting until the frosting is light, creamy, and spreadable, but still firm enough to hold its shape. Finally, stir in a small pinch of salt. This tiny addition is a flavor enhancer, balancing the sweetness of the icing sugar and bringing out the nuanced flavors of the cream cheese and vanilla. Beat the frosting for another minute or two until it’s exceptionally light and fluffy. The goal is a frosting that is luxurious and smooth enough to glide over the cake, yet stable enough to pipe borders and hold the filling securely.
Step 6: Toasting Coconut for the Perfect Garnish
The final flourish for your coconut cake is the toasted coconut flakes, which add a delightful crunch, an irresistible nutty aroma, and a classic bakery aesthetic. To achieve this, melt a teaspoon of butter in a large frying pan over low-medium heat. While butter adds a lovely richness, you can omit it for an even lighter garnish, or use a neutral oil if preferred.
Once the butter is melted and shimmering, add the shredded coconut flakes to the pan. It is essential to use a low to medium heat for this process. High heat can quickly scorch the delicate coconut, turning it bitter and ruining the batch. Stir the coconut frequently using a spatula or wooden spoon. This constant movement ensures that all sides of the coconut flakes come into contact with the heat evenly, promoting uniform browning.
Watch the coconut very carefully as it toasts. It can transition from a pale golden hue to deeply browned and potentially burnt in a matter of seconds. You are looking for a light golden color and a fragrant, nutty aroma to develop. Once the coconut reaches this perfect stage, immediately transfer it from the hot pan onto a plate lined with wax paper or paper towels. This stops the cooking process and prevents residual heat from continuing to toast the coconut. Allow the toasted coconut flakes to cool completely on the paper before using them to garnish your cake. This step significantly enhances the cake’s visual appeal and adds a wonderfully satisfying textural element to every bite.
Step 7: Assembling Your Masterpiece
Now for the exciting part – bringing all the prepared components together to create your stunning coconut cake with raspberry filling. Start with your first cake layer. Place it on your chosen cake stand or serving plate with the top side facing upwards. This will be the base of your cake.
Next, take a portion of the prepared cream cheese frosting and spread a thin, even layer over the surface of this first cake layer. This acts as a sticky base for the raspberry filling and a stabilizer for the next layer. Following this, it’s time to create a dam for the raspberry filling. Using a piping bag fitted with a round tip (or a zip-top bag with one corner snipped off), pipe a sturdy border of frosting around the outer edge of this cake layer. This border is crucial; it will contain the raspberry filling and prevent it from spilling out the sides of the cake.
Once the border is in place, carefully spoon the cooled raspberry filling into the center of the frosting dam. Ensure you distribute it evenly within the piped border. Now, place the second cake layer on top of the first. Repeat the process: spread a thin layer of frosting over the second cake layer, pipe another frosting border, and fill it with raspberry filling. Finally, place the third and final cake layer on top, this time positioning it with the top side facing downwards. This creates a flat, smooth surface for the final frosting application.
Apply a thin layer of frosting all over the cake, including the top and sides. This is known as a crumb coat, and its purpose is to trap any loose crumbs and create a smooth surface for the final frosting. Once the crumb coat is applied, chill the entire cake in the refrigerator or freezer for 10 to 15 minutes. This chilling step firms up the crumb coat, making the final frosting application much cleaner and easier. After chilling, cover the entire cake generously with the remaining cream cheese frosting. You can use an offset spatula to smooth the frosting for a polished look. If desired, spoon a little extra raspberry filling over the top for decorative flair. Finally, gently press the cooled toasted coconut flakes all over the outside of the cake, covering the sides and top. This creates the beautiful, textured finish that is characteristic of a classic coconut cake.
Pro Tips for coconut cake with raspberry filling
Cooling is Key: Always ensure the raspberry filling is completely cool before assembling the cake. Warm filling can soften the frosting border, leading to a runny center and potential cake layer slippage. Patience here prevents a messy outcome.
Full-Fat Ingredients Matter: For the richest flavor and creamiest texture in both the cake layers and the frosting, always opt for full-fat coconut milk and full-fat cream cheese. These ingredients are not interchangeable with their reduced-fat counterparts without significant compromise to the final result.
The Crumb Coat Advantage: Don’t skip the crumb coat and chilling step. Applying a thin layer of frosting first and then chilling the cake helps to seal in any loose crumbs and provides a stable base for the final, thicker layer of frosting, resulting in a much cleaner and more professional finish.
Gentle Folding Technique: When incorporating shredded coconut into the cake batter, use a gentle folding motion with a spatula. This ensures the coconut is evenly distributed without overworking the batter, which is crucial for maintaining a tender cake crumb.
Toast Coconut with Care: Toasted coconut can go from perfectly golden to burnt very quickly. Keep the heat low and monitor it closely, stirring constantly. It’s better to toast it slightly lighter than you think you want, as it will continue to toast a bit as it cools.
Serving Suggestions for coconut cake with raspberry filling
Decoration
The toasted coconut flakes provide a beautiful and classic textured exterior, evoking a tropical paradise. For an extra touch of elegance, you could pipe small rosettes of the cream cheese frosting around the top edge of the cake, or create elegant swirls with an offset spatula. Fresh raspberries can be artfully placed on top of these rosettes or artfully arranged on the cake’s surface for pops of vibrant color and fresh fruitiness. A light dusting of powdered sugar over the entire cake can also add a delicate, snowy finish.
Side Dishes
While this cake is a complete dessert on its own, a simple scoop of high-quality vanilla bean ice cream served alongside provides a delightful temperature and texture contrast. A dollop of freshly whipped cream, perhaps lightly sweetened or infused with a hint of vanilla, can also be a lovely accompaniment. For those who enjoy a beverage pairing, a hot cup of coffee or a gentle black tea complements the sweetness of the cake without overpowering its nuanced flavors.
Creative Serving Ideas
Consider individual servings by cutting the cake into neat slices and topping each with a small spoonful of extra raspberry filling and a few toasted coconut flakes. For a more rustic presentation, you could arrange slices on a platter with a drizzle of raspberry coulis and a sprig of mint. Another creative idea is to serve small cubes of the cake as part of a dessert board, alongside other complementary treats like macarons or chocolate truffles, offering a variety of flavors and textures for guests to explore.
Preparation & Storage
Storing Leftovers
Because this coconut cake with raspberry filling contains cream cheese frosting and fruit filling, it is essential to store any leftovers properly to maintain freshness and safety. Cover the cake tightly with plastic wrap or store it in an airtight cake container. Refrigerate the cake immediately after serving or once you are finished enjoying it. Properly stored, leftover cake should remain delicious for up to 3 to 4 days.
Freezing
Individual slices of this cake can be frozen for longer storage. Ensure the cake is fully chilled before you attempt to freeze it. Wrap each slice securely in plastic wrap, then place the wrapped slices in an airtight freezer-safe container or a heavy-duty freezer bag. This double layer of protection helps prevent freezer burn. Frozen cake slices can be stored for up to 2 months. For the best quality, it’s advisable to eat them sooner rather than later.
Reheating
To enjoy leftover cake that has been refrigerated or frozen, allow it to come to room temperature before serving. For refrigerated slices, letting them sit on the counter for about 15 to 20 minutes usually suffices to soften the frosting and restore the cake’s tender texture. If serving from frozen, transfer the wrapped slices to the refrigerator overnight to thaw completely, then allow them to sit at room temperature for about 15-20 minutes before serving to achieve the optimal eating experience. Avoid microwaving, as this can alter the texture of the frosting and cake.
Frequently Asked Questions
-
Can I make the raspberry filling a day ahead of time?
Absolutely, and in fact, it’s highly recommended to make the raspberry filling at least several hours in advance, or even a day ahead. This allows the filling to cool completely and thicken further, which is crucial for its stability when assembling the cake. Storing the cooled filling in an airtight container in the refrigerator will ensure it’s perfectly set and ready to use. You may need to give it a gentle stir before spreading it between the cake layers to ensure a smooth consistency.
-
How can I prevent my cake layers from sliding or the filling from leaking?
The key to preventing cake layers from sliding and filling from leaking lies in a combination of proper preparation and assembly techniques. Firstly, ensure the raspberry filling is thoroughly cooled and has thickened to a jam-like consistency; a runny filling is a prime culprit for slippage. Secondly, creating a robust dam or border of cream cheese frosting around the edge of each cake layer before adding the filling is vital. This border acts as a barrier to contain the filling. Finally, chilling the cake after applying the initial crumb coat helps to set the frosting and filling, making the entire structure more stable for the final frosting application.
-
Is it possible to use frozen raspberries instead of fresh ones for the filling?
Yes, frozen raspberries are perfectly suitable for making the raspberry filling, and often more convenient and budget-friendly. You do not necessarily need to thaw them completely before cooking; you can usually add them directly to the saucepan. They may release a bit more liquid as they cook, so be prepared for that. Continue with the recipe as written, simmering them until they break down and then thickening the mixture with the cornstarch slurry. The cooking time might be slightly longer with frozen berries. The final consistency should be the same, ensuring a delicious and stable filling for your cake.