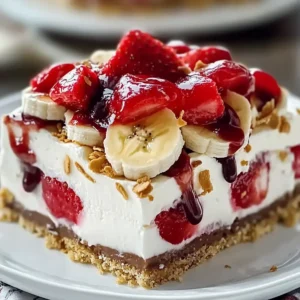
No Bake Banana Split Cake: The Ultimate Guilt-Free Dessert

As the summer heat intensified, a craving for something cool, sweet, and utterly delightful struck. My gaze fell upon a trio of ripe bananas, a carton of vibrant strawberries, and a nearly full tub of cream cheese – ingredients that whispered of classic flavors and effortless preparation. It was then that the idea for a No Bake Banana Split Cake solidified, promising a refreshing escape without the need for an oven’s warmth. This chilled dessert is more than just a treat; it’s a vibrant celebration of summer’s bounty, perfectly capturing the joy of a banana split in a decadent, easy-to-assemble cake form.
Imagine layers of creamy sweetness, fruity freshness, and a hint of chocolate, all coming together to create a symphony of textures and tastes. This no-bake wonder is not only incredibly simple to whip up, making it ideal for spontaneous gatherings or weeknight indulgences, but it’s also wonderfully adaptable. Whether you’re aiming for a lighter version or catering to specific dietary needs, this recipe offers a canvas for your culinary creativity. Let’s embark on this delightful journey to create the ultimate no-bake summer dessert.
Why You Will Love This Recipe
- Effortless Preparation: Requiring no oven time, this cake comes together quickly, making it a perfect choice for busy days or last-minute entertaining.
- Refreshing Summer Flavors: The delightful combination of sweet bananas, tart strawberries, and creamy filling evokes the classic taste of a banana split, offering a cool and vibrant dessert experience.
- Highly Customizable: Easily adapt the recipe to suit dietary preferences or simply to experiment with new flavors, from a gluten-free crust to a medley of different fruits.
- Crowd-Pleasing Appeal: This visually appealing and delicious dessert is a guaranteed hit at any gathering, from backyard barbecues to potlucks, sure to impress guests of all ages.
- Make-Ahead Convenience: Prepare this cake a day in advance, allowing the flavors to deepen and meld, which simplifies your hosting duties and ensures a perfectly chilled dessert is ready when you need it.
Ingredients You Need
The magic of this No Bake Banana Split Cake lies in its simple yet harmonious ingredients, each playing a crucial role in creating its signature flavor and texture. Opting for the freshest, ripest produce will undoubtedly elevate the final taste, transforming this dessert into a true culinary delight. You’ll find that the quality of your base ingredients directly impacts the overall richness and vibrancy of the cake, ensuring every bite is a moment of pure indulgence. Remember, the precise quantities are detailed within the accompanying recipe card for your convenience.
No Bake Banana Split Cake
A refreshing No Bake Banana Split Cake is a perfect summer dessert made with creamy textures and nostalgic flavors, ideal for gatherings. It's easy to prepare, customizable, and can be made ahead.
- For the Crust
- 1 cup Graham Cracker Crumbs (Substitute with gluten-free graham crackers for a gluten-free option.)
- 1/2 cup Butter (Melted coconut oil works well for a dairy-free alternative.)
- For the Filling
- 8 oz Cream Cheese (Can be swapped with dairy-free cream cheese or ricotta for a lighter option.)
- 1 cup Powdered Sugar (Feel free to reduce or use a sugar substitute for a lower sugar option.)
- 8 oz Whipped Topping (A dairy-free whipped topping is a great substitute.)
- For the Fruit Layer
- 2 medium Bananas (The star of the show; try substituting with peaches or kiwi.)
- 1 cup Strawberries (Can be exchanged with raspberries or blueberries if preferred.)
- For the Topping
- 1/2 cup Chocolate Syrup (Consider dark chocolate syrup for a gourmet touch.)
- 1Prepare the Crust: In a mixing bowl, combine the graham cracker crumbs and melted butter until the mixture resembles wet sand. Firmly press this mixture into the bottom of a 9x13 inch pan, creating an even layer.
- 2Make the Filling: In a separate bowl, beat the softened cream cheese and powdered sugar together using an electric mixer until smooth and creamy, about 2-3 minutes. Gently fold in the whipped topping.
- 3Layer Ingredients: Spread the cream cheese filling evenly over your prepared crust. Then, layer the sliced bananas and strawberries on top, distributing them evenly.
- 4Add Chocolate: Drizzle chocolate syrup generously over the fruit layer, allowing some to cascade down the sides.
- 5Chill: Cover the pan with plastic wrap or aluminum foil and refrigerate for at least 2 hours, preferably overnight, to allow the flavors to meld and the cake to set completely.
- 6Serve and Enjoy: Once chilled, remove the cake from the fridge and slice it into generous squares. Serve your No Bake Banana Split Cake garnished with extra chocolate syrup or a dollop of whipped topping if desired.
Keywords: no bake, banana split, cake, dessert, summer, fruit, cream cheese, graham cracker, chocolate
This curated list ensures you have everything required for a flawless preparation, from the sturdy foundation of the crust to the luscious layers of filling and fruit.
Variations
The beauty of a no-bake dessert like this lies in its incredible versatility, allowing for endless creative interpretations that cater to diverse palates and dietary needs. You can transform this classic into something uniquely yours with just a few simple swaps and additions, ensuring every iteration is a delightful surprise.
For those seeking a vegan option, the transformation is wonderfully straightforward. Instead of traditional cream cheese and whipped topping, opt for high-quality vegan cream cheese alternatives and coconut-based or soy-based whipped cream. The graham cracker crust can be made vegan by using vegan butter or coconut oil and ensuring your graham crackers are free from honey or dairy. This approach maintains the creamy texture and rich flavor profile while adhering to vegan principles.
A low-carb or keto-friendly version is also within reach. To achieve this, substitute the graham cracker crust with a mixture of almond flour, melted butter or coconut oil, and a keto-friendly sweetener like erythritol or xylitol. For the filling, use cream cheese and a sugar-free powdered sweetener, and opt for a sugar-free whipped topping. You might also consider swapping the bananas for lower-carb fruits like berries or kiwis, or omitting them altogether and focusing on the creamy filling and chocolate drizzle, perhaps using a sugar-free chocolate syrup.
Introducing different fruit combinations can add a burst of new flavors and colors. Imagine a tropical twist with sliced mango and pineapple in place of bananas, or a berry explosion featuring raspberries, blueberries, and sliced strawberries. Each fruit brings its unique sweetness and tang, creating a dynamic and refreshing flavor profile that keeps the dessert exciting and seasonally appropriate. You could even incorporate a tartness with thinly sliced kiwis for a zesty contrast.
For those who adore chocolate, consider folding in some dark chocolate chips into the cream cheese filling for an extra layer of indulgence, or even using a chocolate-flavored whipped topping. Alternatively, a drizzle of caramel sauce instead of, or in addition to, the chocolate syrup can provide a different sweet dimension. These variations ensure that your No Bake Banana Split Cake is not just a dessert, but a personalized culinary masterpiece, perfect for any occasion, and a wonderful addition to your repertoire, much like the delightful Easy Berry Tart or the indulgent Funfetti Cookies.
How to Prepare no bake banana split cake
Step 1: Crafting the Perfect Crust
The foundation of any great cake, no-bake or otherwise, is its crust, and for our No Bake Banana Split Cake, we’re starting with a classic graham cracker base. Begin by gathering your graham cracker crumbs; you’ll want about one cup of finely crushed crumbs. These can be achieved by pulsing graham crackers in a food processor until they reach a sand-like consistency, or by placing them in a zip-top bag and crushing them with a rolling pin for a more tactile experience. This step is crucial for achieving a uniform texture in your base layer.
Next, you’ll need to bind these crumbs together to form a cohesive layer that won’t crumble when sliced. Melt half a cup of unsalted butter until it’s fully liquid. In a medium bowl, combine the graham cracker crumbs with the melted butter. Stir this mixture thoroughly until every crumb is coated and the texture resembles wet sand. This coating ensures that the crumbs will adhere to each other, creating a sturdy yet delicate base for the subsequent layers of our delicious dessert. Ensure thorough mixing to evenly distribute the butter.
With the crumb mixture perfectly prepared, it’s time to form the crust in your chosen pan, typically a 9×13 inch baking dish. Transfer the buttery graham cracker crumbs into the pan and then, using the bottom of a glass or a measuring cup, firmly press the mixture evenly across the entire base of the dish. You want to create a compact and even layer, ensuring there are no loose crumbs or gaps. This firm pressing is vital for creating a solid foundation that will hold up when you slice and serve the cake, preventing it from falling apart. A well-compacted crust makes for beautiful slices.
Step 2: Whipping Up the Creamy Filling
The heart of our No Bake Banana Split Cake is its luscious, creamy filling, which provides that signature decadence reminiscent of classic ice cream parlor treats. To begin, ensure your 8 ounces of cream cheese are at room temperature; this is a critical step for achieving a smooth, lump-free filling. Softened cream cheese whips up beautifully, blending seamlessly with other ingredients without leaving any undesirable lumps. You can achieve this by letting it sit on the counter for about an hour or by gently warming it in the microwave for very short intervals, being careful not to melt it.
In a large mixing bowl, combine the softened cream cheese with one cup of powdered sugar. Using an electric mixer on medium speed, beat these two ingredients together until they are completely smooth and creamy. This process typically takes about 2 to 3 minutes, and you’ll notice the mixture transforming into a pale, fluffy cloud. Scrape down the sides of the bowl periodically to ensure all the cream cheese and powdered sugar are incorporated, aiming for a homogeneous consistency. This smooth blend is the perfect canvas for our next addition, setting the stage for a light and airy texture.
The final touch for our filling is the addition of 8 ounces of whipped topping. Gently fold this into the cream cheese and powdered sugar mixture using a spatula. The goal here is to incorporate the whipped topping without deflating its airy volume. Use a light, folding motion, bringing the spatula down through the center and up around the sides of the bowl, turning the mixture over itself. Continue this until the whipped topping is just fully combined and the filling is light, fluffy, and homogenous. Avoid overmixing, as this can diminish the lightness we’re striving for.
Step 3: Layering the Flavors
With both the crust and the creamy filling perfectly prepared, it’s time to bring them together in this delightful No Bake Banana Split Cake. Take the chilled crust that you’ve pressed into your 9×13 inch pan and carefully spread the light and fluffy cream cheese filling evenly over its surface. Use your spatula or the back of a spoon to create a smooth, level layer, ensuring that the filling extends all the way to the edges of the pan. This even distribution guarantees that every slice will have a generous portion of the rich, creamy filling.
Once the filling is smoothly spread, it’s time to add the vibrant fruit layers that give this cake its iconic banana split character. Begin by arranging two medium-sized ripe bananas, thinly sliced, over the cream cheese filling. Aim for uniform slices to ensure an even distribution of banana flavor throughout the cake. Following the banana layer, add a cup of fresh strawberries, also sliced. Distribute them evenly amongst the banana slices, filling in any gaps. The colorful contrast between the pale filling, the yellow bananas, and the red strawberries creates a visually stunning presentation even before chilling.
The strategic layering of these fruits is key to capturing the authentic banana split experience in a cake format. The bananas provide a soft, sweet base, while the strawberries offer a delightful tanginess and a pop of fresh flavor. Together, they create a harmonious balance that complements the richness of the cream cheese filling beautifully. This step is where the cake truly begins to resemble its ice cream parlor inspiration, promising a refreshing and satisfying dessert that’s perfect for any occasion, embodying the essence of a summer treat, and perhaps reminding you of simpler times, much like a German Pancake Recipe might.
Step 4: The Sweet Chocolate Finale
To complete the quintessential banana split experience in our No Bake Banana Split Cake, a generous drizzle of chocolate syrup is an absolute must. This is where the dessert truly embraces its namesake, adding that beloved chocolatey note that pairs so wonderfully with fruit and cream. Take your favorite chocolate syrup and liberally drizzle it all over the layered fruit topping. Don’t be shy; allow the syrup to cascade down the sides of the fruit and even onto the edges of the filling. This creates an appealing visual element and ensures that chocolate flavor is present in every bite.
The choice of chocolate syrup can subtly alter the final taste profile of the cake. A classic milk chocolate syrup will provide a familiar, sweet indulgence, while a darker, richer chocolate syrup can add a more sophisticated depth of flavor. For those looking to control sugar intake, a sugar-free chocolate syrup is also an excellent option, allowing you to enjoy the decadent chocolate element without the added sugar. Whichever you choose, ensure it’s applied in a pleasing pattern that enhances the cake’s overall aesthetic appeal. This step is all about visual and gustatory delight.
Beyond just adding sweetness, the chocolate syrup acts as a binding agent for some of the fruit and adds a glossy finish to the cake’s surface. It’s the final decorative touch that signals the dessert is ready for its crucial chilling period. This simple yet impactful step transforms the layers of fruit and cream into a cohesive, enticing dessert. The rich brown streaks of chocolate against the vibrant colors of the fruit are incredibly appetizing, making this No Bake Banana Split Cake a true feast for the eyes before it even graces your palate. This is the final flourish before the magic of refrigeration.
Step 5: The Essential Chill
The success of any no-bake dessert hinges on its chilling time, and our No Bake Banana Split Cake is no exception. Once all the layers have been beautifully assembled, it’s time to give it the crucial period it needs to set and for the flavors to meld. Carefully cover the entire pan with plastic wrap or aluminum foil. Ensure that the covering is snug, pressing it down gently around the edges to create a seal. This prevents the cake from absorbing any unwanted odors from the refrigerator and also helps to keep the fruit from drying out or oxidizing too quickly.
Place the covered cake into the refrigerator and let it chill for a minimum of two hours. During this time, the cream cheese filling will firm up considerably, transforming from a soft mixture into a sliceable, creamy layer. The flavors will also begin to meld together; the sweetness of the bananas, the tang of the strawberries, and the richness of the cream cheese will harmonize, creating a more complex and satisfying taste profile. The longer it chills, the better the flavors will develop, so an overnight chill is highly recommended if time permits.
An overnight chilling period is truly the secret to achieving the perfect texture and flavor in this No Bake Banana Split Cake. It allows the ingredients to fully stabilize and the flavors to deepen significantly, resulting in a dessert that is not only perfectly set but also incredibly delicious. When chilled overnight, the cake becomes easier to slice neatly, and the layers remain distinct and appealing. This patient waiting period is well worth the reward of a perfectly chilled, flawlessly textured, and deeply flavorful dessert. Patience here is key to the final presentation and taste.
Step 6: Serving Up Perfection
The moment of truth has arrived: your No Bake Banana Split Cake is perfectly chilled and ready to be enjoyed! Remove the pan from the refrigerator and carefully peel back the plastic wrap or foil. Admire the beautiful layers of creamy filling, vibrant fruit, and rich chocolate drizzle that have come together during the chilling process. The cake should now be firm enough to slice cleanly, revealing its delightful internal structure.
Using a sharp knife, carefully slice the cake into generous portions. For the cleanest cuts, it’s often helpful to wipe the knife clean with a damp cloth between each slice, especially after cutting through the fruit and chocolate layers. This ensures that each serving is neat and presents beautifully, showcasing the distinct strata of the cake. Arrange the slices on individual serving plates, ready for your guests to savor this refreshing dessert. The anticipation builds as you prepare to serve this delightful creation, a testament to simple ingredients transformed.
To elevate the presentation and add an extra touch of indulgence, consider garnishing each slice. A little extra drizzle of chocolate syrup, a dollop of whipped topping (perhaps some coconut whipped cream for a dairy-free option), or a sprinkle of chopped nuts can add both visual appeal and extra flavor. This No Bake Banana Split Cake is the perfect conclusion to a summer meal, a delightful treat for any occasion, and a testament to the fact that sometimes, the simplest desserts are the most memorable, much like the comforting Baked Lemon Chicken can be for dinner.
Pro Tips for no bake banana split cake
Room Temperature Cream Cheese is Key: For the smoothest, most luxurious filling, always ensure your cream cheese is at room temperature. Cold cream cheese will result in a lumpy mixture, no matter how vigorously you beat it. This simple step guarantees a velvety texture that enhances the overall eating experience. You want the cream cheese to yield easily to the touch.
Embrace the Overnight Chill: While a 2-hour chill is the minimum, allowing this cake to rest in the refrigerator overnight is highly recommended. This extended chilling period allows the flavors to fully meld and deepen, creating a more complex and satisfying taste. It also ensures the cake is perfectly set, making for clean, beautiful slices that hold their shape.
Fruit Freshness Matters: Use the freshest, ripest fruits you can find for the best flavor and texture. Overripe bananas can become too mushy, impacting the cake’s structure, while underripe ones may lack sweetness. Similarly, ensure your strawberries are vibrant and juicy. This attention to fruit quality is paramount for a truly delicious result.
Consider the Drizzle: When it comes to the chocolate syrup, don’t be afraid to experiment. A good quality dark chocolate syrup can add a sophisticated depth of flavor that contrasts beautifully with the sweetness of the fruit and filling. For a fun twist, try a caramel drizzle or even a combination of both chocolate and caramel for a decadent touch.
Presentation is Everything: To achieve those picture-perfect slices, use a sharp knife and wipe it clean between cuts. This prevents the fruit and chocolate from smearing and ensures each serving looks as appealing as the last. A little extra whipped cream or a cherry on top can also add a festive flair to your finished creation.
Serving Suggestions for no bake banana split cake
Decoration
Elevate your No Bake Banana Split Cake with simple yet impactful decorative touches that echo the classic sundae. A generous final drizzle of chocolate syrup, mimicking the nostalgic stripes from a diner, is essential. Consider adding a swirl of whipped cream to each slice, or even a maraschino cherry perched atop for that iconic finishing flourish. For a touch of texture and visual interest, a sprinkle of chopped toasted nuts, such as peanuts or almonds, can be scattered over the top. Edible glitter or even a few colorful sprinkles can add a playful element, especially if serving to children.
Side Dishes
While this cake is a complete dessert on its own, it pairs wonderfully with light and refreshing accompaniments that complement its sweetness without overpowering it. A simple side of fresh fruit salad, featuring seasonal berries and melon, provides a burst of natural freshness. For a classic pairing, a scoop of high-quality vanilla bean ice cream alongside a slice of the cake creates a delightful contrast in temperature and texture. Alternatively, a light and tangy lemonade or freshly brewed iced tea offers a palate-cleansing beverage that cuts through the richness of the dessert.
Creative Serving Ideas
Beyond the traditional slice, think about serving this No Bake Banana Split Cake in innovative ways. Individual portions can be created by assembling the cake in small glasses or ramekins, layering the crust crumbs, filling, fruit, and syrup in each. This offers a more elegant presentation and makes for easy distribution at parties. Another idea is to deconstruct the elements slightly, serving a dollop of the cream cheese filling alongside sliced bananas, strawberries, and chocolate sauce, allowing guests to assemble their own mini banana splits. This interactive approach is always a hit at casual gatherings, similar to the fun you’d have with a Funfetti Cookies recipe.
Preparation & Storage
Storing Leftovers
Keeping your delicious No Bake Banana Split Cake fresh is simple, though it’s best enjoyed within a few days due to the fresh fruit. Ensure the cake is tightly covered with plastic wrap or aluminum foil before placing it in the refrigerator. This prevents it from drying out and protects it from absorbing any unwanted odors from other foods. Properly stored, leftovers should remain delightful for up to three days, maintaining their creamy texture and fruity flavors, though the bananas may begin to soften slightly over time.
Freezing
For longer-term storage, freezing this No Bake Banana Split Cake is an excellent option. It’s advisable to freeze the cake before slicing, if possible, for the best texture upon thawing. Wrap the entire cake tightly in a layer of plastic wrap, followed by a layer of aluminum foil, or place it in an airtight freezer-safe container. Properly frozen, the cake can maintain its quality for up to two months. Freezing helps to preserve the flavors and prevent spoilage, making it a convenient dessert option to have on hand.
Reheating
As this No Bake Banana Split Cake is designed to be served chilled, there is no need for reheating. Instead, if the cake has been frozen, it requires thawing. The best method for thawing is to transfer the frozen cake from the freezer to the refrigerator and allow it to thaw slowly for several hours, preferably overnight. This gradual thawing process helps to maintain the cake’s delicate texture and prevents it from becoming watery or mushy. Once thawed, it can be sliced and served immediately at its ideal chilled temperature.
Frequently Asked Questions
-
What kind of bananas should I use for this recipe?
For the optimal flavor and texture in your No Bake Banana Split Cake, it’s best to use ripe yet firm bananas. Look for bananas that are mostly yellow with perhaps just a few small brown spots; these will offer a good balance of sweetness and structure. Avoid overly ripe bananas that have become very soft and mushy, as they can disintegrate during the layering and chilling process, potentially affecting the cake’s overall consistency. Conversely, green or underripe bananas may not provide enough sweetness. Properly ripened bananas ensure a delightful taste and a pleasant texture within the cake.
-
How should I store the No Bake Banana Split Cake?
To keep your No Bake Banana Split Cake fresh and delicious after preparation, proper storage in the refrigerator is key. It should be tightly covered to prevent it from drying out and to shield it from absorbing any other odors present in the fridge. Plastic wrap or an airtight container works perfectly for this purpose. When stored correctly, leftovers can be enjoyed for up to three days, though the quality of the fresh fruit may slightly diminish towards the end of this period. Ensure the covering is secure to maintain that creamy, delightful texture.
-
Can I freeze the No Bake Banana Split Cake?
Yes, you absolutely can freeze the No Bake Banana Split Cake for longer-term storage. For the best results, it’s recommended to freeze the entire cake before slicing it. Wrap it securely in a double layer of plastic wrap, followed by a layer of aluminum foil, or place it in a freezer-safe airtight container. When frozen properly, the cake can be stored for up to two months. To serve, transfer the cake from the freezer to the refrigerator and allow it to thaw slowly over several hours, or preferably overnight, to retain its intended texture and flavor profile.