Fun Coconut Cake Truffles

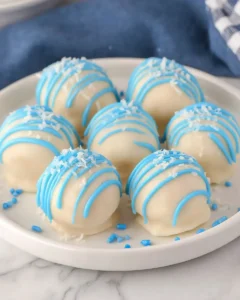
Fun Coconut Cake Truffles are a delightful make-ahead dessert that perfectly encapsulates rich coconut flavor within a soft cake-center, all enrobed in a smooth white chocolate shell. Their simple shaping process makes them ideal for any gathering, offering an elegant treat derived from fundamental pantry staples. These charming confections are the embodiment of effortless sophistication in the dessert world.
The magic of these truffles lies in their exquisite balance of textures and tastes. The core remains tender and moist, thanks to the careful blend of baked cake, creamy coconut milk, and sweet condensed milk. This delightful interior is then contrasted by a crisp, clean snap from the outer coating, creating a satisfying and complete sensory experience with every single bite.
Why You Will Love This Recipe
- Effortless Elegance: These truffles look incredibly sophisticated and festive, making them perfect for special occasions, yet they are surprisingly simple to prepare, requiring minimal culinary expertise.
- Make-Ahead Marvel: Designed for convenience, they can be made a day or two in advance, freeing up your time on the day of your event and allowing flavors to meld beautifully.
- Versatile Flavor Profile: The natural sweetness of coconut and cake, enhanced by creamy condensed milk and a crisp coating, appeals to a wide range of palates, making them a universally loved treat.
- Perfect Portion Control: Their small, bite-sized format makes them easy to serve and enjoy, fitting perfectly onto dessert platters or into treat bags without any fuss.
- Adaptable Creation: Whether you use store-bought cake or a homemade favorite, and whether you opt for white chocolate or candy melts for coating, these truffles offer flexibility to suit your preferences and pantry.
Ingredients You Need
The foundation of these delightful truffles is built upon quality ingredients that harmonize beautifully to create that signature coconut cake flavor. Using a good quality white cake provides a neutral yet tender base, while full-fat coconut milk contributes essential moisture and a more pronounced coconut essence, crucial for achieving that authentic taste. The sweetness and binding properties of sweetened condensed milk, combined with the delightful chewiness of sweetened shredded coconut, further enhance the texture and aroma of the truffle centers.
Fun Coconut Cake Truffles
Fun Coconut Cake Truffles are a make-ahead dessert with rich coconut flavor, a soft cake-center texture, and a smooth white chocolate shell. They are simple to shape, perfect for parties, and especially handy when you want an elegant treat from basic pantry ingredients.
- 1 standard white cake, baked in a 9x13-inch pan and fully cooled
- 1/4 cup sweetened condensed milk
- Candy melts or white chocolate for coating
- 3/4 cup canned coconut milk, preferably full-fat
- 1 cup sweetened shredded coconut
- 1Line a large baking sheet with parchment paper or waxed paper. Set it aside so the truffles can be placed on it without sticking.
- 2Break the cooled cake into fine pieces in a large mixing bowl. Add the canned coconut milk, sweetened condensed milk, and shredded coconut. Mix thoroughly with your hands until the ingredients are evenly blended and the mixture is consistent throughout.
- 3Shape the mixture into small balls and arrange them on the prepared baking sheet. Transfer the tray to the refrigerator and chill for at least 1 hour so the truffles become firm and easier to coat.
- 4Melt the candy melts or white chocolate according to the package directions while the cake balls are chilling. Once the coating is smooth and ready, dip each chilled truffle until completely covered, then place it back on the lined baking sheet.
- 5Return the coated truffles to the refrigerator and let the outer layer set fully. For the finest flavor and texture, chill them overnight before serving. Serve cold.
Keywords: Coconut Cake Truffles, Coconut, Cake Balls, White Chocolate, Make-ahead Dessert, Party Dessert, Easy Dessert
- standard white cake: baked in a 9×13-inch pan and fully cooled, this forms the crumbly base for the truffles, providing the essential cake texture.
- sweetened condensed milk: this rich, creamy ingredient binds the cake crumbs together and adds a luxurious sweetness and smooth texture to the center of each truffle.
- canned coconut milk: preferably full-fat, this liquid component infuses the truffles with deep coconut flavor and essential moisture, ensuring the centers are perfectly tender.
- sweetened shredded coconut: adds delightful texture and amplifies the coconut notes, giving each truffle a satisfying chewiness and a more robust coconut presence.
- candy melts or white chocolate: used for coating, this creates a smooth, elegant shell that hardens beautifully, providing a delightful contrast to the soft cake interior.
Specific quantities for each ingredient can be found within the detailed recipe card provided above, ensuring you have all the precise measurements needed for success.
Variations
To elevate these already delightful Fun Coconut Cake Truffles, consider a few inspired variations that cater to different dietary needs and flavor preferences. Imagine a vegan twist where you use a dairy-free white cake and replace the sweetened condensed milk with a rich, vegan-friendly alternative, perhaps a coconut cream-based dulce de leche, ensuring the bind and sweetness remain. The coconut milk and shredded coconut naturally lend themselves well to a vegan preparation, making this an achievable and delicious adaptation.
For those following a low-carb lifestyle, a creative approach could involve using a sugar-free white cake or even finely ground almond flour mixed with erythritol and cream cheese to form the base. Sweetened condensed milk might be substituted with a thick, homemade sugar-free condensed milk alternative or a combination of heavy cream and a sugar substitute to achieve a similar binding and richness. This would require careful adjustment to ensure the texture remains pliable for shaping and coating, offering a guilt-free indulgence.
Another exciting avenue is to introduce a burst of flavor by infusing the cake mixture with complementary ingredients. Think about adding a touch of lime zest for a tropical zing, or even a small amount of finely chopped crystallized ginger for a warming spice. You could also swirl in a bit of raspberry or strawberry puree into the cake mixture before shaping, creating beautiful pink-marbled centers that offer a fruity counterpoint to the coconut. These variations transform the basic truffle into a personalized masterpiece.
How to Prepare Fun Coconut Cake Truffles
Step 1: Preparing Your Workspace
The very first step in crafting these delightful Fun Coconut Cake Truffles involves meticulous preparation of your working surface. This is not just about cleanliness; it’s about ensuring a smooth process that leads to a professional-looking final product. Line a large baking tray or a standard baking sheet with parchment paper or waxed paper. This crucial step acts as a non-stick barrier, preventing your beautifully shaped truffles from adhering to the tray as they chill and set. A clean, organized workspace significantly streamlines the subsequent steps, making the entire truffle-making journey more enjoyable and less prone to mishaps.
Choosing the right type of parchment or waxed paper is also important. Ensure it is large enough to cover the entire surface of your baking sheet, with a little overhang if possible, providing ample space for all the truffles. This simple act of lining the tray is a small detail that makes a significant difference, especially when it comes to handling the delicate, coated truffles later in the process. It ensures that each truffle can be easily lifted off without damage, preserving their aesthetically pleasing appearance.
Step 2: Creating the Cake Base
Once your workspace is adequately prepared, the next essential phase is breaking down the cake into the perfect base for your truffles. Take your fully cooled standard white cake and crumble it into very fine pieces within a large mixing bowl. The goal here is to achieve an exceptionally fine crumb, as uniform as possible, with absolutely no large chunks remaining. This fine texture is paramount for the truffles to hold their shape neatly when rolled and to present a smooth, unblemished surface once coated.
You can use your hands for this process, gently but firmly breaking apart the cake. For an even finer texture, especially if the cake is very moist, you might consider pulsing it briefly in a food processor. Be cautious not to over-process, however, as this can turn the cake into a paste rather than a crumb. The ideal texture should resemble moist breadcrumbs, providing a soft yet cohesive structure that is easy to mold into uniform balls. This consistent crumbling ensures that each truffle will have a balanced cake-to-binder ratio.
Step 3: Combining the Filling Ingredients
With the cake base meticulously crumbled, it is time to introduce the ingredients that will transform these crumbs into a pliable, flavorful truffle mixture. To the bowl containing the fine cake crumbs, add the full-fat canned coconut milk, the sweetened shredded coconut, and the sweetened condensed milk. These components work in synergy to bind the cake, impart moisture, and infuse the center with that characteristic rich coconut flavor. The combination should result in a mixture that is thoroughly combined and evenly moist.
Using your hands is often the most effective way to mix these ingredients, allowing you to feel the texture develop and ensure everything is fully incorporated. The resulting mixture should feel soft and pliable, almost like a thick dough, but crucially, it must remain firm enough to be shaped into balls without falling apart. If the mixture seems too dry, a tablespoon more of coconut milk can be added, but proceed with caution to avoid making it too wet. Conversely, if it’s too sticky, a little extra shredded coconut can help absorb excess moisture and firm it up. The goal is a manageable consistency that holds its shape beautifully.
Step 4: Shaping the Truffles
Now that your delicious cake mixture has reached the perfect consistency, the next step is to transform it into individual, perfectly formed truffles. Take small portions of the mixture and carefully roll them between your palms to form neat, uniform balls. Aim to make each truffle as close in size as possible to ensure they chill at a consistent rate and present a visually appealing, cohesive appearance once coated. Consistent size also guarantees a more even distribution of the cake center to coating ratio in each bite.
As you shape each truffle, gently press them to ensure they are well-compacted. This prevents them from crumbling or losing their shape during the chilling and coating process. Place the shaped truffles onto the parchment-lined baking sheet that you prepared earlier, ensuring there is a little space between each one. This spacing prevents them from sticking together as they chill and makes the dipping process more manageable. The uniformity achieved in this step significantly contributes to the professional finish of your final dessert.
Step 5: Chilling for Firmness
Before moving on to the critical coating stage, it is absolutely essential to properly chill the shaped truffles. Transfer the baking sheet laden with the uniform cake balls into the refrigerator and let them chill until they are quite firm to the touch. This chilling step is not merely a suggestion; it is a vital part of the process that ensures the truffles will hold their shape perfectly when dipped into the warm coating. Cold centers also help the white chocolate or candy melt coating to set much more quickly and smoothly.
The duration of this chilling period will depend on your refrigerator’s temperature and the size of your truffles, but typically, at least 30-60 minutes should suffice. You should be able to press gently on a truffle and feel that it is solid and unyielding. If they still feel soft or fragile, give them a bit more time in the cold. Properly chilled truffles are far easier to handle and dip, leading to a much neater and more attractive final product, with minimal breakage or smudging of the coating.
Step 6: The Art of Coating and Setting
The final hands-on stage involves coating your chilled truffles in a smooth, glossy shell. While the truffles are chilling, melt your chosen white chocolate or candy melts according to the package instructions. It is important to melt them gently, typically in a double boiler or in the microwave at short intervals, stirring frequently to prevent scorching. The goal is a completely smooth, fluid coating that is easy to work with.
Once the coating is melted and smooth, retrieve the chilled truffles from the refrigerator. Working with one truffle at a time, carefully dip it into the melted coating using a fork or a dipping tool. Ensure it is completely submerged, then lift it out and allow any excess coating to drip back into the bowl for a few seconds. This step is crucial for preventing thick, uneven bottoms. Gently place the coated truffle back onto the parchment-lined baking sheet. Repeat this process for all the truffles.
After all the truffles have been coated, return the entire baking sheet to the refrigerator. Allow the white chocolate or candy melt shells to set completely. This can take anywhere from 20 to 30 minutes. For the absolute best flavor and texture, it is highly recommended to chill them overnight. This extended chill time allows the flavors to meld beautifully and the centers to achieve their optimal, rich, and tender consistency, resulting in a truly exquisite treat.
Pro Tips for Fun Coconut Cake Truffles
Finely Crumble for Smoothness: For the smoothest possible truffle centers, ensure you crumble your cooled white cake into extremely fine pieces. This prevents any hard or dry pockets and helps the truffles hold their shape without cracking during rolling or coating. A food processor can be your best friend here, provided you pulse carefully to avoid turning the cake into a paste.
Chill is Key: Do not underestimate the importance of thorough chilling. Make sure the shaped cake balls are quite firm to the touch before you begin dipping them in the warm coating. This prevents them from softening and losing their shape in the melted chocolate, leading to much cleaner, neater results and preventing any unwanted melting of the center.
Drip for Neatness: When dipping, let excess coating drip off for a good few seconds before placing the truffle back on the parchment. This simple technique prevents the formation of thick, unsightly bases and ensures that each truffle has a sleek, even shell. A gentle tap on the wrist can help encourage the last few drips to fall.
Batch Work for Efficiency: If you are making a large quantity, consider working in batches. Coat a few truffles, let them set slightly, then retrieve more from the fridge while the first batch firms up. This approach helps manage the melting coating and ensures your truffles remain perfectly chilled for dipping.
Storage Savvy: Store your finished truffles in an airtight container in the refrigerator. If you are concerned about the coating sticking or the truffles pressing against each other, place a layer of parchment paper between rows. This simple step preserves their pristine appearance.
Serving Suggestions for Fun Coconut Cake Truffles
Decoration
The inherent beauty of these Fun Coconut Cake Truffles lies in their clean white chocolate coating, but simple embellishments can elevate them further. For a touch of elegance, consider drizzling a contrasting color of melted chocolate, such as dark or milk chocolate, in thin lines over the set white coating. Alternatively, a light dusting of edible glitter or shimmering luster dust can add a magical sparkle, perfect for festive occasions. You could also press a single toasted coconut flake or a tiny edible flower onto the wet coating before it sets, creating a delicate focal point.
Side Dishes
When presenting these truffles as part of a larger dessert spread, pairing them with complementary flavors and textures creates a harmonious experience. A vibrant fruit salad featuring fresh berries like strawberries, raspberries, and blueberries offers a bright, tart contrast to the sweet, creamy truffles. A small serving of lemon or key lime curd can provide a tangy zest that cuts through the richness of the coconut and white chocolate. For a more substantial accompaniment, a delicate sugar cookie or a light almond biscotti can offer a pleasing textural variation.
Creative Serving Ideas
Beyond the standard dessert platter, these Fun Coconut Cake Truffles lend themselves to numerous creative serving presentations. Arrange them artfully in a decorative candy dish or a small trifle bowl for a visually appealing centerpiece. For parties and showers, skewer them onto small lollipop sticks, similar to cake pops, and display them upright in a floral arrangement or a decorated vase. They are also a fantastic addition to a dessert charcuterie board, nestled among fresh fruits, cheeses, and other small sweets for a communal and interactive treat experience. For an especially festive touch, consider placing them in mini cupcake liners or small, decorative boxes as party favors for your guests.
Preparation & Storage
Storing Leftovers
Once these delightful Fun Coconut Cake Truffles have been made, storing any leftovers is quite straightforward and ensures their quality remains intact for several days. Place the cooled and fully set truffles into an airtight container. If you have many layers of truffles, it’s advisable to place a sheet of parchment paper or waxed paper between each layer. This simple step prevents the chocolate coating from sticking to one another and preserves their polished appearance. Store the container in the refrigerator, where they will remain fresh and delicious for up to 5 days.
Freezing
For longer-term storage, these coconut cake truffles freeze exceptionally well, making them an ideal make-ahead dessert for future events or spontaneous cravings. To freeze them, it is best to initially arrange the truffles in a single layer on a baking sheet lined with parchment paper. This prevents them from sticking together as they freeze solid. Once they have frozen hard, you can then transfer them into a well-sealed freezer-safe container or a heavy-duty freezer bag. Ensure as much air as possible is removed from the bag to prevent freezer burn. Properly stored, they can be kept frozen for up to 2 months.
Reheating
The beauty of these Fun Coconut Cake Truffles is that they are designed to be enjoyed chilled, meaning no reheating is typically required. However, if you prefer a slightly softer center with a still-firm coating, you can allow them to sit at room temperature for about 10-15 minutes before serving. This brief tempering period allows the coconut-infused cake center to soften just a touch, enhancing the overall creamy texture while maintaining the integrity of the outer shell. If serving directly from the freezer, allow them to temper for about 20-30 minutes to achieve the perfect balance of textures.
Frequently Asked Questions
-
What is the best way to ensure a smooth, even coating on my truffles?
Achieving a smooth, even coating is crucial for that professional finish. Start with high-quality white chocolate or candy melts that are specifically designed for coating, as they have a fluid consistency. Ensure your truffles are thoroughly chilled and firm before dipping; this prevents them from absorbing heat and softening the cake center, which can lead to an uneven coating. Melt your coating gently, stirring frequently to avoid scorching, and aim for a consistency that is fluid but not overly thin. When dipping, use a fork or a dipping tool, ensuring full submersion, and then lift the truffle, allowing excess coating to drip back into the bowl for several seconds before placing it on the parchment paper. This allows for a thinner, more uniform shell rather than a thick, gloopy one.
-
My truffle mixture is too sticky to roll; what can I do to fix it?
A sticky truffle mixture is a common issue, but thankfully, it’s usually easy to resolve. The most common cause is too much moisture from the coconut milk or condensed milk, or perhaps the cake itself was very moist. The simplest solution is to refrigerate the entire bowl of mixture for about 15-30 minutes; the chill will firm up the fats and sugars, making it more manageable. If it’s still too sticky after chilling, you can gradually mix in a little more sweetened shredded coconut, about a tablespoon at a time, until the mixture becomes pliable enough to roll without sticking excessively to your hands. Alternatively, you can lightly dust your hands with powdered sugar or a tiny amount of cornstarch before shaping the balls, though be mindful that too much can affect the flavor and texture.
-
Can I use a different type of cake for these truffles, and will it affect the flavor or texture significantly?
Yes, you can certainly use different types of cake, but it will influence the final flavor and texture. A plain white or vanilla cake is ideal because it provides a neutral base that allows the coconut flavor to shine through prominently. Using a yellow cake might introduce a slight eggy or buttery flavor. If you opt for a denser cake, like a pound cake, you might need to adjust the amount of coconut milk and condensed milk slightly, as it might absorb more liquid. Conversely, a very light and airy cake might require a touch more binder to hold its shape. For the best results and to maintain the intended coconut profile, it’s recommended to stick with lighter cakes like white, vanilla, or even a simple yellow cake mix. Avoid heavily flavored cakes like chocolate or red velvet, as they will dramatically alter the intended taste of these Fun Coconut Cake Truffles.