Easy Garlic Butter Oven Baked Tilapia – Quick & Delicious!
Discover a truly delightful and remarkably simple way to prepare tilapia that will have you coming back for more. This Garlic Butter Oven Baked Tilapia recipe is a testament to how minimal ingredients can yield maximum flavor, creating a dish that’s both healthy and incredibly satisfying for any night of the week.
Imagine tender, flaky fish bathed in a vibrant, zesty, and buttery sauce, baked to golden perfection in your oven. It’s a culinary dream come true for anyone seeking a quick yet elegant meal that feels gourmet without the fuss. Prepare to be amazed by the ease and the exquisite taste that this recipe brings to your table.
Why You Will Love This Recipe
- Effortless Elegance: Transform simple tilapia fillets into a restaurant-quality dish with minimal effort, perfect for busy weeknights or casual entertaining.
- Bursting with Flavor: The harmonious blend of garlic, butter, lemon, and a hint of paprika creates a complex and utterly delicious coating that complements the delicate fish.
- Healthy and Wholesome: This recipe is naturally low in carbohydrates, gluten-free, and keto-friendly, making it a fantastic choice for health-conscious diners or those with specific dietary needs.
- Incredibly Fast Preparation: From pantry to plate in under 30 minutes, this dish is ideal when time is of the essence, proving that delicious meals don’t need to be time-consuming.
- Family-Approved Taste: Even the pickiest eaters will find themselves drawn to the familiar and comforting flavors of garlic and butter, ensuring a meal that pleases everyone at the table.
Ingredients You Need
The beauty of this Garlic Butter Oven Baked Tilapia lies in its simplicity, showcasing the power of fresh, high-quality ingredients. We focus on readily available pantry staples and fresh produce to create a symphony of flavors that truly elevates the humble tilapia fillet. Each component plays a crucial role, from the richness of the butter to the brightness of the lemon and the aromatic punch of fresh garlic.
Garlic Butter Oven Baked Tilapia

Light, nutritious tilapia fillets seasoned with garlic, butter, and lemon, and baked to perfection. This simple and quick recipe is ideal for a healthy weeknight dinner.
- 4 tilapia fillets
- Salt and freshly ground black pepper, to taste
- ½ teaspoon paprika
- ½ teaspoon dried thyme
- ½ teaspoon dried oregano
- 4 tablespoons butter, melted
- 4 cloves garlic, minced
- 2 tablespoons lemon juice
- ¼ teaspoon lemon zest
- 1 lemon, sliced into rounds, for garnish
- Red pepper flakes, for garnish
- Chopped fresh parsley, for garnish
- Lemon slices, for garnish
- 1Preheat oven to 400°F.
- 2Season tilapia with salt, pepper, paprika, thyme, and oregano; arrange fish in a 9x13 baking dish.
- 3In a mixing bowl, whisk together melted butter, garlic, lemon juice, and lemon zest; pour over tilapia.
- 4Bake tilapia for 10 to 12 minutes, or until fish flakes and is fork-tender.
- 5Garnish with pepper flakes, parsley, and lemon slices. Serve.
Keywords: tilapia, baked fish, garlic butter, lemon, easy dinner, seafood, quick recipe, healthy
You’ll find the precise quantities for each ingredient within the dedicated recipe card, ensuring your culinary creations are always spot-on.
Variations
While this Garlic Butter Oven Baked Tilapia recipe is magnificent as is, its versatility allows for delightful variations that cater to different tastes and dietary preferences. Experimenting with a few simple tweaks can open up a whole new world of flavors and textures.
For a vibrant, plant-based twist, consider a Vegan Mediterranean Delight. Swap the tilapia for thick slices of firm tofu or large portobello mushroom caps, ensuring they are well-pressed to remove excess moisture. Marinate them in a similar garlic-lemon-herb mixture before baking, perhaps adding sun-dried tomatoes and Kalamata olives to the baking dish during the last few minutes of cooking for an extra layer of Mediterranean zest.
If you’re following a Keto or low-carb lifestyle, this recipe is already a star. To enhance it further, you could introduce a medley of low-carbohydrate vegetables like asparagus spears, broccoli florets, or thinly sliced zucchini directly into the baking dish alongside the fish. Toss them with a little olive oil, salt, and pepper before baking, allowing them to roast and absorb the delicious garlic butter sauce.
For a spicy kick that awakens the palate, consider infusing the butter mixture with a pinch of cayenne pepper or a finely diced jalapeño. You could also introduce a sprinkle of chili flakes directly onto the fish before baking. This adds a wonderful warmth and depth that complements the richness of the butter and the delicate flavor of the tilapia, making it a truly exciting and flavorful meal.
How to Prepare Garlic Butter Oven Baked Tilapia
Step 1: Preheating and Preparing the Pan
The journey to delicious Garlic Butter Oven Baked Tilapia begins with a simple yet crucial step: preheating your oven. Set your oven to a robust 400 degrees Fahrenheit (200 degrees Celsius). This optimal temperature is key to ensuring the tilapia bakes evenly and quickly, achieving that perfect flaky texture without drying out. Simultaneously, prepare your 9×13 inch baking dish. A light coating of cooking spray or a thin smear of butter will prevent the fish from sticking, ensuring easy removal and presentation.
This initial step sets the stage for the entire cooking process. A properly preheated oven guarantees that the moment the dish enters, it begins to cook immediately, developing that desirable sear on the edges and cooking the fish through efficiently. Having your baking dish ready means you can transfer the seasoned tilapia without delay, minimizing the time the fish sits after seasoning and before it starts its transformation into a delectable meal. It’s all about creating the perfect environment for culinary success from the outset.
Step 2: Seasoning the Tilapia Fillets
Now, it’s time to impart wonderful flavor to the star of our dish: the tilapia fillets. Begin by patting each fillet thoroughly dry with paper towels. This seemingly small step is vital for achieving a better sear and allowing the seasonings to adhere properly, preventing a watery outcome. Once dry, generously season both sides of each fillet with salt and freshly ground black pepper. Don’t be shy; these basics form the foundation of the flavor profile, enhancing the natural taste of the fish.
Next, sprinkle the fillets with a carefully measured blend of paprika, dried thyme, and dried oregano. The paprika not only adds a beautiful subtle color but also a mild, earthy sweetness. Thyme and oregano contribute aromatic, herbaceous notes that pair exceptionally well with seafood. Arrange the seasoned tilapia fillets in a single layer within your prepared baking dish. Ensure they have a little space between them; this promotes even cooking and prevents steaming, which can make the fish mushy. The arranged fillets are now ready to receive their flavorful garlic butter bath.
Step 3: Crafting the Garlic Butter Sauce
The heart of this recipe lies in the intoxicatingly simple yet incredibly flavorful garlic butter sauce. In a separate medium-sized mixing bowl, combine the melted butter, minced fresh garlic, fresh lemon juice, and the delicate lemon zest. The butter serves as the rich, luscious base, carrying all the other flavors beautifully. Fresh garlic is indispensable here, providing a pungent, aromatic depth that can’t be replicated by garlic powder.
The fresh lemon juice and zest are crucial for cutting through the richness of the butter, adding a bright, citrusy counterpoint that elevates the entire dish. The zest, in particular, contains the flavorful oils of the lemon peel, offering a more intense and nuanced lemon aroma than juice alone. Whisk these ingredients together vigorously until they are thoroughly combined and emulsified. This creates a fragrant, golden mixture that is ready to be poured over the waiting tilapia fillets, infusing them with its delightful essence.
Step 4: Bathing the Tilapia in Flavor
With the garlic butter sauce perfectly whisked, it’s time to anoint the tilapia fillets with this liquid gold. Carefully and evenly pour the fragrant garlic butter mixture over each tilapia fillet in the baking dish. Ensure that the sauce generously coats the top and sides of the fish. You can use a spoon or a brush to help distribute the sauce, making sure every nook and cranny is touched by the buttery, garlicky goodness. This step is where the magic truly begins, as the fish starts to absorb all those incredible flavors.
Take a moment to appreciate the visual appeal as the golden sauce glistens over the seasoned fillets. This saucing is not just about flavor; it’s also about ensuring the fish stays moist and tender during the baking process. The butter helps to create a barrier, preventing the delicate tilapia from drying out, while the lemon and garlic infuse it with their signature aromas and tastes. The fillets are now poised to enter the oven and undergo their final delicious transformation.
Step 5: Baking to Perfection
The moment has arrived to bake your masterpiece. Carefully place the baking dish with the sauced tilapia fillets into the preheated 400°F (200°C) oven. Allow the fish to bake for approximately 10 to 12 minutes. The exact baking time can vary slightly depending on the thickness of your tilapia fillets and the specific calibration of your oven. It’s crucial to keep an eye on the fish during the latter half of the cooking time.
The tilapia is perfectly cooked when it flakes easily with a fork. This is the universally recognized sign of properly cooked fish; the flesh should separate into delicate, moist layers without resistance. If you have a food thermometer, the internal temperature should reach 145°F (63°C) in the thickest part of the fillet. Avoid overcooking, as this can lead to dry, rubbery fish, diminishing the delightful texture that makes this recipe so special. The aroma filling your kitchen at this stage is simply irresistible.
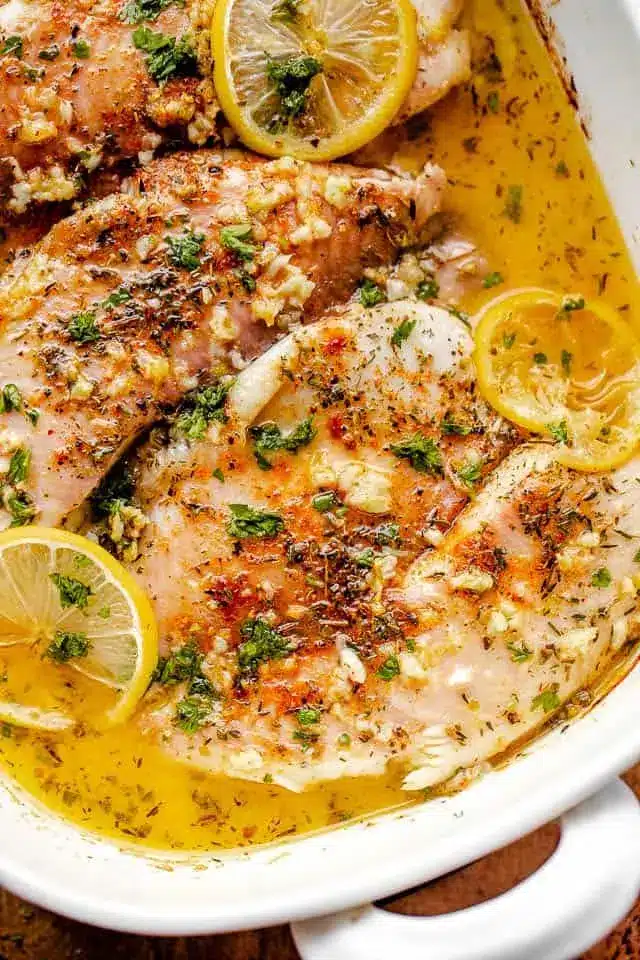
Step 6: Garnishing and Serving
Once the tilapia is perfectly baked and beautifully flaky, it’s time for the final flourish. Carefully remove the baking dish from the oven. Now, artfully garnish the fillets with fresh lemon slices, a sprinkle of red pepper flakes for a touch of heat and visual appeal, and a generous scattering of freshly chopped parsley. The vibrant green of the parsley adds a burst of color and a hint of fresh, herbaceous flavor that complements the richness of the dish.
The lemon slices not only serve as a beautiful edible decoration but also allow diners to add an extra squeeze of fresh lemon juice if desired, further brightening the flavors. The red pepper flakes offer a subtle warmth that can be adjusted to individual preference. Serve the Garlic Butter Oven Baked Tilapia immediately while it’s hot and at its most succulent. The combination of the tender fish, the aromatic sauce, and the fresh garnishes creates a truly memorable and satisfying culinary experience. Enjoy this delightful creation that is as pleasing to the eye as it is to the palate.
Pro Tips for Garlic Butter Oven Baked Tilapia
Quality Matters: Always opt for fresh, high-quality tilapia fillets. If fresh isn’t available, good quality frozen fillets, thawed properly, will also yield excellent results. The fresher the fish, the better the final texture and taste will be.
Don’t Overcrowd the Pan: Ensure your tilapia fillets have ample space in the baking dish. Overcrowding can lead to steaming rather than baking, resulting in a less desirable texture. If you have more than four fillets, consider using two baking dishes.
Pat It Dry: Before seasoning, thoroughly pat your tilapia fillets dry with paper towels. This step is crucial for achieving a slightly crisped exterior and allowing the seasonings to adhere properly, preventing a watery outcome.
Adjust Garlic to Taste: The recipe calls for 4 cloves of minced garlic, but feel free to adjust this based on your personal preference. For a more intense garlic flavor, add an extra clove or two, ensuring it’s finely minced to distribute evenly.
Watch for Doneness: Tilapia cooks very quickly. Keep a close eye on it during the last few minutes of baking to prevent overcooking. The fish should flake easily with a fork and reach an internal temperature of 145°F (63°C).
Serving Suggestions for Garlic Butter Oven Baked Tilapia
Decoration
Elevate the presentation of your Garlic Butter Oven Baked Tilapia with simple yet impactful garnishes. Freshly chopped parsley adds a vibrant splash of green, bringing a touch of freshness and visual appeal. Thinly sliced lemon rounds, artfully arranged around or on top of the fillets, not only look beautiful but also offer an extra burst of citrusy brightness for those who desire it. A delicate dusting of red pepper flakes provides a subtle hint of color and a promise of gentle warmth, adding a sophisticated touch to the overall aesthetic.
Side Dishes
This exquisite tilapia dish pairs wonderfully with a variety of side dishes that complement its delicate flavors. For a light and refreshing complement, a crisp green salad with a zesty vinaigrette is an excellent choice, offering a palate-cleansing contrast. Steamed or roasted asparagus spears, drizzled with a little olive oil and a squeeze of lemon, provide a healthy and elegant vegetable accompaniment. Alternatively, consider serving it with a side of fluffy rice or quinoa, which will soak up any extra garlic butter sauce beautifully.
For a more substantial meal, especially for dinner, consider pairing it with oven-roasted potatoes or sweet potato wedges. The earthy flavors and satisfying textures of these root vegetables create a well-rounded and hearty plate. Another fantastic option is a side of simple roasted broccoli or green beans, seasoned lightly to let the tilapia shine. These suggestions aim to balance the meal, ensuring a delightful dining experience.
Creative Serving Ideas
Transform your Garlic Butter Oven Baked Tilapia into a complete culinary experience with a few creative serving ideas. Consider serving individual portions family-style by arranging the garnished fillets on a large platter, surrounded by vibrant steamed vegetables. This makes for an impressive presentation for guests and allows everyone to help themselves.
For a lighter, more casual meal, you could flake the cooked tilapia and serve it in warm tortillas or lettuce cups for delicious fish tacos or wraps, topping with your favorite salsa and avocado. Another imaginative approach is to incorporate the flaked fish into a hearty seafood pasta dish, perhaps with a light cream sauce or a tomato-based marinara, though keep in mind this would shift the nutritional profile significantly. For a more elegant presentation, serve the tilapia over a bed of creamy polenta or a light risotto, allowing the sauce to meld with the base.
You could also present this dish as part of a larger seafood feast, perhaps alongside other baked fish recipes or grilled shrimp, creating a spectacular spread. Don’t forget to consider the visual appeal; using colorful plates and adding fresh herb sprigs can make even a simple weeknight meal feel special. The adaptability of this tilapia dish truly allows for endless creative possibilities.
Preparation & Storage
Storing Leftovers
If you are fortunate enough to have any leftover Garlic Butter Oven Baked Tilapia, proper storage is key to maintaining its quality. Allow the cooked fish to cool down to room temperature before transferring it to an airtight container. Ensure the container is sealed tightly to prevent moisture loss and the absorption of any odors from other foods in the refrigerator. Store the container in the refrigerator for up to 3 days.
It’s important to note that while refrigeration helps preserve the fish, the texture may slightly change upon reheating. However, with proper storage, the flavor will remain quite pleasant. Avoid leaving cooked fish at room temperature for extended periods, as this can lead to bacterial growth and spoilage. Always check the fish for any signs of spoilage, such as an off-putting odor or slimy texture, before consuming leftovers.
Freezing
For longer storage, freezing is an excellent option for leftover Garlic Butter Oven Baked Tilapia. First, ensure the fish has cooled completely. Place the individual fillets in a single layer on a baking sheet lined with parchment paper. Freeze them until they are solid, which typically takes about 1-2 hours. This flash-freezing method prevents the fillets from sticking together in a large clump.
Once frozen solid, carefully transfer the individual fillets into heavy-duty freezer bags or airtight freezer-safe containers. Before sealing the bags, gently press out as much air as possible. Removing excess air minimizes the risk of freezer burn, which can negatively impact the texture and flavor of the fish. Properly sealed, the tilapia can remain in the freezer for up to 3 weeks. Label the bags with the date to keep track of freshness.
Reheating
Reheating your Garlic Butter Oven Baked Tilapia requires a gentle approach to preserve moisture and texture as much as possible. If your fish was frozen, begin by thawing it completely in the refrigerator overnight. Once thawed, let the fillets sit at room temperature for about 15-20 minutes while you preheat your oven. Set your oven to 350°F (175°C).
Arrange the thawed tilapia fillets in a clean baking dish. To help retain moisture, it’s best to cover the dish tightly with aluminum foil. Place the covered dish in the preheated oven and bake for approximately 8-10 minutes, or until the fish is heated through. Avoid overheating, as this can dry out the delicate fish. Check for doneness by gently flaking with a fork; it should be warm throughout. The texture might be slightly less moist than when originally baked, but it will still be delicious.
Frequently Asked Questions
- Can I use other types of white fish instead of tilapia?
Absolutely! This Garlic Butter Oven Baked recipe is incredibly versatile and works beautifully with a variety of other firm white fish fillets. Cod, haddock, sole, and even flaky salmon can be substituted with great success. The cooking time might need slight adjustments based on the thickness and density of the fish you choose. For instance, thicker fillets like cod might require a few extra minutes in the oven, while thinner fillets like sole might cook a bit faster. Always check for flakiness with a fork to ensure it’s cooked through, aiming for that tender, moist result.
- What if I don’t have fresh garlic? Can I use garlic powder?
While fresh garlic is highly recommended for its superior flavor and aroma, you can substitute it with garlic powder in a pinch. For the amount of garlic called for in this recipe (4 cloves), you would typically use about 1/2 teaspoon of garlic powder. However, it’s important to note that garlic powder imparts a different flavor profile – it’s generally less pungent and more mellow than fresh garlic. To ensure the best flavor, consider using slightly more garlic powder, perhaps 3/4 to 1 teaspoon, and mix it thoroughly with the butter and lemon juice to distribute its flavor evenly. For optimal results, though, fresh garlic truly makes a difference in this dish.
- My tilapia seems to be cooking very quickly. How can I prevent it from drying out?
Tilapia is a delicate fish that cooks very rapidly, and overcooking is the most common reason it can become dry. To prevent this, pay close attention to the cooking time. Start checking for doneness around the 8-minute mark, even if the recipe suggests 10-12 minutes. The visual cue of the fish flaking easily with a fork is the most reliable indicator. Additionally, ensuring your oven is at the correct temperature (400°F) is vital for quick, even cooking. Finally, the butter and lemon juice mixture itself provides moisture, so make sure each fillet is well-coated before baking. If you’re concerned, you can even tent the fish loosely with foil for the last few minutes of cooking to trap steam and extra moisture.