Pico de Gallo – Easy and Classic Pico de Gallo Recipe!
Welcome to the vibrant world of fresh, zesty flavors! Today, we’re diving headfirst into the creation of an iconic Mexican condiment that’s as versatile as it is delicious. This simple yet spectacular dish brings a burst of sunshine to any meal, elevating everything it touches with its bright and bold profile.
Imagine the perfect balance of juicy tomatoes, sharp onion, a hint of fiery jalapeño, and the refreshing zing of lime, all brought together by the aromatic embrace of fresh cilantro. This isn’t just a side dish; it’s a culinary statement that promises to transform your everyday meals into something extraordinary. Get ready to experience the true essence of homemade goodness.
Why You Will Love This Recipe
- Freshness Guaranteed: This recipe prioritizes the use of ripe, high-quality ingredients, ensuring a vibrant and authentic taste that store-bought alternatives simply cannot match. Each bite is a celebration of nature’s best.
- Incredibly Simple: With just a few core ingredients and minimal preparation time, you can whip up a batch of this delightful salsa in under 30 minutes, making it perfect for spontaneous gatherings or busy weeknights. It’s the epitome of fuss-free cooking.
- Remarkably Versatile: Beyond being a fantastic dip for tortilla chips, this pico de gallo recipe is a culinary chameleon. It’s the perfect topping for tacos, grilled meats, salads, eggs, and so much more, adding a fresh, chunky texture and bright flavor to any dish.
- Customizable Heat: You have complete control over the spice level. Easily adjust the amount of jalapeño, or omit it entirely, to suit your personal preference, ensuring a perfect flavor profile for everyone.
- Healthy & Wholesome: Packed with vitamins and antioxidants from fresh vegetables and lime juice, this pico de gallo is a guilt-free way to add flavor and nutrition to your meals. It’s a feel-good addition to any diet.
Ingredients You Need
The beauty of authentic pico de gallo lies in its simplicity and the quality of its components. Using the freshest, ripest ingredients available will elevate this dish from good to absolutely unforgettable. We’re talking about produce that bursts with flavor and aroma, making each mouthful a delightful experience. Selecting the right kind of tomatoes, onions, and peppers is crucial for achieving that perfect balance of sweetness, sharpness, and subtle heat that defines this beloved salsa.
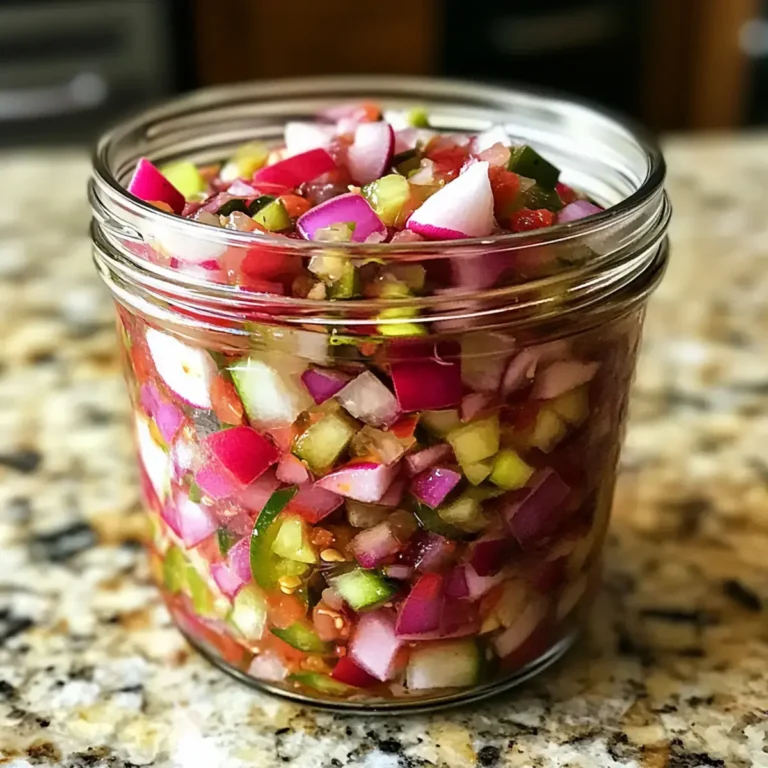
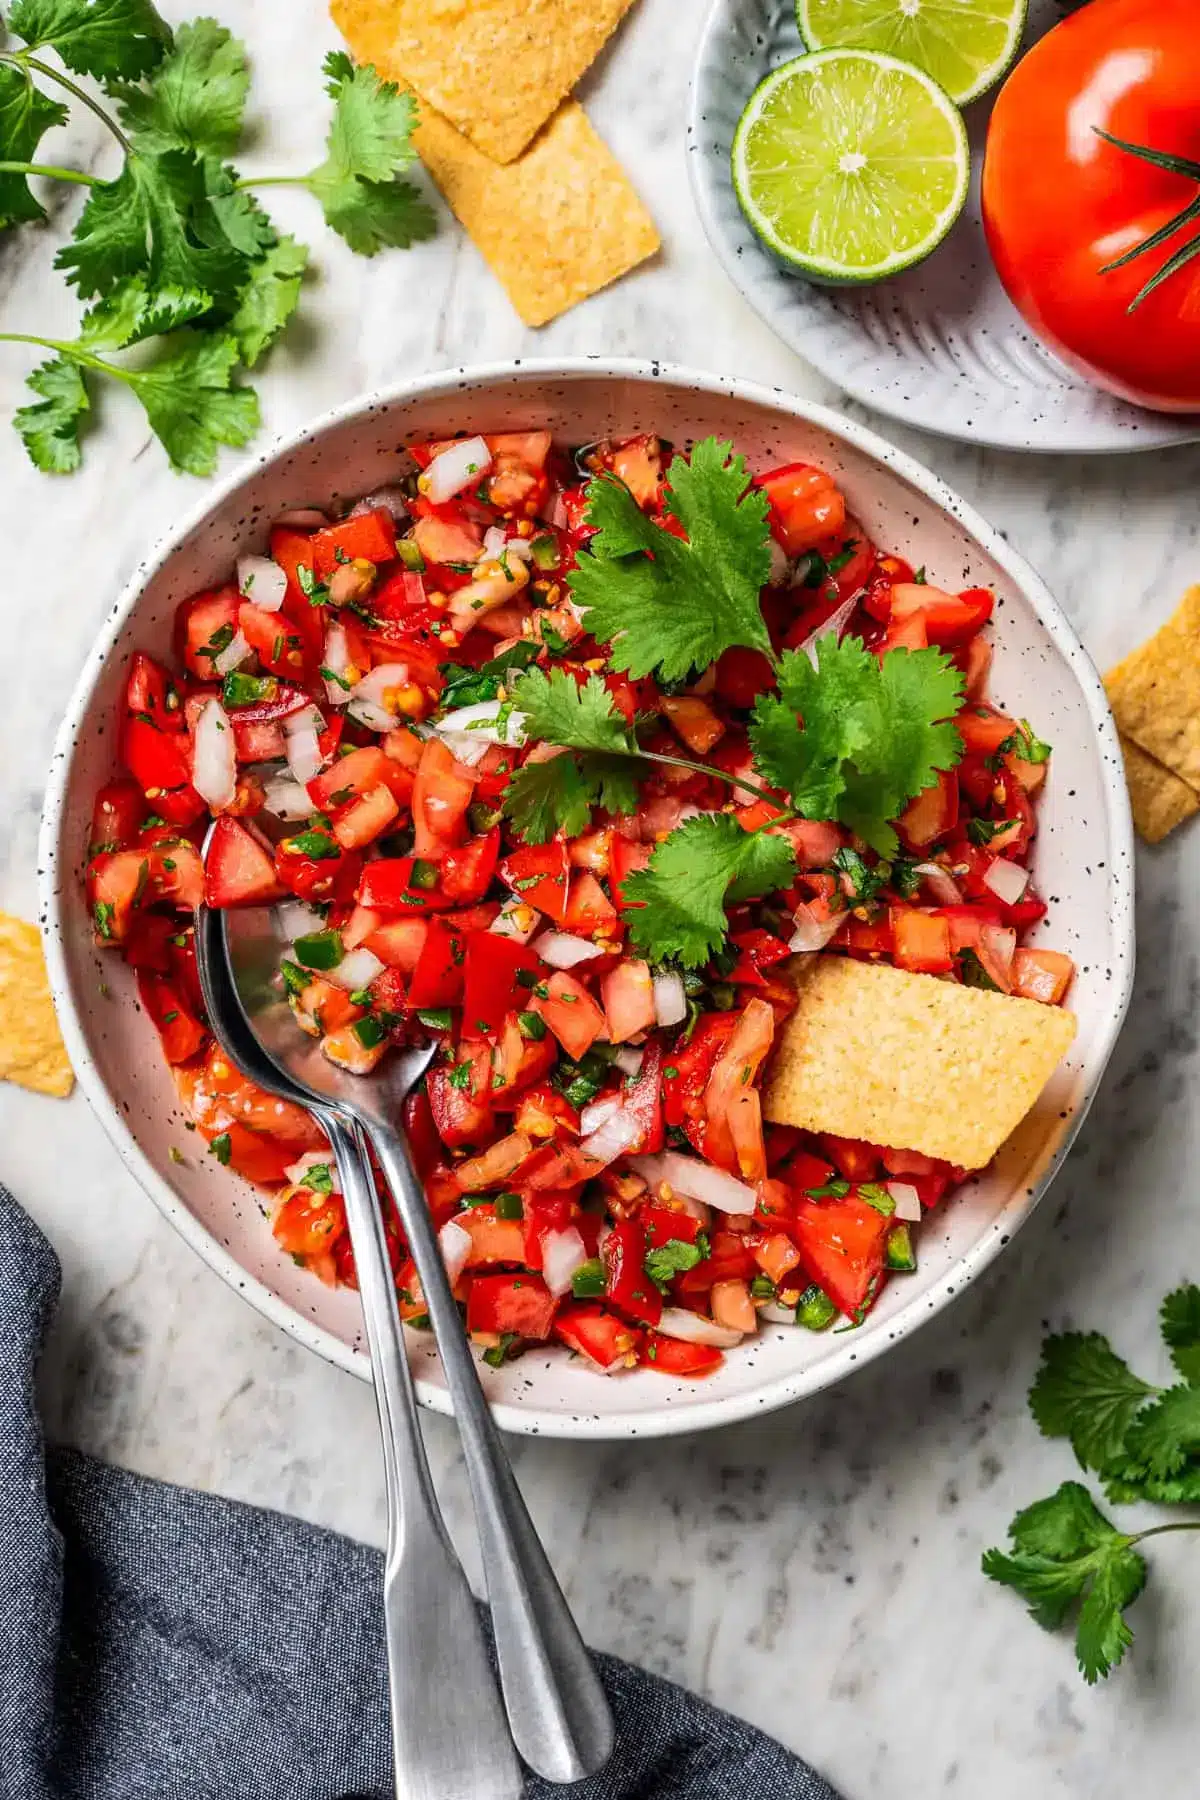
Pico de Gallo Recipe
Pico de gallo is a fresh Mexican tomato salsa with only 5 ingredients: tomatoes, onion, jalapeño, cilantro, and lime. It's quick and easy to make!
- 1 to 1.5 pounds ripe tomatoes, diced
- 1 jalapeño, finely diced (ribs and seeds removed)
- 3 tablespoons fresh lime juice
- 1In a bowl, combine the diced tomatoes, onions, jalapeño, salt, and pepper. Let it sit for about 5 minutes.
- 2Stir in the lime juice and cilantro and toss to combine. Taste and adjust accordingly.
- 3Let it rest for about 15 to 20 minutes before serving. You can also refrigerate it, covered, for up to 4 days.
Keywords: pico de gallo, salsa fresca, mexican, fresh salsa, tomato, jalapeño, cilantro, lime, side dish, dip
The recipe card above provides the precise quantities needed for each ingredient. Feel free to refer back to it as you gather your supplies.
Variations
While the classic combination of tomatoes, onion, jalapeño, cilantro, and lime is undeniably perfect, this versatile salsa serves as a fantastic base for countless creative variations. Don’t be afraid to experiment and infuse your own unique flavors into this beloved Mexican staple.
One delightful variation is the Mango Pico de Gallo, perfect for adding a tropical twist. Simply incorporate diced ripe mango alongside the tomatoes, and perhaps swap a portion of the lime juice for a splash of orange juice. This introduces a wonderful sweetness and a different fruity dimension that pairs beautifully with grilled fish or chicken tacos. The slight tang of the mango complements the other ingredients, creating a harmonious blend of sweet, savory, and spicy.
For those seeking a lighter, lower-carb option, consider a Cucumber and Avocado Pico de Gallo. Replace some or all of the tomatoes with finely diced cucumber for added crunch and freshness. Gently fold in diced avocado just before serving to add a creamy texture and healthy fats. This version is incredibly refreshing and makes for a delightful topping on salads or grilled shrimp. The coolness of the cucumber and the richness of the avocado create a luxurious mouthfeel.
A Spicy Corn and Black Bean Pico de Gallo offers a more substantial and hearty twist. Add a cup of cooked corn kernels (fresh, frozen, or roasted) and half a cup of rinsed black beans to the traditional mixture. You can also increase the jalapeño or add a pinch of chili powder for an extra kick. This variation is fantastic as a standalone side dish or as a hearty topping for burrito bowls and baked potatoes, providing a delightful textural contrast and a satisfying flavor profile. This robust version can even stand alone as a light lunch.
How to Prepare pico de gallo recipe
Step 1: Prepare Your Vegetables
The foundation of an exceptional pico de gallo lies in meticulous preparation of its core components. Begin by selecting the freshest, ripest tomatoes you can find; Roma tomatoes are often preferred for their firm flesh and fewer seeds, but any high-quality, flavorful tomato will suffice. Wash them thoroughly under cool running water, and then carefully dice them into small, uniform pieces. The goal is to achieve bite-sized cubes that will meld beautifully with the other ingredients. Don’t aim for mush; a slight firmness in the diced tomatoes will contribute to the delightful texture of the final product.
Next, take your chosen onion – white or red onions are excellent choices for their flavor profiles. Finely dice the onion, ensuring the pieces are as small as possible. This step is crucial for ensuring that the onion’s sharp flavor is distributed evenly throughout the salsa and doesn’t overpower any single bite. If you find raw onion too pungent, you can rinse the diced onion under cold water for a minute or two and then drain it thoroughly before adding it to the mix; this process mellows its intensity slightly without sacrificing its essential bite. This small step can make a significant difference for those with a more sensitive palate, ensuring a balanced flavor experience.
Now, turn your attention to the jalapeño pepper. For a milder heat, it’s essential to remove the seeds and the white ribs from the inside of the pepper. These are the parts that contain the most capsaicin, the compound responsible for the heat. Slice the jalapeño in half lengthwise, then use a small spoon or a paring knife to carefully scrape out the seeds and pith. Once cleaned, finely mince the jalapeño. If you prefer a spicier salsa, leave some or all of the seeds in, or consider using a hotter pepper like a serrano. Remember to wash your hands thoroughly after handling chili peppers, or wear gloves, to avoid any lingering irritation. The aim here is to introduce a pleasant warmth, not an overwhelming inferno, unless that is your desired outcome.
Step 2: Combine and Season
Once all your vegetables are prepped and finely diced, it’s time to bring them together in a medium-sized mixing bowl. Gently add the diced tomatoes, finely diced onion, and minced jalapeño to the bowl. At this stage, you’ll also introduce the salt and freshly ground black pepper. These seasonings are not merely for flavor; the salt plays a crucial role in drawing out excess moisture from the tomatoes and onions, which helps to prevent the pico de gallo from becoming watery and mushy over time. Start with the recommended amounts, but remember that seasoning is always to taste, and you can adjust it later.
Toss the ingredients together gently to combine them. Avoid overmixing or mashing the vegetables, as this can break down their texture and release too much liquid prematurely. The goal is to have distinct, well-defined pieces that offer a satisfying mouthfeel. Let this mixture sit for about five minutes. This brief resting period allows the salt to begin its work, starting the process of infusing the vegetables with flavor and drawing out some of the initial moisture. It’s a subtle yet important step in developing the depth of flavor that will characterize the final pico de gallo.
After the initial five-minute rest, it’s time to add the vibrant, herbaceous notes and the essential citrus element. Finely chop the fresh cilantro leaves and tender stems. If you’re not a fan of cilantro, or if it’s one of those ingredients that tastes like soap to you due to a genetic variation, you can substitute it with finely chopped fresh parsley. Add the chopped cilantro (or parsley) to the bowl, along with the freshly squeezed lime juice. The lime juice is non-negotiable; it provides the crucial brightness and acidity that cuts through the richness of the tomatoes and onions, balancing the flavors and awakening the palate. Ensure you’re using freshly squeezed lime juice, as bottled versions lack the vibrant flavor and aroma.
Step 3: Marinate and Serve
With all the ingredients now in the bowl, gently toss everything together once more to ensure an even distribution of the lime juice and cilantro. This is also the opportune moment to taste your creation and make any necessary adjustments. Does it need a little more salt to enhance the flavors? Perhaps a touch more lime juice for extra zest? Or maybe another pinch of pepper for a subtle kick? This is your chance to perfect the balance according to your personal preference, creating a pico de gallo that is uniquely yours. Don’t be shy about tasting and tweaking until it sings.
Now comes the most important part of developing the flavors: letting the pico de gallo rest. Cover the bowl tightly with plastic wrap or transfer the salsa to an airtight container. For the best results, allow the mixture to marinate at room temperature for at least 15 to 20 minutes. This resting period is crucial, as it allows the flavors to meld and deepen. The acidity of the lime juice will begin to subtly tenderize the vegetables, and all the ingredients will harmonize, creating a more complex and satisfying taste. This is where the magic truly happens, transforming simple chopped ingredients into a cohesive and delicious salsa.
If you are preparing the pico de gallo more than 20 minutes in advance, or if you want to have it ready for a meal the next day, you can store it in the refrigerator. Once it has rested for the initial period, cover it securely and place it in the fridge. While it can be made up to 4 days in advance, its peak freshness and vibrant texture are typically experienced within the first 1-2 days. When you’re ready to serve, it’s highly recommended to use a slotted spoon to scoop the pico de gallo from the bowl. This will leave behind the excess liquid that has been released by the tomatoes, preventing your other dishes from becoming soggy. This simple technique ensures that your tacos, nachos, or other accompaniments maintain their crispness and integrity.
Step 4: Incorporate Optional Add-ins
While the classic recipe is perfect on its own, there are numerous delightful ways to enhance your pico de gallo with additional ingredients. Consider adding a cup of sweet corn kernels, whether fresh off the cob, thawed from frozen, or even roasted for a smoky depth. This adds a burst of sweetness and a pleasing chewy texture that complements the other components beautifully. Roasted corn, in particular, brings a wonderfully caramelized flavor that elevates the entire dish.
For a touch of creamy richness, gently fold in about half a cup of diced avocado just before serving. The avocado adds a luxurious texture and healthy fats that create a delightful contrast to the bright, acidic flavors. It’s important to add the avocado at the last minute to prevent it from browning or becoming mushy. Another fantastic addition is finely diced red or green bell pepper; this adds a subtle sweetness and a satisfying crunch, further enhancing the overall texture and visual appeal of the salsa. The vibrant colors of the bell pepper also make the pico de gallo even more enticing.
If you enjoy a bit of heat, you can introduce other elements like finely diced red onion for a sharper bite, or even a touch of minced garlic for an extra savory dimension. Some enthusiasts also enjoy adding a sprinkle of cumin for an earthy warmth or a pinch of smoked paprika for a subtle smoky undertone. Experimentation is key; the goal is to create a flavor profile that resonates with your personal taste preferences and complements the dishes you plan to serve it with. Each addition should enhance, not overpower, the core essence of the pico de gallo.
Step 5: Rest and Refine Flavors
The crucial step of allowing the pico de gallo to rest is where the true magic of flavor development occurs. As the ingredients sit together, the natural juices of the tomatoes and onions are gently coaxed out by the salt, and these juices mingle with the lime juice and cilantro. This process allows the distinct flavors of each component to meld and harmonize, creating a much more complex and satisfying taste than if the salsa were served immediately after mixing. Think of it as a brief, yet essential, moment for the ingredients to become acquainted and truly become a cohesive dish.
During this resting period, the acidity from the lime juice also begins to subtly tenderize the diced vegetables. This is particularly noticeable with the onions, helping to soften their sharp bite and integrate them more seamlessly into the salsa. This subtle transformation ensures that each bite offers a balanced combination of textures and flavors, from the slight firmness of the tomatoes to the softened edges of the onion. It’s this attention to detail that separates a good pico de gallo from an exceptional one.
After the recommended 15-20 minute rest (or even longer if you’ve refrigerated it), it’s time for a final taste test. This is your last chance to make any minor adjustments. Perhaps the lime juice has mellowed slightly, and it needs another small squeeze for extra brightness. Or maybe the salt has fully integrated, and a tiny pinch more will make all the flavors pop. This final refinement ensures that the pico de gallo is perfectly balanced and exactly to your liking. This iterative process of tasting and adjusting is a hallmark of great home cooking, allowing you to achieve culinary perfection.
Step 6: Serving Considerations
When it’s time to serve your beautifully crafted pico de gallo, consider the method of delivery. As mentioned earlier, using a slotted spoon is highly recommended. This ensures that you’re serving the chunky, flavorful solids and leaving behind the excess liquid at the bottom of the bowl. This liquid, while flavorful, can make your accompanying dishes soggy, especially when serving with crunchy items like tortilla chips or tacos. The liquid itself can be saved and incorporated into salad dressings or used to add depth to soups, preventing any waste.
The visual appeal of pico de gallo is undeniable, with its vibrant red, white, and green hues. It adds a fresh, colorful garnish to almost any dish. Consider the presentation; a small, attractive bowl filled with the fresh salsa can be a centerpiece on a table laden with Mexican fare. For even more visual interest, you can garnish the top of the pico de gallo with a few extra sprigs of cilantro or a thin slice of jalapeño, especially if you know your guests appreciate a bit of heat.
Pico de gallo is incredibly adaptable to various serving styles. It can be served in a traditional salsa bowl alongside a basket of warm tortilla chips for dipping. It’s also perfect for spooning generously over grilled meats like steak or chicken, or as a vibrant topping for tacos, burritos, nachos, and quesadillas. Its fresh, chunky texture provides a welcome contrast to richer, heavier dishes, cutting through the fat and adding a bright, clean finish to every bite. The possibilities for enjoyment are truly endless.
Pro Tips for pico de gallo recipe
Select the Ripest Tomatoes: The quality of your tomatoes is paramount. Look for firm, ripe tomatoes that yield slightly to gentle pressure. Ideally, use tomatoes that are in season for the best flavor. Roma tomatoes are a popular choice due to their meaty texture and fewer seeds, which results in a less watery salsa. If Roma tomatoes aren’t available or in season, choose the ripest, most flavorful variety you can find.
Uniform Dicing is Key: Aim for consistency when dicing your tomatoes, onions, and jalapeños. Very fine, uniform pieces ensure that every spoonful offers a balanced mix of flavors and textures. This meticulous chopping method prevents any one ingredient from dominating a bite and contributes to a more cohesive salsa.
Don’t Skip the Lime Juice: Always use fresh lime juice. The bottled stuff simply doesn’t compare in terms of brightness and authentic flavor. The acidity is crucial for balancing the other ingredients and adding that signature zesty kick that defines pico de gallo. It’s the lifeblood of the salsa.
Taste and Adjust Diligently: Seasoning is subjective, so tasting and adjusting is essential. After the initial resting period, sample your pico de gallo and adjust salt, lime juice, or even add more jalapeño if desired. This step ensures the final product is perfectly tailored to your palate and the meal it will accompany.
Consider the “Resting” Time: While you can eat pico de gallo immediately, allowing it to rest for at least 15-20 minutes lets the flavors meld. This marination process significantly enhances the depth and complexity of the salsa, transforming it from simple chopped ingredients into a harmonious blend. For even better flavor, make it a few hours ahead or the day before.
Serving Suggestions for pico de gallo recipe
Decoration
Enhance the visual appeal of your pico de gallo by garnishing the top with a few extra sprigs of fresh cilantro. A thin slice or two of jalapeño can also be artfully placed on top, signaling the potential for a little heat to adventurous eaters. You can also add a vibrant sprinkle of finely chopped red onion or a few small cubes of diced red bell pepper for added color contrast. For a more rustic presentation, a light dusting of chili powder or smoked paprika can add visual depth.
Side Dishes
Pico de gallo is the ultimate accompaniment for a wide array of dishes, especially those with Mexican or Tex-Mex influences. It’s a classic pairing with crispy tortilla chips, offering a refreshing contrast to their salty crunch. Serve it alongside tacos, enchiladas, quesadillas, fajitas, and burritos to add a burst of freshness and acidity. It’s also a fantastic topping for grilled meats, fish, chicken, and even simple baked potatoes or sweet potatoes. Consider serving it with huevos rancheros for breakfast or as a vibrant side for rice and bean dishes.
Creative Serving Ideas
Elevate your culinary creations by using pico de gallo in unexpected ways. Spoon it generously over grilled salmon or chicken breasts for a light and flavorful topping. Mix it into tuna salad or chicken salad for a zesty twist. Use it as a base for a refreshing ceviche by adding cooked shrimp or white fish. It can also be transformed into a delicious bruschetta topping by serving it on toasted baguette slices with a dollop of crema or a sprinkle of cotija cheese. For a unique appetizer, layer it in shooter glasses with refried beans and sour cream for a vibrant dip parfait.
Preparation & Storage
Storing Leftovers
To store leftover pico de gallo, transfer it to an airtight container. Ensure the container is clean and dry to maintain freshness. Press a piece of plastic wrap directly onto the surface of the salsa before sealing the lid; this helps to minimize air exposure and prevent oxidation, which can lead to browning and a less appealing texture. Properly stored in the refrigerator, pico de gallo will retain its best quality for up to 4 days. However, it’s worth noting that the texture may soften slightly over time as the ingredients continue to release moisture.
Freezing
Freezing pico de gallo is generally not recommended if you wish to preserve its fresh, chunky texture. The high water content of the tomatoes and other vegetables will cause them to break down significantly upon thawing. When frozen and then thawed, pico de gallo often becomes watery and mushy, losing the crisp, vibrant quality that makes it so appealing. For this reason, it’s best enjoyed fresh or stored in the refrigerator.
Reheating
Pico de gallo is a dish best served fresh and cold or at room temperature, so reheating is typically not applicable. Its appeal lies in its vibrant, uncooked ingredients and their refreshing qualities. If you have stored leftovers in the refrigerator, simply remove them from the fridge about 15-20 minutes before serving to allow them to come up to room temperature. This ensures the flavors are at their most optimal and the texture is pleasant. Attempting to heat pico de gallo would cook the ingredients, altering its characteristic fresh flavor profile and texture considerably.
Frequently Asked Questions
-
What exactly is “pico de gallo,” and what’s the difference between it and other salsas?
Pico de gallo, which translates from Spanish to “rooster’s beak,” is a fresh, uncooked Mexican salsa characterized by its chunky texture and vibrant, simple ingredients. The key distinction between pico de gallo and many other salsas lies in their preparation: pico de gallo always uses raw, finely diced ingredients like tomatoes, onions, jalapeños, cilantro, and lime juice, resulting in a fresh, vibrant, and less liquidy consistency. In contrast, many other salsas might involve cooked or blended ingredients, leading to a smoother, more puréed texture and a different flavor profile. While both are delicious dips and condiments, pico de gallo offers a distinctively bright and textural experience that is cherished in Mexican cuisine.
-
Can I make pico de gallo milder or spicier, and are there any substitutes for jalapeño?
Absolutely! The beauty of making pico de gallo at home is its complete customizability. To make it milder, you can omit the jalapeño pepper entirely, or if you choose to include it, ensure you remove all seeds and ribs, as these parts hold the most heat. For a spicier version, you can leave some or all of the seeds and ribs intact, or even substitute the jalapeño with a hotter pepper like a serrano or a habanero, again adjusting the quantity to your heat preference. If you have a sensitivity to capsaicin but still want a hint of pepper flavor, you could try using a very small amount of a milder pepper like a poblano, or simply focus on the other vibrant ingredients.
-
How long does homemade pico de gallo last, and are there any ingredients that should be added just before serving?
Homemade pico de gallo is best enjoyed fresh, but it can be stored in an airtight container in the refrigerator for up to 4 days. While the flavors often meld and deepen beautifully over the first day, the texture might soften slightly over time. For optimal freshness and texture, it’s ideal to consume it within the first 1-2 days. Certain ingredients are best added just before serving to maintain their integrity. Avocado, for instance, should be diced and folded in right before you plan to eat the salsa, as it can brown and become mushy if left sitting for too long. Similarly, if you’re adding any delicate herbs or a final squeeze of lime, doing so right before serving will ensure the most vibrant flavor and appealing texture.