Fresh Berry Tart – Light and Easy Berry Dessert!
Sometimes, the most delightful desserts require minimal effort and few ingredients. This easy berry tart is a prime example, offering a burst of fruity flavor encased in a flaky, buttery crust. It’s the perfect solution for those moments when a craving strikes but the energy to bake is low.
Designed for speed and simplicity, this tart transforms humble ingredients into an elegant treat. It’s an ideal centerpiece for brunches, picnics, or simply as an indulgent evening dessert that impresses without demanding hours in the kitchen. Get ready to discover your new favorite shortcut to deliciousness.
Why You Will Love This Recipe
- Effortless Preparation: With just 10 minutes of prep time, this tart comes together in a flash, making it perfect for busy days or spontaneous gatherings.
- Minimal Ingredients: Featuring only 5 core ingredients, you likely have most of what you need already in your pantry or freezer, making it incredibly accessible.
- Crisp, Flaky Crust: Utilizing ready-made puff pastry ensures a beautifully golden, buttery, and wonderfully flaky base that elevates the fresh berry filling.
- Versatile Fruit Options: While the recipe calls for mixed berries, it’s highly adaptable, allowing you to use your favorite single berry or a different seasonal fruit combination.
- Visually Stunning: The vibrant colors of the berries atop the golden pastry and finished with a dusting of powdered sugar create a show-stopping dessert that looks as good as it tastes.
Ingredients You Need
The beauty of this easy berry tart lies in its carefully selected ingredients, prioritizing quality and simplicity. Using fresh, ripe berries is paramount to achieving the best flavor profile, as they contribute natural sweetness and a delightful tartness. The puff pastry, when baked, provides an irresistible crisp and buttery texture that perfectly complements the soft fruit filling.
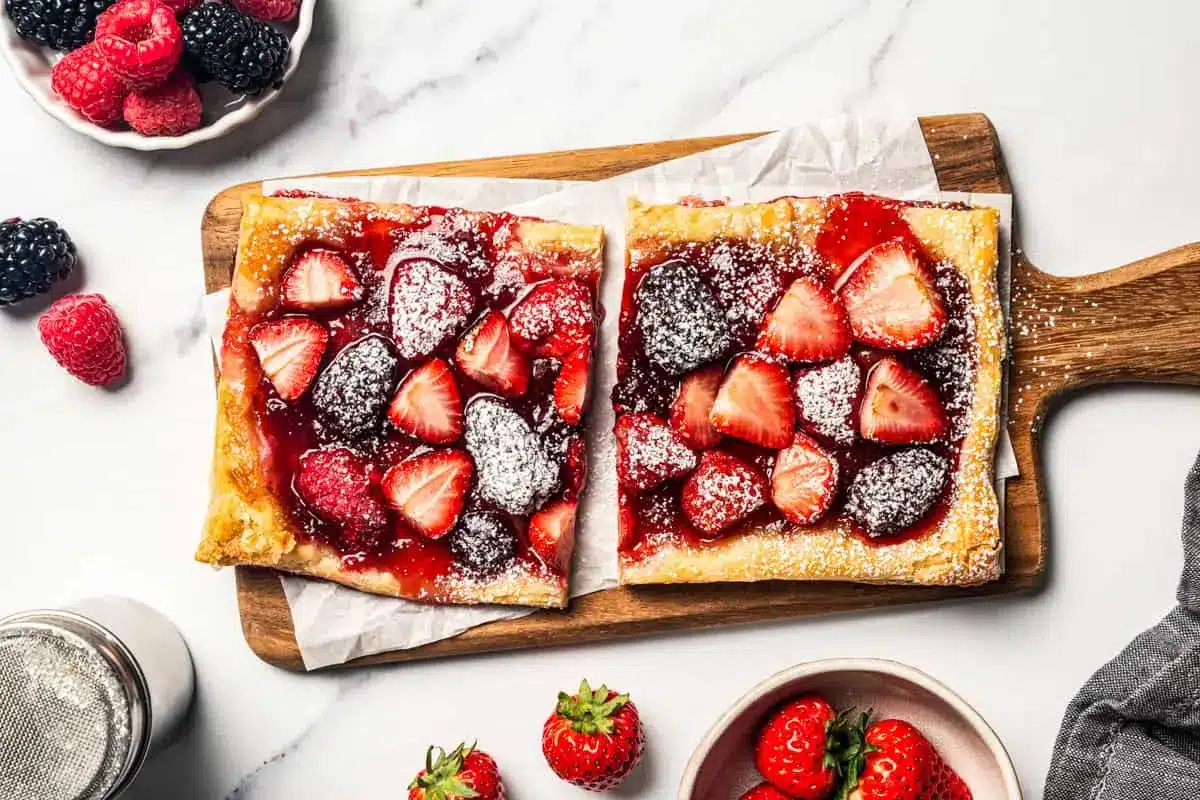
Easy Berry Tart
This easy berry tart needs only 5 ingredients and takes 10 minutes to prepare for the oven. It has a crisp, buttery puff pastry crust covered with strawberry jam and sugar-coated berries. It's the perfect quick and impressive dessert.
- 1 sheet puff pastry, thawed, cut in half
- 2 cups mixed fresh berries
- 4 tablespoons strawberry jam, divided
- powdered sugar
- 1Preheat the oven to 400°F. Line a baking sheet with parchment paper.
- 2Combine the berries and sugar in a mixing bowl; lightly stir, then let stand for 5 minutes.
- 3Place the puff pastry dough on the previously prepared baking sheet and cut it in half.
- 4Spread 2 tablespoons of strawberry jam right down the middle of each pastry sheet.
- 5Evenly divide the berries and arrange them over the strawberry jam, down the middle of each pastry sheet.
- 6Bake for 18 to 20 minutes, or until golden brown.
- 7Remove and let the tart stand for a few minutes. Dust with powdered sugar, cut and serve.
Keywords: berry tart, easy dessert, puff pastry, summer dessert, quick dessert, fruit tart
Exact quantities for each ingredient are conveniently located within the recipe card at the end of this article, ensuring you have all the precise measurements needed for success.
Variations
To truly personalize this delightful tart, consider exploring a few creative variations. For a vibrant dessert that caters to specific dietary needs, a vegan adaptation is easily achievable. Simply substitute the puff pastry with a vegan-friendly puff pastry sheet, and ensure your jam is also free of animal products.
For those watching their carbohydrate intake, a low-carb version can be crafted by using a sugar-free jam and opting for a different crust base. Perhaps a nut-flour-based crust could offer a satisfying crunch and a nutty flavor that pairs wonderfully with berries.
Another exciting avenue is to infuse the jam layer with complementary flavors. A hint of lemon zest mixed into the strawberry jam before spreading it on the pastry can add a bright, citrusy note that cuts through the sweetness beautifully. You could also experiment with different jam flavors entirely, such as raspberry, blueberry, or even a spiced apple jam for a seasonal twist.
How to Prepare easy berry tart
Step 1: Prepare to Bake
The first crucial step in creating this delightful easy berry tart is to preheat your oven to the specified temperature. A hot oven is key to achieving that perfect puff and golden-brown crispness in the pastry. Simultaneously, prepare your baking sheet by lining it with parchment paper.
This lining not only prevents any potential sticking but also makes for easier cleanup once the tart is baked. Ensure the parchment paper covers the entire surface of the baking sheet, providing a clean and non-reactive baking environment for your tart.
Step 2: Coat the Berries
In a medium mixing bowl, gently combine your fresh berries with granulated sugar. The sugar plays a vital role here; it not only sweetens the berries but also helps them to release some of their natural juices. This process, known as maceration, enhances the berry flavor and creates a slightly syrupy consistency.
Allow the sugar-coated berries to stand for approximately five minutes. This short resting period gives the sugar enough time to work its magic, drawing out the delicious berry essence. Avoid over-macerating, as you don’t want the berries to become overly mushy before baking.
Step 3: Prepare the Crust
Take your thawed puff pastry sheet and place it onto the prepared baking sheet. Since this recipe uses a convenient shortcut, you won’t be rolling out the dough. Instead, you’ll simply cut the sheet in half horizontally.
This division creates two individual tart bases, perfect for individual servings or a more rustic presentation. Handle the puff pastry gently to maintain its delicate layers, ensuring the best possible flaky texture once baked.
Step 4: Assemble the Tart
Now it’s time to bring all the components together. Spread approximately two tablespoons of strawberry jam evenly down the center of each puff pastry half. Leave a small border around the edges, as the jam might spread slightly during baking.
Next, evenly divide the macerated berries and arrange them in a neat layer over the strawberry jam on each pastry sheet. Create a concentrated filling down the middle, leaving the edges of the pastry clear to puff up beautifully.
Step 5: Bake to Golden Perfection
Place the baking sheet with the assembled tarts into your preheated oven. Bake for a duration of 18 to 20 minutes. You are looking for the puff pastry to be deeply golden brown and puffed, and the berry filling to be bubbly and fragrant.
Keep an eye on the tarts as they bake, as oven temperatures can vary. If you notice one side puffing up significantly more than the other, a gentle prick with a fork can help to deflate it slightly, ensuring a more even rise.
Step 6: Rest and Serve
Once the tarts are baked to a beautiful golden hue, carefully remove them from the oven. Allow them to rest on the baking sheet for a few minutes to set. This resting period is important as it helps the filling to settle and prevents the pastry from being too delicate to handle immediately.
Before serving, dust the cooled tarts generously with powdered sugar. This final touch adds a lovely visual appeal and a hint of extra sweetness that complements the tart berries and rich jam. Slice and serve your delicious creation warm or at room temperature.
Pro Tips for easy berry tart
Berry Selection Matters: While mixed berries are fantastic, consider using slightly firmer berries if you’re not a fan of very soft fruit. Strawberries, blueberries, and raspberries tend to hold their shape well during baking. For an extra pop of flavor, toss in a few chunks of fresh kiwi or finely diced mango.
Jam Layer Thickness: Don’t be shy with the jam! A generous, even layer of strawberry jam (or your chosen flavor) not only adds sweetness but also acts as a barrier, preventing the pastry from becoming too soggy from the berry juices. Aim for a layer that covers the center area without reaching the very edges.
Pastry Handling: Puff pastry is quite forgiving, but it’s best to work with it when it’s cold. If it becomes too soft or sticky while you’re working with it, pop it back into the refrigerator for 10-15 minutes to firm up. This ensures those delicate layers remain intact for maximum flakiness.
Even Baking: If you find your oven has hot spots, consider rotating the baking sheet halfway through the baking process. This ensures both tarts receive even heat, promoting uniform browning and puffing of the pastry. Sometimes, using two baking sheets placed side-by-side can also help promote more even cooking.
Sugar Adjustment: The amount of sugar for macerating the berries can be adjusted based on the sweetness of your fruit and your personal preference. Taste a berry before adding sugar to gauge its natural sweetness. If your berries are particularly tart, you might want to add a touch more sugar or use a sweeter jam.
Serving Suggestions for easy berry tart
Decoration
The classic dusting of powdered sugar is a simple yet elegant finish. For an added touch of sophistication, consider a light drizzle of melted white chocolate or dark chocolate over the top of the cooled tart. A few fresh mint leaves or edible flowers can also provide a beautiful burst of color and freshness.
Side Dishes
This easy berry tart pairs wonderfully with a dollop of freshly whipped cream or a scoop of vanilla bean ice cream. A side of Greek yogurt, perhaps drizzled with honey, offers a creamier, tangier contrast. Consider serving it alongside a light fruit salad to extend the fruity theme.
Creative Serving Ideas
Cut the tart into smaller squares or rectangles for delightful bite-sized desserts perfect for parties. Serve individual tartlets with a small glass of dessert wine or a complementary herbal tea. For a more informal presentation, break the tart into rustic pieces and serve with a communal bowl of berries and cream.
Preparation & Storage
Storing Leftovers
Leftover easy berry tart is best stored in an airtight container at room temperature for up to 24 hours to maintain the crispness of the pastry. If storing for longer, refrigerate the tart in an airtight container for up to 3 days. The pastry will soften over time.
Freezing
While this tart is best enjoyed fresh, you can freeze unfrozen tart shells for later use. Place prepared, unbaked pastry shells on a baking sheet and freeze until firm, then transfer to a freezer-safe bag or container. Bake directly from frozen, adding a few extra minutes to the baking time.
Reheating
To reheat a leftover tart, gently warm it in a preheated oven at around 300°F (150°C) for 5-10 minutes, or until heated through. This helps to revive some of the pastry’s crispness. Avoid microwaving, as this will make the pastry soggy.
Frequently Asked Questions
-
Can I use frozen berries instead of fresh berries for this easy berry tart?
Absolutely, you can use frozen berries, but there’s a crucial extra step involved to prevent a soggy crust. You must thaw the frozen berries completely and then drain away any excess liquid. For even better results, gently pat the drained berries dry with paper towels to remove as much moisture as possible. This preparation is key to ensuring the pastry bakes up beautifully crisp rather than becoming soggy.
-
What kind of jam is best for this berry tart, and can I substitute it?
Strawberry jam is recommended and works wonderfully because its sweet-tart profile complements most berries. However, this recipe is very versatile! You can easily substitute it with raspberry jam, blueberry jam, or even a mixed berry jam for an intensified berry flavor. For a more unique twist, consider a complementary flavor like apricot or even lemon curd, though these might alter the classic berry tart taste.
-
My puff pastry puffed up unevenly during baking. What went wrong, and how can I fix it?
Uneven puffing in puff pastry is quite common and usually due to slight variations in temperature or thickness. If one side puffs up excessively, you can gently prick it with a fork or the tip of a sharp knife immediately after removing it from the oven. This allows the trapped steam to escape and helps to deflate that overly puffed section, creating a more level surface. It’s a simple fix that doesn’t affect the taste or overall appeal of your tart.