Irresistible Plum Jam recipe
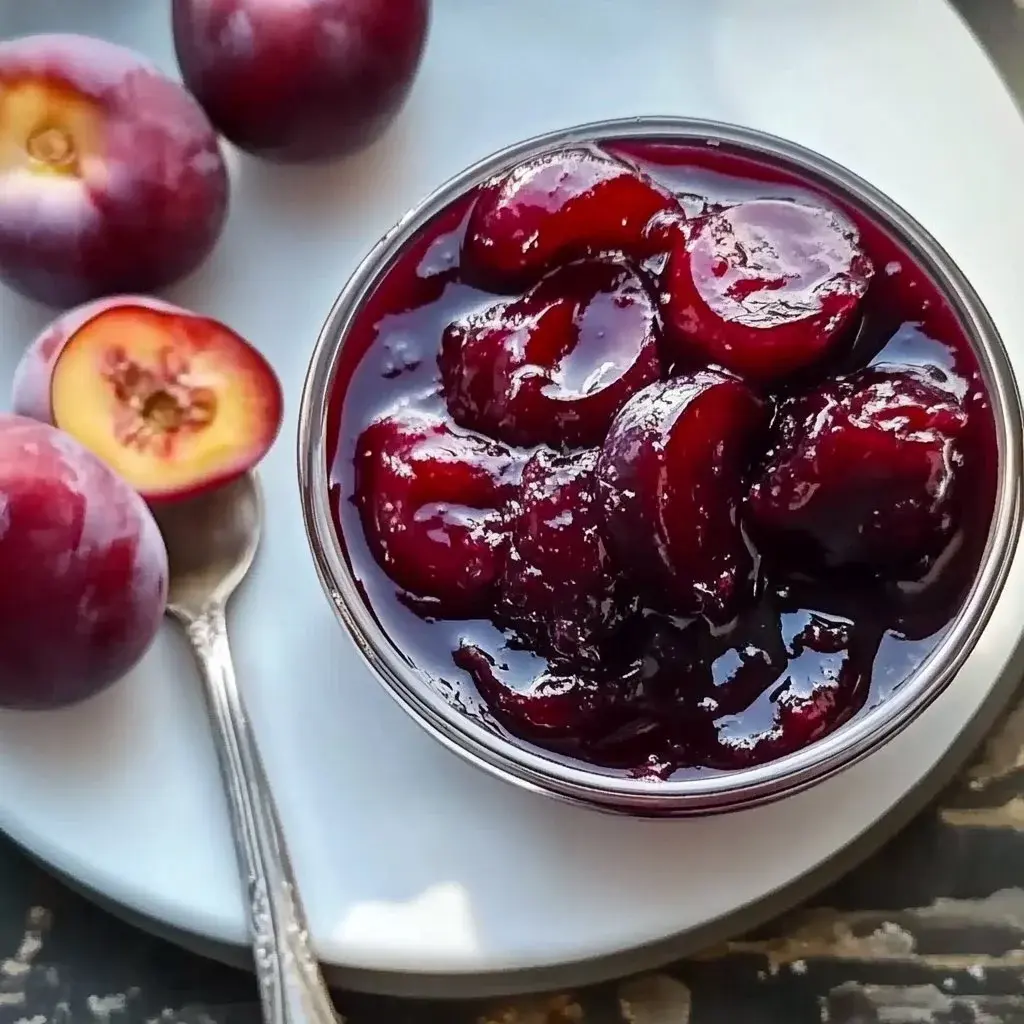
There’s a certain magic in transforming fresh seasonal fruit into a sweet, spreadable delight that captivates the senses. Plum Jam offers a perfect example of this delicious metamorphosis, a true testament to nature’s bounty and a little bit of kitchen alchemy. Picture this: plump, ripe, juicy plums bursting with an intense, complex flavor, combined with the crystal sweetness of sugar and just a hint of bright lemon to cut through the richness, all simmered gently to a luscious, spreadable perfection. Doesn’t the very thought of that heavenly aroma filling your kitchen sound truly delightful and incredibly inviting?
What makes this particular Plum Jam recipe so incredibly special is its astonishing versatility and the sheer joy it brings to everyday moments. Whether you’re slathering a generous spoonful onto a warm, buttered piece of artisanal toast for a comforting breakfast, artfully arranging it on a sophisticated cheese platter to accompany your favorite bries and cheddars, or using it as a luscious, vibrant filling in delicate pastries and tarts, the candid, unadulterated burst of pure plum flavor will undoubtedly elevate any dish it graces. It’s a remarkably easy recipe that even culinary novices can confidently tackle, transforming any kitchen, no matter how humble, into a bustling, fragrant jam-making factory where deliciousness is the only order of business. You’ll not only fill your home with an intoxicating, sweet scent but also create a treasure that will impress friends and family lucky enough to receive a beautifully presented jar or two as a thoughtful, homemade gift.
Why You Will Love This Recipe
- Intense Flavor Profile: The natural sweetness of ripe plums is perfectly balanced by a touch of tartness, creating an irresistible flavor combination that enhances many dishes.
- Simplicity at its Core: Requiring just a few basic ingredients and straightforward steps, this recipe is incredibly accessible for cooks of all skill levels, ensuring success every time.
- Remarkable Versatility: Beyond just a spread for toast, this jam is a culinary chameleon, perfect for desserts, breakfast bowls, savory glazes, or as a vibrant addition to charcuterie boards.
- Customizable Delight: This recipe serves as a fantastic base, allowing for easy personalization with added spices or complementary fruits to suit individual preferences and occasions.
- Thoughtful Homemade Gift: A beautifully presented jar of homemade Plum Jam is a heartfelt and memorable gift that conveys care and appreciation, making any occasion feel more special.
- Seasonal Flavor Capture: It’s an ideal way to preserve the exquisite taste of summer plums, allowing you to enjoy their peak flavor long after the season has passed.
Ingredients You Need
The foundation of any truly exceptional jam lies in the quality of its ingredients, and this Plum Jam recipe is no exception. Opting for the ripest, most flavorful plums you can find will undoubtedly yield the most delicious results, as their natural sweetness and subtle tartness are the stars of the show. A good quality granulated sugar is essential for both sweetness and preservation, while fresh lemon juice not only brightens the fruit’s flavor but also aids in setting the jam. A touch of vanilla extract, though optional, adds a warm, aromatic depth that complements the plum beautifully, and a pinch of salt helps to enhance all the other flavors.
Homemade Plum Jam
Transform fresh seasonal plums into a sweet, spreadable delight with this easy-to-make homemade plum jam. This versatile jam is perfect for breakfast, desserts, or as a thoughtful homemade gift.
- 2 pounds ripe plums, pitted and chopped
- 1 cup sugar
- 1/4 cup lemon juice
- 1/2 teaspoon vanilla extract (optional)
- 1/4 teaspoon salt
- 1Wash the ripe plums thoroughly. Cut them in half to remove the pits and chop them into small pieces.
- 2In a large pot, combine the chopped plums, sugar, lemon juice, vanilla extract, and salt. Cook over medium heat, stirring frequently until the sugar dissolves and the mixture begins to boil.
- 3Reduce the heat and let the mixture simmer for about 30-40 minutes, stirring occasionally, until it thickens to your desired consistency. Test thickness by placing a spoonful on a cold plate; it should hold a line.
- 4Remove the pot from heat and let it cool for a few minutes.
- 5Sterilize your jars by boiling them or running them through a dishwasher cycle.
- 6Pour the jam into sterilized jars, leaving about 1/4 inch of headspace at the top.
- 7Secure the lids tightly and allow jars to cool completely.
- 8Store the jam in the refrigerator for up to 3-4 weeks.
Keywords: Easy Recipe, Fruit Preserve, Homemade Jam, Plum Jam, Seasonal Cooking
You’ll find the precise quantities for each ingredient readily available within the detailed recipe card. Remember, using the freshest, highest-quality produce will always elevate your final jam.
Variations
The beauty of homemade jam is its inherent adaptability, allowing you to play with flavors and textures to create something truly unique. For a delightful vegan interpretation, simply ensure that your chosen sugar is certified vegan, as some white sugars are processed with bone char; alternatively, you can use natural sweeteners like agave syrup or maple syrup, though you may need to adjust the quantity slightly to achieve the desired sweetness and consistency.
If you’re keen on a lower-carbohydrate option, experimenting with sugar substitutes like erythritol or xylitol is possible, but it’s crucial to note that these may affect the setting properties of the jam, potentially requiring the addition of a pectin or gelatin for optimal texture. It’s always wise to start with a smaller reduction and test for set. For a delightful low-sugar version, simply reducing the amount of sugar by half and increasing the lemon juice slightly can create a tarter, fruit-forward jam that highlights the natural flavors of the plums even more.
Spice lovers will rejoice in the possibility of a Chili Plum Jam. A small pinch of crushed red pepper flakes added during the simmering process introduces a subtle warmth and a surprising kick that beautifully contrasts the sweet and tart notes of the plum. This variation is particularly wonderful served alongside sharp cheeses or as a glaze for grilled meats, offering a sophisticated sweet and spicy dynamic.
How to Prepare Plum Jam
Step 1: Preparing the Star Ingredients
The initial step in crafting this exquisite Plum Jam involves the meticulous preparation of your primary ingredient: the plums. It is absolutely paramount to select plums that are perfectly ripe; they should yield slightly to gentle pressure and possess a rich, deep color indicative of their full flavor potential. Avoid any plums that are too hard, as they will lack sweetness and may not cook down properly, or those that show signs of bruising or spoilage, which can affect the final taste and texture of your jam. Thoroughly wash each plum under cool running water to remove any surface impurities, ensuring a clean start to your jam-making journey.
Once washed, the plums need to be carefully cut in half, revealing their vibrant flesh. The key here is to extract the pit, or stone, from the center of each plum. This can sometimes be a little tricky depending on the variety of plum, but a sharp paring knife or a sturdy spoon can usually assist. After pitting, proceed to chop the plum halves into smaller, manageable pieces. The size of these pieces is somewhat a matter of preference; some prefer a chunkier jam with distinct fruit pieces, while others aim for a smoother consistency. Aiming for pieces roughly ½ inch in size is a good starting point, as they will break down considerably during the cooking process, contributing to the jam’s luxurious texture.
As you work through your batch of plums, it’s a good practice to place the prepared fruit into a large, heavy-bottomed saucepan. This type of pot is essential for even heat distribution, which helps to prevent scorching and ensures that your jam cooks uniformly. You should aim to have approximately 2 pounds of prepared, chopped plums. This quantity is a good starting point for a manageable batch that will yield several jars of delicious jam. Having all your fruit prepped and ready before you start the cooking process will make the entire endeavor much smoother and more enjoyable, allowing you to focus on the simmering and achieving that perfect jam consistency.
Step 2: Building the Flavor Base
With your meticulously prepared plums ready to go, it’s time to introduce the supporting cast of ingredients that will transform them into a delightful jam. Into the same large, heavy-bottomed saucepan that now holds your chopped plums, add the granulated sugar. The amount of sugar is crucial here, not only for sweetness but also as a natural preservative, helping to extend the jam’s shelf life. For this recipe, one cup of sugar is generally recommended for two pounds of fruit, but you can adjust this slightly based on the natural sweetness of your plums and your personal preference for sweetness versus tartness.
Next, introduce the fresh lemon juice. This ingredient plays a vital role that goes far beyond simply adding a hint of citrus. The acidity from the lemon juice is crucial for balancing the sweetness of the sugar and enhancing the natural fruit flavor of the plums, making the jam taste brighter and more vibrant. It also plays a significant role in the setting process of the jam, interacting with the pectin in the fruit to help it thicken properly. A quarter cup of lemon juice is typically the perfect amount to achieve this balance without making the jam taste overtly lemony.
If you’re opting for that extra layer of warmth and complexity, now is the time to add the vanilla extract. A half teaspoon is usually sufficient to impart a subtle, comforting aroma and flavor that beautifully complements the plum. Finally, a small but mighty quarter teaspoon of salt is added. This might seem unusual in a sweet preserve, but salt is a flavor enhancer; it works to deepen and round out all the other tastes present, preventing the jam from tasting one-dimensionally sweet and making the plum flavor truly sing. Ensure all these ingredients are evenly distributed amongst the chopped plums before you begin the heating process.
Step 3: The Gentle Simmer to Perfection
Now that all the ingredients are gathered in the pot, it’s time to initiate the cooking process. Place the large saucepan over medium heat on your stovetop. The initial stage involves gently heating the mixture, stirring frequently with a heat-resistant spoon or spatula. Your primary objective here is to ensure that all the sugar crystals fully dissolve into the fruit mixture. This is a crucial step; undissolved sugar granules can lead to a grainy texture in your finished jam, which is far from ideal. Continue stirring regularly, making sure to scrape the bottom and sides of the pot to prevent any sticking or potential scorching, which can impart an unpleasant burnt flavor.
As the mixture heats and the sugar dissolves, you will notice the plums beginning to soften and release their juices. The aroma will start to fill your kitchen, a sweet, fruity perfume that signals the transformation is underway. Keep stirring diligently until the entire mixture comes to a rolling boil. A rolling boil is characterized by large, vigorous bubbles that cannot be stirred down. Once this point is reached, it signifies that the jam is actively cooking and the thickening process is beginning in earnest. This is the moment to carefully reduce the heat from medium to low.
Once the heat is reduced, the jam will transition from a vigorous boil to a gentle simmer. This slower, more controlled cooking process is essential for developing the deep flavor and achieving the perfect consistency. Allow the jam to simmer gently for approximately 30 to 40 minutes. During this time, it is still important to stir occasionally, though perhaps not as frequently as during the initial heating. The goal is to prevent the jam from sticking to the bottom of the pot and burning. As it simmers, the mixture will gradually thicken, its color will deepen to a richer, more inviting hue, and the individual plum pieces will begin to break down, creating a beautifully textured preserve. This simmering phase is where the magic truly happens, concentrating the flavors and allowing the natural pectin to do its work.
Step 4: The Crucial Consistency Check
The simmering process requires vigilance, as the jam will gradually thicken, but it’s essential to know precisely when it has reached its optimal consistency. Overcooking can result in a jam that is too stiff and candy-like, while undercooking will leave you with a jam that is too runny and may not preserve well. To accurately gauge the jam’s readiness, the classic cold plate test is your most reliable tool. This method relies on the fact that the jam will continue to thicken as it cools, so you need to test its setting point while it’s still hot.
To perform this test, you will need a small, chilled plate. You can place a few small plates in your freezer or refrigerator beforehand to ensure they are cold. Take a small spoonful of the hot jam from the simmering pot. Be careful, as the jam is very hot at this stage. Gently place this spoonful of jam onto the surface of one of your chilled plates. Allow the spoonful of jam to sit undisturbed on the cold plate for about one to two minutes. This brief cooling period on the plate will simulate how the jam will behave once it starts to cool down in the jar.
After the minute or two has passed, gently run your finger through the center of the dollop of jam on the plate. If the jam is ready, the line created by your finger should hold its shape and remain distinct. The jam should not immediately flow back together to fill the gap. This indicates that the jam has reached the correct viscosity and has set properly. If the jam flows back together almost immediately, it means it is still too thin and needs more cooking time to thicken. In this case, return the pot to a gentle simmer and continue cooking for a few more minutes, then repeat the cold plate test. Continue this process until the jam passes the test, ensuring you don’t overcook it.
Step 5: Removing from Heat and Initial Cooling
Once your Plum Jam has successfully passed the cold plate test and you are confident it has reached the perfect consistency, it’s time to remove the pot from the heat source. This step is crucial to prevent further cooking and potential over-thickening. Carefully lift the saucepan from the burner and place it on a heat-resistant surface, such as a trivet or a wooden cutting board, away from the direct heat. The jam will continue to bubble and thicken slightly for a few minutes even after being removed from the heat, due to the residual heat within the mixture and the pot itself.
Allow the jam to cool in the pot for about 5 to 10 minutes. This initial cooling period serves a couple of important purposes. Firstly, it allows the jam to calm down slightly, reducing the intensity of the bubbling and making it safer to handle for the next stage. Secondly, as the jam begins to cool, you will observe a deepening of its color. The vibrant, bright red or purple hue will transform into a richer, more translucent jewel-toned shade, which is a visual indicator that the jam is nearing its final appearance and is ready for jarring. This brief resting period ensures the jam isn’t excessively hot when you begin to fill your jars, and it also helps to distribute the fruit pieces evenly throughout the thickened preserve.
During this short cooling interval, it’s also a good time to give the jam one final stir. This gentle stir can help to ensure that any fruit pieces are evenly dispersed throughout the thickened liquid, preventing them from all settling at the bottom of the pot. It also helps to release any trapped air bubbles that might have formed during the simmering process. Once this brief cooling period is complete and the jam has slightly subsided in its bubbling activity, it will be ready for the critical step of being transferred into sterilized jars.
Step 6: The Art of Sterilizing Jars
The process of sterilizing your jars is arguably one of the most critical steps in successful jam making, especially if you intend to store the jam for extended periods. Sterilization ensures that any lingering bacteria, yeasts, or molds are eradicated, which are the primary culprits behind spoilage and the premature breakdown of preserves. Without proper sterilization, even the most beautifully made jam can quickly become unsafe or unpalatable. Therefore, dedicating ample time and attention to this step is non-negotiable for achieving a long-lasting and safe product. There are several effective methods for sterilizing your jars, and choosing one that suits your kitchen setup is key.
One of the most common and effective methods is boiling. You will need a large pot deep enough to fully submerge your jars and lids. Place the clean jars upright in the pot, ensuring they are not touching each other. Fill the pot with enough cold water to cover the jars by at least an inch. Bring the water to a rolling boil over medium-high heat. Once boiling, maintain the boil for at least 10 minutes. This sustained boiling time is essential to ensure all microorganisms are destroyed. Use a jar lifter or tongs to carefully remove the jars from the boiling water, allowing them to drain upside down on a clean dishtowel or paper towel. Keep the jars warm until you are ready to fill them; this helps prevent thermal shock when they come into contact with the hot jam.
Alternatively, if you have a dishwasher with a sterilization cycle, this can be a very convenient and effective option. Run the jars and lids through a hot wash and dry cycle. Ensure the cycle reaches a high enough temperature to effectively sterilize the glass. Another method involves using your oven. Place the clean, dry jars on a baking sheet and place them in a preheated oven at around 120-130°C (250-275°F) for at least 15-20 minutes. For the lids, if they are the type that requires sealing (like metal canning lids), it’s often recommended to simply wash them thoroughly with hot, soapy water and then place them in a small bowl of hot water to keep them pliable and ready for sealing. It’s important to have your sterilized jars ready and waiting as soon as the jam has finished its initial cooling period, to minimize the time the jam is exposed to air.
Step 7: The Delicate Art of Jarring the Jam
With your beautifully cooked Plum Jam having undergone its initial cooling and your jars perfectly sterilized and still warm, it’s time for the satisfying process of filling them. This step requires a steady hand and a bit of care to ensure a good seal and a clean presentation. Using a ladle or a heatproof measuring cup with a spout, carefully spoon the hot jam into the sterilized jars. It’s important to work relatively quickly but without rushing, as the jam will continue to thicken as it cools, and you want it to be pourable enough to fill the jars evenly.
As you fill each jar, pay close attention to the headspace. Headspace refers to the empty space between the top of the jam and the rim of the jar. For most jams and preserves, leaving approximately ¼ inch of headspace is recommended. This space is crucial for creating a proper vacuum seal during the cooling process. If you overfill the jars, the jam might expand and push the lid off during sealing, or it might prevent the lid from sealing correctly. Conversely, if you leave too much headspace, it might be more difficult to achieve a strong seal.
After filling each jar to the appropriate level, it’s essential to ensure the rim of the jar is perfectly clean before applying the lid. Any residue from the jam, such as stray fruit pieces or sugary drips, on the rim can interfere with the sealing process and potentially compromise the longevity of your jam. Use a clean, damp cloth or a paper towel to carefully wipe around the entire rim of each jar. Ensure it is completely free of any sticky or solid matter. Once the rim is clean, immediately place a sterilized lid onto the jar, ensuring it is centered. If you are using two-piece canning lids, screw on the band fingertip tight; it should be snug but not overly tight, allowing air to escape during the sealing process.
Step 8: Achieving a Perfect Seal
The final steps in creating shelf-stable Plum Jam involve sealing the jars properly and allowing them to cool completely. This cooling and sealing process is what creates the vacuum that preserves the jam, preventing spoilage and maintaining its freshness for extended periods. Once the jars are filled and the lids are secured, the next crucial action is to let them cool down naturally at room temperature. Do not attempt to rush the cooling process by placing hot jars in the refrigerator or immersing them in cold water, as this can lead to shattered glass due to thermal shock, a dangerous situation.
As the jars of hot jam begin to cool, a fascinating phenomenon occurs: the air and steam trapped inside the jar contract. This contraction creates a vacuum that pulls the lid down onto the rim of the jar, forming an airtight seal. You will often hear a satisfying “pop” or “ping” sound emanating from the jars as they seal. This sound is the sound of success and indicates that a proper vacuum has been established. It’s a good idea to let the jars cool undisturbed for at least 12 to 24 hours, allowing the seals to fully form and the jam itself to settle and thicken further.
After the jars have completely cooled, it’s important to check each seal. To do this, press down on the center of the lid. If the lid does not flex or move up and down, it means the jar is properly sealed. If you press on the lid and it flexes, or if you hear a faint clicking sound, that seal has not been achieved. Jars that have not sealed properly should be refrigerated immediately and consumed within a few weeks, or the jam can be reprocessed with a new lid and re-sealed. Jars that have sealed correctly are now ready for storage and will typically last for up to a year when stored in a cool, dark place.
Step 9: Proper Storage for Lasting Freshness
Once your delicious homemade Plum Jam has cooled completely and you have confirmed that each jar has achieved a perfect seal, the final step before enjoying its fruity goodness is to store it correctly. Proper storage is paramount to maintaining the quality, flavor, and safety of your homemade preserve. The most ideal place for storing sealed jars of Plum Jam is in a cool, dark, and dry location. A pantry, a cellar, or a cupboard that is not exposed to direct sunlight or significant fluctuations in temperature is perfect.
The cool, dark environment helps to prevent the jam from degrading prematurely. Direct sunlight can cause the colors to fade and can also contribute to faster spoilage, even in sealed jars. Consistent, moderate temperatures are key. Avoid storing your jam in places where temperatures fluctuate wildly, such as near a stove or oven, or in a garage where it can freeze in winter and become extremely hot in summer. Such fluctuations can compromise the seal over time and affect the jam’s texture and flavor. When stored under these optimal conditions, properly sealed jars of Plum Jam can typically last for up to a year, maintaining their delightful taste and consistency.
It is also good practice to label each jar with the date it was made. This allows you to keep track of your inventory and ensures you use the oldest batches first, following the “first-in, first-out” principle. While the jam will remain safe to eat for a considerable time, its peak flavor and texture are usually within the first year of storage. If you notice any signs of spoilage, such as mold growth, a fermented smell, or a bulging lid, the jar should be discarded immediately. For any jars that have been opened, they must be stored in the refrigerator. These opened jars will retain their freshness for approximately 3 to 4 weeks, so it’s best to consume them within that timeframe.
Step 10: The Ultimate Reward – Enjoyment!
After all the careful preparation, simmering, jarring, and sealing, you have reached the most exciting and rewarding stage: enjoying your homemade Plum Jam! The culmination of your efforts is a treasure trove of sweet, tangy, fruity goodness, ready to be savored in countless delicious ways. Whether you’ve made a small batch for immediate enjoyment or a larger quantity for preserving, the moment of tasting your creation is incredibly satisfying. It’s a tangible result of your hard work and a delightful way to bring a burst of homemade flavor into your life.
The most classic and perhaps universally loved way to enjoy Plum Jam is by spreading it generously onto a warm, buttered piece of toast. The contrast between the crisp toast, the melting butter, and the luscious, sweet-tart jam is a simple yet profound culinary pleasure. It’s perfect for a quick breakfast, a comforting snack, or even a light dessert. Don’t limit yourself to just toast, though; this jam is incredibly versatile and can elevate many other dishes. Consider swirling a spoonful into a bowl of creamy plain yogurt or thick oatmeal for a delightful fruity twist that adds both flavor and sweetness.
Beyond simple spreads, think of the possibilities for desserts and baked goods. This Plum Jam makes an exquisite filling for thumbprint cookies, rugelach, or even as a layer in a classic Victoria sponge cake. Its vibrant color and rich flavor can also be a fantastic addition to a cheese board, offering a sweet counterpoint to sharp cheddars, creamy bries, or tangy goat cheeses. For the more adventurous, consider using it as a glaze for roasted meats, like pork or duck, where its sweet and tart notes can create a wonderfully caramelized and complex exterior. No matter how you choose to enjoy it, your homemade Plum Jam is sure to bring a smile and a burst of delicious flavor to your table.
Pro Tips for Plum Jam
To elevate your Plum Jam from simply good to absolutely extraordinary, consider a few expert tips. Always prioritize using ripe, but not overripe, plums; they should feel slightly soft to the touch and be deeply colored for the best flavor and pectin content. If your plums are on the tarter side, you might need to slightly increase the sugar or lemon juice, and conversely, if they are very sweet, a little less sugar might suffice, but always remember sugar is also a preservative.
Experimenting with spice is a fantastic way to add personality. A cinnamon stick, a few whole cloves, or even a star anise pod added during the simmering process can infuse the jam with wonderful warmth and complexity. Remember to remove these whole spices before jarring to avoid biting into them later. For an extra layer of fruity depth, consider combining plums with other seasonal fruits like blackberries, raspberries, or even a few sliced peaches; this creates unique flavor profiles.
Ensure your jars are not just clean but truly sterilized; hot jars filled with hot jam are crucial for a good seal. A final check of the seals after cooling is also vital – if a lid doesn’t flex, your jam is properly preserved. For a smoother jam, you can always process the cooked mixture briefly with an immersion blender before jarring, but many prefer the rustic texture of fruit pieces. Proper storage in a cool, dark place is key to maximizing its shelf life and maintaining its vibrant flavor.
Serving Suggestions for Plum Jam
Decoration
A beautifully presented jar of homemade Plum Jam is a feast for the eyes even before it’s opened. For an extra touch of elegance, consider tying a decorative ribbon or twine around the neck of the jar. You can also tuck a small sprig of fresh herb, like rosemary or thyme, under the ribbon; these herbs complement the plum flavor surprisingly well. A piece of fabric, such as burlap or a charming floral pattern, cut to fit the lid and secured with the band, can also add a rustic, homemade aesthetic. Finally, a well-designed, handwritten label detailing the flavor and the date it was made adds a personal and professional finish, making your jam even more enticing.
Side Dishes
Plum Jam is wonderfully versatile and pairs excellently with a variety of side dishes that highlight its sweet and tart profile. On a breakfast table, it is a natural companion to warm, crusty bread, flaky croissants, tender scones, or fluffy pancakes and waffles. Its rich flavor also shines when served alongside a selection of cheeses; think of a sharp cheddar, a creamy brie, a tangy goat cheese, or a nutty Gruyère. The jam provides a delightful sweet contrast that cuts through the richness of the cheese. For a more substantial meal, consider it as a side to savory dishes; it can accompany roasted pork, duck, or even game meats, providing a balancing fruity sweetness to the richness of the protein.
Creative Serving Ideas
The possibilities for enjoying Plum Jam extend far beyond the breakfast table. It can be used as a luscious filling for tarts, pastries, and even homemade donuts, adding a burst of fruity flavor to baked goods. Swirl it into plain Greek yogurt or a creamy panna cotta for an elegant dessert topping. For a unique appetizer, try spooning a small amount onto crackers topped with cream cheese and a sprinkle of toasted nuts. It also makes a surprisingly effective glaze for grilled or roasted meats, such as chicken or pork tenderloin, caramelizing beautifully and adding a delightful sweet and tangy dimension to the savory dish. Even a simple dollop stirred into a glass of sparkling water or a cocktail can create a refreshingly fruity beverage.
Preparation & Storage
Storing Leftovers
Once a jar of your delicious Plum Jam has been opened, it’s crucial to store it properly to maintain its freshness and quality. The best place for opened jam is always the refrigerator. Ensure the lid is securely fastened after each use to create an airtight seal. This prevents the jam from drying out, absorbing odors from other foods in the fridge, and protects it from potential contamination.
When stored in the refrigerator, opened Plum Jam will typically remain at its best for approximately 3 to 4 weeks. During this time, you should enjoy its delightful flavor and texture. Always use a clean spoon or utensil to scoop out the jam; avoid double-dipping, as this can introduce bacteria into the jar, which will significantly shorten its shelf life and could potentially lead to spoilage. If you notice any signs of mold, an off smell, or a change in texture, it’s best to discard the entire jar.
While refrigeration is standard, if you find yourself with an abundance of jam and anticipate not being able to finish it within the typical timeframe, consider freezing it. Freezing is an excellent method for long-term preservation, allowing you to enjoy your homemade jam for much longer periods. Ensure you are using freezer-safe containers for this purpose.
Freezing
Freezing is an excellent option for preserving your Plum Jam for extended periods, allowing you to savor its homemade goodness long after the plum season has passed. When preparing to freeze your jam, it’s important to use containers that are specifically designed for freezer storage. These containers are typically made of durable plastic and feature airtight lids, which are essential for protecting the jam from freezer burn and preventing the absorption of unwanted odors from other frozen items.
When filling your freezer-safe containers, leave a small amount of headspace at the top. This is because liquids, including jam, expand as they freeze. By leaving about ½ to 1 inch of space, you prevent the container from cracking or bursting during the freezing process. Make sure to seal the lids tightly once filled. Label each container clearly with the contents (Plum Jam) and the date it was frozen. This will help you keep track of your frozen goods and ensure you use them within a reasonable timeframe for optimal quality.
Frozen Plum Jam can maintain its quality for up to a year, sometimes even longer, though its peak flavor and texture are best experienced within the first 6-8 months. Once you are ready to use your frozen jam, the best method for thawing is to transfer the container from the freezer to the refrigerator. Allow it to thaw slowly overnight. This gradual thawing process helps to maintain the jam’s texture and prevents any drastic changes that could occur with rapid thawing. Once thawed, it can be used just as you would freshly made jam.
Reheating
While Plum Jam is typically enjoyed at room temperature or cold, there are specific instances where reheating might be beneficial. For example, if your jam has become a little too firm after being refrigerated, or if you are using it as a glaze or sauce for a warm dish, a gentle reheating can restore its desired consistency. It’s important to reheat the jam slowly and carefully to avoid scorching or altering its delicate flavor and texture.
The most straightforward method for reheating jam is to place the required amount into a small saucepan over low heat. Stir the jam continuously with a wooden spoon or spatula as it warms up. The goal is simply to make it pliable and spreadable again, or to achieve the right consistency for a glaze. Be patient; this process should not be rushed. Avoid high heat, as this can cause the sugar to caramelize too quickly, potentially leading to a burnt taste, or it could cause the jam to break down and become watery.
Alternatively, you can use a microwave for reheating, which is often quicker for smaller quantities. Place the jam in a microwave-safe bowl and heat it in short intervals, typically 15-20 seconds at a time. Stir thoroughly between each interval. This allows you to monitor the jam’s temperature and consistency closely, preventing overheating. Always stir well after reheating, whether on the stovetop or in the microwave, to ensure the heat is evenly distributed and the jam is smooth and ready for use. Once reheated, allow it to cool slightly if necessary before serving, especially if it’s intended for children or delicate baked goods.
Frequently Asked Questions
-
Can I make Plum Jam without sugar?
While sugar plays a vital role in both flavor and preservation, you can make Plum Jam with alternative sweeteners. Natural options like honey or agave syrup can be used, though their distinct flavors might alter the jam’s profile, and you may need to adjust the quantity to achieve the desired sweetness. It’s also worth noting that sugar-free jams, especially those made with artificial sweeteners, may not set as firmly and will require refrigeration and have a shorter shelf life. For a truly sugar-free version focusing on the fruit’s natural sweetness, the jam would need to be consumed very quickly or preserved through freezing.
-
How long does Plum Jam last?
When properly prepared and sealed in sterilized jars, homemade Plum Jam can last for up to a year when stored in a cool, dark place. Once a jar has been opened, it should be refrigerated and typically lasts for about 3 to 4 weeks. Always check for signs of spoilage, such as mold or an unusual odor, before consuming, especially if it has been stored for a longer period.
-
Can I freeze Plum Jam?
Yes, absolutely! Freezing is an excellent method for long-term preservation of Plum Jam. Spoon the cooled jam into airtight, freezer-safe containers, leaving a small amount of headspace (about ½ to 1 inch) to accommodate expansion as it freezes. Label the containers with the contents and date. Thaw frozen jam slowly in the refrigerator overnight for the best results and to maintain its texture.