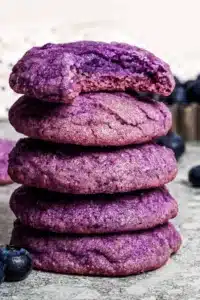
Blueberry Cookies – Soft & Chewy!

The gentle aroma of freshly baked goods is a universal comfort, and this recipe for blueberry cookies promises an unforgettable experience. Imagine biting into a cookie that’s both tender and delightfully chewy, each mouthful bursting with the vibrant flavor of real blueberries. These aren’t just any cookies; they are a carefully crafted delight designed to bring a touch of homemade joy to any occasion.
We’ve poured our passion for baking into developing a recipe that is not only easy to follow but also delivers exceptional results. From the initial preparation of the luscious blueberry sauce to the final bake, every step is designed to ensure you achieve that perfect soft-baked texture and intense berry flavor that makes these cookies truly special. Get ready to impress your family and friends with these extraordinary blueberry treats.
Why You Will Love This Recipe
- Intense Blueberry Flavor: Unlike many recipes that rely on dried fruit or extracts, these cookies use a homemade blueberry sauce, infusing every bite with authentic, concentrated berry goodness and a beautiful natural hue.
- Perfectly Chewy Texture: The secret to their irresistible chewiness lies in the thoughtful inclusion of cornstarch in the dough, a simple ingredient that significantly enhances the soft, tender crumb and prevents excessive spreading.
- Visually Appealing: The delightful speckled appearance from the real blueberries, complemented by a final sugar coating, makes these cookies as beautiful to look at as they are to eat.
- Long-Lasting Freshness: Thanks to the carefully balanced ingredients and the natural moisture from the blueberry sauce, these cookies remain wonderfully soft and delicious for several days, making them ideal for make-ahead baking.
- Versatile and Customizable: While perfect as is, these cookies offer a fantastic base for variations, allowing you to easily adapt them to different tastes or dietary needs, ensuring everyone can enjoy a delicious blueberry cookie.
Ingredients You Need
The foundation of any excellent baked good lies in the quality of its ingredients, and these blueberry cookies are no exception. By selecting fresh, high-quality components, you elevate the final flavor and texture to remarkable heights. Using plump, ripe blueberries, good quality butter, and fresh lemon juice will make a noticeable difference in the final outcome, ensuring a taste that is rich, authentic, and deeply satisfying.
Blueberry Cookies
These blueberry cookies are irresistibly soft, chewy, and bursting with real blueberries. They stay soft for days and taste like blueberry pie!
- For the blueberry sauce:
- 1 cup fresh blueberries, stems removed
- 2 teaspoons granulated sugar
- 1 tablespoon fresh lemon juice, not bottled
- For the cookies:
- 2 cups all purpose flour
- 1½ tablespoons cornstarch
- 1½ teaspoons baking powder
- ½ teaspoon kosher salt
- ½ cup unsalted butter, room temperature
- 1½ cups granulated sugar, divided
- 2 tablespoons milk
- 1 large egg
- ¼ teaspoon purple food dye (liquid dye), using it is optional
- 1Make the blueberry sauce: In a medium pot over medium-low heat, combine the fresh blueberries, sugar, and lemon juice. Cook, stirring frequently, until the blueberries break down and the mixture thickens. This will take about 5-8 minutes. Set aside to cool.
- 2Combine the dry ingredients: In a large bowl, combine the flour, cornstarch, baking powder, and salt. Set aside.
- 3Cream the butter and sugar: In another large bowl, cream the butter and 1¼ cups of white granulated sugar until light and fluffy.
- 4Add the blueberry sauce: Scoop 3 tablespoons of the cooled blueberry sauce out of the pot and mix it into the butter and sugar. (If you have extra sauce, put it in a mason jar for later. You can use it on pancakes.)
- 5Add remaining liquid ingredients: Add milk, egg, and dye. Mix until just combined.
- 6Add dry ingredients: Mix until everything is well combined and there are no dry bits of batter.
- 7Chill the dough: Cover your bowl with saran wrap and chill in the refrigerator for 3 hours.
- 8Prep your tools: Preheat your oven to 325ºF. Line a baking sheet with parchment paper or a Silpat. Set aside.
- 9Pour sugar: Place the remaining 1/4 cup of sugar in a shallow plate. Set aside.
- 10Form the cookies: Scoop the chilled cookie dough and roll it into balls, using about 1 heaping tablespoon of dough per cookie.
- 11Roll in sugar: Place the rolled cookie dough into the sugar and roll it around to coat. Place the sugar cookie dough ball onto your prepared baking sheet. You will be able to fit 6 cookies on one standard baking sheet. (There needs to be space between the balls of dough.)
- 12Chill the extra dough: Once you have shaped your 6 cookies, place the cookie dough back in the fridge until you are ready to shape the next batch. Or, if you have two cookie sheets, you can start working on the next batch while the first one bakes. You just don’t want the cookie dough to sit on the counter and warm up.
- 13Bake: Place in the oven and bake for 15 minutes or until cracks form.
- 14Cool: Remove the cookies from the oven and allow them to cool for 10 minutes on the baking sheet before transferring them to a wire rack to finish cooling for another 20 minutes. If you try to move the cookies before 10 minutes, they will be too soft and will break.
Keywords: blueberry cookies, soft cookies, chewy cookies, homemade cookies, dessert, baking, Katerina Petrovska
The full list of ingredients, including precise measurements, can be found within the recipe card below, ensuring you have everything you need for baking success.
Variations
While the classic blueberry cookie is a masterpiece on its own, the beauty of baking lies in its endless possibilities for adaptation. These cookies serve as a fantastic canvas for culinary creativity, allowing you to tailor them to specific dietary preferences or flavor profiles. Experimenting with different additions can transform this beloved recipe into something entirely new, catering to a wider range of tastes and occasions.
Consider a delightful vegan rendition by substituting the butter with a high-quality vegan butter alternative and using a flax egg or commercial egg replacer. For the milk, any plant-based milk such as almond, soy, or oat milk will work beautifully to maintain the cookie’s soft texture and richness. The resulting vegan blueberry cookies will be just as tender and flavorful, proving that plant-based baking can be every bit as indulgent.
For those following a lower carbohydrate lifestyle, transforming these cookies is also quite achievable. You can experiment with a blend of almond flour and coconut flour as a substitute for all-purpose flour, adjusting the liquid content as needed to achieve the right dough consistency. While cornstarch is integral to the chewy texture, small amounts of xanthan gum can help bind and improve the structure in a low-carb setting. Be mindful that the texture may differ slightly, but the delicious blueberry flavor will remain a star.
Another exciting variation involves adding complementary flavors and textures. Imagine folding in white chocolate chips, which melt into decadent pockets of sweetness that pair wonderfully with the tartness of the blueberries. Alternatively, a hint of lemon zest added to the dough can amplify the bright, citrus notes of the blueberry sauce, creating a more complex and zesty cookie. These simple additions can elevate the cookie experience to a new level of indulgence and intrigue.
How to Prepare blueberry cookies
Step 1: Crafting the Luscious Blueberry Sauce
The journey to extraordinary blueberry cookies begins with the creation of a vibrant, homemade blueberry sauce. This step is crucial as it forms the flavor nucleus of your cookies, infusing them with an intense, authentic berry essence that dried fruit simply cannot replicate. In a medium-sized saucepan, gently combine one cup of fresh, plump blueberries with two teaspoons of granulated sugar and one tablespoon of freshly squeezed lemon juice.
Place the saucepan over medium-low heat, allowing the ingredients to meld and transform. Stir frequently, encouraging the blueberries to break down and release their juices. This process should take approximately five to eight minutes, during which the mixture will thicken into a jam-like consistency. Once achieved, remove the saucepan from the heat and set it aside to cool completely. This cooling period is essential, as adding a warm sauce to the cookie dough can negatively impact its structure and texture.
Ensure the sauce has reached room temperature before proceeding to the next stages of the recipe. If you find you have more sauce than is called for in the cookie dough, do not fret; this delicious leftover can be preserved in a sealed jar and used as a delectable topping for pancakes, waffles, or even as a component in other desserts like cheesecake or yogurt parfaits. The rich, concentrated flavor will be a welcome addition to many breakfast and dessert applications.
Step 2: Assembling the Dry Ingredients
While your blueberry sauce is diligently cooling, it’s time to prepare the dry components that will form the structural backbone of your cookie dough. In a large mixing bowl, systematically combine two cups of all-purpose flour, one and a half tablespoons of cornstarch, one and a half teaspoons of baking powder, and half a teaspoon of kosher salt. Whisk these ingredients together thoroughly to ensure they are evenly distributed.
The cornstarch plays a vital role here; it’s not merely a filler but a crucial ingredient that contributes significantly to the cookie’s signature chewy texture and helps prevent them from spreading too thinly during the baking process. Proper whisking is important to ensure that the leavening agent (baking powder) and the salt are uniformly dispersed, which will lead to consistent baking results across all your cookies. This even distribution prevents pockets of saltiness or under-leavened areas.
Set this bowl of meticulously combined dry ingredients aside. It will be ready to be introduced to the wet ingredients in a later step, bringing together all the elements needed for a perfectly balanced cookie dough. Ensuring each component is properly prepared before combining them is a hallmark of successful baking, laying the groundwork for a superior final product. This methodical approach minimizes errors and maximizes the potential for deliciousness.
Step 3: Creaming the Butter and Sugar
In a separate, generously sized mixing bowl, the magic of creating a tender cookie base truly begins with the creaming of butter and sugar. Take half a cup of unsalted butter, ensuring it has been brought to room temperature so it is soft but not melted. This softened butter is then combined with one and a quarter cups of granulated sugar.
Using either a hand mixer or a stand mixer fitted with the paddle attachment, cream these two ingredients together. Beat them on medium speed for several minutes until the mixture becomes visibly lighter in color and develops a fluffy, cloud-like texture. This creaming process is fundamental for incorporating air into the dough, which contributes to the cookies’ rise and delicate crumb structure. It also ensures the sugar is well-dissolved, preventing a gritty texture in the finished cookie.
The goal is a pale yellow, airy mass that resembles whipped cream. This light and fluffy consistency is indicative that enough air has been incorporated to produce tender cookies. Resist the temptation to rush this step; the time spent creaming is a direct investment in the quality of your final baked goods. Properly creamed butter and sugar are the bedrock of a tender, melt-in-your-mouth cookie experience.
Step 4: Incorporating the Flavor and Liquids
Now, it’s time to introduce the star of the show – the blueberry sauce – and other essential liquid ingredients into the creamed butter and sugar mixture. Take approximately three tablespoons of the cooled blueberry sauce you prepared earlier and gently stir it into the fluffy butter and sugar base. This addition not only brings the rich berry flavor but also begins to impart a beautiful, subtle color to the dough.
Next, add the remaining liquid components: two tablespoons of milk and one large egg. If you are opting to use purple food dye for an enhanced blue hue, now is the time to add about a quarter teaspoon of liquid food coloring. Mix these ingredients together with your mixer on low speed, or by hand, just until everything is combined and no streaks of egg or milk remain visible. Be careful not to overmix at this stage; you want to gently incorporate these elements without developing the gluten in the flour.
The combination of the blueberry sauce, milk, egg, and optional dye creates the moist foundation of the cookie dough. The vibrant color from the sauce and dye should be evenly distributed, hinting at the delightful berry flavor that awaits. This mixture should appear smooth and slightly glossy, ready to embrace the dry ingredients that will bring it all together into a cohesive dough.
Step 5: Bringing the Dough Together and Chilling
With the wet and dry ingredients prepped, it’s time to unite them to form the cookie dough. Gradually add the bowl of dry ingredients (flour, cornstarch, baking powder, and salt) to the wet ingredients in your mixing bowl. Mix on a low speed or by hand using a spatula until the ingredients are just combined and no dry pockets of flour remain visible. It’s imperative not to overmix the dough at this point, as excessive mixing can lead to tough, dense cookies.
The dough should be soft and slightly sticky, reflecting the moisture from the blueberry sauce and other liquids. Once the dough has just come together, cover the bowl tightly with plastic wrap. This step is crucial for preventing the dough from drying out while it rests. Place the covered bowl in the refrigerator and allow the dough to chill for a minimum of three hours. This chilling period is non-negotiable for achieving the desired cookie texture and preventing excessive spreading during baking.
During this time, the fats in the dough will solidify, and the gluten will relax, leading to a more tender cookie. Furthermore, the chilling process allows the flavors to meld together, deepening the overall taste profile of the cookies. The dough will become firmer and easier to handle after chilling, which is essential for shaping uniform cookies that bake evenly. Patience during this chilling phase is key to the success of these blueberry cookies.
Step 6: Shaping and Baking the Cookies
Once the cookie dough has had ample time to chill thoroughly, it’s time to prepare for baking. Preheat your oven to a moderate 325°F (160°C). While the oven heats, line a baking sheet with parchment paper or a silicone baking mat to prevent sticking and ensure easy cleanup. This also promotes even heat distribution for baking.
Prepare a shallow plate by pouring the remaining quarter cup of granulated sugar onto it. This sugar will be used to coat the cookies before baking, adding a delightful subtle crunch and a beautiful sparkle to the finished product. Take the chilled cookie dough from the refrigerator and scoop it using a heaping tablespoon measure to ensure uniform cookie size. Roll each scoop of dough into a smooth ball between your palms.
Gently roll each dough ball in the granulated sugar on the prepared plate, ensuring it is well-coated on all sides. Place the sugar-coated dough balls onto the prepared baking sheet, leaving about two inches of space between each cookie to allow for expansion. You will likely be able to fit six cookies on a standard-sized baking sheet. If you have more dough, keep the remaining portion chilled in the refrigerator until you are ready to shape and bake the next batch; it’s vital to keep the dough cold.
Place the baking sheet into the preheated oven and bake for approximately 15 minutes. The cookies are ready when the edges appear set and you notice them beginning to form cracks on the surface, similar to crinkle cookies. Avoid overbaking, as this will result in dry, crumbly cookies rather than the desired soft and chewy texture. The interior should still appear slightly soft when removed from the oven.
Step 7: Cooling and Enjoying
Once the baking time is complete, carefully remove the baking sheet from the oven. It’s crucial to let the freshly baked blueberry cookies rest on the hot baking sheet for a full ten minutes. During this time, they will continue to set and firm up, making them sturdy enough to be moved without breaking. Attempting to transfer them too soon will likely result in their premature disintegration, due to their soft, delicate state.
After the ten-minute resting period on the baking sheet, gently transfer the cookies to a wire cooling rack. Allow them to cool completely on the rack for at least another twenty minutes. This final cooling stage is important for the cookies to reach their optimal texture and for any residual heat to dissipate, ensuring they are perfectly ready to be enjoyed. The irresistible aroma filling your kitchen is a testament to the delightful treat you’ve created.
These blueberry cookies are best enjoyed when they have cooled sufficiently. Their soft, chewy interior and slightly crisp sugar coating offer a delightful textural contrast. The burst of real blueberry flavor will transport you with every bite, making them a perfect accompaniment to a cup of coffee, tea, or a glass of cold milk. Sharing them is optional, but highly recommended!
Pro Tips for blueberry cookies
Chill, Chill, and Chill Again: Do not underestimate the power of a well-chilled cookie dough. This is perhaps the most critical tip for achieving perfectly shaped, chewy blueberry cookies that don’t spread into flat discs. The cold fat solidifies, preventing excessive melting in the oven and ensuring a thicker cookie. Aim for at least three hours, but overnight chilling can further enhance flavor and texture.
The Magic of Cornstarch: As mentioned, cornstarch is a secret weapon in cookie making. It absorbs moisture, tenderizes the flour, and contributes significantly to that desirable chewy texture. Ensure you measure it accurately to reap its full benefits. It’s a small addition that makes a huge difference in the final cookie experience.
Gentle Mixing is Key: Overmixing cookie dough, especially after adding the dry ingredients, develops gluten, which leads to tough cookies. Mix only until the ingredients are just combined. A few streaks of flour are better than overworking the dough. This is crucial for maintaining that soft, tender crumb we are aiming for.
Watch Your Oven Temperature: Ovens can vary, and consistent temperature is vital for baking success. Consider using an oven thermometer to ensure your oven is accurately calibrated. Baking at the correct temperature prevents cookies from browning too quickly on the outside while remaining undercooked inside. This recipe calls for a moderate 325°F (160°C) to ensure a slow, even bake.
Embrace the Cracks: The visual cue for these cookies being done is the formation of cracks on the surface. This indicates the cookie has set but is still soft in the center. Remove them from the oven promptly when you see these cracks; they will continue to cook slightly as they cool on the baking sheet, achieving that perfect chewy texture without becoming dry.
Serving Suggestions for blueberry cookies
Decoration
These blueberry cookies already boast a beautiful appearance with their speckled blue interiors and a glistening sugar coating. For an extra touch of elegance, consider a simple drizzle of white chocolate glaze or a light dusting of powdered sugar once they have completely cooled. A few extra fresh blueberries placed artfully on top of a still-warm cookie can also add a pop of color and freshness.
Side Dishes
While these cookies are a delightful treat on their own, they pair exceptionally well with various beverages. A steaming cup of coffee, whether a simple brew or a fancy latte, provides a warm contrast to the sweet berry flavor. A refreshing glass of cold milk is a classic pairing that enhances the comforting nature of the cookies. For a more sophisticated accompaniment, a light herbal tea or even a glass of chilled white wine can offer a surprising yet delightful contrast.
Creative Serving Ideas
Elevate these cookies into a delightful dessert by sandwiching a scoop of vanilla bean or blueberry ice cream between two cooled cookies for an instant ice cream sandwich. They also make a wonderful component in a deconstructed dessert, crumbled over yogurt or a fruit salad. For a truly special occasion, arrange them on a dessert platter alongside other homemade treats, like lemon bars or chocolate chip cookies, creating a visually stunning and delicious spread.
Preparation & Storage
Storing Leftovers
To maintain the delightful softness and flavor of your blueberry cookies, store them in an airtight container at room temperature. This prevents them from drying out and losing their tender texture. They are best enjoyed within three to four days of baking. The cornstarch content helps them stay soft longer, but their peak freshness is within this initial window.
Freezing
For longer storage, these blueberry cookies freeze beautifully. Once completely cooled, place them in a single layer on a baking sheet and freeze until solid, which usually takes about an hour. Then, transfer the frozen cookies to a freezer-safe airtight container or a heavy-duty freezer bag, ensuring they are well-sealed to prevent freezer burn. Properly stored, they can remain delicious for up to one month.
Reheating
If you’re reheating frozen cookies, allow them to thaw completely at room temperature before serving for the best texture. If you wish to warm them slightly, you can place them in a low oven (around 300°F or 150°C) for just a few minutes until they are gently warmed through. Be cautious not to overheat, as this can dry them out. The goal is to reawaken their soft, chewy character.
Frequently Asked Questions
- Can I use frozen blueberries instead of fresh ones for the sauce?
Yes, you absolutely can use frozen blueberries for the sauce, but there are a couple of important considerations. If using frozen blueberries, you can either thaw them completely before starting the sauce, making sure to drain any excess liquid, or you can cook them directly from frozen. If cooking from frozen, you will need to extend the simmering time of the sauce slightly longer than specified in the recipe to allow for the extra moisture to evaporate and for the mixture to thicken properly. This ensures you achieve the desired jam-like consistency without compromising the dough’s structure.
- Why are my blueberry cookies spreading too much in the oven?
Excessive spreading in cookies is usually due to a few common culprits. Firstly, ensure your butter was not too soft or melted when you creamed it with the sugar; it should be softened to room temperature but still hold its shape. Secondly, overmixing the dough after adding the dry ingredients can develop gluten, leading to a looser dough that spreads more. Most importantly, if you skipped or shortened the chilling time for the dough, this is the most likely reason for excessive spreading. Chilling solidifies the fats, which prevents them from melting too quickly in the oven and helps the cookies maintain their shape and thickness. Ensure the dough is thoroughly chilled before scooping and baking.
- How can I achieve that vibrant blue color without using artificial food coloring?
While the recipe suggests optional purple food dye for an enhanced blue hue, there are natural alternatives available if you prefer to avoid artificial coloring. One excellent option is to use blue butterfly pea powder, often referred to as blue matcha. You typically only need about a teaspoon of this natural powder to achieve a beautiful blue tint in your dough. The intensity of the color can vary depending on the brand and the amount used, so you may want to experiment with small quantities first. Alternatively, you can embrace the natural color of the blueberries, which will give your cookies a lovely purple-blue speckled appearance without any added coloring, focusing solely on the authentic fruit flavor.