Fresh Berry Tart – Light and Easy Berry Dessert!
There’s a certain magic in creating a dessert that looks incredibly impressive but requires minimal effort. This easy berry tart embodies that magic perfectly, transforming simple ingredients into a show-stopping treat. It’s the ideal solution when you crave something sweet and elegant without spending hours in the kitchen.
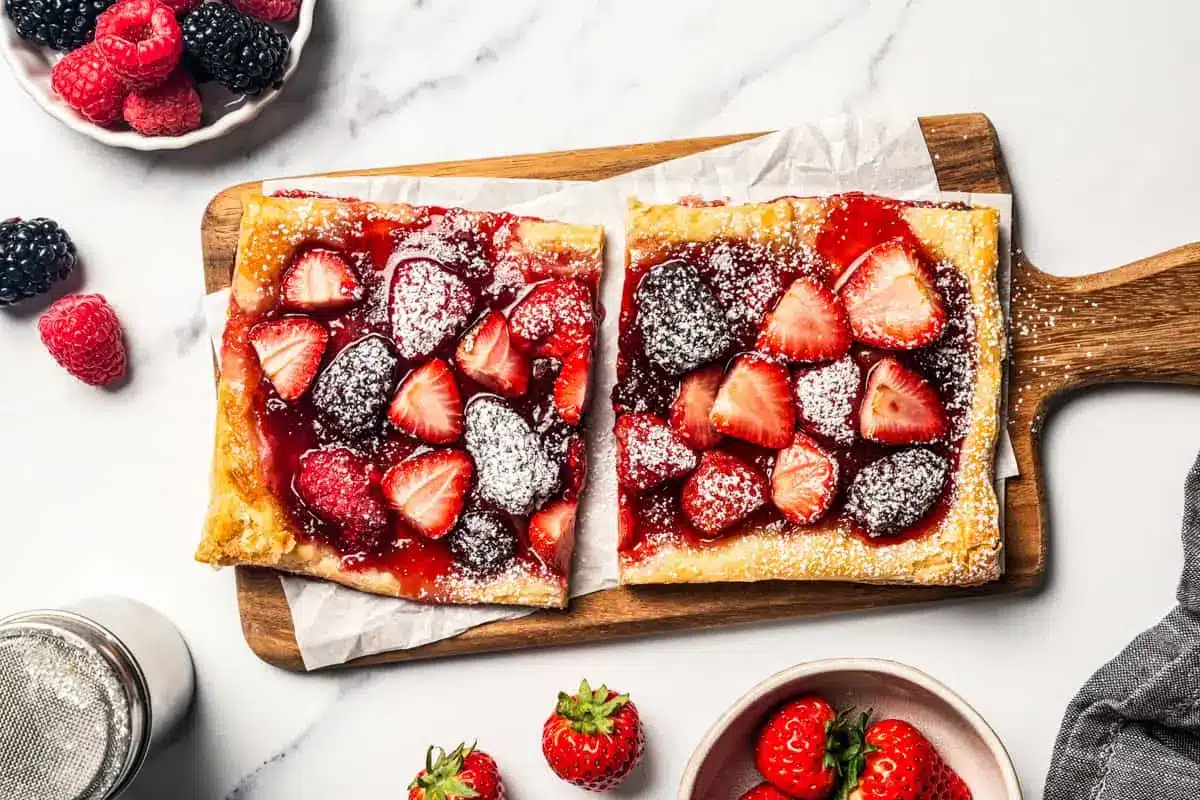
Imagine a crisp, golden puff pastry base, generously spread with sweet strawberry jam, and then piled high with jewel-toned, sugar-coated berries. This delightful creation is not only a feast for the eyes but also a joy to the palate, making it suitable for any occasion, from a casual afternoon tea to a festive holiday gathering. Its effortless charm is precisely why it has become a cherished recipe.
Why You Will Love This Recipe
- Effortless Preparation: With just a few key ingredients and a quick assembly process, this tart comes together in minutes, making it a stress-free option for busy bakers.
- Impressive Presentation: Despite its simplicity, the vibrant colors of the berries and the golden puff pastry create a visually stunning dessert that will wow your guests.
- Versatile Ingredients: You can easily adapt this recipe using your favorite types of berries, whether fresh or frozen, and experiment with different jams or even fruit curds for a personalized touch.
- Speedy Baking: The tart bakes quickly to a beautiful golden brown, meaning you can satisfy your sweet cravings in under 30 minutes from start to finish.
- Minimal Cleanup: Using pre-made puff pastry significantly reduces the number of dishes, allowing you more time to enjoy your delicious creation.
Ingredients You Need
The beauty of this easy berry tart lies in its reliance on high-quality, readily available ingredients. Opting for the freshest berries you can find will undoubtedly elevate the flavor profile, creating a more vibrant and juicy filling. Similarly, using a good quality jam will impart a deeper, richer sweetness that complements the tartness of the fruit.
Easy Berry Tart
This easy berry tart requires only 5 ingredients and 10 minutes of prep time. It features a crisp, buttery puff pastry crust topped with strawberry jam and sugar-coated fresh berries. It's a perfect quick dessert for any occasion.
- 1 sheet puff pastry, thawed and cut in half
- 2 cups mixed fresh berries
- ¼ cup granulated sugar
- 4 tablespoons strawberry jam, divided
- Powdered sugar, for dusting
- 1Preheat oven to 400ºF. Line a baking sheet with parchment paper.
- 2In a mixing bowl, combine the berries and granulated sugar. Stir lightly and let stand for 5 minutes.
- 3Place the puff pastry dough on the prepared baking sheet and cut it in half.
- 4Spread 2 tablespoons of strawberry jam down the middle of each pastry sheet.
- 5Evenly divide the berries and arrange them over the strawberry jam, down the middle of each pastry sheet.
- 6Bake for 18 to 20 minutes, or until golden brown.
- 7Remove from the oven and let the tart stand for a few minutes. Dust with powdered sugar, cut, and serve.
Keywords: berry tart, puff pastry, easy dessert, quick dessert, summer dessert, fruit tart
Quantities for these essential components can be found within the recipe card provided. However, the core elements include puff pastry, a medley of fresh berries, granulated sugar for maceration, a luscious strawberry jam, and a final dusting of powdered sugar for that perfect finishing touch.
Variations
This easy berry tart recipe is a fantastic canvas for culinary creativity. For a delightful vegan twist, simply ensure your puff pastry is made without butter or eggs; many store-bought options are suitable. You can then proceed with the rest of the recipe as is, creating a beautiful and compassionate dessert.
If you’re looking for a low-carb option, consider substituting the granulated sugar with a keto-friendly sweetener like erythritol or stevia when macerating the berries. For an extra layer of flavor and a touch of healthy fat, you might also add a thin layer of almond flour or finely chopped nuts over the jam before adding the berries.
To introduce a different fruit dimension, try swapping the strawberry jam for a tangy lemon curd or a rich raspberry preserve. You could also incorporate other fruits alongside your berries, such as thinly sliced peaches or apricots, for a more complex flavor profile. This adaptability ensures the tart can be tailored to any preference or dietary need.
How to Prepare easy berry tart
Step 1: Getting Ready to Bake
The first crucial step in preparing your easy berry tart is to preheat your oven to a moderately high temperature of 400°F (200°C). This high heat is essential for achieving that signature puff and golden crispness in the pastry. Simultaneously, line a sturdy baking sheet with parchment paper. This not only prevents sticking but also makes for a much easier cleanup after baking.
Having your baking sheet ready before you start assembling ensures that you can transfer the tart immediately to the hot oven, preventing the puff pastry from becoming warm and potentially less flaky. This attention to temperature and preparation sets the stage for a perfectly baked tart every time. Consider having all your ingredients measured and ready to go before you begin this step, further streamlining the process.
Step 2: Macerating the Berries
In a medium mixing bowl, combine your chosen assortment of fresh berries with the granulated sugar. Gently stir them together, ensuring each berry is lightly coated. This process, known as maceration, encourages the berries to release some of their natural juices, which will create a more luscious filling and a slightly syrupy texture once baked.
Allow the berries to sit at room temperature for approximately 5 minutes. During this short period, you’ll notice the sugar beginning to dissolve and draw moisture from the fruit. If you’re using frozen berries, ensure they are completely thawed and thoroughly drained before this step, and you might even consider patting them dry with paper towels to prevent excess moisture from making the pastry soggy.
Step 3: Preparing the Puff Pastry Crust
Take your thawed puff pastry sheet and carefully place it onto the parchment-lined baking sheet you prepared earlier. Puff pastry can be delicate, so handle it with gentle hands to avoid tearing. Once positioned, use a sharp knife or a pizza cutter to slice the puff pastry sheet exactly in half. This will create two individual tart bases, making for a balanced presentation.
The goal is to create a slightly raised edge for the tart filling to sit within. You can achieve this by lightly scoring a border about ½ inch from the edge of each pastry half, being careful not to cut all the way through. This scoring will guide the puffing action and create a natural well for your toppings. If one side of your puff pastry seems to puff up more during baking than the other, don’t worry; a simple prick with a fork can help deflate it and achieve a more even bake.
Step 4: Assembling the Tart
Now comes the moment to layer your flavors. Take your strawberry jam and spread approximately 2 tablespoons evenly down the center of each puff pastry half. Aim for a consistent layer, leaving the scored border clear. The jam acts as a sweet, sticky base that holds the berries in place and adds a delightful depth of flavor.
Next, evenly divide the macerated berries between the two pastry sheets, arranging them directly on top of the strawberry jam. Distribute them in a single layer as much as possible, creating a beautiful mound of colorful fruit. Ensure the berries are concentrated in the center, following the lines you’ve created with the jam, which will help keep the filling contained during baking.
Step 5: Baking to Golden Perfection
Carefully transfer the prepared baking sheet with the assembled berry tarts into your preheated 400°F (200°C) oven. Bake for a crucial 18 to 20 minutes. During this time, the puff pastry will puff up magnificently, turning a deep golden brown, and the berries will soften and bubble enticingly. Keep a close eye on them during the last few minutes to ensure they don’t over-bake and burn.
The aroma filling your kitchen will be an irresistible testament to the tart’s readiness. The goal is a crust that is crisp and flaky, and berries that are tender and slightly caramelized from the heat. If, by chance, one side of the pastry puffs up significantly more than the other, you can gently prick the over-puffed area with a fork to help it settle and achieve a more even rise. This simple technique ensures a beautiful final appearance.
Step 6: Resting and Finishing Touches
Once the berry tarts are beautifully golden and the berries are bubbling, carefully remove the baking sheet from the oven. Allow the tarts to rest on the baking sheet for a few minutes. This resting period is important as it allows the pastry to firm up slightly and the juices to settle, preventing the tart from falling apart when you move it.
After they have cooled slightly, transfer the tarts to a serving platter or individual plates. Just before serving, generously dust the tops with powdered sugar. This final touch adds a delicate sweetness and an elegant finish, mimicking a light dusting of snow over the vibrant berry landscape. The contrast of the white sugar against the colorful berries and golden crust is visually stunning.
Pro Tips for easy berry tart
Quality Jam Matters: While any strawberry jam will work, using a high-quality, homemade, or artisanal jam can significantly elevate the flavor of your tart. Look for one with a good fruit content and a balanced sweetness.
Don’t Overcrowd the Berries: While it’s tempting to pile on as many berries as possible, resist the urge to overfill. Too many berries can release excessive moisture, potentially leading to a soggy bottom crust. A single, generous layer is usually best.
Thawing Puff Pastry Correctly: If using frozen puff pastry, ensure it is fully thawed but still chilled. Puff pastry bakes best when cold, so avoid letting it get too warm at room temperature. This is key to achieving maximum flakiness.
Cool Completely Before Serving: For the cleanest slicing and best texture, allow the tart to cool completely. While warm berries are delicious, a fully cooled tart allows the puff pastry to set properly and prevents the filling from oozing out excessively.
Experiment with Berry Combinations: Don’t limit yourself to just strawberries. A mix of raspberries, blueberries, blackberries, and even a few tart cranberries can create a more complex and interesting flavor profile. The visual appeal is also enhanced with a variety of colors.
Serving Suggestions for easy berry tart
Decoration
To truly make your easy berry tart shine, consider a few simple yet effective decorative touches. A light dusting of powdered sugar is classic and elegant, providing a beautiful contrast to the vibrant berries. For an extra touch of sophistication, a few fresh mint leaves scattered around the tart or tucked into the berry mixture can add a pop of green and a hint of refreshing aroma.
You could also drizzle a thin stream of melted white or dark chocolate over the cooled tart for a more decadent look. If you have edible flowers, such as pansies or violets, they can add a whimsical and professional finish. A tiny sprinkle of lemon zest over the berries can also brighten their flavor and add a visual sparkle.
Side Dishes
This delightful berry tart pairs wonderfully with a variety of complementary sides. A dollop of freshly whipped cream, either plain or lightly sweetened and flavored with vanilla, is a classic accompaniment that adds a creamy richness. For those who enjoy a bit of tang, a small scoop of vanilla bean or lemon sorbet can provide a refreshing contrast to the sweet, fruity tart.
If serving this as part of a larger meal, consider pairing it with a light, crisp salad. A simple green salad with a light vinaigrette can offer a palate-cleansing contrast to the sweetness of the dessert. For a more indulgent experience, consider serving it alongside a delicate lemon chicken or a light seafood dish, balancing the meal’s flavors.
Creative Serving Ideas
Think beyond the standard slice! For a more whimsical presentation, cut the tart into smaller, bite-sized squares and serve them on a tiered stand at a brunch or tea party. This makes them easy for guests to mingle and enjoy. You could also serve individual mini tarts, made by using smaller pastry squares or cookie cutters, for a charming, personalized touch.
Another fun idea is to deconstruct the tart slightly for a more modern presentation. Serve slices of the baked pastry base alongside a generous spoonful of the jam and a mound of the macerated berries in separate bowls. Guests can then assemble their own perfect bite. This interactive approach is always a hit at gatherings and allows for customized sweetness levels.
Preparation & Storage
Storing Leftovers
This easy berry tart is best enjoyed fresh, as the puff pastry tends to lose its crispness over time. However, if you do have leftovers, store them in an airtight container at room temperature for no more than a day, provided your kitchen is cool. For longer storage, refrigerate the tart in an airtight container for up to 3 days. The pastry will soften considerably, but the flavors will remain intact.
When refrigerating, it’s a good practice to place a piece of parchment paper between tart slices if they are stacked to prevent them from sticking together. Always ensure the tart has cooled completely before attempting to store it to avoid creating condensation inside the container, which can further compromise the pastry’s texture.
Freezing
Freezing this berry tart is possible, though it’s important to manage expectations regarding the pastry’s texture upon thawing. It is generally not recommended to freeze the fully assembled and baked tart, as the puff pastry will likely become soggy. The best approach is to freeze the unbaked tart.
Assemble the tart as directed but do not bake it. Once assembled on the parchment-lined baking sheet, place the entire sheet in the freezer until the pastry is firm. Then, carefully transfer the frozen tart to a freezer-safe bag or container. When ready to bake, remove it from the freezer and bake directly from frozen, adding a few extra minutes to the baking time. Alternatively, allow it to thaw in the refrigerator overnight before baking as usual.
Reheating
Reheating this berry tart can help revive some of its crispness, though it might not return to its original freshly baked glory. The most effective method is to reheat in a moderate oven. Preheat your oven to around 300°F (150°C).
Place the leftover tart directly on a baking sheet or in an oven-safe dish. Reheat for about 5-10 minutes, or until warmed through and the pastry has regained some of its crispness. Avoid using a microwave, as this will likely make the puff pastry even softer and less appealing. If you’re reheating a frozen unbaked tart, bake it at the higher temperature (400°F) for a longer duration, as mentioned in the freezing section.
Frequently Asked Questions
-
Can I use frozen berries instead of fresh for this easy berry tart?
Absolutely! Using frozen berries is a perfectly acceptable and often more convenient option, especially when fresh berries are out of season. However, it’s crucial to follow a specific procedure to prevent a soggy crust. You must thaw the frozen berries completely and drain off any excess liquid. Some bakers even recommend gently patting the thawed berries dry with paper towels to remove as much moisture as possible. This step is vital because excess water from frozen berries can seep into the puff pastry during baking, compromising its crisp texture. If you do use frozen berries, you might also want to adjust the sugar maceration step; instead of letting them sit, stir the sugar into the berries just before you add them to the tart to minimize juice release.
-
What kind of jam is best for this berry tart, and can I use something other than strawberry jam?
Strawberry jam is a classic choice for this easy berry tart because its sweet, slightly tart profile complements the berries beautifully and provides a familiar base flavor. However, the recipe is wonderfully versatile, and you can absolutely use other types of jam or preserves! Raspberry jam offers a vibrant tanginess, while a mixed berry jam can amplify the fruitiness. If you’re feeling adventurous, consider a more unique option like apricot preserves or even a lemon curd for a delightful citrusy twist. The key is to choose a jam that you enjoy and that has a good, concentrated fruit flavor, as it forms a significant part of the tart’s overall taste profile.
-
My puff pastry sometimes puffs unevenly. How can I ensure a flat, even crust for my berry tart?
Uneven puffing is a common occurrence with puff pastry, but it’s usually quite manageable. If you notice one side puffing up significantly more than the other during baking, the simplest solution is to gently prick the over-inflated section with a fork or the tip of a sharp knife. This allows the steam to escape, helping to deflate that specific area and encourage a more balanced rise across the pastry. Another preventive measure is to ensure your puff pastry is well-chilled before baking, as cold butter layers expand more evenly when exposed to heat. Scoring a border around the edge of the pastry before adding the filling can also help guide the puffing action and create a more defined edge for your tart.