Irresistible Eggless Rose Tiramisu – A No-Bake Delight

As I stood near the bustling kitchen counter, the sweet, floral scent of rose wafted through the air, instantly transporting me to a sunlit garden party. That’s exactly what my Eggless Rose Tiramisu embodies—a delightful, no-bake dessert that merges the creamy indulgence of mascarpone with the enchanting essence of rose syrup.
This recipe isn’t just about simplicity; it brings a customizable twist to traditional flavors, making it a crowd-pleaser for all occasions. Whether you’re hosting a gathering or simply treating yourself, this dessert is a breeze to whip up and guarantees a stunning presentation. Curious about how to create this light, layered masterpiece that’s sure to impress? Let’s dive into the delightful world of Rose Tiramisu!
Why You Will Love This Recipe
- Effortless Preparation: This delightful dessert requires no baking, making it an ideal choice for those seeking a simple yet elegant treat. You can assemble it with ease, saving precious time and energy in the kitchen.
- Exquisite Floral Flavor: The infusion of rose syrup and rose water creates a beautifully aromatic and subtly sweet profile that is both unique and utterly charming. It offers a sophisticated twist on classic Italian flavors.
- Customizable Options: This recipe is a fantastic canvas for your creativity, allowing for numerous variations to suit diverse palates and dietary needs. Feel free to experiment with different fruits, nuts, or even complementary spices to make it your own.
- Visually Stunning Presentation: With its delicate layers and optional garnishes like rose buds and pistachios, this Rose Tiramisu is a feast for the eyes. It’s guaranteed to impress guests and elevate any dessert table with its elegance.
- Make-Ahead Convenience: For busy hosts, this tiramisu can be prepared fully in advance, allowing the flavors to meld beautifully. Simply chill it overnight and garnish just before serving for a stress-free entertaining experience.
Ingredients You Need
Crafting this Rose Tiramisu begins with selecting the finest ingredients, ensuring each layer contributes to a symphony of delicate flavors and creamy textures. The quality of your components directly influences the final outcome, transforming simple elements into an exquisite dessert.
Eggless Rose Tiramisu

A delightful, no-bake dessert that merges the creamy indulgence of mascarpone with the enchanting essence of rose syrup. This recipe isn't just about simplicity; it brings a customizable twist to traditional flavors, making it a crowd-pleaser for all occasions.
- For the Rose Milk Mixture: 1/2 cup rose syrup, 1 cup full fat milk, 1 teaspoon rose water
- For the Cream Layers: 1 cup mascarpone cheese, 1/2 cup powdered sugar, 1 cup heavy cream
- For Assembling: 24 pieces ladyfinger cookies
- For Decoration: Food grade rose buds, silvered pistachios
- 1Prepare Rose Milk Mixture: Whisk together rose syrup, milk, and rose water until well combined. Set aside.
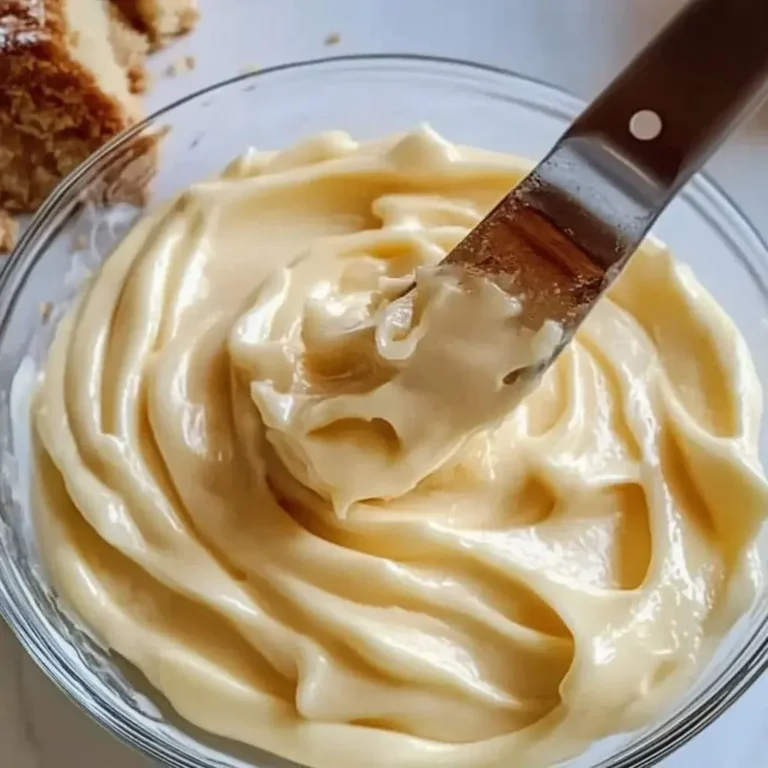
- 2Whip Mascarpone: In a chilled bowl, combine cold mascarpone cheese, powdered sugar, and a dash of rose essence. Beat until smooth and creamy.
- 3Whip Cream: In the same chilled bowl, whip heavy cream with 2 tablespoons of powdered sugar until soft peaks form.
- 4Layer Ladyfingers: Quickly dip ladyfinger cookies into the rose milk mixture and arrange a layer in an 8x8-inch dish.
- 5Add Cream Layers: Spoon half of the whipped mascarpone mixture over the ladyfingers, then add another layer of dipped ladyfingers, and top with the remaining mascarpone mixture.
- 6Chill: Cover and refrigerate for at least 6 hours, or preferably overnight.
- 7Decorate & Serve: Garnish with rose buds and slivered pistachios before slicing and serving.
Keywords: tiramisu, rose, no-bake, dessert, eggless, italian, creamy, floral
For the Rose Milk Mixture, you will need rose syrup for sweetness and a distinct floral note, full-fat milk to bring creaminess, and a touch of rose water to amplify the enchanting aroma. The cream layers rely on smooth, cold mascarpone cheese, powdered sugar for sweetness and stability, and chilled heavy cream for that signature airy texture. For assembly, classic ladyfinger cookies are essential for structure, while food-grade rose buds and silvered pistachios offer a beautiful, textural finish. The specific quantities for these ingredients are detailed within the provided recipe card.
Variations
One wonderful way to adapt this Rose Tiramisu is by embracing a vegan approach. To achieve this, you can substitute the mascarpone cheese and heavy cream with a rich blend of silken tofu and full-fat coconut cream. Ensure the tofu is well-drained and blended until perfectly smooth with the coconut cream. This swap, when sweetened appropriately with powdered sugar, creates a lusciously creamy and dairy-free alternative that retains the delightful floral notes.
For those mindful of carbohydrate intake, a low-carb variation can be easily achieved. Instead of traditional ladyfingers, opt for sugar-free almond flour ladyfingers or even thin slices of angel food cake, ensuring they are low in net carbs. Sweeten the mascarpone and cream layers with a sugar substitute like erythritol or stevia. This modification allows you to enjoy the elegant rose and creamy flavors while adhering to a low-carbohydrate diet.
Another exciting avenue for variation involves introducing complementary fruit flavors. Consider adding a thin layer of fresh raspberries or finely diced strawberries between the mascarpone layers. The tartness of the berries provides a refreshing counterpoint to the sweetness and richness of the tiramisu. Alternatively, a delicate infusion of citrus zest, such as orange or lemon, can be added to the mascarpone mixture, offering a bright, zesty undertone that beautifully balances the floral rose essence.
How to Prepare Rose Tiramisu
Step 1: Prepare the Enchanting Rose Milk Mixture
Begin by creating the fragrant liquid that will imbue your ladyfingers with the signature rose flavor. In a medium-sized mixing bowl, gently combine ½ cup of high-quality rose syrup, 1 cup of rich full-fat milk, and 1 teaspoon of pure rose water. Whisk these ingredients together thoroughly until the rose syrup is completely dissolved and the mixture achieves a beautiful, uniform pink hue.
This aromatic blend is crucial for infusing the ladyfingers with the delicate floral notes that define this dessert. It’s essential that the syrup is fully incorporated to avoid any pockets of intense sweetness. Once blended, set this captivating rose milk mixture aside. Allow it to rest at room temperature for a short while, giving the flavors ample opportunity to meld and deepen, preparing them to transform the plain ladyfingers into something truly special.
The quality of your rose syrup is paramount here; opt for a reputable brand, perhaps Rooh Afza if it’s available in your region, as it offers an authentic and balanced sweetness. The full-fat milk contributes essential creaminess and body to the soaking liquid, preventing the ladyfingers from becoming overly soggy while ensuring they absorb just enough moisture. The addition of rose water, even in small quantities, significantly enhances the perfumed aroma, making the entire dessert even more evocative and delightful.
Step 2: Whip the Silky Mascarpone Cream
To achieve the perfect smooth and creamy texture for your mascarpone layer, it’s vital to start with chilled equipment. Place your mixing bowl and beaters in the refrigerator for at least 15 minutes before you begin. This chilling process ensures that the mascarpone will whip up beautifully and remain stable.
In the now thoroughly chilled bowl, combine 1 cup of cold mascarpone cheese with ½ cup of finely powdered sugar and a small dash of rose essence, if desired, to further enhance the floral notes. Beat these ingredients together on a medium speed using your electric mixer. Continue beating for approximately 2 minutes, or until the mixture transforms into a consistently smooth, velvety, and lump-free cream. Avoid overbeating, as this can cause the mascarpone to break.
This luxurious mascarpone mixture will form the heart of your tiramisu’s creamy layers. It should be rich and decadent, yet light enough not to overpower the other delicate flavors. Once it reaches the desired consistency, gently scrape the sides of the bowl to ensure all ingredients are incorporated, and then set this prepared mascarpone cream aside. It will be used in subsequent layering steps to create that signature tiramisu richness.
Step 3: Create the Airy Whipped Cream
To achieve a light and airy texture that complements the density of the mascarpone, it is crucial to whip the heavy cream correctly. Using the same chilled mixing bowl and beaters from the previous step will help ensure optimal results and also save on washing up. Make sure your heavy cream is also very cold, straight from the refrigerator, as this is essential for successful whipping.
Pour 1 cup of chilled heavy cream into the cold bowl. Add approximately 2 tablespoons of powdered sugar to the cream. The sugar not only adds a touch of sweetness but also aids in stabilizing the whipped cream, helping it hold its shape. Begin whipping the cream on a medium speed with your electric mixer.
Continue whipping until the cream forms soft peaks. This typically takes about 3 to 4 minutes, but keep a close eye on it as the time can vary. Soft peaks mean that when you lift the beaters, the cream will form a peak that gently curls over on itself. It’s imperative not to overbeat the cream, as this can lead to a grainy or buttery texture, which is undesirable in a delicate tiramisu. The goal is a light, fluffy, and smooth consistency that will contribute to the ethereal texture of your dessert.
Step 4: Assemble the First Layer of Ladyfingers
This is where the structure of your Rose Tiramisu begins to take shape. Have your prepared rose milk mixture readily accessible, and work with the ladyfinger cookies one or two at a time to ensure they don’t become too saturated. The key here is a quick dip; you want the cookies to absorb just enough of the liquid to become soft and flavorful, but not so much that they disintegrate.
Carefully take each ladyfinger cookie and dip it into the rose milk mixture. Allow it to soak for no more than 1 to 2 seconds on each side. The exact time may vary slightly depending on the thickness and density of your ladyfingers, so it’s a good idea to do a test dip first. You’re aiming for them to be moist but still hold their form, providing a sturdy foundation for the creamy layers.
Once dipped, arrange these rose-infused ladyfingers in a single layer within your chosen 8×8-inch serving dish. Place them snugly next to each other, covering the entire bottom of the dish. This layer acts as the crucial base of your tiramisu, absorbing the flavors and moisture from the layers above and below, and providing that characteristic texture that tiramisu lovers adore. Ensure the layer is as even as possible for consistent results.
Step 5: Build the Creamy Layers
With your first ladyfinger base perfectly in place, it’s time to add the luscious creamy components that make tiramisu so irresistible. Take about half of the prepared whipped mascarpone mixture. Spoon it evenly over the layer of dipped ladyfingers that you’ve just arranged in the dish.
Use a spatula to gently spread the mascarpone mixture. Aim for a smooth, even layer that covers the ladyfingers completely, right to the edges of the dish. This creates the first of your rich, decadent cream layers. The smooth, cool mascarpone will begin to soften the ladyfingers beneath it, allowing the flavors to meld together beautifully.
Once the first mascarpone layer is smoothed, repeat the process with another layer of dipped ladyfingers. Quickly dip each cookie into the rose milk mixture again, ensuring they are adequately moistened, and arrange them atop the mascarpone. Finally, spoon the remaining half of the whipped mascarpone mixture over this second ladyfinger layer. Use your spatula once more to spread it out evenly, creating a clean, smooth top surface for your tiramisu. This meticulous layering is key to achieving the perfect texture and flavor distribution.
Step 6: The Essential Chill Time
Now comes perhaps the most important step for achieving the perfect tiramisu: allowing it to chill and set. This period is crucial for the flavors to fully develop and meld together, and for the dessert to achieve its characteristic creamy, cohesive texture. Without adequate chilling, your tiramisu might be too soft or the flavors won’t have had enough time to harmonize.
Cover the entire dish tightly with plastic wrap. Ensure that the plastic wrap creates a good seal around the edges of the dish. This is important not only to prevent the tiramisu from drying out but also to stop it from absorbing any unwanted odors from your refrigerator, which can compromise the delicate floral notes of the rose. A well-sealed cover is your best defense against flavor contamination.
Place the covered dish into the refrigerator. It is recommended to chill your Rose Tiramisu for a minimum of 6 hours. For the absolute best results and a more intense flavor melding, it is ideal to refrigerate it overnight, or for at least 8-12 hours. During this time, the ladyfingers will soften beautifully, the mascarpone and cream will firm up slightly, and all the flavors will harmonize into a delightful symphony. Patience here is truly rewarded with an exceptional dessert.
Step 7: Garnish and Serve with Flair
Once your Rose Tiramisu has undergone its essential chilling period and has firmed up beautifully, it’s time for the final, artistic touches. Carefully remove the plastic wrap from the dish, revealing the immaculately set dessert beneath. The aroma of rose should now be wonderfully pronounced.
For an extra layer of elegance and visual appeal, you can optionally pipe additional whipped cream onto the top surface of the tiramisu. This can be done using a piping bag fitted with a decorative tip, creating swirls, rosettes, or a simple border around the edges. This step adds a professional flourish and extra creaminess, enhancing the overall presentation.
The final decorative elements are key to truly showcasing the Rose Tiramisu’s theme. Sprinkle food-grade rose buds generously over the top. These edible flowers add a pop of color and reinforce the rose theme beautifully. Follow this by scattering a handful of silvered pistachios. The vibrant green of the pistachios provides a lovely visual contrast to the pinkish cream and the delicate rose buds, and their crunchy texture adds a delightful counterpoint to the soft, creamy layers. Slice your magnificent creation into portions and serve immediately, ready to impress your guests with this stunning, no-bake dessert.
Pro Tips for Rose Tiramisu
Chill Your Equipment: For the most stable and voluminous whipped cream and mascarpone mixtures, ensure your mixing bowls and beaters are thoroughly chilled. Pop them in the freezer for about 15-20 minutes before you start. This temperature difference helps the fat globules in the cream and mascarpone to stabilize more effectively, resulting in a lighter, airier texture that holds its shape beautifully. Cold ingredients and cold equipment are your best friends in achieving that perfect tiramisu consistency.
Master the Ladyfinger Dip: The key to perfectly soaked ladyfingers is speed and precision. Dip them into the rose milk mixture very quickly, no more than one to two seconds per side. The goal is for them to absorb just enough liquid to soften and become infused with flavor, but not so much that they turn mushy or fall apart. Test one ladyfinger first to gauge the exact dipping time needed for your specific brand; it’s better to be slightly under-soaked initially as they will continue to soften during the chilling process.
Patience is a Virtue (for Chilling): While it’s tempting to serve your Rose Tiramisu as soon as it’s assembled, resisting that urge is crucial. The minimum chilling time of 6 hours, and ideally overnight, is absolutely essential. This period allows the flavors to fully meld and deepen, the ladyfingers to soften perfectly and absorb the surrounding moisture, and the entire dessert to set into its signature creamy texture. Rushing this step will result in a tiramisu that is less cohesive and lacks the depth of flavor it should possess.
Garnish Just Before Serving: For the most visually appealing result, save your delicate garnishes like fresh rose buds and slivered pistachios for the very end. If they are added too far in advance, especially the rose buds, they might lose some of their vibrant color or texture. Applying them just before you present the dessert ensures they look their freshest and most appealing, completing the elegant presentation of your homemade Rose Tiramisu and making a stunning final impression.
Taste and Adjust Sweetness: While the recipe provides specific amounts for sugar, always taste your mascarpone and cream mixtures as you go. Depending on the sweetness of your rose syrup and your personal preference, you might want to slightly adjust the amount of powdered sugar. Aim for a balanced sweetness that complements the floral notes without being cloying. This small adjustment can make a big difference in the overall flavor profile of your Rose Tiramisu.
Serving Suggestions for Rose Tiramisu
Decoration
Elevate your Rose Tiramisu with thoughtful decoration that enhances both its visual appeal and thematic elegance. The use of food-grade rose buds is paramount; scatter them artfully across the top surface of the chilled dessert. Their delicate petals add a touch of natural beauty and reinforce the signature rose flavor. Complementing the floral element, silvered pistachios provide a wonderful textural contrast and a vibrant green hue that pops against the creamy backdrop.
For an added touch of luxury and sweetness, consider a light dusting of edible rose petals or a sprinkle of finely chopped toasted almonds. If you’ve opted for additional whipped cream, use a piping bag with a star tip to create elegant rosettes or swirls around the edges or in the center. A very light drizzle of honey or a complementary syrup, like a subtle raspberry coulis, can also add an extra dimension without overwhelming the delicate rose essence.
Ensure your decorations are applied just before serving to maintain their freshness and visual impact. The goal is to create a dessert that is as beautiful to look at as it is delightful to eat, making each slice a small work of art. The combination of delicate floral notes and charming presentation is what truly sets this Rose Tiramisu apart.
Side Dishes
The creamy, floral notes of Rose Tiramisu pair wonderfully with a variety of subtle yet complementary side dishes. A simple fresh fruit salad, featuring seasonal berries like raspberries, strawberries, and blueberries, provides a refreshing and slightly tart counterpoint. The bright, natural sweetness of the fruits cuts through the richness of the tiramisu, creating a balanced palate experience.
For a more decadent pairing, consider a scoop of mint chocolate chip ice cream. The cool, creamy texture of the ice cream, combined with the refreshing mint and subtle chocolate chips, offers a delightful contrast to the warm, floral notes of the rose. Alternatively, a light, tangy lemon sorbet can cleanse the palate and add a zesty brightness that enhances the overall dessert course.
If you prefer something with a bit more texture, small bowls of lightly sweetened, toasted nuts like slivered almonds or chopped pistachios can be offered on the side. They echo the garnishes on the tiramisu and provide a satisfying crunch. Small, delicate cookies, such as shortbread or amaretti, can also be served alongside, offering another textural element and a subtle flavor complement.
Creative Serving Ideas
Transform your Rose Tiramisu from a simple dessert into a memorable experience with these creative serving ideas. Instead of slicing a large 8×8-inch dish, consider assembling individual servings in elegant glassware, such as martini glasses or small dessert bowls. This presentation allows guests to see the beautiful layers of ladyfingers and cream, adding an extra visual delight. Layer the ingredients directly into the glasses for a charming, layered effect that looks sophisticated and is perfectly portioned.
Another innovative approach is to deconstruct the tiramisu slightly. Serve individual portions of the mascarpone cream alongside perfectly soaked rose ladyfingers and a small garnish of rose petals and pistachios. This allows guests to assemble their own perfect bite, controlling the ratio of cream to ladyfinger, and adding to the interactive dining experience. It’s a playful yet elegant way to present the dessert.
For a truly unique twist, serve small cubes of the chilled Rose Tiramisu as part of a dessert tasting platter. Alongside other mini desserts, like chocolate truffles or fruit tarts, the Rose Tiramisu offers a distinct floral and creamy element. This allows guests to sample a variety of flavors and textures, with your Rose Tiramisu standing out for its delicate and unique profile. You can find other delightful dessert inspirations on platforms like Pinterest, which offers a wealth of creative ideas.
Preparation & Storage
Storing Leftovers
To ensure your delicious Rose Tiramisu remains fresh and enjoyable for subsequent servings, proper storage is key. The most effective way to store any leftovers is to keep them in an airtight container. This prevents the dessert from drying out and, critically, stops it from absorbing any other aromas from within your refrigerator, which could otherwise interfere with its delicate rose fragrance.
If stored correctly in an airtight container, your Rose Tiramisu should maintain its delightful texture and flavor for up to 3 days. It’s best to keep it refrigerated throughout this period. When you’re ready to enjoy a leftover portion, it can be served directly from the refrigerator, no reheating required, as tiramisu is best enjoyed chilled. The creamy layers will continue to meld and develop even more flavor over the first couple of days.
Avoid leaving the tiramisu at room temperature for extended periods, as this can affect its texture and potentially lead to spoilage, especially given the dairy components. Always ensure the container is securely sealed before placing it back into the refrigerator. This simple step ensures that every bite of your leftover Rose Tiramisu is as delightful as the first.
Freezing
For those occasions when you’ve made a larger batch of Rose Tiramisu or wish to prepare it well in advance, freezing is an excellent option. Freezing allows you to preserve the dessert for an extended period while retaining its flavor and much of its texture, though some minor changes might occur upon thawing. Ensure the tiramisu is completely chilled before you attempt to freeze it; this helps it set properly and prevents ice crystals from forming excessively.
To freeze, it is imperative to wrap the Rose Tiramisu extremely well. First, wrap the entire dish or individual portions tightly in several layers of plastic wrap. Make sure there are no gaps or exposed areas where air can penetrate. Following the plastic wrap, add another layer of protection by wrapping it thoroughly in aluminum foil. This double-layer approach provides the best defense against freezer burn.
When properly wrapped, your Rose Tiramisu can be safely stored in the freezer for up to 1 month. While it might remain safe to consume for longer, quality can begin to degrade. Label your frozen dessert with the date of freezing to keep track of its freshness. This method allows you to enjoy this elegant treat long after its initial preparation, ensuring you always have a delightful dessert on hand.
Reheating
Rose Tiramisu is a dessert that is specifically designed to be enjoyed cold, and therefore, reheating is not recommended under any circumstances. The delicate balance of textures and flavors is achieved through chilling, which allows the mascarpone and cream to firm up and the ladyfingers to soften while absorbing the luscious soaking liquid. Applying heat would completely disrupt this structure.
Reheating would cause the creamy layers to melt and become liquid, turning the once delightful dessert into a soupy mess. The ladyfingers would likely disintegrate, losing all their structure and becoming unpleasantly soggy. Furthermore, the subtle floral aromas of the rose would likely diminish or change undesirably with heat. Instead of reheating, the best approach for enjoying frozen Rose Tiramisu is gradual thawing.
When you are ready to serve your Rose Tiramisu after freezing, the recommended method is to transfer it directly from the freezer to the refrigerator. Allow it to thaw slowly and completely overnight. This gentle thawing process allows the dessert to return to its intended chilled state without compromising its texture or flavor. Once thawed, it can be garnished and served as usual, ensuring you experience the dessert as it was meant to be.
Frequently Asked Questions
-
What type of rose syrup should I use for the best flavor?
For the most delightful and authentic flavor profile in your Eggless Rose Tiramisu, it is highly recommended to use Rooh Afza rose syrup. This particular brand is celebrated for its balanced sweetness and true floral essence, which significantly enhances the overall taste of the dessert. If Rooh Afza is not readily available in your area, any high-quality rose syrup from a reputable brand will suffice. However, it’s always a good practice to check the ingredient list for any added artificial flavors or excessive coloring that might alter the intended taste of your tiramisu.
-
How should I store my Rose Tiramisu?
To maintain the optimal freshness and creamy texture of your Eggless Rose Tiramisu, it is essential to store it properly. Place the dessert in an airtight container, ensuring it is completely sealed to prevent any exposure to air or refrigerator odors. This method will help keep the tiramisu fresh for up to 3 days. If you find you have more than you can consume within this timeframe, or if you wish to prepare it further in advance, freezing is a viable option for longer storage.
-
Can I freeze Rose Tiramisu?
Yes, absolutely! Freezing your Eggless Rose Tiramisu is a practical and effective way to extend its shelf life and enjoy this exquisite dessert at a later time. To freeze it successfully, ensure it is very well-wrapped. Start by tightly enclosing the tiramisu in several layers of plastic wrap, making sure there are no gaps. Subsequently, wrap it again thoroughly with aluminum foil for an added layer of protection against freezer burn. When you are ready to indulge in your frozen creation, simply transfer it from the freezer to the refrigerator and allow it to thaw slowly overnight. It is crucial to remember that this dessert is best served chilled, so avoid any attempts at reheating it.