Whole Orange Cake Recipe – Rind and All!
Imagine a cake so fragrant, so incredibly moist, that the very scent transports you to sun-drenched groves. This isn’t just any cake; it’s a celebration of pure, unadulterated citrus, crafted with a secret that unlocks an explosion of flavor. Get ready to discover a dessert that’s as simple to make as it is delightful to devour.
We’re talking about a whole orange cake, where every zesty bit contributes to an unparalleled taste experience. The magic lies in embracing the entire fruit, peel and all, transforming it into a tender, flavorful masterpiece. This recipe is designed to bring sunshine to your table with minimal fuss and maximum deliciousness, making it a go-to treat for any occasion.
Why You Will Love This Recipe
- Effortless Preparation: The entire batter comes together seamlessly in a blender, eliminating the need for extensive mixing and whisking.
- Intense Citrus Flavor: Utilizing the whole orange, including the peel, infuses the cake with a bright, authentic orange essence that is truly remarkable.
- Unbelievably Moist Texture: The unique preparation method and the rich glaze ensure every bite is luxuriously tender and exceptionally moist.
- Simple Ingredient List: You’ll find that most of the ingredients are pantry staples, making this delightful cake accessible any time a craving strikes.
- Visually Stunning Finish: A glistening citrus glaze and a dusting of powdered sugar create an elegant presentation that’s perfect for sharing.
Ingredients You Need
The beauty of this whole orange cake lies in its simplicity, relying on fresh, high-quality ingredients to shine. Using ripe, seedless oranges is paramount for achieving the best flavor and texture, ensuring a naturally sweet and vibrant citrus base. Always opt for fresh butter and eggs at room temperature for optimal blending and a tender crumb.
Easy Whole Orange Cake

This orange cake recipe uses the whole orange, rind and all! The batter comes together in the blender, and the cake comes out super moist, especially once it’s drenched in glaze. It’s practically bursting with sweet citrus flavor, just in time for spring.
- 2 large seedless oranges, preferably organic
- ¾ cup unsalted butter, softened
- 1 cup granulated sugar
- ¼ cup brown sugar
- 3 large eggs, room temperature
- 2 cups all purpose flour
- 2 teaspoons baking powder
- ¼ teaspoon salt
- ¼ cup freshly squeezed orange juice
- 2 tablespoons granulated sugar
- powdered sugar, for dusting
- 1Preheat your oven to 350ºF. Line an 8-inch cake pan with parchment paper, bottom and sides, and set aside.
- 2Cut the oranges into smaller pieces and remove any seeds. Add them to a food processor, including the peel, and blend until smooth. If the pith (the white part under the peel) is very thick or bitter, peel the oranges first, trim away some of the pith, then add the peel back in before blending.
- 3To the food processor, add the butter, sugar, brown sugar, and eggs. Process until smooth. Stir in the flour, baking powder, and salt. It is okay if you see some specks of butter.
- 4Pour the prepared cake batter into the cake pan. Bake the cake for 50 minutes.
- 5Add orange juice and sugar to a small saucepan. Simmer for 4 to 5 minutes, or until the mixture reaches a syrupy consistency.
- 6Remove the cake from the oven and, while it’s still warm, brush the prepared orange glaze evenly over the top so it soaks in.
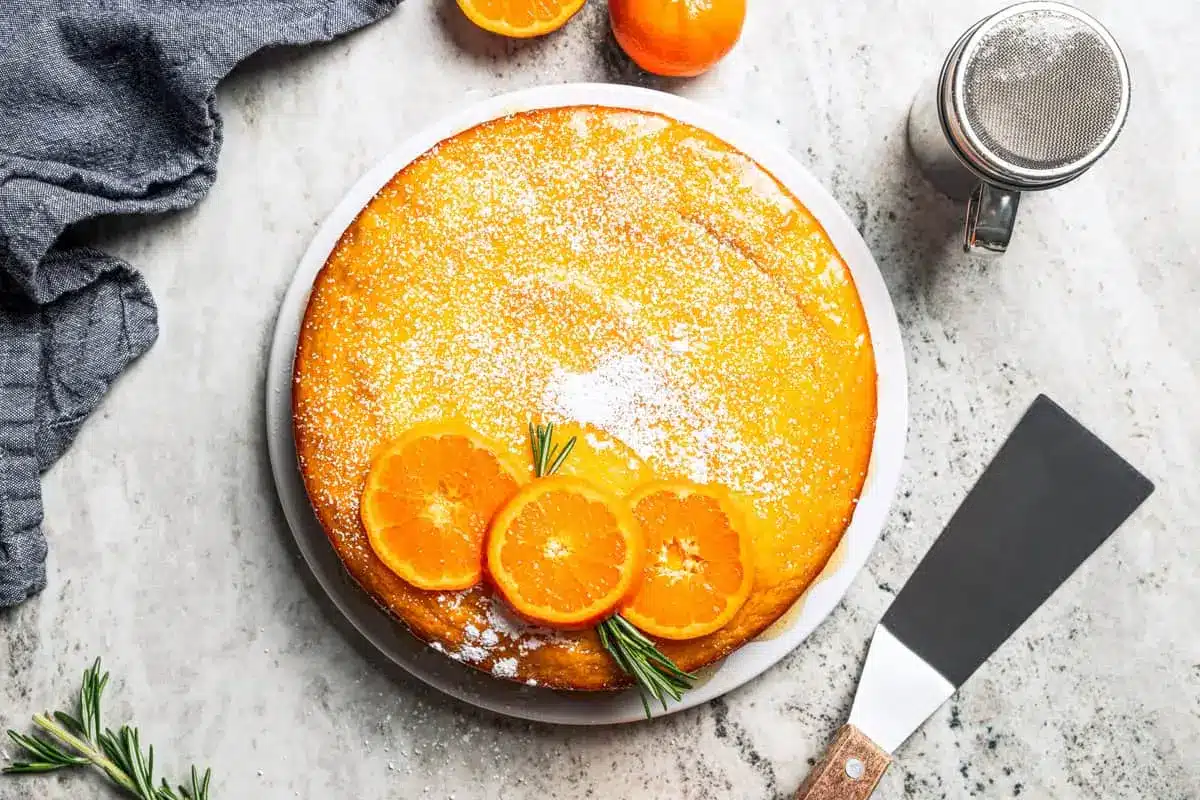
- 7Set the cake aside to cool completely, then dust it with the powdered sugar before slicing and serving.
Keywords: orange cake, whole orange cake, citrus cake, blender cake, moist cake, dessert, spring baking, German
For precise measurements and detailed ingredient specifications, please refer to the comprehensive recipe card provided.
Variations
While this whole orange cake is a triumph in its classic form, its inherent adaptability makes it a canvas for exciting variations. Consider infusing even more complex citrus notes by adding a touch of orange zest to the batter, rubbed into the sugar to release its aromatic oils before blending. This simple addition amplifies the orange’s fragrant profile, creating a deeper, more nuanced flavor experience that elevates the cake to new heights.
For those seeking a lighter, more diet-conscious option, a vegan adaptation is wonderfully achievable. Substitute the butter with a high-quality vegan butter or coconut oil, and replace the eggs with a flax egg (one tablespoon of ground flaxseed mixed with three tablespoons of water, left to sit for five minutes) or a commercial egg replacer. The result is a delightfully moist cake that retains its signature citrus punch, proving that vegan baking can be just as decadent and satisfying.
A low-carb or gluten-free twist can also transform this delightful cake. Experiment with almond flour or a gluten-free flour blend in place of all-purpose flour, adjusting liquid quantities as needed for the perfect batter consistency. For a low-carb version, a combination of erythritol and stevia or monk fruit sweeteners can replace the granulated and brown sugars, ensuring that the cake remains a guilt-free indulgence without sacrificing its wonderful texture or bright citrus taste. These mindful modifications ensure that everyone can enjoy a slice of this sunny delight.
How to Prepare whole orange cake recipe
Step 1: Prepare to Bake and Oranges
Begin by preheating your oven to the optimal baking temperature of 350°F (175°C). This crucial first step ensures that your oven is ready to evenly cook the cake from the moment it enters, promoting a consistent rise and a beautifully golden-brown crust. Proper preheating is a cornerstone of successful baking, preventing the cake from sinking or baking unevenly, which can compromise its delicate texture.
Simultaneously, prepare your chosen cake pan by lining it meticulously with parchment paper. Ensure the paper covers both the bottom and the sides of an 8-inch cake pan, creating a non-stick barrier that will facilitate easy release after baking. This careful preparation prevents any sticking and makes removing the cake a breeze, preserving its beautiful form.
Next, turn your attention to the star ingredient: the oranges. Wash them thoroughly under running water, scrubbing gently to remove any surface residue. Then, chop the oranges into manageable pieces, typically quarters or eighths, depending on their size. Carefully inspect each piece for seeds and remove them thoroughly; while some minor seeds might be overlooked, minimizing them will ensure a smoother batter and a more pleasant eating experience.
Step 2: Blend the Oranges and Pith Consideration
Place the chopped, deseeded oranges directly into a food processor or a high-powered blender. You will include the peels along with the fruit, as this is where much of the cake’s vibrant flavor and essential oils are concentrated. The goal is to break down the oranges completely, creating a smooth, pulpy base for your cake batter. Blend until you achieve a fine, uniform consistency, ensuring no large chunks of peel remain.
During this blending stage, pay close attention to the white pith that lies between the peel and the flesh of the orange. If the oranges you are using have particularly thick or noticeably bitter pith, it’s advisable to remove some of it before blending. You can do this by carefully peeling the oranges and then trimming away excess white material from the rinds before adding them back into the processor. This step is key to avoiding an overly bitter cake, though a small amount of pith can add a desirable complexity to the flavor profile.
Once the oranges are processed into a smooth pulp, you are ready to incorporate the remaining wet ingredients. The blender or food processor makes this process incredibly efficient, allowing for seamless integration. This method significantly reduces the preparation time and the number of dishes used, making the entire baking process more enjoyable and less of a chore, a true hallmark of this user-friendly recipe.
Step 3: Add Remaining Wet Ingredients and Blend
To the blended orange mixture in the food processor, now add the softened unsalted butter, granulated sugar, and brown sugar. Softened butter is crucial here; it creams more easily with the sugar and emulsifies better with the other wet ingredients, contributing to a smoother batter and a more tender crumb. Ensure your butter is truly at room temperature, yielding slightly when pressed, to avoid any lumps.
Next, incorporate the three large eggs. It is important that these eggs are also at room temperature, as this helps them to blend more seamlessly into the batter, creating a stable emulsion. Cold eggs can cause the butter to seize, resulting in a less homogenous mixture. Blend these ingredients thoroughly until the mixture is smooth and well combined, creating a rich, creamy base.
Continue blending until the batter is homogenous and light in texture. It is perfectly normal to notice small flecks of butter remaining in the batter at this stage; these will melt and incorporate fully during the baking process, contributing to the cake’s moistness. The goal is a thoroughly combined mixture that indicates all the wet ingredients have been well incorporated before moving on to the dry components, ensuring a balanced batter.
Step 4: Incorporate Dry Ingredients and Final Mix
Now, it’s time to introduce the dry ingredients into the wet mixture. Add the two cups of all-purpose flour, two teaspoons of baking powder, and a quarter teaspoon of salt to the food processor or blender. Measure your flour carefully by spooning it into the measuring cup and leveling it off with a straight edge, a technique that prevents overpacking and ensures the correct flour-to-liquid ratio for a light cake.
Gently pulse or blend the ingredients together just until the flour is incorporated. Overmixing at this stage can develop the gluten in the flour too much, leading to a tougher cake. The batter should be smooth but not overworked. A few small lumps of flour are acceptable, as they will disappear during baking. This careful approach to combining ensures the cake remains tender and light.
It’s important to note that some specks of butter may still be visible in the batter. As mentioned previously, this is perfectly fine and even desirable, as these fat pockets contribute to the cake’s inherent moistness. The baking process will fully melt and integrate these components, creating a cohesive and delightful crumb. The batter should be thick but pourable, ready to fill your prepared cake pan.
Step 5: Bake the Cake
Pour the prepared cake batter evenly into the parchment-lined 8-inch cake pan. Use a spatula to scrape all the delicious batter from the processor bowl, ensuring you don’t waste any of this flavorful mixture. Smooth the top of the batter gently to ensure even baking and a level surface for the glaze later on.
Place the filled cake pan into the preheated oven. Bake for approximately 50 minutes, or until a wooden skewer or toothpick inserted into the center of the cake comes out clean. The baking time may vary slightly depending on your oven’s calibration, so it’s always best to check for doneness a few minutes before the stated time. A golden-brown exterior is a good indicator that the cake is nearing completion.
While the cake is baking, you can prepare the luscious orange glaze. This simple syrup will add an extra layer of sweetness and citrus intensity, infusing the warm cake with its delightful flavor. The aroma filling your kitchen during this baking period is simply intoxicating, a testament to the vibrant citrus notes permeating the air and promising a truly delightful treat.
Step 6: Make and Apply the Glaze
To prepare the orange glaze, combine the quarter cup of freshly squeezed orange juice with the two tablespoons of granulated sugar in a small saucepan. Use freshly squeezed juice for the most authentic and vibrant orange flavor; bottled juices can sometimes lack the brightness and depth needed for this glaze.
Heat the mixture over medium heat, stirring constantly, until the sugar has completely dissolved. Continue to simmer the glaze for about 4 to 5 minutes, or until it reaches a slightly syrupy consistency. Be careful not to overcook it, as it can become too thick and sticky. The glaze should be fluid enough to brush easily over the cake.
As soon as the cake comes out of the oven, while it is still warm, generously brush the prepared orange glaze evenly over the entire top surface. The warmth of the cake will allow the glaze to absorb beautifully, creating a moist, sweet, and intensely orangey layer. Ensure that the glaze covers the cake edge to edge for maximum flavor distribution.
Step 7: Cool and Serve
Once the glaze has been applied, set the cake aside to cool completely in the pan on a wire rack. This cooling period is essential for several reasons. Firstly, it allows the glaze to fully set and penetrate the cake, enhancing its moistness and citrus flavor. Secondly, it is crucial for the cake’s structural integrity; slicing a warm cake can often lead to crumbling and a messy presentation.
Patience is key here; allow the cake to cool for at least an hour, or until it has reached room temperature. Once completely cooled, you can gently remove the cake from the pan using the parchment paper overhangs. If desired, you can dust the top of the cooled cake with powdered sugar for an additional touch of sweetness and a beautiful visual contrast.
Finally, slice the cake into generous portions and serve. This whole orange cake is delightful on its own, but it also pairs wonderfully with a cup of coffee or tea, making it a perfect treat for breakfast, brunch, or an afternoon pick-me-up. Enjoy the burst of sunshine in every bite!
Pro Tips for whole orange cake recipe
Select the Right Oranges: For the best results, choose oranges with thin peels, such as Valencia or Cara Cara varieties. Thin peels typically contain less of the bitter white pith, ensuring a cleaner, sweeter orange flavor in your cake. If you can’t find thin-skinned oranges, be prepared to trim away more of the pith before blending.
Manage Pith Bitterness: If your oranges have a thick, white pith, carefully use a sharp knife to remove as much of it as possible before blending. The pith can impart a significant bitter note to the cake, so this step is crucial for a balanced flavor. Don’t be afraid to trim generously to ensure a delightful sweetness.
Don’t Fear Butter Specks: As you blend the batter, you might notice small specks of butter. This is perfectly normal and even beneficial, as these bits will melt into the cake during baking, contributing to its exceptionally moist texture. Embrace these little pockets of fat as a promise of a tender crumb.
Cool Completely for Clean Slices: Resist the urge to slice the cake while it’s still warm. Allowing the cake to cool down completely is vital; it allows the glaze to set properly and ensures that the cake holds its shape when cut, preventing it from crumbling and making for a much neater and more appealing presentation.
Zest for Extra Aroma: For an intensified orange aroma and flavor, consider adding a tablespoon or two of fresh orange zest to the sugar before blending it with the wet ingredients. Rubbing the zest into the sugar helps to release its fragrant essential oils, infusing the cake with an even more potent citrus essence, creating a truly aromatic experience.
Serving Suggestions for whole orange cake recipe
Decoration
Elevate the visual appeal of your whole orange cake with simple yet elegant decorative touches. A light dusting of powdered sugar over the cooled cake provides a classic, snowy finish that beautifully contrasts with the golden hue of the cake and the sheen of the glaze. For a more vibrant presentation, consider garnishing the cake with fresh orange slices or segments, perhaps candied for an extra special touch. A few fresh mint leaves can add a pop of green and a hint of refreshing aroma, creating a visually appealing and aromatic dessert.
Side Dishes
This citrus-forward cake pairs wonderfully with a variety of accompaniments that complement its bright flavor profile. A dollop of freshly whipped cream or crème fraîche adds a rich, creamy counterpoint to the tangy sweetness of the orange. For a more decadent experience, consider serving it alongside a scoop of creamy vanilla bean ice cream or a refreshing lemon sorbet, creating a delightful contrast in flavors and temperatures. A side of fresh berries, such as raspberries or blueberries, also adds a burst of natural sweetness and a pleasant tartness.
Creative Serving Ideas
Transform this versatile cake into a show-stopping dessert with a few creative serving ideas. For a brunch centerpiece, consider serving individual slices alongside a glass of sparkling orange juice or a light citrus mimosa. You could also incorporate small pieces of the cake into a trifle, layered with custard, whipped cream, and fresh orange segments for a delightful textural and flavor experience. For a tea party, cut the cake into smaller, bite-sized squares and present them alongside an assortment of teas, offering a sophisticated treat.
Preparation & Storage
Storing Leftovers
To keep your delightful whole orange cake fresh for enjoying later, proper storage is key. Once the cake has completely cooled, store it in an airtight container or wrap it tightly with plastic wrap. This prevents the cake from drying out and protects it from absorbing any unwanted odors from other foods in your kitchen.
This cake is best stored at room temperature for up to 3 days. The natural moisture from the oranges and glaze helps to keep it tender and delicious for a few days. Avoid storing it in a humid environment, which could affect its texture over time. For longer freshness, refrigeration is an option, but it can sometimes slightly dry out the cake’s texture.
If refrigerating, ensure the cake is very well-wrapped to maintain as much moisture as possible. When you are ready to enjoy a slice from the refrigerator, allow it to come back to room temperature for about 20-30 minutes before serving to restore its optimal texture and flavor. Room temperature is truly the ideal state for this cake.
Freezing
For longer-term storage, this whole orange cake freezes beautifully, either as a whole cake or in individual slices. This makes it a convenient option for baking ahead for special occasions or when you want a delightful treat readily available.
To freeze, ensure the cake is completely cooled and free of any moisture. Wrap the cake, or individual slices, tightly in a double layer of plastic wrap, ensuring there are no air gaps. Follow this by wrapping it securely in aluminum foil or placing it in a freezer-safe airtight container to protect it from freezer burn. Properly wrapped, the cake can maintain its quality for up to 2 months.
When you’re ready to enjoy your frozen cake, the best method is to thaw it slowly at room temperature. Remove the wrapping and let it sit on a counter for a few hours, allowing it to gradually reach its optimal texture and moisture levels. Avoid microwaving the cake to thaw, as this can lead to uneven thawing and affect the texture.
Reheating
If you’ve refrigerated your cake and prefer it slightly warmer or want to refresh it after freezing, gentle reheating is the way to go. The goal is to warm it through without drying it out, ensuring it retains its characteristic moistness.
For a whole cake or larger slices, the oven is your best bet. Preheat your oven to a low temperature, around 300°F (150°C). Place the cake on a baking sheet, loosely tented with foil to prevent the top from browning too much. Warm it for about 10-15 minutes, or until just heated through. This gentle warmth will bring out its lovely aroma and soften any slightly dried-out areas.
Alternatively, for individual slices, you can use a microwave on a very low power setting or for short bursts. Place the slice on a microwave-safe plate and heat for 15-20 second intervals, checking for warmth in between. Be extremely cautious, as microwaves can quickly overcook and dry out baked goods. A toaster oven can also be a good option for reheating individual slices, offering a gentle, even heat.
Frequently Asked Questions
-
Can I really use the entire orange, including the peel? Won’t it be bitter?
Yes, you absolutely can and should use the entire orange for this recipe! The magic of this cake lies in embracing the whole fruit. The bitterness of the orange peel is significantly mellowed during the blending process and further balanced by the sugars and other ingredients in the batter. If you are particularly concerned about bitterness, or if your oranges have a very thick white pith, you can trim away some of that white part before blending. However, the recipe is designed to incorporate the peel for its essential oils and vibrant flavor, which creates a unique and delicious citrus profile that isn’t overwhelmingly bitter.
-
My cake batter seems a bit lumpy after blending; is this normal?
It is entirely normal for the batter to have some minor lumps, especially if you notice small flecks of butter remaining after blending the wet ingredients. These specks of butter are not detrimental to the cake’s texture; in fact, they contribute to its overall moistness as they melt during the baking process. As long as the flour has been mostly incorporated and the batter is relatively smooth overall, you should have no issues. Overmixing the batter after adding the flour can develop the gluten too much, leading to a tougher cake, so a few small imperfections are often preferable. The baking process will ensure a cohesive and tender crumb.
-
How can I ensure my orange glaze is perfectly syrupy and not too thin or too thick?
Achieving the perfect glaze consistency involves careful simmering. When you combine the orange juice and sugar in the saucepan, bring it to a gentle simmer over medium heat, stirring until the sugar dissolves completely. Then, allow it to simmer without stirring too much for about 4 to 5 minutes. The goal is for the liquid to reduce slightly and thicken to a syrup that coats the back of a spoon. If it seems too thin, let it simmer for another minute or two, but be cautious not to overcook it, as it can become overly sticky or hard. Conversely, if it thickens too quickly, you can stir in a teaspoon of hot water to loosen it up. The glaze should be pourable but viscous enough to adhere to the cake.