Irresistible White Chocolate Ganache Filling
Have you ever dreamt of a dessert filling that is both elegantly simple and decadently rich? The White Chocolate Ganache Filling is precisely that, a velvety smooth creation that whispers luxury with every bite. It’s the perfect way to elevate your homemade cakes, cupcakes, and pastries, transforming them into show-stopping delights. This recipe is designed for ease, proving that gourmet results don’t require complicated techniques.
The magic of white chocolate ganache lies in its delicate sweetness and incredibly smooth texture, achieved with just a few key ingredients. It’s a versatile companion to many baked goods, offering a sophisticated contrast to darker flavors or a complementary creaminess to lighter ones. Get ready to discover a new favorite filling that is as delightful to make as it is to devour.
Why You Will Love This Recipe
- Silky Smooth Texture: Achieved through the perfect ratio of white chocolate and cream, this ganache melts in your mouth.
- Effortless Preparation: Requiring minimal ingredients and straightforward steps, it’s accessible for bakers of all skill levels.
- Versatile Application: Ideal for filling cakes, frosting cupcakes, creating truffles, or even serving as a luxurious dip.
- Customizable Flavor: Easily adapt the recipe with extracts, zests, or spices to create unique flavor profiles.
- Elegant Presentation: Its glossy finish adds a touch of sophistication to any dessert, making it perfect for special occasions.
Ingredients You Need
Crafting the perfect White Chocolate Ganache Filling starts with selecting high-quality ingredients. The richness of the white chocolate is paramount, as it forms the flavor base, so opt for a good quality brand. Fresh, full-fat heavy cream is essential for achieving that signature smooth and luxurious texture, while unsalted butter adds a subtle depth and gloss. These core components work in harmony to create a filling that is truly irresistible, proving that simplicity can indeed be sublime.
White Chocolate Ganache Filling

A luscious, creamy filling made from rich white chocolate, heavy cream, and butter, perfect for cakes, cupcakes, and pastries.
- 8 ounces white chocolate, chopped
- 1 cup heavy cream
- 2 tablespoons unsalted butter
- 1 teaspoon vanilla extract
- 1 pinch salt
- 1Gather all ingredients. Ensure white chocolate is chopped into small pieces.
- 2Heat the heavy cream in a medium saucepan over medium heat for about 5-7 minutes until it simmers.
- 3Remove from heat and add the chopped white chocolate to the hot cream. Allow to sit for a minute.
- 4Stir gently until chocolate is melted and smooth, returning to low heat if needed.
- 5Incorporate the butter, vanilla extract, and pinch of salt into the mixture and stir well.
- 6Allow ganache to cool at room temperature for 10-15 minutes.
- 7Cover with plastic wrap and refrigerate for 1-2 hours until thickened.
- 8Optionally, beat with a hand mixer for a lighter texture.
- 9Use ganache as filling for cakes or cupcakes, or as a dip for fruits.
Keywords: dessert, Easy Recipe, filling, Ganache, White Chocolate
- white chocolate, chopped: high-quality white chocolate ensures the best flavor and smooth melting properties; look for bars rather than chips for better results.
- heavy cream: full-fat heavy cream is crucial for the ganache’s creamy consistency and rich mouthfeel; avoid half-and-half or lower-fat options for this recipe.
- unsalted butter: adds a touch of richness and a beautiful glossy finish, contributing to the overall luxurious texture.
- vanilla extract: enhances the sweetness of the white chocolate and adds a warm, aromatic note that rounds out the flavor profile.
- salt: a tiny pinch of salt is vital for balancing the sweetness of the white chocolate and elevating all the other flavors.
The exact quantities for these essential ingredients are detailed within the provided recipe card, ensuring you have precisely what you need for a flawless outcome.
Variations
To add an exciting twist to your White Chocolate Ganache Filling, consider infusing it with vibrant citrus notes. A tablespoon of finely grated lemon or orange zest stirred in with the butter can transform the ganache into a bright, refreshing accompaniment to fruit-based desserts or even light sponge cakes. This simple addition offers a delightful contrast to the inherent sweetness of the white chocolate.
For those seeking a more decadent experience, a swirl of caramel before the ganache sets can be absolutely divine. Gently drizzle a high-quality caramel sauce into the ganache and use a toothpick to create subtle swirls. This creates a visually appealing marbled effect and adds a rich, buttery caramel flavor that pairs wonderfully with the white chocolate.
If you’re aiming for a healthier or vegan option, this ganache can be adapted beautifully. Substitute high-quality vegan white chocolate and use full-fat coconut cream (the thick part from a chilled can) instead of dairy cream. This variation still yields a wonderfully rich and creamy texture, perfect for those with dietary restrictions, and is a testament to the adaptability of this classic dessert component.
How to Prepare white chocolate ganache filling
Step 1: Preparing Your Workspace and Ingredients
Before you begin the delightful process of creating your White Chocolate Ganache Filling, it’s essential to have all your ingredients measured and ready. This mise en place approach ensures a smooth and uninterrupted workflow, minimizing the chance of errors or rushed steps. Chop your white chocolate into small, uniform pieces; smaller pieces will melt more quickly and evenly, which is critical for achieving a lump-free ganache.
Gather your heavy cream, unsalted butter, vanilla extract, and a pinch of salt. Measure them precisely according to the recipe. Having everything within easy reach on your countertop will make the transition between steps seamless. This preparation is key to the success of the ganache, ensuring that the delicate white chocolate doesn’t scorch or seize due to uneven heating or ingredient preparation.
Ensure that your bowl and utensils are completely dry. Water is the enemy of chocolate and can cause it to seize, resulting in a grainy texture instead of the desired smooth silkiness. A clean, dry environment is paramount for working with chocolate and achieving the perfect ganache consistency.
Step 2: Gently Heating the Cream
The next crucial step involves gently heating the heavy cream. Pour the measured heavy cream into a medium-sized saucepan. Place the saucepan over medium heat on your stovetop. It is vital to watch the cream closely and stir occasionally to prevent it from scalding or forming a skin on top. The goal here is to bring the cream just to a simmer, not a rolling boil.
You’ll know the cream is ready when you see tiny bubbles forming around the edges of the saucepan and a gentle steam rising from the surface. This simmering point is crucial because it’s hot enough to melt the chocolate effectively without causing it to burn or overheat. Overheating the cream can lead to a less refined ganache texture and an undesirable cooked flavor.
Take your time with this step. It typically takes about 5 to 7 minutes for the cream to reach the desired simmer. Patience here will pay off in the final texture and taste of your White Chocolate Ganache Filling. Once it has reached the gentle simmer, immediately remove the saucepan from the heat source to prevent further cooking.
Step 3: Melting the White Chocolate
As soon as you remove the simmering cream from the heat, it’s time to introduce the star of the show: the chopped white chocolate. Pour the warm cream directly over the finely chopped white chocolate in a heatproof bowl. Ensure all the chocolate is submerged in the cream. Do not stir at this point; allow the hot cream to sit undisturbed over the chocolate for at least one minute.
This resting period is essential. The residual heat from the cream will begin to gently soften and melt the white chocolate from the outside in. This gradual melting process is far more controlled and less likely to cause the delicate white chocolate to seize or separate, which can happen if chocolate is exposed to direct heat or too-hot liquid too quickly. This patient approach is key to achieving a perfectly smooth ganache.
Observe the chocolate as it sits in the warm cream. You’ll begin to see it soften and lose its solid form. This is the initial stage of the melting process, where the fat molecules in the chocolate start to break down and emulsify with the liquid. This gentle start is the foundation for a truly luxurious ganache.
Step 4: Achieving a Silky Smooth Emulsion
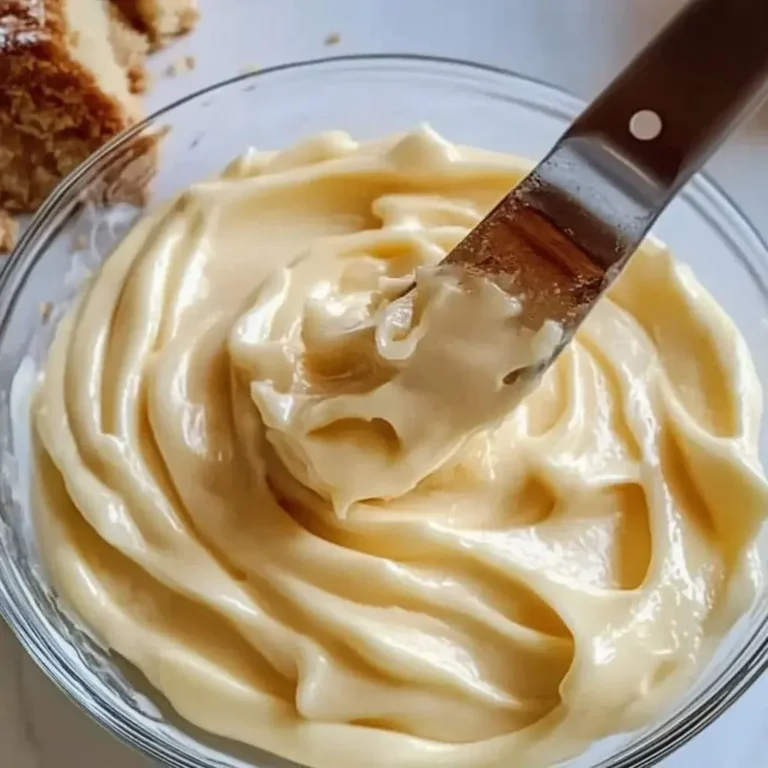
After the brief resting period, it’s time to gently encourage the melting and emulsification process. Using a heat-resistant spatula or a wooden spoon, begin to stir the mixture very slowly and deliberately. Start from the center of the bowl and gradually work your way outwards in small, circular motions. The goal is to create a beautiful, glossy emulsion where the melted chocolate and cream are fully combined.
Continue stirring until you no longer see any solid pieces of white chocolate. The ganache should transform into a smooth, uniform liquid. If, after a minute or two of gentle stirring, you notice any stubborn lumps of unmelted chocolate, do not panic. You can very carefully return the bowl to the stovetop over the lowest possible heat setting, or place the saucepan back on the lowest burner.
Stir continuously for very short intervals (10-15 seconds at a time), always keeping a close eye on it, until those last few lumps disappear and the ganache is completely smooth and homogenous. Be extremely cautious not to overheat the mixture at this stage, as white chocolate is particularly sensitive to high temperatures and can easily become grainy or separate. The result should be a pouring consistency that gleams under the light.
Step 5: Enhancing with Butter and Flavorings
Once your white chocolate ganache has reached that wonderfully smooth, silky consistency, it’s time to add the final touches that elevate its flavor and texture. Add the unsalted butter, cut into small cubes, to the warm ganache. The butter will melt quickly in the residual heat of the mixture.
Follow this by adding the pure vanilla extract and the pinch of salt. The vanilla extract not only adds its aromatic sweetness but also helps to round out the overall flavor profile, complementing the creamy white chocolate beautifully. The tiny pinch of salt might seem insignificant, but it plays a crucial role in balancing the sweetness of the white chocolate, preventing it from tasting overly cloying and enhancing its natural flavor notes.
Stir these additions gently but thoroughly into the ganache until they are completely incorporated and the mixture is uniform. The butter will lend a luxurious sheen and an extra layer of richness to the ganache, making it even more decadent. This step is about harmonizing the flavors and ensuring a perfectly smooth, glossy finish that will make your desserts irresistible.
Step 6: Initial Cooling for Optimal Consistency
After all the ingredients have been beautifully blended, it’s time to allow the ganache to begin its cooling process. Let the bowl of ganache sit undisturbed at room temperature for approximately 10 to 15 minutes. This initial cooling period is important because it allows the ganache to start thickening slightly without becoming too firm. It also helps to temper the temperature of the mixture before it goes into the refrigerator.
During this time, the fats within the chocolate and butter begin to solidify slightly as they cool, initiating the thickening process. Resist the urge to stir it constantly during this phase; let it settle and cool naturally. This gentle initial cooling is a critical step that helps set the stage for the ganache to reach the perfect spreadable or pipeable consistency later on.
This intermediate cooling phase prevents the ganache from becoming too hard too quickly in the refrigerator, which could make it difficult to work with later. It’s a patient step that ensures the ganache develops the right structure and texture, making it ideal for whatever culinary creation you have in mind. The surface might start to look a little less liquid and more viscous.
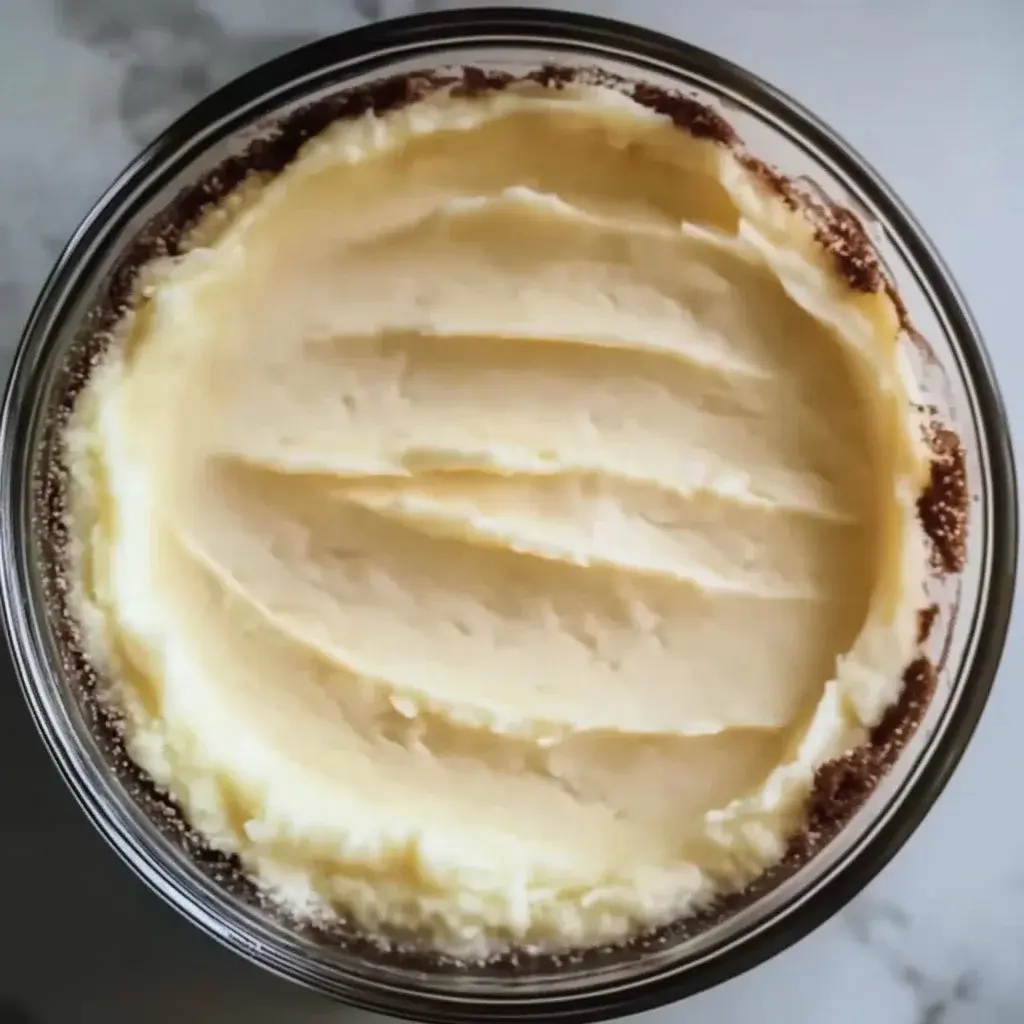
Step 7: Refrigerating for Proper Setting
Once the ganache has cooled slightly at room temperature, it’s time to move it to the refrigerator to achieve its final, desirable consistency. Transfer the ganache into a clean, airtight container. It’s crucial to cover the surface of the ganache directly with plastic wrap, pressing it down gently so that it touches the surface of the ganache. This prevents a skin from forming on top as it cools, which can be unsightly and difficult to incorporate back in.
Place the covered container in the refrigerator. The chilling time will vary depending on the ambient temperature of your refrigerator and the initial temperature of the ganache, but generally, it requires at least 1 to 2 hours. You are looking for a consistency that is firm enough to spread easily with an offset spatula, similar to thick frosting, but not so hard that it becomes difficult to maneuver.
Check the consistency periodically after the first hour. The ganache should feel set but still pliable. If it becomes too hard, you can gently warm it slightly by placing the bowl in a warm water bath for a few moments or microwaving it in very short bursts, stirring frequently, until it reaches the desired spreadable state. Proper chilling is key to making the ganache functional for filling and frosting.
Step 8: Optional Whipping for a Lighter Texture
For those who desire an even lighter, airier texture, akin to a rich mousse or buttercream, there’s an optional but highly recommended step: whipping the chilled ganache. Once the ganache has thoroughly chilled and reached a firm but still manageable consistency, remove it from the refrigerator. Place it back into a clean mixing bowl.
Using an electric hand mixer fitted with the whisk attachment (or a stand mixer), begin to beat the ganache on medium speed. Start slowly to avoid splattering, then gradually increase the speed. As you whip it, the ganache will become lighter in color and significantly increase in volume, incorporating tiny air bubbles into its structure.
Continue whipping until the ganache becomes fluffy and holds soft peaks. Be careful not to over-whip, as this can cause the ganache to become grainy or split. The texture should be smooth, airy, and light, making it perfect for piping delicate swirls or using as a fluffy frosting. This step transforms the dense ganache into a more ethereal confection, adding another layer of versatility.
Step 9: Ready to Use and Create
Congratulations! Your White Chocolate Ganache Filling has reached its perfect state and is now ready to be transformed into edible art. Whether you’ve opted for the classic smooth ganache or the lighter, whipped version, it’s now prepared for its starring role in your dessert creations. Its smooth, creamy texture makes it incredibly versatile, allowing you to fill delicate macarons, layer birthday cakes, pipe decorative rosettes onto cupcakes, or even use it as a luscious dip for fresh fruits and cookies.
If using for filling cakes, ensure the cake layers have cooled completely. Spread an even layer of the ganache between the cake layers using an offset spatula for a beautiful and delicious finish. For cupcakes, you can either spread it on top or pipe it decoratively using a pastry bag fitted with your favorite tip. The possibilities are truly endless, limited only by your imagination and culinary aspirations.
Enjoy the process of decorating and assembling your desserts with this exquisite filling. The delightful flavor and luxurious texture of the White Chocolate Ganache Filling will undoubtedly impress anyone who has the pleasure of tasting it, making your baked goods truly memorable. Consider it the secret weapon in your dessert arsenal.
Pro Tips for white chocolate ganache filling
Quality Matters: Always use the best quality white chocolate you can find. Couverture white chocolate, with a higher percentage of cocoa butter, will yield the smoothest and most flavorful ganache. Avoid using white chocolate chips, as they often contain stabilizers that can prevent them from melting smoothly and can result in a grainy texture.
Gentle Heating is Key: When heating the cream, never let it boil vigorously. A gentle simmer is all that’s needed to melt the chocolate. If the cream becomes too hot, it can scald the delicate white chocolate, leading to a less desirable texture and flavor. If you’re unsure, err on the side of caution and use lower heat.
The Role of Salt: Don’t skip the pinch of salt! It might seem like a small addition, but it is essential for balancing the sweetness of the white chocolate. Salt enhances the overall flavor profile and prevents the ganache from tasting overly sugary, making it more complex and enjoyable. It truly elevates the taste experience.
Achieving the Right Consistency: If your ganache becomes too firm after chilling, gently warm it in a double boiler or in the microwave on very low power in 10-second intervals, stirring between each burst until it reaches a spreadable consistency. Conversely, if it’s too thin, it may need a bit more chilling time or you can gently cook it down over low heat, stirring constantly, to reduce some of the liquid.
Flavor Infusions: Elevate your ganache by infusing the cream beforehand. Gently warm the cream with ingredients like a vanilla bean (split and scraped), a few cardamom pods, or a cinnamon stick. Let it steep for about 20-30 minutes, then strain before heating it to a simmer and proceeding with the recipe. This adds a subtle depth of flavor that is truly artisanal.
Serving Suggestions for white chocolate ganache filling
Decoration
The glossy sheen of perfectly set white chocolate ganache makes it an excellent candidate for decorative elements on cakes and pastries. Once chilled and at a spreadable consistency, it can be applied as a smooth, elegant frosting for cakes, offering a clean canvas for further adornment. For a more intricate look, pipe the ganache using various pastry tips to create rosettes, swirls, or borders.
When whipped to a lighter, mousse-like texture, it becomes ideal for piping fluffy dollops on cupcakes or filling delicate choux pastry. The contrast between the crisp pastry and the creamy filling is delightful. You can also use it to create beautiful drip effects on the sides of cakes by gently warming it until it has a pourable, yet still thick, consistency.
For an extra touch of elegance, consider garnishing the ganache-topped desserts with fresh berries, edible flowers, a dusting of cocoa powder, or finely grated white chocolate. A sprinkle of toasted nuts or a drizzle of fruit coulis can also add both visual appeal and complementary flavors.
Side Dishes
While primarily a filling, white chocolate ganache can also act as a decadent dip or accompaniment to a variety of desserts and even some fruits. Imagine serving a bowl of warm, slightly thinned ganache alongside fresh strawberries, raspberries, or slices of ripe melon for an indulgent fruit dipping experience. The sweet, creamy chocolate beautifully complements the natural tartness of the berries.
It also pairs wonderfully with plain or lightly sweetened cookies, such as shortbread or vanilla wafers, providing a rich contrast. For a more sophisticated presentation, consider serving small portions of the ganache alongside a slice of pound cake or a dense flourless chocolate cake. The contrast in textures and the complementary flavors create a truly memorable dessert pairing.
If you’re hosting a dessert tasting or a sophisticated tea party, small ramekins of white chocolate ganache can be offered as a luscious accompaniment to other smaller pastries or tarts. It can even be a surprising yet delightful partner to certain cheeses, particularly mild, creamy varieties like mascarpone or ricotta.
Creative Serving Ideas
Beyond its traditional roles, white chocolate ganache offers exciting avenues for creative culinary expression. Consider using it to create mini chocolate truffles; chill the ganache until firm, scoop small portions, and roll them into balls, then coat them in cocoa powder, finely chopped nuts, or shredded coconut for a delightful bite-sized treat. This is a simple yet impressive way to serve the ganache.
Another inventive idea is to layer the ganache in individual glasses or small jars to create elegant no-bake parfaits. Alternate spoonfuls of the ganache with crumbled cookies, fresh fruit, or a light biscuit for a visually stunning and delicious individual dessert. Top with a sprig of mint or a single berry for a final flourish.
For a unique twist, gently fold in a spoonful of finely chopped espresso beans or a dash of your favorite liqueur (like Frangelico or Grand Marnier) into the ganache before it fully sets. This adds a sophisticated adult kick and a complex flavor profile that can be enjoyed on its own or as a topping for other desserts. Explore the endless possibilities this versatile filling offers.
Preparation & Storage
Storing Leftovers
Proper storage is key to preserving the delightful texture and flavor of your leftover White Chocolate Ganache Filling. Once cooled, transfer any unused ganache into an airtight container. This prevents it from absorbing odors from other foods in the refrigerator and keeps it from drying out. Ensure the lid is securely fastened before placing it in the fridge.
In the refrigerator, the ganache will keep well for up to one week. As it chills, it will firm up considerably. Before using it again, it’s advisable to let it sit at room temperature for about 15-30 minutes, or gently warm it in the microwave for very short intervals, stirring between each burst, until it reaches a soft, spreadable consistency again. This ensures it is pliable and easy to work with.
Avoid storing the ganache uncovered or in a container that isn’t tightly sealed, as this can lead to a tough, dry surface or an undesirable change in texture. A good quality airtight container will maintain its lusciousness, ready for your next baking project or spontaneous dessert craving.
Freezing
For longer-term storage, freezing your White Chocolate Ganache Filling is an excellent option. Ensure the ganache is completely cooled and has reached its desired firmness before you attempt to freeze it. Transfer the ganache into a freezer-safe airtight container or a heavy-duty freezer bag. Press out as much air as possible before sealing.
Label the container or bag with the date, which is helpful for tracking its freshness. Properly stored, white chocolate ganache can remain frozen for up to three months. While the texture may slightly change upon thawing, it generally holds up very well and remains delicious for future use, making it a convenient option for last-minute dessert needs.
When you are ready to use the frozen ganache, the best method is to transfer it from the freezer to the refrigerator and allow it to thaw slowly overnight. This gradual thawing process helps to maintain the integrity of the ganache and prevents it from becoming watery. Once thawed, gently stir it, and if necessary, warm it slightly as described for refrigeration storage.
Reheating
Reheating chilled or thawed White Chocolate Ganache Filling requires a gentle touch to avoid damaging its delicate emulsion. The most effective and safest method is to use a double boiler. Place the ganache in a heatproof bowl set over a saucepan of simmering water, ensuring the bottom of the bowl does not touch the water. Stir the ganache gently and continuously until it is warm and has reached your desired consistency for spreading or piping.
Alternatively, you can use a microwave, but this method requires extreme caution. Place the ganache in a microwave-safe bowl and heat it on 50% power (or defrost setting) in very short intervals of 10-15 seconds. Stir thoroughly after each interval. It’s crucial to stir frequently to distribute the heat evenly and prevent the chocolate from overheating, which can cause it to seize or separate into an oily mess.
Watch the ganache very closely during the reheating process. You are aiming for a smooth, spreadable consistency, not a hot liquid. Overheating is the primary cause of ganache failure during reheating. Once it reaches the right texture, remove it from the heat and stir it well before using. If it becomes slightly too thin, allow it to cool for a few minutes, and it will thicken as it reaches room temperature.
Frequently Asked Questions
-
How long can I store the White Chocolate Ganache Filling?
You can store your White Chocolate Ganache Filling in an airtight container in the refrigerator for up to one week. For longer preservation, it can be successfully frozen for up to three months. Ensure it is well-sealed to maintain its quality and prevent freezer burn. This makes it a fantastic ingredient to have on hand for spontaneous baking projects or planned desserts.
-
Can I make this ganache filling ahead of time?
Absolutely! This White Chocolate Ganache Filling is an excellent candidate for making ahead. Prepare it a day or two in advance and store it in an airtight container in the refrigerator. It will firm up nicely, and you can easily bring it back to a spreadable consistency by allowing it to sit at room temperature for a short while or by gently warming it. This convenience makes it perfect for busy bakers who want to get a head start on their dessert preparations.
-
What if my ganache is too thick?
If your ganache becomes too thick after chilling, don’t worry, it’s usually an easy fix. Gently warm it in the microwave on a low power setting for very short intervals (10-15 seconds at a time), stirring thoroughly after each interval. Alternatively, you can use a double boiler to gently melt it. Continue warming and stirring until it reaches your desired spreadable consistency. Be cautious not to overheat it, as this can cause separation.
-
Is there a way to make this recipe gluten-free?
Yes, the White Chocolate Ganache Filling is naturally gluten-free. The core ingredients—white chocolate, heavy cream, butter, vanilla extract, and salt—do not contain any gluten. Therefore, you can confidently use this recipe as is to create a delicious gluten-free filling for your cakes, cupcakes, and other desserts. Always double-check the labels of your white chocolate and other ingredients to ensure they are certified gluten-free if you have celiac disease or a severe sensitivity.
-
Can I use non-dairy substitutes?
Certainly! To make a dairy-free or vegan version of this White Chocolate Ganache Filling, you can substitute the heavy cream with full-fat coconut cream (the thick solid part from a chilled can of full-fat coconut milk) and use a high-quality vegan white chocolate. Ensure the vegan white chocolate you choose melts well and has a good flavor profile, as it is the primary flavor component. This adaptation allows those with dietary restrictions to enjoy a similarly rich and creamy filling.