Sheet Pan Chicken Dinner – Easy Meal Prep Idea!
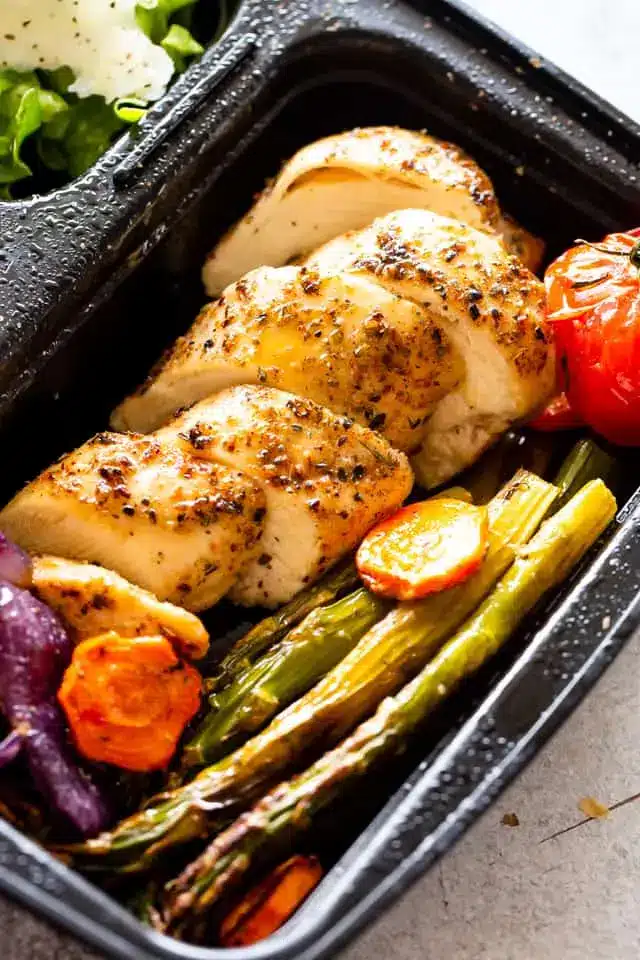
Sheet pan chicken is the ultimate weeknight warrior, offering a delicious and remarkably easy way to get a wholesome meal on the table with minimal fuss. Imagine juicy, seasoned chicken breasts nestled alongside tender, roasted vegetables and potatoes, all cooked to perfection on a single baking sheet. This method not only streamlines cooking but also makes cleanup a breeze, freeing up your valuable time for what truly matters.
This particular recipe elevates the humble sheet pan dinner with a symphony of flavors and textures, making it a go-to choice for busy families and individuals alike. It’s a testament to how simple ingredients, thoughtfully prepared, can yield extraordinary results, proving that a gourmet meal doesn’t need to be complicated or time-consuming.
Why You Will Love This Recipe
- Effortless Preparation: With just about 10 minutes of hands-on time, you can prep the ingredients and let the oven handle the rest, making it ideal for busy evenings.
- One-Pan Wonder: Everything cooks together on a single sheet pan, drastically reducing the number of dishes you need to wash and simplifying the entire cooking process.
- Versatile Vegetable Options: Feel free to customize the vegetables based on what you have on hand or your personal preferences, ensuring a fresh and exciting meal every time.
- Excellent for Meal Prep: This recipe is perfect for preparing meals in advance, as the chicken and vegetables store well and can be enjoyed throughout the week for lunches or quick dinners.
- Deeply Satisfying Flavors: The combination of savory chicken, perfectly roasted vegetables, and aromatic herbs creates a comforting and incredibly delicious meal that will please everyone at the table.
Ingredients You Need
The foundation of any great dish lies in the quality of its ingredients, and this sheet pan chicken recipe is no exception. Opting for fresh, vibrant produce and good quality chicken will elevate the final taste and texture of your meal. Even simple seasonings can work wonders when allowed to caramelize and meld together during the roasting process.
Sheet Pan Chicken with Vegetables

This flavorful sheet pan chicken recipe is ready in under an hour, with juicy seasoned chicken breasts, tender potatoes, and vegetables all baked together. It’s perfect for an easy weeknight chicken dinner, and I love it as a meal prep idea!
- 4 boneless, skinless chicken breasts (about 1 to 1½ pounds total)
- 3 cups diced potatoes
- 1 pound asparagus, ends trimmed
- 2 large carrots, diced or thinly sliced
- 1 large red onion, quartered
- 2 cups cherry tomatoes (optional)
- 2 tablespoons olive oil, divided
- 2 cloves garlic, minced, divided
- 1 teaspoon garlic powder
- 1½ teaspoons dried rosemary, divided
- 1½ teaspoons dried thyme, divided
- salt and freshly ground black pepper, to taste
- 1 tablespoon butter, cut into 4 pats
- 1Preheat oven to 425°F. Line a large sheet pan with parchment paper or foil; set aside.
- 2Cut the potatoes, Brussels sprouts, asparagus, carrots, and red onion. Place each in a separate corner of the prepared sheet pan. DO NOT add the cherry tomatoes yet.
- 3Drizzle olive oil over the veggies. Season with garlic powder, ½ teaspoon dried rosemary, ½ teaspoon dried thyme, salt, and pepper.
- 4Place 2 chicken breasts over a large piece of parchment paper. Rub both sides of the chicken with a bit of olive oil, and season with salt, pepper, ½ teaspoon rosemary, ½ teaspoon thyme, and half of the minced garlic.
- 5Place a pat of butter on top of each chicken breast and tightly seal the parchment paper around the chicken breasts. Repeat the same process with the remaining 2 chicken breasts.
- 6Bake for 30 minutes, or until the chicken is cooked through. Chicken is done when its internal temperature reaches 165°F.
- 7Optionally, 10 minutes before it’s done cooking, add cherry tomatoes to the sheet pan.
- 8Remove from oven and let stand 5 minutes. Unwrap the chicken and serve.
Keywords: sheet pan chicken, easy chicken recipe, weeknight dinner, meal prep, healthy dinner, roasted vegetables
The exact quantities for all these delightful components can be found in the detailed recipe card below, ensuring you have everything you need for a perfect culinary creation.
Variations
One of the most appealing aspects of sheet pan chicken is its inherent adaptability. Whether you’re looking to cater to specific dietary needs or simply want to explore new flavor profiles, this recipe serves as an excellent canvas for culinary creativity.
For a vegan twist, you can substitute the chicken with firm tofu or hearty portobello mushrooms. Ensure you press the tofu well to remove excess moisture, then cube and season it similarly to the chicken. Marinate the tofu for at least 30 minutes to allow the flavors to penetrate. For a more robust umami flavor, consider adding a splash of soy sauce or tamari to the marinade. The vegetables can remain largely the same, but you might want to add some plant-based sausage for extra heartiness. This vegan sheet pan wonder offers a delightful plant-powered alternative.
If you’re following a low-carb lifestyle, you can easily adapt this recipe by swapping out the potatoes for low-carb vegetables. Think cauliflower florets, broccoli florets, Brussels sprouts, or even bell peppers. Ensure these vegetables are cut into similar-sized pieces for even cooking. You might also consider adding zucchini or asparagus in the last 15 minutes of baking, as they cook more quickly. For an extra boost of healthy fats, you can add avocado slices after the chicken and vegetables have finished cooking, providing a creamy contrast to the roasted elements. This modified approach ensures you can enjoy a delicious, satisfying meal without the carbohydrates.
Exploring Mediterranean-inspired flavors is another fantastic variation. Instead of the standard herbs, try using oregano, thyme, and a hint of lemon zest. Add Kalamata olives and sun-dried tomatoes to the vegetable mix during the last 15 minutes of baking. You could also incorporate chunks of feta cheese just before serving for a briny, creamy element. This variation transforms the sheet pan chicken into a vibrant dish reminiscent of a Grecian feast, offering a burst of fresh, tangy, and savory notes.
How to Prepare sheet pan chicken
Step 1: Prepare to Bake and Cut the Veggies
Begin by preheating your oven to a robust 425°F (220°C). This high temperature is crucial for achieving beautifully roasted vegetables and perfectly cooked chicken in a timely manner. Simultaneously, line a large, sturdy baking sheet with parchment paper or aluminum foil. This step is key to preventing sticking and making cleanup significantly easier, ensuring you can enjoy your meal without the dread of scrubbing burnt-on food.
Now, it’s time to prepare your chosen vegetables. The goal is to cut them into uniform, bite-sized pieces, ideally around 1-inch cubes or similar sizes. This ensures they all cook evenly and achieve that desirable tender-crisp texture. For this specific recipe, we’ll be working with potatoes, Brussels sprouts, asparagus, carrots, and red onion. Make sure to dice the potatoes and carrots, halve the Brussels sprouts, trim the woody ends off the asparagus, and quarter the red onion. The aim is to have these vegetables ready to go, so when it’s time for seasoning, it’s a quick and efficient process.
It’s important to note that certain vegetables, like cherry tomatoes, require a different cooking timeline. These delicate gems can become mushy if added too early. Therefore, set the cherry tomatoes aside for now; they will be introduced later in the cooking process to retain their fresh burst and vibrant color. This mindful preparation of each component is what sets the stage for a perfectly balanced and delicious sheet pan dinner, demonstrating that attention to detail, even in simple steps, makes a significant difference in the final outcome.
Step 2: Season the Veggies and Prepare the Chicken
With your vegetables prepped and beautifully arranged on the prepared baking sheet, it’s time to infuse them with flavor. Drizzle the cut vegetables evenly with about 1 tablespoon of olive oil. This oil will help them roast and caramelize beautifully in the oven, bringing out their natural sweetness and enhancing their texture. Now, generously season these vegetables with the garlic powder, half a teaspoon each of dried rosemary and dried thyme, and a good pinch of salt and freshly ground black pepper.
Ensure the seasonings are well distributed among the vegetables. You can gently toss them directly on the baking sheet with your hands or a spatula to coat them evenly. This ensures that every piece of vegetable gets a chance to absorb the delicious flavors during the roasting process, contributing to a more cohesive and satisfying dish. The aroma starting to build at this stage is a promising sign of the delicious meal to come.
Next, turn your attention to the star of the show: the chicken. Take two boneless, skinless chicken breasts and place them on a separate large piece of parchment paper. Rub both sides of the chicken with the remaining 1 tablespoon of olive oil. This oil acts as a carrier for the seasonings and helps to create a lovely sear on the chicken as it bakes. Season the chicken generously with salt, pepper, the remaining half teaspoon each of rosemary and thyme, and half of the minced garlic. Ensure the seasonings coat the chicken evenly for maximum flavor impact.
Step 3: Wrap the Chicken and Begin Baking
Now, for a crucial step that ensures incredibly juicy and flavorful chicken: the parchment paper packets. Take one tablespoon of butter and cut it into four equal pats. Place one pat of butter on top of each chicken breast that you’ve seasoned. The butter will melt and baste the chicken as it cooks, locking in moisture and adding a rich, decadent layer of flavor. Imagine the butter slowly melting, infusing the chicken with its creamy goodness.
Once the butter is in place, carefully bring the edges of the parchment paper up and around the chicken breasts. Seal the parchment paper tightly by twisting the top or folding it over securely. This creates a sealed packet, essentially steaming the chicken in its own juices along with the melting butter and seasonings. This technique is similar to the classic French “en papillote” method, which is renowned for its ability to produce exceptionally moist and tender results. You are creating a personal steam oven for each chicken breast.
Repeat this wrapping process with the remaining two chicken breasts. Ensure each packet is well-sealed to prevent any steam from escaping prematurely. Now, place these carefully wrapped chicken packets in the center of the large baking sheet, nestled amongst the seasoned vegetables that are arranged around the perimeter. The vegetables will roast around the chicken, absorbing the delicious drippings that may escape, creating a beautiful symphony of flavors and textures on a single pan. This thoughtful arrangement maximizes the cooking space and ensures even heat distribution.
Step 4: Bake and Add Cherry Tomatoes
With everything prepped and arranged on the baking sheet, it’s time to introduce them to the heat of the oven. Place the baking sheet into the preheated oven, which should be set at 425°F (220°C). The high heat is essential for roasting the vegetables to a perfect tenderness and ensuring the chicken cooks through efficiently without drying out. This initial baking period is typically around 30 minutes.
During this time, the magic happens: the vegetables will soften and develop beautiful caramelized edges, while the chicken will cook to a juicy perfection, basted by the melting butter and infused with the aromatic herbs and garlic. Keep an eye on the chicken; it is done when it is opaque throughout and reaches an internal temperature of 165°F (74°C) when checked with an instant-read thermometer. Using a thermometer is the most reliable way to ensure your chicken is cooked safely and is not overcooked, which can lead to dryness.
Now, if you are using cherry tomatoes, this is the opportune moment to add them. Approximately 10 minutes before the end of the total baking time, carefully remove the sheet pan from the oven. Scatter the optional cherry tomatoes around the existing vegetables on the pan. The residual heat and the remaining baking time will be just enough to soften the tomatoes slightly and bring out their sweetness, without turning them into a sauce. Return the sheet pan to the oven to finish cooking.
Step 5: Rest and Serve
Once the chicken has reached its perfect internal temperature of 165°F (74°C) and the vegetables are tender and slightly caramelized, carefully remove the sheet pan from the oven. It’s crucial to allow the chicken to rest for about 5 to 10 minutes before unwrapping and serving. This resting period is vital for allowing the juices within the chicken to redistribute evenly throughout the breast. If you cut into the chicken immediately, all those delicious juices will run out, leaving you with a drier piece of meat.
When you are ready to serve, carefully unwrap the parchment paper packets. Be mindful of the hot steam that will escape, as the sealed packets trap a significant amount of moisture. The chicken should be incredibly moist and tender, and the aroma will be absolutely intoxicating. The roasted vegetables, now perfectly cooked and infused with the chicken’s flavors, will be a delightful accompaniment.
Serve the juicy, butter-basted chicken alongside the colorful medley of roasted vegetables directly from the pan. This simple presentation emphasizes the rustic, wholesome nature of the dish. You can garnish with a sprinkle of fresh parsley or chives if desired, adding a pop of freshness and color. This sheet pan chicken dinner is a complete meal in itself, offering a balanced and satisfying dining experience with minimal effort and maximum flavor.
Pro Tips for sheet pan chicken
Achieve Perfectly Even Cooking: When cutting your vegetables, strive for uniform sizes, approximately 1-inch pieces. This ensures that all the vegetables cook at the same rate, preventing some from becoming mushy while others remain undercooked. For faster-cooking vegetables like asparagus or bell peppers, you might cut them slightly larger to compensate. Consistency is key for a harmonious texture.
Don’t Skimp on the Seasoning: Generous seasoning is paramount for developing deep flavors. Ensure the chicken and vegetables are well-coated with herbs, spices, salt, and pepper before they hit the oven. Consider using a homemade chicken seasoning blend for an extra layer of flavor complexity. Remember that the oven’s heat concentrates flavors, so don’t be shy with your spice rack.
Master the Parchment Packet: The parchment paper packets for the chicken are a game-changer for moisture retention. Make sure to seal them tightly to trap all the delicious steam and juices. This method effectively steams the chicken, ensuring it remains incredibly tender and succulent throughout the cooking process, preventing that dreaded dry chicken breast.
Vegetable Selection Matters: While this recipe provides a great base, feel free to experiment with different vegetables. Just be mindful of their cooking times. Root vegetables like potatoes and carrots take longer, while delicate vegetables like asparagus or cherry tomatoes cook quickly and should be added later. Grouping vegetables with similar cooking times on the pan will yield the best results.
Embrace the Rest: Allowing the chicken to rest after cooking is a non-negotiable step for juicy meat. Just like a perfectly grilled steak, the resting period allows the juices to redistribute throughout the chicken breast, ensuring every bite is moist and flavorful. Patience during this stage will be richly rewarded.
Serving Suggestions for sheet pan chicken
Decoration
Elevate the visual appeal of your sheet pan chicken by adding a touch of freshness and color just before serving. A sprinkle of freshly chopped parsley, chives, or even a few sprigs of fresh rosemary can make a significant difference. For an extra burst of vibrancy and a touch of acidity, consider a squeeze of fresh lemon juice over the entire dish. A small scattering of toasted sesame seeds can also add a pleasing visual texture and a subtle nutty flavor.
Side Dishes
While the sheet pan chicken is a complete meal in itself with its accompanying vegetables, you can certainly enhance it further with thoughtful side dishes. For a heartier meal, serve it alongside fluffy rice, such as jasmine or basmati, to soak up any delicious pan juices. Another excellent option is a side of creamy mashed potatoes or a light and refreshing salad. Garlic butter noodles or a simple quinoa pilaf also pair wonderfully, adding another layer of flavor and texture to your dinner.
Creative Serving Ideas
Move beyond simply plating the chicken and vegetables. For a deconstructed approach, shred the chicken and serve it in warm tortillas or flatbreads with your favorite taco or fajita toppings. You can also incorporate the shredded chicken and vegetables into a flavorful pasta dish or a hearty grain bowl. Another idea is to serve the chicken and vegetables over a bed of seasoned couscous or polenta for a more elegant presentation. The possibilities are truly endless, making this versatile dish a favorite for both weeknight dinners and more adventurous culinary explorations.
Preparation & Storage
Storing Leftovers
Once your delicious sheet pan chicken and vegetables have cooled, it’s time to think about storing any potential leftovers. The best way to keep them fresh and flavorful is to transfer them to an airtight container. Ensure the container is well-sealed to prevent air from entering, which can lead to spoilage and affect the texture. Store these containers in the refrigerator, where they will remain good for up to 5 days.
This method of storage is ideal for meal prepping lunches for the week or for ensuring you have a quick and easy dinner option readily available. The vegetables will retain their texture reasonably well, and the chicken will stay moist and flavorful. Proper storage is key to maximizing the enjoyment of your culinary creations and minimizing food waste, making this a smart and practical approach to home cooking.
Freezing
If you find yourself with an abundance of sheet pan chicken and vegetables, or if you’ve made a large batch for future consumption, freezing is an excellent option. Transfer the cooled chicken and vegetables into freezer-safe containers or heavy-duty freezer bags. Make sure to remove as much air as possible from the packaging to prevent freezer burn, which can degrade the quality of the food.
Label the containers with the date of freezing for easy reference. Properly frozen leftovers can maintain their quality for up to 2 months. This makes it incredibly convenient to have a homemade meal ready to go on a busy day, simply by thawing and reheating. Freezing is a fantastic way to extend the lifespan of your delicious sheet pan creations and have them available when you need them most.
Reheating
Reheating your leftover sheet pan chicken and vegetables is a straightforward process that aims to bring them back to their delicious, freshly cooked state. One of the simplest methods is using the microwave. Place the leftovers in a microwave-safe dish, cover loosely to allow steam to escape, and heat on medium power in 1-2 minute intervals until everything is thoroughly heated through. Stirring halfway through can ensure more even heating.
For a slightly better texture, consider reheating on the stovetop. Place the leftovers in a lidded skillet with a tablespoon or two of water or broth. Heat over medium-low heat, stirring occasionally, until everything is hot. This method helps to reintroduce moisture and prevent the food from drying out. Alternatively, you can reheat the leftovers in the oven at around 350°F (175°C) until warmed through. This can sometimes provide a texture closer to the original, especially if you place them on a baking sheet.
Frequently Asked Questions
-
What are the best vegetables to use for sheet pan chicken?
The best vegetables for sheet pan chicken are those that have similar cooking times to the chicken, or those that can withstand high heat for a moderate duration. Excellent choices include potatoes (diced), sweet potatoes (diced), Brussels sprouts (halved or quartered), carrots (diced or sliced), red onions (quartered), broccoli florets, cauliflower florets, bell peppers (chopped), and asparagus (trimmed). Root vegetables like potatoes and carrots might require a slightly smaller cut or a head start in the oven if you prefer them very tender. Quick-cooking vegetables like cherry tomatoes, spinach, or pre-cooked corn should be added in the last 10-15 minutes of cooking to prevent them from becoming overcooked or mushy.
-
Can I use chicken thighs instead of chicken breasts?
Absolutely! Chicken thighs are a fantastic alternative to chicken breasts for sheet pan dinners, and many people prefer them for their superior moisture and flavor. If you opt for boneless, skinless chicken thighs, they generally cook in a similar amount of time to chicken breasts, around 25-35 minutes at 425°F (220°C). If you are using bone-in, skin-on chicken thighs, they will likely take longer to cook, potentially 40-50 minutes, so you may need to adjust your cooking time accordingly. Always check the internal temperature of the chicken to ensure it reaches 165°F (74°C) for safety, regardless of the cut used. The slightly higher fat content in thighs makes them more forgiving and less prone to drying out.
-
How can I prevent my chicken from drying out on the sheet pan?
Preventing dry chicken on a sheet pan involves a few key strategies. Firstly, using chicken thighs instead of breasts is inherently more forgiving due to their higher fat content. Secondly, ensure you are not overcooking the chicken; using an instant-read thermometer to check for an internal temperature of 165°F (74°C) is the most reliable method. Thirdly, consider the parchment paper packet method described in the recipe, which steams the chicken in its own juices and butter, creating an exceptionally moist result. Marinating the chicken for at least 30 minutes before cooking can also add moisture and flavor. Finally, allowing the chicken to rest for 5-10 minutes after removing it from the oven is crucial for redistributing its juices, ensuring it remains tender and succulent when served.