Pizza Dough recipe – The Ultimate Comfort Food Delight
Embarking on the journey of creating your own pizza dough is a culinary adventure that promises incredibly rewarding results. Imagine the aroma filling your kitchen as you transform simple ingredients into a perfect, pliable base, ready to be adorned with your favorite toppings. This recipe is meticulously designed to guide you through each step, ensuring a delightful experience and a truly authentic pizza crust that rivals any pizzeria.
Whether you are a seasoned baker or a curious beginner, this guide will demystify the process of crafting exquisite pizza dough. We’ll explore the nuances of each ingredient, the importance of proper kneading, and the magic that happens during the rising process. Get ready to impress yourself and your loved ones with homemade pizzas that are not just a meal, but a memorable experience.
Why You Will Love This Recipe
- Quick Preparation: Achieve a perfectly risen dough in approximately 30 minutes, making it ideal for spontaneous pizza cravings or busy weeknights.
- Pizzeria-Quality Crust: This recipe consistently delivers a delightful crust with delightfully puffy edges and a satisfying, slightly chewy interior, reminiscent of authentic Italian pizzas.
- Versatile Topping Canvas: The neutral yet delicious flavor profile of this dough makes it an exceptional foundation for any imaginable topping combination, from the simplest to the most elaborate gourmet creations.
- Beginner-Friendly: Whether you prefer the tactile experience of hand-kneading or the efficiency of a stand mixer or food processor, this recipe accommodates various methods and skill levels with ease.
- Generous Yield: This recipe is designed to produce enough dough for three generous 12-inch pizzas, making it perfect for feeding a crowd, meal prepping, or enjoying leftovers.
Ingredients You Need
The foundation of any great pizza lies in the quality of its ingredients, and this dough recipe is no exception. By selecting fresh, high-quality components, you ensure a superior texture and flavor for your homemade pizzas. Using good bread flour is paramount for developing the necessary gluten structure, which results in that desirable chewy crust. Fresh yeast guarantees a vigorous rise, while good olive oil imparts a subtle richness and aids in dough pliability.
Pizza Dough

This Pizza Dough recipe is the key to transforming any gathering into a pizza party! With just a handful of ingredients, you can create a light and airy crust with that irresistible pizzeria-style chew. Perfect for any occasion, this dough allows for endless topping combinations and is incredibly easy to prepare in under 30 minutes. Whether you’re craving classic pepperoni or gourmet veggie toppings, this versatile base will satisfy all your pizza desires.
- 600g (4 cups) bread flour or pizza flour
- 2 tsp rapid rise or instant yeast
- 2.5 tsp salt
- 4 tsp white sugar
- 4 tbsp extra virgin olive oil
- 330 ml (1 1/3 cups) warm water
- 1In a mixing bowl, combine flour, yeast, salt, and sugar.
- 2Make a well in the center and pour in warm water and olive oil.
- 3Mix until a shaggy dough forms; then knead for about 5 minutes until smooth.
- 4Place the dough in an oiled bowl, cover it, and let it rise in a warm place for about 30 minutes until doubled in size.
Keywords: pizza dough, homemade pizza, easy pizza recipe, bread flour, instant yeast, quick pizza crust
- bread flour or pizza flour: approximately 600g (4 cups), providing the ideal gluten structure for a chewy crust.
- rapid rise or instant yeast: 2 teaspoons (6g), ensuring a quick and efficient rise for your dough.
- salt: 2.5 teaspoons (15g), crucial for flavor and controlling yeast activity.
- white sugar: 4 teaspoons (20g), to feed the yeast and add a touch of sweetness.
- extra virgin olive oil: 4 tablespoons, contributing to tenderness and flavor.
- warm tap water: 330 ml (1 1/3 cups), the perfect temperature to activate the yeast.
- extra flour: 1 tablespoon, for dusting surfaces and preventing sticking during shaping.
- extra olive oil: 2 teaspoons, for greasing the bowl to aid rising and prevent drying.
The specific quantities for assembling and topping your pizzas, such as mozzarella cheese and pizza sauce, can be found within the detailed recipe card for a complete guide.
Variations
This foundational pizza dough recipe is remarkably adaptable, allowing you to tailor it to specific dietary needs or flavor preferences. Consider these exciting variations to broaden your homemade pizza horizons.
For a vibrant vegan pizza experience, simply omit any dairy-based cheese and opt for your favorite plant-based alternatives. Many excellent vegan mozzarella shreds are now available, melting beautifully and offering a satisfying cheesy texture. Load your vegan pizza with an abundance of fresh vegetables, roasted garlic, or even some flavorful vegan pepperoni for a truly delicious meat-free creation.
If you’re following a low-carb lifestyle, you can still enjoy pizza night with a few smart substitutions. While this dough recipe is traditional, you can explore cauliflower crusts or almond flour-based doughs for a significantly lower carbohydrate count. Alternatively, use this dough sparingly and focus on low-carb toppings like grilled chicken, spinach, mushrooms, and a generous amount of cheese.
Adding a touch of herbaceous delight can elevate your pizza dough. Before the first rise, consider incorporating finely chopped fresh herbs like rosemary, thyme, or basil directly into the dough. This infusion of flavor will create a wonderfully aromatic crust that complements a variety of toppings, making your pizza an even more sensory experience.
How to Prepare pizza dough recipe
Step 1: Combine Ingredients
The journey to perfect pizza dough begins with the careful combination of your dry ingredients. This initial step is crucial for ensuring that the yeast is evenly distributed and that all components are ready to meld together harmoniously. A well-mixed dry base sets the stage for a consistent and well-risen dough.
In a large mixing bowl, meticulously whisk together the bread flour, rapid rise or instant yeast, salt, and white sugar. This ensures that no clumps of yeast remain and that the salt, which can inhibit yeast if concentrated, is evenly dispersed. The sugar acts as a readily available food source for the yeast, kick-starting its activity.
Once your dry ingredients are thoroughly combined, create a well in the center of the mixture. This central depression will serve as the perfect reservoir for your liquid ingredients, allowing them to gradually incorporate into the dry components without splashing or creating dry pockets.
Step 2: Add Wet Ingredients
Now it’s time to introduce the liquid elements that will bind your dry ingredients into a cohesive dough. The temperature of the water is critically important here; it needs to be warm enough to activate the yeast but not so hot that it kills it. Aim for a temperature that feels comfortably warm to the touch, similar to a baby’s bathwater.
Gradually pour the warm tap water into the well you created in the dry ingredients. Simultaneously, drizzle in the extra virgin olive oil. The olive oil contributes to the dough’s tenderness and helps prevent it from sticking excessively to your hands or the bowl during the kneading process.
Begin to mix everything together using a fork or a spatula. Continue stirring until the ingredients just start to come together to form a shaggy, somewhat sticky dough. At this stage, it will not look smooth or uniform, and that is perfectly normal; the real magic happens during kneading.
Step 3: Knead the Dough
Kneading is perhaps the most vital step in developing the gluten structure that gives pizza dough its characteristic chewiness and elasticity. This process strengthens the gluten network, trapping the gases produced by the yeast and allowing the dough to rise and hold its shape.
If you are kneading by hand, transfer the shaggy dough onto a lightly floured surface. Begin to push the dough away from you with the heels of your hands, then fold it back over on itself. Rotate the dough a quarter turn and repeat this push-fold-turn motion consistently for about 5 to 7 minutes.
Alternatively, you can use a stand mixer fitted with a dough hook. Add the dough to the mixer bowl and knead on low speed for about 40 seconds to 1 minute, or until it becomes smooth and elastic. The dough should start to pull away from the sides of the bowl, indicating that the gluten has developed sufficiently. A properly kneaded dough will feel smooth, soft, and slightly tacky, but it should not stick to your fingers.
Step 4: Let it Rise
The rising process, also known as proofing, is where the yeast works its magic, producing carbon dioxide gas that causes the dough to expand. This stage is crucial for achieving a light, airy crust with a pleasant texture.
Gently form the kneaded dough into a smooth ball. Lightly oil a clean mixing bowl with a little extra virgin olive oil, then place the dough ball into the bowl, turning it once to ensure it’s coated in oil. This coating helps prevent the dough from drying out as it rises.
Cover the bowl tightly with plastic wrap or a clean, damp kitchen towel. Place the covered bowl in a warm, draft-free environment. A slightly warm oven (turned off, with the light on) or a sunny spot on your counter can be ideal. Allow the dough to rise for about 30 minutes, or until it has visibly doubled in size. This initial rise is often called the bulk fermentation.
Step 5: Shape and Prepare for Baking
Once your dough has risen beautifully, it’s time to shape it into your desired pizza form. This step requires a gentle touch to preserve the air bubbles created during the rise, which contribute to a lighter crust.
Gently punch down the risen dough to release some of the accumulated gases. This process also helps to redistribute the yeast and sugars, preparing the dough for its final transformation. Be careful not to overwork or deflate the dough completely; a gentle deflation is all that is needed.
Divide the dough into three equal portions for making three 12-inch pizzas. On a lightly floured surface, take one portion and gently begin to shape it. You can use your fingertips to press the dough outwards from the center, leaving a slightly thicker rim for the crust, or use a rolling pin if you prefer a thinner, more uniform base. The key is to be gentle and patient.
Step 6: Add Toppings and Bake
With your dough perfectly shaped, it’s time for the most creative part: adding your favorite toppings! This is where your pizza truly comes to life, reflecting your personal taste preferences.
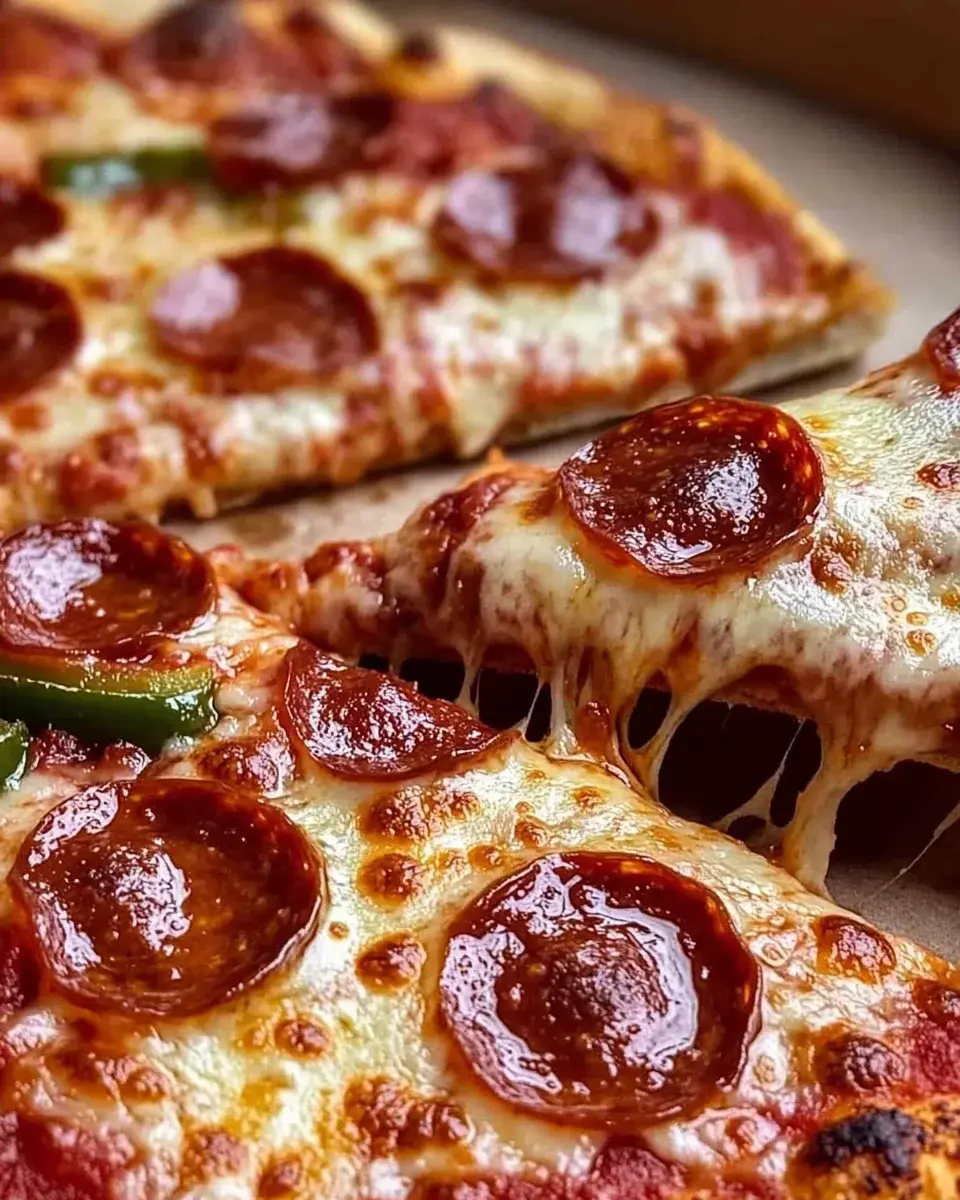
Spread a thin, even layer of your chosen pizza sauce over the dough, leaving a small border for the crust. Then, generously sprinkle your grated mozzarella cheese, ensuring even coverage for that irresistible cheesy pull. Finally, artfully arrange your selected toppings – be it classic pepperoni, vibrant vegetables, or savory meats – over the cheese.
Preheat your oven to its highest temperature, ideally between 475°F and 500°F (245°C – 260°C), with a pizza stone or baking sheet inside. Carefully transfer your topped pizza onto the preheated stone or sheet. Bake for 10-15 minutes, or until the crust is golden brown and the cheese is bubbly and slightly caramelized. The exact baking time will depend on your oven and the thickness of your toppings.
Pro Tips for pizza dough recipe
Mastering homemade pizza dough involves a few key techniques that elevate your creation from good to exceptional. Paying attention to these finer details can make all the difference in achieving that perfect crust.
The Flour Matters: For that authentic, slightly chewy pizza crust, it’s highly recommended to use bread flour or a specific pizza flour. These flours have a higher protein content, which translates to more gluten development, resulting in a superior texture compared to all-purpose flour. While all-purpose flour can be used in a pinch, the outcome will be noticeably different.
Temperature Control is Key: The temperature of your water is crucial for yeast activation. Too cold, and the yeast will be sluggish; too hot, and you’ll kill it. Aim for warm, not hot, water – around 105-115°F (40-46°C) is ideal for rapid-rise yeast. The environment where your dough proofs also plays a significant role; a warm, draft-free spot encourages optimal rising.
Don’t Rush the Rise: While this recipe aims for a quicker rise, allow the dough ample time to double in size. Patience during this stage is rewarded with a lighter, more flavorful crust. If your kitchen is cool, it might take a little longer than the suggested 30 minutes. Resist the urge to speed it up with excessive heat, as this can lead to an off-flavor or uneven texture.
Achieve a Crispy Bottom: For that desirable crispy pizza base, preheating a pizza stone or a heavy baking sheet in the oven for at least 30 minutes before baking is essential. This intense heat transfer directly to the bottom of the pizza creates a perfectly crisp crust, mimicking the results of a professional pizza oven. Avoid placing the pizza on a cold surface.
Handle with Care: When shaping the dough, treat it gently. Overworking or aggressively deflating the dough after its rise can result in a dense, tough crust. Use your fingertips to press and stretch the dough outwards, preserving as many of the air bubbles created by the yeast as possible. A gentle approach will yield a lighter, airier result.
Serving Suggestions for pizza dough recipe
Decoration
Elevate your homemade pizza from a simple meal to a culinary masterpiece with thoughtful decoration. Fresh herbs are your best friends here; a sprinkle of fresh basil leaves after baking adds a burst of color and aroma. A drizzle of balsamic glaze can provide a touch of elegance and a complementary sweet-tangy flavor. Consider adding a final flourish of grated Parmesan cheese or a scattering of red pepper flakes for a visual and flavorful kick.
Side Dishes
A perfectly baked pizza is often best enjoyed with complementary side dishes that enhance the overall dining experience. A crisp Caesar salad, with its creamy dressing and crunchy croutons, offers a refreshing contrast to the richness of the pizza. For a more Italian-inspired meal, consider a simple Caprese salad with fresh tomatoes, mozzarella, and basil, drizzled with olive oil and balsamic vinegar.
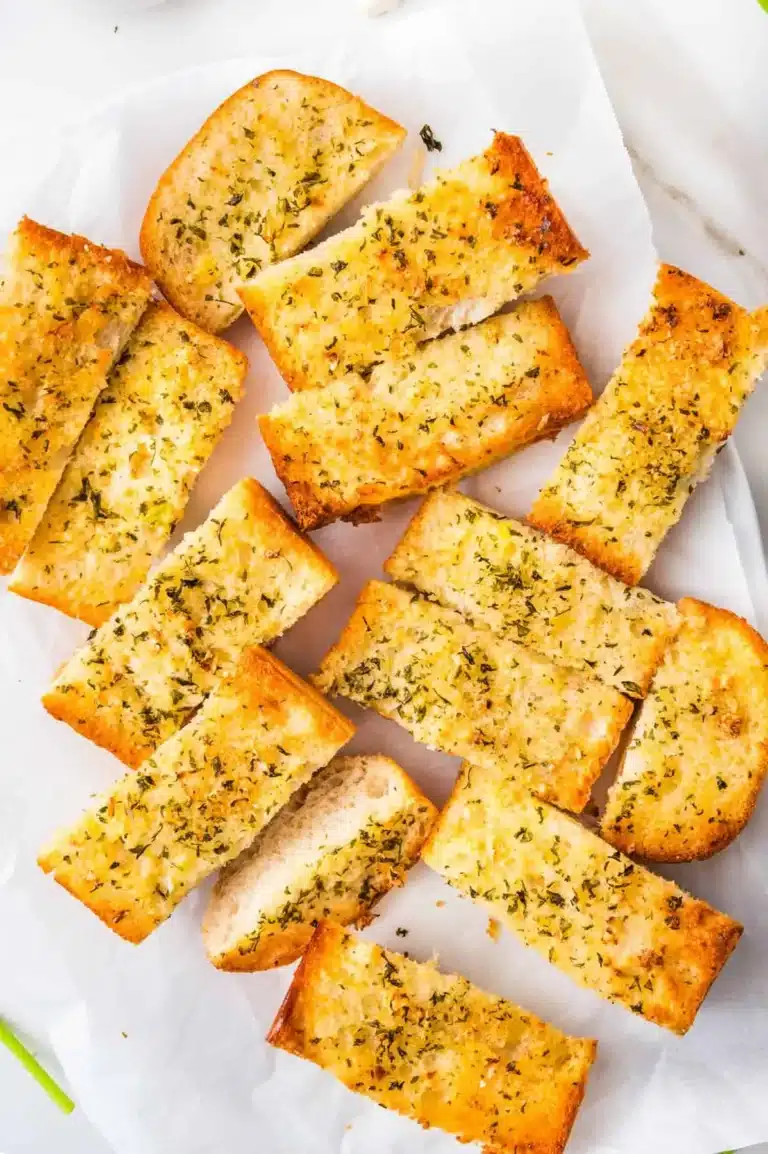
Garlic bread is another timeless accompaniment that pairs wonderfully with pizza, especially for dipping into any extra marinara sauce. Alternatively, a platter of roasted vegetables, such as bell peppers, zucchini, and onions, can add a healthy and flavorful dimension to your pizza feast. For something a little more substantial, consider offering a light pasta salad or a simple green salad with a vinaigrette.
Don’t underestimate the power of a well-chosen appetizer. Mini bruschetta with ripe tomatoes and garlic, or a warm spinach and artichoke dip served with toasted bread or tortilla chips, can set the stage perfectly for your pizza. These options provide variety and cater to different preferences, ensuring everyone at the table is delighted.
Creative Serving Ideas
Move beyond the traditional round pizza and explore creative ways to serve your delicious homemade dough. Consider making mini individual pizzas using cookie cutters for fun shapes, which are perfect for children’s parties or a playful appetizer. You could also create a calzone by folding a smaller circle of dough in half and sealing the edges, then baking until golden and puffed.
Another exciting idea is to prepare a pizza board. Instead of baking a large pizza, bake smaller, individual crusts and arrange them on a large wooden board, each topped with a different flavor combination. This allows guests to sample a variety of toppings and creates a stunning centerpiece for any gathering. Think about themes, such as a “Mediterranean Delight” with feta, olives, and sun-dried tomatoes, or a “Spicy Sensation” with jalapeños and chorizo.
For a more rustic presentation, serve your pizza directly from the baking sheet or pizza peel, emphasizing its homemade charm. Slice it into wedges or even squares for a more casual, family-style serving. You could also consider a “build-your-own-pizza” bar, where guests can select their sauces, cheeses, and toppings to create their personalized masterpieces.
Preparation & Storage
Storing Leftovers
Once your pizza has been enjoyed, it’s inevitable that you might have a few slices left over. Proper storage is key to maintaining their freshness and deliciousness for future enjoyment. It’s best to let any leftover pizza cool down completely before storing it.
Once cooled, wrap individual slices tightly in plastic wrap or aluminum foil. Alternatively, place the slices in an airtight container, layering them with parchment paper in between to prevent them from sticking together. Store the wrapped or contained pizza in the refrigerator for up to 3 days. This method ensures that the crust remains as crisp as possible and the toppings stay fresh.
Freezing
Pizza dough itself freezes exceptionally well, allowing you to have homemade pizza dough ready at a moment’s notice. This is a fantastic way to prepare ahead of time or to store any extra dough made from a larger batch.
To freeze pizza dough, divide it into portion sizes suitable for one pizza. Shape each portion into a ball. Wrap each dough ball tightly in plastic wrap, ensuring there are no air pockets. For added protection against freezer burn, place the wrapped dough balls into a freezer-safe bag or an airtight container. Properly frozen pizza dough can be stored for up to 3 months. Labeling the bag or container with the date of freezing is always a good practice.
Reheating
Reheating leftover pizza is an art form in itself, as the goal is to revive its deliciousness without making the crust soggy. Several methods can be employed, each offering slightly different results.
For the crispiest crust, reheating in a conventional oven or toaster oven is often the best approach. Preheat your oven to around 375°F (190°C). Place the leftover pizza slices directly on the oven rack or on a baking sheet. Heat for about 10-15 minutes, or until the crust is re-crisped and the cheese is bubbly and melted. This method effectively mimics the original baking process.
A microwave can be used for quick reheating, but it often results in a softer crust. To mitigate this, you can place a small cup of water in the microwave alongside the pizza slice; the steam helps keep the toppings moist while the pizza heats. Heat on medium power for 30-60 second intervals, checking frequently to avoid drying out the toppings or making the crust too chewy.
For those who prefer stovetop reheating, a cast-iron skillet works wonders. Place a slice of pizza in a dry, non-stick skillet over medium heat. Cover the skillet to trap heat and steam, allowing the crust to crisp up while the toppings warm through. This typically takes about 5-7 minutes. This method is particularly effective for reviving a slightly soggy crust.
Frequently Asked Questions
-
How do I know if my pizza dough has risen enough?
There are a couple of key indicators to tell if your pizza dough has achieved optimal rise. Visually, the dough should have at least doubled in volume from its original size, appearing puffy and airy. To test its readiness, gently poke the dough with a lightly floured finger; if the indentation springs back slowly and only partially, it’s ready to be shaped. If it springs back immediately and completely, it needs more time to rise. Conversely, if it collapses entirely when poked, it may have over-proofed, and while still usable, it might result in a slightly denser crust.
-
Can I use whole wheat flour instead of bread flour for this pizza dough recipe?
Yes, you can certainly use whole wheat flour, but it will alter the texture and flavor of your pizza crust. Whole wheat flour contains the bran and germ of the wheat kernel, which absorb more liquid and can make the dough denser and less elastic than bread flour. For the best results and to maintain a good balance of chewiness and tenderness, it’s often recommended to use a blend of whole wheat and bread flour, perhaps a 50/50 ratio, or start with a smaller percentage of whole wheat (e.g., 25%) and gradually increase it in subsequent attempts. This approach allows you to enjoy the nutty flavor of whole wheat while still achieving a desirable pizza crust texture. You might also find that you need to add a touch more water when using whole wheat flour.
-
How do I adjust this Pizza Dough recipe for more or fewer pizzas?
Adjusting this pizza dough recipe for a different number of pizzas is straightforward, involving simple proportional scaling. If you wish to make more pizzas, multiply all the ingredient quantities by the desired factor. For instance, if you want to make six 12-inch pizzas (twice the original recipe), you would double the amount of flour, yeast, salt, sugar, olive oil, and water. Conversely, if you only want to make one pizza, divide all the ingredient amounts by three. It’s crucial to maintain the ratios between ingredients to ensure the dough develops correctly and achieves the desired texture. For example, keep the ratio of flour to water consistent, and the amount of yeast relative to the flour, to guarantee a good rise and flavor profile for your adjusted batch.