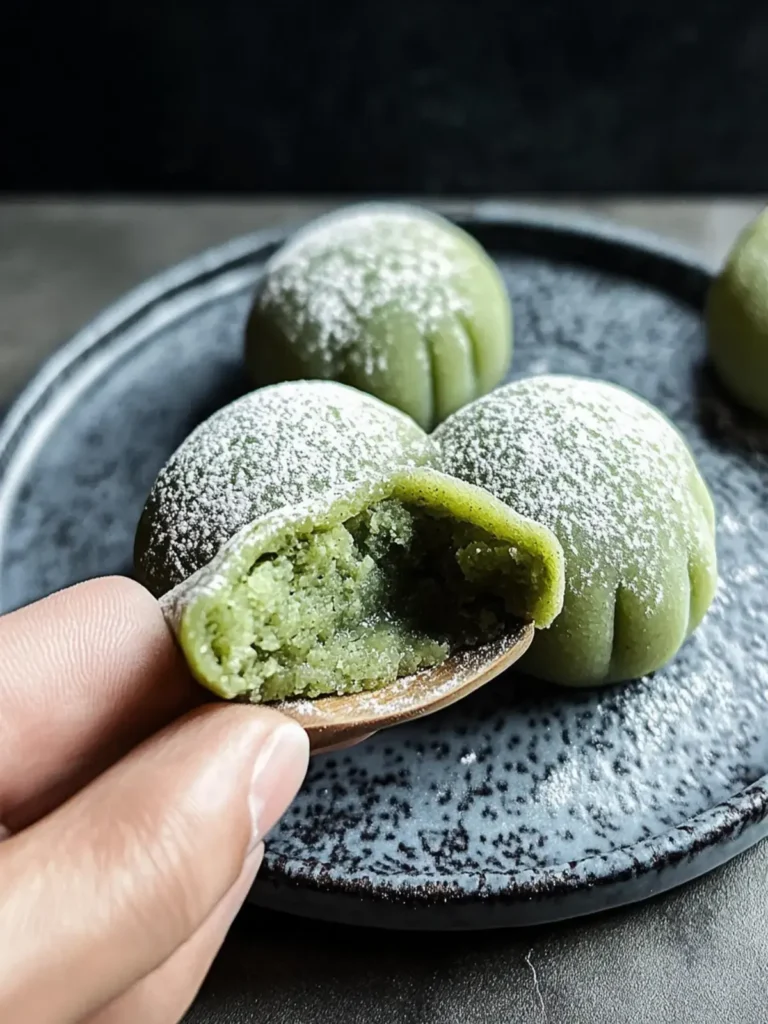
Irresistible Pistachio Cream Cookies Recipe That Melts
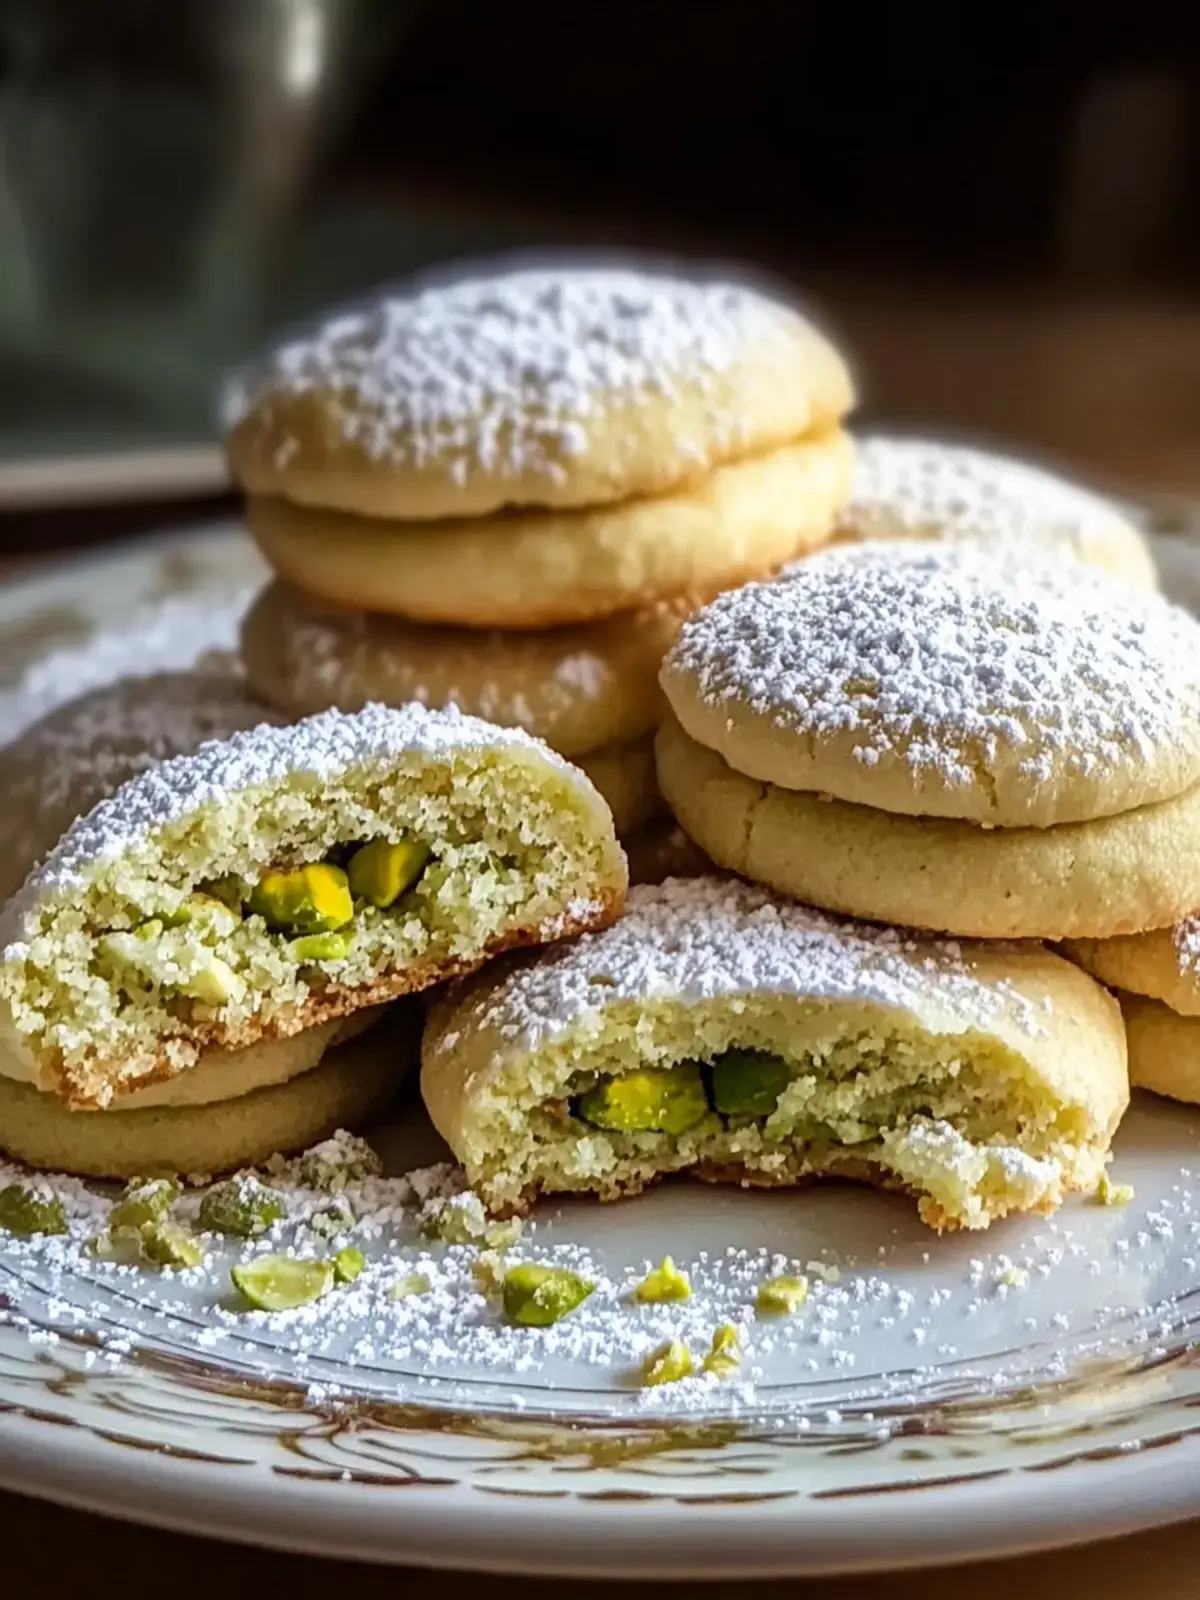
Every time I pop a batch of these Pistachio Cream Cookies into the oven, I’m instantly transported to a cozy café, where the aroma of freshly baked treats mingles with the rich scent of roasted nuts. There’s something enchanting about how the vibrant green hue of the cookies catches the eye, promising a delightful experience that is as joyful as it is delicious.
Whether you’re hosting a gathering or simply looking to treat yourself, these cookies are your answer to an indulgence that pairs creamy filling with a nutty crunch, creating a delightful feast for the senses. But don’t let their elegant appearance fool you—these beauties are surprisingly simple to make! With a few key ingredients, you’ll whip up soft, chewy cookies enveloped in a luscious pistachio cream that will have everyone asking for the recipe.
Why You Will Love This Recipe
- Exquisite Flavor: The exquisite blend of nutty pistachio flavor and creamy filling makes each bite unforgettable, offering a sophisticated taste profile.
- Simplicity in Preparation: This recipe is straightforward and perfect for bakers of any level, demystifying the creation of these elegant cookies.
- Guaranteed Crowd-Pleaser: Impress your guests or loved ones with a unique treat that stands out at any gathering, ensuring rave reviews.
- Remarkable Versatility: You can experiment with various nuts or toppings for personalized flavors, making each batch a new adventure.
- Delightful Texture: These cookies are soft and chewy, with the creamy center adding an indulgent touch that melts in your mouth.
Dive into the creamy goodness today and enjoy these delightful treats! These cookies are a testament to how simple ingredients can transform into something truly special and utterly delicious.
Ingredients You Need
Get ready to bake these delightful Pistachio Cream Cookies with an irresistible creamy filling! For the Cookie Dough, you’ll need all-purpose flour to provide structure, powdered sugar for sweetness and a light texture, and unsalted butter to create a tender, rich base. The star ingredient, pistachio paste, infuses a delightful nutty flavor, complemented by an egg yolk for binding and richness. Vanilla extract and almond extract enhance the overall flavor depth, while a touch of salt balances the sweetness and is essential for flavor.
Pistachio Cream Cookies

Discover the Pistachio Cream Cookies Recipe that combines creamy filling with crunchy pistachio, resulting in an unforgettable treat that melts in your mouth.
- For the Cookie Dough: 2 cups All-Purpose Flour, 1 cup Powdered Sugar, 1 cup Unsalted Butter, 1/2 cup Pistachio Paste, 1 large Egg Yolk, 1 teaspoon Vanilla Extract, 1 teaspoon Almond Extract, 1/4 teaspoon Salt
- For the Cream Filling: 1/2 cup Pistachio Paste, 1/2 cup Unsalted Butter, 1 cup Powdered Sugar
- For Garnish: 1/4 cup Crushed Pistachios
- 1For the Cookie Dough: In a mixing bowl, beat together softened butter and powdered sugar until light and fluffy, about 2-3 minutes.
- 2Mix in pistachio paste, egg yolk, vanilla extract, and almond extract until everything is well combined.
- 3In a separate bowl, whisk together the flour and salt. Gradually incorporate this dry mix into the wet ingredients until just combined. Avoid overmixing to keep your cookies tender.
- 4Portion dough into small balls using a spoon, and place them on a baking sheet lined with parchment paper. Make sure to leave some space between each ball for spreading.
- 5Preheat the oven to 350°F (175°C) and bake the cookies for 10-12 minutes until they’re lightly golden on the edges. They’ll puff up slightly during baking.
- 6Allow the cookies to cool on the baking sheet for about 5 minutes, then gently transfer them to a wire rack to cool completely.
- 7For the Cream Filling: In a bowl, beat additional pistachio paste with softened butter and powdered sugar until smooth. Adjust the consistency as needed to achieve a velvety filling.
- 8Assemble: Spread the cream filling generously between two cooled cookies. For an extra touch, dust them with powdered sugar and top with crushed pistachios if desired.
Keywords: pistachio, cookies, cream, dessert, baking, nuts, sweet
- all-purpose flour: provides structure to the cookies; substitute with gluten-free flour for a gluten-free option.
- powdered sugar: adds sweetness and a light texture; can be replaced with granulated sugar for a crunchier cookie.
- unsalted butter: creates a tender, rich base; ensure it’s softened but not melted for the best results.
- pistachio paste: infuses a delightful nutty flavor into the cookies; can be replaced with almond paste for a different taste.
- egg yolk: acts as a binding agent that adds richness; avoid substituting with egg whites, as the texture will differ.
- vanilla extract: enhances the overall flavor depth; skip or substitute with more almond extract if desired.
- almond extract: adds a subtle aromatic note; replace with additional vanilla if necessary.
- salt: balances the sweetness; it’s essential for flavor, so don’t omit it.
- pistachio paste: incorporates a rich pistachio essence into the filling for extra flavor; feel free to adjust the amount for intensity.
- unsalted butter: again, used here to create a luscious, creamy texture; ensure it’s softened for easy mixing.
- powdered sugar: sweetens the filling and creates a light, smooth consistency; add more if you prefer it sweeter.
- crushed pistachios: adds a decorative touch and extra crunch; completely optional, but highly recommended for that beautiful finish!
With these simple yet essential ingredients, you’re almost ready to embark on your baking adventure. The exact quantities for these components are detailed within the recipe card, ensuring precision for perfect results.
Variations
Feel free to make these delicious cookies your own with these fun and tasty twists! For those with dietary restrictions, a gluten-free variation can be achieved by substituting all-purpose flour with a high-quality gluten-free flour blend, ensuring everyone can partake in this delightful treat. This adaptation maintains the cookie’s structure and texture remarkably well, making it a seamless alternative.
If you’re looking to avoid nuts, a nut-free version is wonderfully simple to create. Replace the pistachio paste with creamy sunflower seed butter, also known as sun butter. This swap offers a similar richness and smooth texture, making the cookies accessible and enjoyable for those with nut allergies, without compromising on the delightful creaminess.
For the chocolate aficionados, adding mini chocolate chips directly into the cookie dough introduces delightful pockets of rich, melted chocolate. These chocolate morsels beautifully complement the nutty pistachio flavor, creating a more complex and decadent cookie experience. You can also consider a sprinkle of cocoa powder in the dough for a deeper chocolate undertone.
If you prefer a naturally sweetened cookie with a hint of caramel, use date sugar instead of powdered sugar. This substitution not only adds a unique sweetness but also introduces a slightly different flavor profile that is earthy and comforting. Another exciting option is the zesty twist, where you can incorporate a teaspoon of fresh lemon zest into the dough. This bright, refreshing citrus note provides a lovely contrast to the richness of the pistachio.
For those who enjoy a little heat, a pinch of cayenne pepper or your favorite chili powder in the dough adds a surprising warmth that beautifully pairs with the sweetness of the cookie. Lastly, a mocha delight can be achieved by mixing in finely ground coffee or espresso powder. These cookies will not only perk you up with their flavor but also offer a sophisticated coffee-nut combination. A creamy white chocolate variation can also be achieved by adding chunks of white chocolate to the filling for an extra layer of richness.
How to Prepare Pistachio Cream Cookies Recipe
Step 1: Prepare the Cookie Dough Base
Begin by bringing your unsalted butter to the perfect softened state—it should yield gently to pressure but not be melted. In a large mixing bowl, combine this softened butter with the powdered sugar. Using an electric mixer, beat these two ingredients together on medium speed until the mixture transforms into a light, fluffy, and pale yellow concoction. This crucial step, typically taking about 2 to 3 minutes, creates an airy foundation that is essential for tender cookies. Ensure you scrape down the sides of the bowl periodically to incorporate all the butter and sugar.
The texture should resemble creamy frosting. This initial creaming process incorporates air, which will contribute to the cookies’ light and delicate crumb. It’s important not to overwork the butter and sugar at this stage, as it can lead to a denser cookie later on. The goal here is aeration and a smooth, uniform consistency before moving on to the next set of ingredients.
Step 2: Incorporate Wet Ingredients and Flavorings
Next, it’s time to infuse the dough with the characteristic flavors of pistachio and subtle aromatics. To the creamed butter and sugar mixture, add the pistachio paste, ensuring it’s well-incorporated for that signature nutty essence. Then, gently mix in the egg yolk; this acts as a binder and adds a touch of richness and helps with the dough’s texture, contributing to its chewiness. Finally, add the vanilla extract and almond extract. These extracts are crucial for enhancing the overall flavor profile, making the pistachio and other ingredients sing.
Mix everything together until the ingredients are just combined and the batter takes on a lovely, uniform color and a wonderfully fragrant aroma. The consistency should be smooth and creamy, with no streaks of unincorporated ingredients visible. Avoid overmixing at this stage, as it can develop the gluten in the flour too much, leading to tougher cookies. The goal is a homogeneous mixture that is ready to receive the dry ingredients.
Step 3: Combine Dry Ingredients and Form the Dough
In a separate medium-sized bowl, whisk together the all-purpose flour and the salt. Whisking ensures that the salt is evenly distributed throughout the flour, preventing pockets of saltiness and promoting consistent flavor in every bite. This simple step is vital for the even leavening and structure of the cookies. The salt also plays a key role in balancing the sweetness from the sugar and enhancing the other flavors present.
Now, gradually add this dry flour mixture to the wet ingredients in the large mixing bowl. Use your mixer on a low speed or a spatula to incorporate the flour. Mix only until the flour streaks have just disappeared and the dough comes together. It’s extremely important to avoid overmixing at this point; overdeveloping the gluten will result in tough, dense cookies, which is the opposite of the desired melt-in-your-mouth texture. The dough should be soft and pliable, but not sticky.
Step 4: Shape the Cookies for Baking
Once the dough is perfectly combined, it’s time to portion it into individual cookies. For uniform size and even baking, using a small cookie scoop or a tablespoon is recommended. Roll each portion into a small, smooth ball between your palms. Aim for consistency in size so that all the cookies bake at the same rate, ensuring they are all perfectly golden and chewy.
Arrange these dough balls on a baking sheet that has been lined with parchment paper. Parchment paper is essential as it prevents the cookies from sticking and makes for easy cleanup. Ensure you leave adequate space between each dough ball, about 2 inches apart. This provides room for the cookies to spread as they bake, preventing them from merging into one large cookie mass. The dough is quite soft, so chilling it briefly before shaping can make it easier to handle if you find it too sticky.
Step 5: Bake to Golden Perfection
Preheat your oven to 350°F (175°C). This consistent temperature is critical for achieving the perfect cookie texture. Once the oven is preheated, place the prepared baking sheet into the center rack. Bake the cookies for approximately 10 to 12 minutes. You will know they are ready when the edges begin to look lightly golden brown, and the centers are still slightly soft. They will puff up slightly during baking and continue to set as they cool.
It’s crucial not to overbake them, as this will result in dry, hard cookies. The slight softness in the center is exactly what you want for that characteristic chewy texture. Keep a close eye on them during the last few minutes of baking, as oven temperatures can vary. The aroma filling your kitchen at this stage is simply heavenly, a delightful preview of the treat to come.
Step 6: Cool and Prepare the Cream Filling
Once baked to perfection, remove the baking sheet from the oven. Allow the cookies to cool on the baking sheet for about 5 minutes. This brief cooling period on the hot sheet allows them to firm up slightly, preventing them from breaking when you move them. After this initial resting period, gently transfer the cookies to a wire rack to cool completely. This is a vital step, as assembling the cookies while they are still warm will cause the cream filling to melt and make a mess.
While the cookies are cooling, prepare the luscious pistachio cream filling. In a clean mixing bowl, combine the remaining pistachio paste with softened unsalted butter and powdered sugar. Beat these ingredients together using an electric mixer until the filling is smooth, creamy, and wonderfully spreadable. You can adjust the amount of powdered sugar to achieve your desired sweetness and consistency; it should be thick enough to hold its shape but soft enough to spread easily. The result should be a velvety smooth filling, ready to become the heart of your pistachio cream cookies.
Step 7: Assemble the Pistachio Cream Cookies
With both the cookies and the cream filling completely cooled, it’s time for the most satisfying step: assembly! Take two cooled cookie rounds and spread a generous amount of the prepared pistachio cream filling onto the flat side of one cookie. Then, carefully place the second cookie on top of the filling, gently pressing down to create a sandwich. Ensure the filling is spread evenly to the edges for a beautiful presentation and balanced flavor in every bite.
For an extra touch of elegance and flavor, you can optionally dust the tops of the assembled cookies with a light coating of powdered sugar. This adds a lovely visual appeal and a hint of extra sweetness. To further enhance their beauty and nutty character, sprinkle the sides or tops with crushed pistachios. This final garnish not only looks appealing but also provides a delightful textural contrast and reinforces the pistachio flavor.
Pro Tips for Pistachio Cream Cookies Recipe
Achieving the Creamy Consistency: Ensure your butter for the cream filling is properly softened—it should be pliable but not melted. This is critical for achieving an ideal, luscious, and easily spreadable texture for your filling. Softened butter will cream beautifully with the pistachio paste and powdered sugar, creating a smooth, luxurious consistency that won’t be oily or grainy.
Avoiding Tough Cookies: The key to tender cookies lies in gentle mixing. Mix your cookie dough just until the ingredients are combined, and you no longer see streaks of flour. Overmixing develops gluten, which is the enemy of tender baked goods, so resist the urge to mix longer than necessary.
Accurate Flour Measurement: For consistent and perfectly textured cookies, it’s best to measure your flour correctly. Spoon the flour into your measuring cup and level it off with a straight edge, rather than scooping directly from the bag. This prevents packing too much flour, which can lead to dry and dense cookies.
Patience with Cooling: Allow your cookies to cool adequately on the baking sheet for about 5 minutes before transferring them to a wire rack. This resting period helps them firm up sufficiently to avoid breaking. Patience during the cooling phase ensures that your delicate cookies maintain their shape and soft texture.
Customizing Your Filling: Don’t be afraid to adjust the pistachio flavor intensity in your cream filling. If you love a strong pistachio taste, feel free to add a little more pistachio paste to the filling mixture. Experimenting with the filling can offer exciting variations and allow you to tailor the cookies to your perfect preference, making each bite truly personalized.
Serving Suggestions for Pistachio Cream Cookies Recipe
Decoration
Elevate the visual appeal of your Pistachio Cream Cookies with thoughtful decorations. A delicate dusting of powdered sugar offers a classic, elegant look, reminiscent of freshly fallen snow. For an extra burst of color and nutty flavor, sprinkle the tops or sides with finely crushed pistachios. You can also use whole, blanched pistachios as a centerpiece for a truly artisanal presentation. Consider adding a tiny sprig of fresh mint for a vibrant green contrast and a hint of freshness.
Side Dishes
These delightful cookies pair wonderfully with a variety of beverages and complementary treats. A warm cup of herbal tea, such as chamomile or peppermint, provides a soothing contrast to the cookie’s sweetness. For coffee lovers, a rich espresso or a creamy latte beautifully complements the nutty and sweet notes. A simple glass of cold milk, whether dairy or plant-based, is always a classic and comforting pairing.
Creative Serving Ideas
Present these cookies on a tiered dessert stand for an impressive display at parties or gatherings. Arrange them alongside other small pastries or fruits for a delightful dessert buffet. For a more intimate setting, serve them with a small scoop of vanilla bean or pistachio ice cream, creating a delightful warm-cookie-and-cold-ice-cream experience. A drizzle of white chocolate ganache or a light raspberry coulis can add an extra layer of sophistication and flavor complexity.
Preparation & Storage
Storing Leftovers
To keep your Pistachio Cream Cookies tasting fresh and delicious, proper storage is key. Store them in an airtight container at room temperature. This method ensures they maintain their soft, chewy texture and vibrant flavor for up to 7 days. Ensure the container is completely sealed to prevent the cookies from drying out or absorbing any unwanted odors from the kitchen.
Freezing
For longer-term enjoyment, these cookies freeze exceptionally well. First, place the assembled cookies in a single layer on a baking sheet and freeze until they are firm, which typically takes about 1 to 2 hours. This step prevents them from sticking together in a clump. Once firm, carefully transfer the frozen cookies to a freezer-safe bag or an airtight container. They can be stored in the freezer for up to three months, retaining their quality and delightful taste.
Reheating
If you’ve frozen your cookies or simply prefer them warm, reheating is a straightforward process. Preheat your oven to a low temperature, around 300°F (150°C). Place the cookies on a baking sheet and warm them for about 5 to 10 minutes, or until they are heated through and have regained their soft, fresh-baked texture. Be careful not to overheat them, as this can dry them out. This gentle warming brings back that delightful aroma and melt-in-your-mouth quality.
Frequently Asked Questions
-
What type of pistachios should I use for the best flavor and texture?
For the most vibrant and authentic flavor in your Pistachio Cream Cookies, it’s highly recommended to use high-quality, shelled pistachios. Opt for unsalted, roasted pistachios as they provide a delightful nutty essence without the excess sodium, which can unpleasantly alter the cookie’s flavor balance. If you are using pistachio paste, ensure it is made from pure pistachios without added fillers or excessive sugars, as this will significantly impact the final taste. Freshness is also key; older pistachios can develop a rancid flavor, so check the expiration date or purchase from a reputable source.
-
How should I store these cookies to maintain their freshness and texture for as long as possible?
To ensure your Pistachio Cream Cookies remain delightfully fresh and maintain their perfect texture, storing them correctly is paramount. The best method is to place them in an airtight container at room temperature. This will keep them soft and chewy for up to 7 days, preventing them from drying out. If you desire a firmer cookie or a slightly longer shelf life, you can refrigerate them in a sealed container for up to two weeks. It’s crucial that the cookies are completely cooled before storage, whether at room temperature or in the refrigerator, to prevent condensation from making them soggy.
-
Can I freeze pistachio cream cookies, and if so, what is the best way to do it to preserve their quality?
Yes, absolutely! Freezing is an excellent option for preserving the delightful quality of your Pistachio Cream Cookies for an extended period. The recommended method is to first arrange the assembled cookies in a single layer on a baking sheet and freeze them until they are firm, which usually takes around 1 to 2 hours. This pre-freezing step prevents them from sticking together. Once solid, carefully transfer the frozen cookies into a freezer-safe bag or an airtight container, ensuring they are well-protected from freezer burn. Properly stored, they can be kept in the freezer for up to three months. When you’re ready to enjoy them, simply let them thaw at room temperature for a few hours, or gently warm them in a low-temperature oven for a few minutes to revive their fresh-baked essence.