Ultimate Pink Coconut Cake Bars (Snowball Inspired)
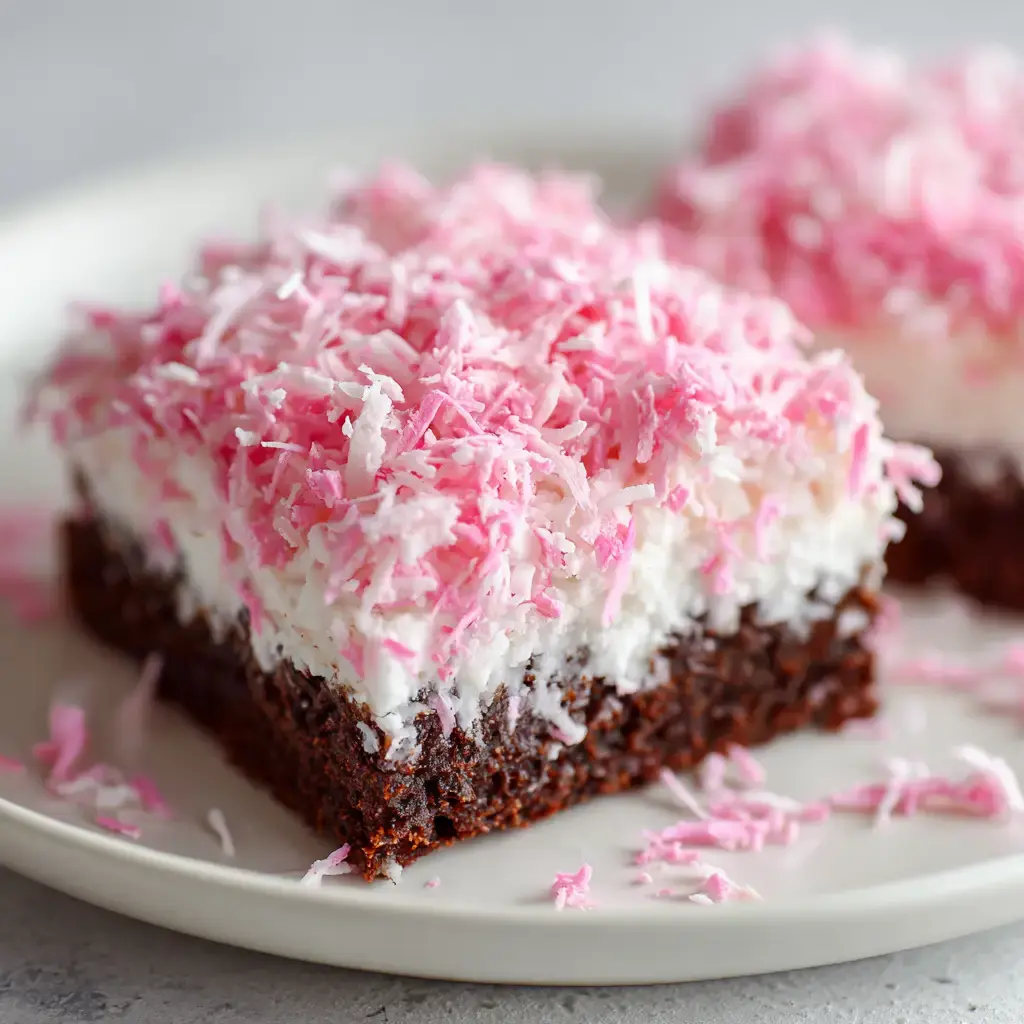
Prepare to be utterly enchanted by the Pink Coconut Cake Bar, a confection that transcends mere dessert into an edible work of art. This isn’t simply a sweet treat; it’s a symphony of textures and flavors, meticulously crafted into a delightfully portable bar that’s almost too beautiful to eat. Imagine a foundation of intensely rich, dark chocolate brownie, a luscious, pillowy layer of sweet marshmallow frosting, and a strikingly vibrant coating of pink shredded coconut.
Each component has been thoughtfully designed to deliver a specific, delightful sensory experience. From the dense, fudgy chew of the brownie base to the ethereal fluffiness of the frosting, culminating in the sweet, satisfying texture of the coconut coating, this recipe guarantees a truly memorable indulgence. The scattered pink coconut isn’t just for show; it’s an open invitation to a world of flavor and joy, a visual promise of the deliciousness within.
Why You Will Love This Recipe
- Decadent Brownie Base: Forget crumbly cake; this recipe features a dense, fudgy dark chocolate brownie that offers a perfect, satisfying chew and deep chocolate flavor to beautifully complement the sweet topping.
- Cloud-like Marshmallow Frosting: A thick, incredibly fluffy, and delightfully sticky marshmallow frosting forms the irresistible middle layer, acting as the perfect adhesive for the vibrant coconut.
- Stunning Visual Appeal: The vibrant, bright pink shredded coconut coating gives these bars an unmissable visual pop, making them a showstopper for any occasion.
- Simple Yet Impressive: Despite their gourmet appearance and taste, these bars are surprisingly straightforward to create in your home kitchen, proving that impressive desserts don’t need to be complicated.
- Perfect Texture Contrast: The combination of dense brownie, airy frosting, and chewy coconut creates an exciting and harmonious blend of textures in every single bite.
Ingredients You Need
The secret to these extraordinary Pink Coconut Cake Bars lies in the quality and careful selection of each ingredient. We believe that using the best components results in the most delightful outcome, and this recipe is no exception. From the rich cocoa powder that forms the base to the bright gel coloring that creates the iconic pink hue, every element plays a crucial role in the final masterpiece.
Ultimate Pink Coconut Cake Bars

These Pink Coconut Cake Bars feature a rich, fudgy dark chocolate brownie base, a thick layer of sticky marshmallow frosting, and a vibrant coating of sweet pink coconut. An easy and visually stunning dessert perfect for any occasion.
- For the Dense Dark Chocolate Brownie Base: 0.5 cup Unsalted Butter, melted (113g)
- 1 cup Granulated Sugar (200g)
- 2 Large Eggs
- 1 tsp Vanilla Extract (5ml)
- 0.5 cup Unsweetened Cocoa Powder (50g)
- 0.75 cup All-Purpose Flour (90g)
- 0.25 tsp Salt (1.5g)
- For the Sticky Marshmallow Frosting: 0.5 cup Unsalted Butter, softened (113g)
- 2 cups Powdered Sugar (240g)
- 7 oz Marshmallow Fluff/Creme (approx. 1 jar (200g))
- 0.5 tsp Vanilla Extract (2.5ml)
- For the Vibrant Pink Coconut Topping: 2 cups Sweetened Shredded Coconut (200g)
- 3 drops Pink Gel Food Coloring (or more, to desired color)
- 1Prepare the Brownie Base: Preheat your oven to 350°F (175°C). Line an 8x8 inch baking pan with parchment paper, leaving an overhang on the sides.
- 2In a medium bowl, whisk together the melted butter and granulated sugar. Add the eggs and vanilla, whisking until glossy.
- 3Fold in the cocoa powder, all-purpose flour, and salt until just combined. Do not overmix.
- 4Pour the batter into the prepared pan, spread evenly, and bake for 22-25 minutes, or until a toothpick comes out with moist crumbs. Let cool completely.
- 5Make the Marshmallow Frosting: In a large bowl, beat the softened butter with an electric mixer until creamy. Add the powdered sugar, marshmallow fluff, and vanilla.
- 6Beat on low speed, then increase to medium-high and beat for 3-4 minutes until light, fluffy, and increased in volume.
- 7Assemble the Bars: Place the shredded coconut and pink gel food coloring in a large zip-top bag. Seal and shake until the coconut is evenly colored.
- 8Spread the marshmallow frosting evenly over the cooled brownie base. Immediately cover with the pink coconut, pressing down gently to adhere.
- 9Chill the bars in the refrigerator for at least 1 hour to set before lifting from the pan and slicing into 16 squares.
Use Gel Food Coloring: For the most intense, vibrant pink, gel-based food coloring is non-negotiable.
Chill for Clean Cuts: Chilling the bars until the frosting is firm is the only way to get perfectly square, clean-edged slices.
Keywords: coconut, brownie, marshmallow, pink, dessert, bars, sweet, chocolate, festive
The precise quantities for each ingredient are detailed within the accompanying recipe card, ensuring you have all the necessary information to recreate these delicious bars perfectly.
Variations
While the classic pink coconut cake bar is a marvel in itself, its versatility allows for exciting creative twists. Consider a berry-infused variation by adding a swirl of raspberry or strawberry puree into the brownie batter for a fruity tang and even more color.
For those seeking a lighter, perhaps more breakfast-friendly option, you could explore a subtle lemon zest incorporated into the frosting, offering a bright counterpoint to the sweetness. Imagine the delightful scent and flavor mingling with the coconut.
Another intriguing possibility involves a hint of spice. A touch of cinnamon or even a whisper of cardamom in the brownie base can add an unexpected layer of warmth and complexity, transforming the familiar into something uniquely intriguing.
How to Prepare pink coconut cake bars
Step 1: Forge the Fudgy Dark Chocolate Foundation
Begin by igniting the warmth of your oven, setting it to a precise 350°F (175°C). Prepare your trusty 8×8 inch baking pan by lining it meticulously with parchment paper, ensuring generous overhang on all sides. This overhang will act as your culinary handles, allowing for effortless extraction of the baked goodness later.
In a medium-sized bowl, unite the melted unsalted butter with the granulated sugar, whisking them together until they form a harmonious, well-combined mixture. Next, introduce the large eggs and the fragrant vanilla extract to this blend, whisking with vigor until the entire concoction achieves a glossy, smooth consistency. This thorough whisking is crucial for incorporating the right amount of air, which contributes significantly to the classic brownie texture you desire.
Now, introduce the unsweetened cocoa powder, the all-purpose flour, and the vital salt directly into the wet ingredients. Switch your tool to a spatula and gently fold everything together until it is just combined; the key here is to stop the moment you can no longer see any dry streaks of flour. Overmixing will toughen the brownie, so be patient and observe carefully. The resulting batter should be impressively thick and possess a beautiful, shiny sheen, a testament to its fudgy destiny.
Carefully pour this rich, dense batter into your prepared pan, using the spatula to spread it into an even, consistent layer. Place the pan into the preheated oven and bake for approximately 22 to 25 minutes. You will know it is perfectly baked when a toothpick inserted into the center emerges with moist crumbs clinging to it, but not wet batter. Allow the brownie base to cool completely within the pan, a crucial step for texture development and easy handling.
Step 2: Whip Up the Sticky Marshmallow Cloud
While your fudgy brownie base takes its time to cool completely, it’s the ideal moment to embark on crafting the ethereal marshmallow frosting. In a large, pristine mixing bowl, introduce the softened unsalted butter. Employ an electric mixer, starting on medium speed, to beat the butter until it transforms into a creamy, pale, and wonderfully smooth consistency, typically taking about one to two minutes of diligent beating.
Now, it’s time to bring in the other stars of the frosting show: the powdered sugar, the entire jar of marshmallow fluff or creme, and the remaining vanilla extract. Begin mixing on the lowest speed setting of your electric mixer. This initial low-speed phase is critical to prevent a dramatic explosion of powdered sugar, often referred to as a “sugar storm,” across your kitchen. Once the ingredients are somewhat incorporated, confidently increase the speed to medium-high.
Continue to beat the mixture for a thorough 3 to 4 minutes. During this time, you will witness a remarkable transformation as the frosting lightens in color, increases significantly in volume, and develops an incredibly fluffy, airy texture. The final consistency should be wonderfully sticky, yet undeniably cloud-like, hinting at the delightful sweetness it will bring to the bars. This creamy frosting will serve as the perfect sweet and sticky adhesive for our vibrant topping.
Step 3: Create the Vibrant Topping and Assemble
Prepare yourself for the visually stunning finale by focusing on the vibrant pink coconut topping. Take your sweetened shredded coconut and place it into a large, sturdy zip-top bag. Carefully add a few judicious drops of the pink gel food coloring. Gel coloring is paramount here, as it provides intense pigment without introducing excess liquid that could make the coconut clumpy or dull the color.
Seal the bag securely, ensuring you expel as much air as possible to allow for efficient mixing. Now, the fun begins: vigorously shake and massage the bag. Continue this energetic process until the coconut is uniformly and vibrantly pink. You want to ensure every strand is kissed by that beautiful hue, creating a visually arresting blanket for your bars.
Once the brownie base has cooled down completely, take your prepared marshmallow frosting and spread it evenly over the top of the cooled brownie layer. Aim for a thick, consistent layer that covers the entire surface, creating a smooth canvas for the coconut. Immediately after applying the frosting, generously sprinkle the prepared pink coconut over the entire surface. Gently press the coconut down with your hands or the back of a spatula to ensure it adheres firmly to the sticky frosting, creating a secure and beautiful coating.
Step 4: Chill for Perfection
This chilling stage is not optional; it is a vital step that separates merely good bars from truly exceptional ones. Carefully place the pan containing the assembled bars into the refrigerator. Allow them to chill for a minimum of 1 hour. This crucial period allows the frosting to firm up considerably, binding the coconut securely to the brownie and making the entire bar cohesive.
The chilling process is paramount for achieving those clean, precise cuts that give the bars their polished, professional look. Without adequate chilling, the frosting would be too soft, leading to messy slices and a less appealing presentation. Patience during this phase will be richly rewarded with perfectly formed, stunning dessert bars.
Step 5: Slice and Serve with Flair
Once the bars have chilled sufficiently and the frosting has firmed up, it’s time for the grand reveal. Gently grasp the overhanging parchment paper handles that you so thoughtfully prepared earlier. Use these handles to carefully lift the entire block of dessert out of the baking pan and onto a clean cutting board.
Now, with a large, sharp knife, slice the block into 16 equal squares. For the cleanest possible cuts, it is advisable to wipe the knife blade clean with a damp cloth between each slice, preventing any smudging of the frosting or coconut. Arrange the beautiful Pink Coconut Cake Bars on a serving platter, perhaps garnishing the plate itself with a few extra scattered pink coconut shreds for an artistic flourish.
These bars are now ready to be admired and devoured, offering a delightful combination of rich chocolate, sweet marshmallow, and chewy coconut. Their visual appeal is undeniable, and their flavor profile is sure to leave a lasting impression on anyone lucky enough to enjoy one. You have successfully created a dessert that is both a feast for the eyes and a delight for the palate, a true testament to your culinary skills.
Pro Tips for pink coconut cake bars
- Don’t Overbake the Brownie: The absolute key to achieving that desired dense, fudgy texture is to err on the side of slightly underbaking the brownie base. The residual heat within the pan will continue to cook it gently as it cools, ensuring maximum moisture and chewiness.
- Embrace Gel Food Coloring: For the most intensely vibrant and saturated pink hue without diluting the coconut’s texture or flavor, gel-based food coloring is an indispensable tool. A little goes a long way in achieving that striking visual impact.
- Chill for Immaculate Cuts: Patience truly is a virtue when it comes to achieving those perfectly sharp, clean edges. Ensuring the bars are thoroughly chilled until the frosting is firm is the only reliable method for obtaining the pristine, gallery-worthy slices you see in professional photographs.
- Room Temperature is Crucial: For the fluffiest, most voluminous frosting, make sure your butter is perfectly softened, not melted or cold. Similarly, using room-temperature eggs for the brownie base will help them emulsify more effectively with the other ingredients, contributing to a better overall texture.
- Gentle Folding is Key: When incorporating the dry ingredients into the brownie batter, resist the urge to overmix. Gentle folding until just combined prevents the development of gluten, which can lead to a tougher, cake-like brownie instead of the desired fudgy consistency.
Serving Suggestions for pink coconut cake bars
Decoration
The inherent beauty of the pink coconut topping is often enough, but a few subtle enhancements can elevate the presentation further. Consider a delicate dusting of edible glitter for a touch of sparkle, especially for celebratory occasions. You could also pipe a small amount of white or dark chocolate ganache in a delicate pattern, like a drizzle or swirl, on top of the pink coconut for added visual interest and flavor contrast.
Side Dishes
While these bars are a dessert star in their own right, they can beautifully complement certain meals. For a rich yet balanced experience, consider serving them after a savory dish like baked lemon chicken, where the brightness of the lemon cuts through the sweetness. A lighter option, such as easy lobster bisque, would also provide a luxurious prelude to these delightful bars.
Creative Serving Ideas
Beyond simply slicing them, get creative with presentation. Serve individual bars on small dessert plates with a dollop of whipped cream or a scoop of vanilla bean ice cream for an elevated dessert experience. For a more casual gathering, arrange them on a tiered stand, interspersed with fresh berries, creating a visually appealing dessert buffet. You could even cut them into smaller, bite-sized portions for a delightful party favor or a sophisticated addition to a dessert tasting platter.
Preparation & Storage
Storing Leftovers
To maintain the delightful texture and flavor of your Pink Coconut Cake Bars, proper storage is key. Place the cut bars in a single layer within an airtight container to prevent them from drying out or absorbing unwanted odors from other foods. Stored this way, they can remain fresh and delicious at room temperature for up to three days, making them perfect for week-long enjoyment.
Alternatively, for extended freshness, you can store them in the refrigerator for up to a week. If you choose to refrigerate them, remember to allow them to sit at room temperature for about 20 minutes before serving. This brief resting period helps to soften the frosting slightly, restoring that perfect, creamy consistency.
Freezing
For those times when you’ve baked a batch and want to enjoy them even further into the future, freezing is an excellent option. To freeze the bars, first wrap each individual bar tightly in plastic wrap to create a protective barrier against freezer burn. Once individually wrapped, place the bars into a freezer-safe bag or container, ensuring it is sealed tightly.
Frozen Pink Coconut Cake Bars can maintain their quality for up to three months. When you’re ready to enjoy them, the best method for thawing is to transfer the frozen bars to the refrigerator overnight. This gradual thawing process helps to preserve their texture and prevents any condensation from forming, which could make them soggy.
Reheating
These bars are generally best served at room temperature or slightly chilled, as reheating can alter the texture of the frosting and coconut. However, if you find yourself with very cold bars that you wish to warm slightly, the microwave can be used with extreme caution. Heat them on a very low power setting for just 10-15 seconds at a time, checking frequently to avoid melting the frosting or toasting the coconut.
The ideal approach is to simply allow the refrigerated bars to come to room temperature naturally, as mentioned in the storage section. This ensures the frosting regains its intended soft, sticky consistency without compromising the integrity of the other components. For optimal enjoyment, a little patience during the thawing or tempering process will yield the best results.
Frequently Asked Questions
-
Can I make these Pink Coconut Cake Bars ahead of time?
Absolutely! These bars are an ideal make-ahead dessert, perfect for preparing a day or even two in advance. Store them fully assembled and cut in an airtight container in the refrigerator. Before serving, allow them to sit at room temperature for approximately 20 minutes to ensure the frosting reaches its optimal creamy texture and the brownie base is wonderfully soft. This allows all the flavors to meld beautifully.
-
Can I use unsweetened coconut for this recipe?
While it is possible to use unsweetened shredded coconut, the final result will be noticeably less sweet and the topping may be slightly drier and less cohesive. Sweetened shredded coconut provides both the essential sweetness that balances the rich brownie and sticky frosting, and it also contains enough moisture and stickiness to adhere well to the marshmallow layer. For the best flavor and texture balance, sweetened coconut is highly recommended.
-
How do I get clean cuts on these bars?
Achieving perfectly clean, sharp cuts is paramount for that professional look, and it relies heavily on proper chilling. Ensure the bars are refrigerated for at least 1 to 2 hours before attempting to slice them; this firms up both the brownie and the marshmallow frosting, making them more stable. Use a large, very sharp knife, and for the absolute cleanest cuts, wipe the knife blade with a damp cloth after each slice. This prevents any frosting or coconut residue from being dragged across subsequent cuts, ensuring each bar is pristine.