Sunny Pineapple Layer Cake

This Pineapple Layer Cake is a delightful testament to how simple ingredients can create something truly spectacular. It’s the perfect dessert for any occasion, offering a bright, tropical twist that’s both refreshing and satisfying.
Imagine tender cake layers infused with the sweet tang of pineapple, topped with a light, airy frosting that melts in your mouth. This cake is designed to be made ahead, meaning less stress and more enjoyment when it’s time to serve.
Why You Will Love This Recipe
- Effortless Assembly: Utilizes cake mix for speed and ease, making it accessible for bakers of all skill levels.
- Intense Pineapple Flavor: Both the cake and frosting are infused with pineapple for a consistent, delightful taste.
- Moist & Tender Crumb: Pineapple juice soaks into the cake layers, ensuring every bite is incredibly moist and flavorful.
- Light & Fluffy Frosting: The combination of whipped topping and pudding mix creates an airy, creamy frosting that perfectly complements the cake.
- Make-Ahead Magic: This cake tastes even better when chilled, allowing flavors to meld and textures to set, perfect for planning parties.
Ingredients You Need
The beauty of this Pineapple Layer Cake lies in its straightforward ingredient list, focusing on quality and accessibility to deliver maximum flavor. Using a good quality yellow cake mix is paramount for a tender and reliable base that bakes up beautifully. Room temperature eggs are crucial for a smooth batter and a better cake structure.
Pineapple Layer Cake
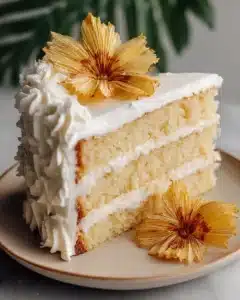
A light and tender layered cake infused with pineapple juice and finished with a creamy pineapple-vanilla frosting. This chilled dessert offers a moist crumb and a bright tropical flavor in every slice. Perfect for birthdays, spring gatherings, and easy family celebrations.
- 1 package yellow cake mix
- 3 large eggs, brought to room temperature
- 1/3 cup neutral vegetable oil
- 1 cup water
- 1 cup pineapple juice
- 1 can crushed pineapple
- 12 ounces whipped topping, thawed
- 1 package instant vanilla pudding mix
- Crushed pineapple from the ingredient list above
- 1Preheat the oven to 350°F.
- 2In a large bowl, prepare the cake batter by mixing the yellow cake mix, room-temperature eggs, vegetable oil, and water according to the package instructions. Stir until the mixture is smooth and evenly blended.
- 3Grease three 6-inch cake pans or two 9-inch cake pans thoroughly with nonstick cooking spray. Divide the batter evenly among the prepared pans.
- 4Bake for 35 minutes when using 6-inch pans, or 25 minutes when using 9-inch pans. The cake layers are ready when a toothpick inserted into the center comes out clean.
- 5Place the pans on a wire rack and allow the cakes to cool for 10 minutes before removing them from the pans. Turn the layers out and set them right side up to continue cooling until they are easy to handle.
- 6Using a serrated knife, trim away the rounded tops of the cake layers so each one is level.
- 7Slowly spoon or pour the pineapple juice over each layer, allowing the liquid to absorb into the cake. Leave the layers to cool completely before frosting.
- 8To make the frosting, combine the whipped topping, instant vanilla pudding mix, and crushed pineapple in a mixing bowl. Stir until the mixture is fully incorporated and creamy.
- 9Place one cake layer onto a serving plate and spread a generous portion of frosting across the top. Add the next layer and repeat. If using a third layer, continue in the same manner.
- 10After stacking the cake, spread the remaining frosting over the top and around the sides until the entire cake is evenly covered.
- 11Refrigerate the finished cake until serving time so the frosting can set and the flavors can develop fully.
- yellow cake mix: a convenient base for quick and consistent cake layers.
- large eggs: provide structure, richness, and contribute to a tender crumb.
- neutral vegetable oil: ensures a moist cake that stays tender even after chilling.
- water: essential for hydrating the cake mix and creating a smooth, workable batter.
- pineapple juice: infuses the cake layers with a bright, tropical flavor and crucial moisture.
- crushed pineapple: adds delightful texture and fruity sweetness to the creamy frosting.
- whipped topping: the key to a light, airy, and easily spreadable frosting.
- instant vanilla pudding mix: thickens the frosting and adds a classic, complementary vanilla note.
For the specific quantities of each ingredient, please refer to the detailed recipe card provided with this article. This ensures you have the perfect balance for an exquisite cake.
Variations
While this Pineapple Layer Cake is perfection as is, it’s a wonderfully adaptable dessert. Its simple yet effective flavor profile lends itself well to creative adaptations for different dietary needs or taste preferences.
Vegan Adaptation: To make this cake entirely vegan, you would need to swap out the eggs for a vegan egg substitute, like a flax egg or a commercial egg replacer. Ensure your yellow cake mix is also vegan, as some contain dairy or eggs. For the frosting, use a plant-based whipped topping alternative, and verify that the instant vanilla pudding mix is dairy-free, or opt for a homemade vegan vanilla pudding base.
Gluten-Free Version: For those avoiding gluten, a simple switch to a high-quality gluten-free yellow cake mix will be your primary adjustment. Follow the package directions for the gluten-free version, which may require slightly different liquid or egg ratios. The frosting ingredients, typically whipped topping and pudding mix, are often naturally gluten-free, but it’s always wise to check the product labels for any hidden gluten-containing ingredients.
Tropical Twist Enhancement: Elevate the tropical theme by adding finely shredded coconut to both the cake batter and the frosting. You could also fold in some small chunks of fresh or drained canned mango or papaya into the frosting for an even more complex fruit profile. A sprinkle of toasted coconut flakes over the frosted cake would provide a beautiful finish and an extra layer of texture.
How to Prepare Pineapple Layer Cake
Step 1: Oven and Pan Preparation
Begin by preheating your oven to a steady 350°F (175°C). This ensures the oven is at the optimal temperature for even baking from the moment the pans go in. Proper pan preparation is crucial; grease your cake pans thoroughly with non-stick cooking spray or butter and a dusting of flour. This step guarantees that your delicate cake layers will release cleanly after baking, preventing breakage and frustration.
You have a choice in pan size, each offering a slightly different aesthetic and baking time. Using three 6-inch round cake pans will yield thinner layers, resulting in a taller, more dramatic cake with a higher frosting-to-cake ratio. Alternatively, two standard 9-inch round cake pans will produce thicker layers, a more classic cake shape, and slightly shorter overall height, which can sometimes be easier to manage for frosting.
Whichever pan size you choose, ensuring even greasing and flouring is key. For extra assurance against sticking, you can also line the bottoms of your pans with parchment paper circles after greasing and before flouring. This provides a physical barrier that further helps the cakes to lift out smoothly, preserving their beautiful shape.
Step 2: Mixing the Cake Batter
In a large mixing bowl, combine the yellow cake mix, the room-temperature eggs, the neutral vegetable oil, and the specified amount of water. The use of room-temperature eggs is a small but significant detail; they emulsify better with the other ingredients, leading to a smoother batter and a finer cake crumb. Vegetable oil is preferred over butter for cakes that will be chilled, as it remains liquid at cooler temperatures, ensuring the cake stays moist and tender.
Stir these ingredients together until the batter is smooth and consistently blended. Avoid overmixing, which can develop the gluten in the flour too much, resulting in a tougher cake. Scrape down the sides and bottom of the bowl with a spatula to ensure all dry pockets of cake mix are incorporated into the wet ingredients. The batter should have a luxurious, pourable consistency, free from lumps or streaks of dry mix.
The goal here is a homogenous mixture where all components are fully integrated. This thorough mixing ensures that the leavening agents in the cake mix will activate evenly during baking, leading to a cake that rises beautifully and has a uniform texture. The batter should look creamy and inviting, ready to be transformed into delicious cake layers.
Step 3: Baking the Cake Layers
Once your batter is smooth and your pans are prepared, divide the batter evenly among the greased and floured cake pans. Distribute the batter as equally as possible to ensure that all layers bake at the same rate and achieve a similar height. A kitchen scale can be helpful for achieving perfect precision if you want to be absolutely sure of even distribution.
Place the filled pans into the preheated oven. Bake for approximately 35 minutes if using 6-inch pans, or about 25 minutes if using 9-inch pans. These times are approximate, and it’s crucial to test for doneness. A toothpick inserted into the center of each cake should come out clean, with no wet batter clinging to it.
As soon as the cakes are done, remove them from the oven. Let them rest in their pans on a wire rack for about 10 minutes. This brief resting period allows the cakes to firm up slightly, making them less likely to break when you invert them. After this initial rest, carefully invert the cakes out of their pans and onto the wire rack to cool completely. It is vital that the cakes are entirely cool before proceeding to the next steps to prevent the frosting from melting or becoming too runny.
Step 4: Leveling and Soaking the Cake Layers
Once the cake layers have cooled completely to room temperature, it’s time to prepare them for assembly. Using a long, serrated knife, carefully level the tops of each cake layer. Many cakes bake with a domed top, and leveling them creates a flat surface, which is essential for stable stacking and an even distribution of frosting. Take your time with this step; a steady hand ensures neat edges and a professional appearance.
With your leveled layers ready, it’s time to imbue them with that signature pineapple flavor and moisture. Slowly and methodically spoon or pour the pineapple juice over the surface of each cake layer. Don’t rush this process; allow the juice to be absorbed gradually into the tender crumb. This step is a game-changer for the cake’s texture, ensuring it remains incredibly moist and flavorful even after being chilled.
Ensure you distribute the juice as evenly as possible across each layer. The goal is for the cake to soak up the liquid without becoming soggy. Let the layers sit and absorb the juice thoroughly, allowing the pineapple essence to permeate the cake. This soaking step is what elevates this cake from good to absolutely divine, creating an irresistible moistness and a distinct tropical note in every bite.
Step 5: Assembling the Frosting and Cake
While the cake layers are soaking or continuing to cool if they weren’t fully cooled yet, prepare the luscious frosting. In a medium mixing bowl, combine the thawed whipped topping, the instant vanilla pudding mix, and the drained crushed pineapple. Stir these ingredients together until the mixture is thoroughly incorporated and forms a creamy, smooth frosting. Ensure all the pudding mix is dissolved and no dry pockets remain, as this can affect the texture.
Drain the crushed pineapple well to avoid making the frosting too wet. If you prefer a smoother frosting without the texture of pineapple pieces, you can gently pulse the crushed pineapple in a food processor before adding it. However, the small pieces do add a delightful bite and extra burst of fruitiness.
Now, it’s time to assemble your masterpiece. Place one of the soaked cake layers onto your serving plate or cake stand. Spread a generous portion of the prepared frosting evenly over the top of this layer. Carefully place the second cake layer on top of the frosting. If you are using three layers, repeat this process, adding frosting between the second and third layers.
Once all layers are stacked, use the remaining frosting to generously cover the top and sides of the entire cake. Spread the frosting smoothly or create decorative swirls with your spatula or a piping bag for a more finished look. Ensure the cake is completely coated, creating a beautiful canvas for the finished dessert. The simplicity of this frosting makes it incredibly forgiving and easy to work with.
Step 6: Chilling and Setting
The final, and perhaps most crucial, step for this Pineapple Layer Cake is chilling. Once the cake is fully assembled and frosted, cover it loosely with plastic wrap or place it in a cake carrier. Refrigerate the cake for at least 2 to 4 hours, or ideally overnight. This chilling period is not just for setting the frosting; it allows the pineapple juice to fully meld with the cake layers, enhancing the moisture and intensifying the tropical flavors.
During this time, the whipped topping and pudding mix in the frosting will firm up, creating a stable and delightful texture that is wonderfully cool and creamy. The flavors will have a chance to harmonize, transforming the individual components into a cohesive and delicious whole. This make-ahead aspect is what makes this cake so perfect for entertaining, as the bulk of the work is done in advance.
When ready to serve, remove the cake from the refrigerator. If you prefer a slightly softer texture, you can let it sit at room temperature for about 10-15 minutes before slicing. This brief tempering allows the frosting to soften just slightly, making it even more melt-in-your-mouth delicious. The cake will slice cleanly and present beautifully, a testament to the power of proper chilling.
Pro Tips for Pineapple Layer Cake
Tip: Achieve Perfectly Level Layers: Use a long, serrated knife to gently saw off the domed tops of your cake layers. This creates a flat surface for stable stacking and ensures your frosting will spread evenly, resulting in a professional-looking cake.
Tip: Maximize Pineapple Infusion: Don’t rush the pineapple juice soaking step. Spoon it gradually over the cake layers, allowing ample time for absorption. This is key to achieving that signature moist crumb and deep pineapple flavor that defines this cake.
Tip: Ensure Frosting Stability: Make sure your cake layers are completely cool before you begin frosting. If the layers are warm, the whipped topping can melt, leading to a runny and unstable frosting that can slide off.
Tip: The Power of the Chill: This cake truly benefits from ample chilling time. Refrigerating for at least 2-4 hours, or overnight, allows the flavors to meld beautifully and the frosting to set perfectly, making it easier to slice and enjoy.
Tip: Draining is Key: When using crushed pineapple for the frosting, ensure it is well-drained. Excess liquid can make the frosting too thin and affect its ability to set properly. Squeeze out as much moisture as possible before adding it to the whipped topping mixture.
Serving Suggestions for Pineapple Layer Cake
Decoration
Keep the decoration simple and elegant to let the cake’s natural charm shine. A few fresh pineapple chunks artfully arranged on top, perhaps with a sprig of mint, can be visually stunning and reinforce the cake’s tropical theme. Consider a dusting of powdered sugar around the edges, or a delicate piping of reserved frosting along the base for a touch of classic flair. For a festive touch, edible flowers or maraschino cherries can add pops of vibrant color.
Side Dishes
This cake is delightful on its own, but it pairs wonderfully with complementary flavors and textures. Fresh berries, such as strawberries, raspberries, or blueberries, offer a bright, tart contrast to the sweet cake and creamy frosting. A simple scoop of high-quality vanilla bean ice cream provides a luxurious addition, enhancing the overall dessert experience. For a lighter option, a small serving of fresh fruit salad, especially one featuring melon or kiwi, would be refreshing.
Creative Serving Ideas
Transform this cake into a delightful trifle by cubing the layers and layering them with the frosting and perhaps some additional crushed pineapple or whipped cream in individual glasses or a large trifle bowl. For a party, cut the cake into small, bite-sized squares for easy mingling and serving, almost like elegant petit fours. You could also serve warm slices with a drizzle of caramel sauce for a twist on the tropical theme, offering a warm and cool textural contrast.
Preparation & Storage
Storing Leftovers
Any leftover Pineapple Layer Cake should be stored, covered, in the refrigerator. Due to the whipped topping and pudding mix in the frosting, it must be kept chilled to maintain its texture and prevent spoilage. Properly stored, leftovers can remain delicious for up to 4 days. The chilled nature of this cake is part of its appeal, so it’s best enjoyed cold or with a very short tempering period.
Freezing
If you find yourself with more cake than you can consume within a few days, freezing is a great option. You can freeze individual slices or unfrosted cake layers separately. Wrap them tightly in plastic wrap, followed by a layer of aluminum foil or a freezer-safe bag to protect them from freezer burn. Unfrosted cake layers can typically be stored in the freezer for up to 2 months, while frosted slices are best consumed within about 1 month to maintain the optimal texture of the frosting.
Reheating
Reheating is generally not necessary or recommended for this Pineapple Layer Cake, as it is designed to be served chilled. If a slice is particularly firm straight from the refrigerator, a brief rest at room temperature for 10 to 15 minutes is usually sufficient to soften it to a more palatable consistency. This short tempering period allows the frosting to become a little creamier without compromising the cake’s structure or the frosting’s integrity. Avoid any form of actual heating, like microwaves or ovens, as this will melt the frosting and ruin the cake’s intended texture.
Frequently Asked Questions
-
Can I use fresh pineapple instead of canned crushed pineapple for the frosting?
While fresh pineapple is delicious, using it in this specific frosting recipe can be tricky. Fresh pineapple contains enzymes that can break down the whipped topping and pudding mix, preventing the frosting from setting properly and potentially leading to a runny consistency. It’s best to stick with canned, drained crushed pineapple for the most reliable and stable frosting. If you absolutely want to use fresh, ensure it is well-cooked and cooled first to neutralize the enzymes, or opt for a different frosting recipe entirely that is designed to accommodate fresh fruit.
-
Why is my cake dry even after adding pineapple juice?
Several factors could contribute to a dry cake. First, ensure you are measuring your ingredients accurately, especially the dry cake mix and liquids for the batter. Over-baking is a common culprit; always test for doneness with a toothpick and remove the cake from the oven as soon as it comes out clean. If you soaked the cake layers and it still feels dry, you might not have used enough pineapple juice, or the cake might have been slightly over-baked before soaking. Allowing adequate time for the juice to absorb is also crucial, so don’t slice it too soon after soaking.
-
What is the best way to ensure my cake layers don’t stick to the pans?
Proper pan preparation is paramount for easy release. Start by thoroughly greasing the inside of your cake pans with butter or non-stick cooking spray, ensuring you reach all corners and edges. Then, dust the greased pans with a light coating of flour, tapping out any excess. For an extra layer of security, especially with delicate cakes, you can line the bottom of each pan with a circle of parchment paper after greasing and before flouring. This creates a physical barrier that makes it very difficult for the cake to adhere to the pan.