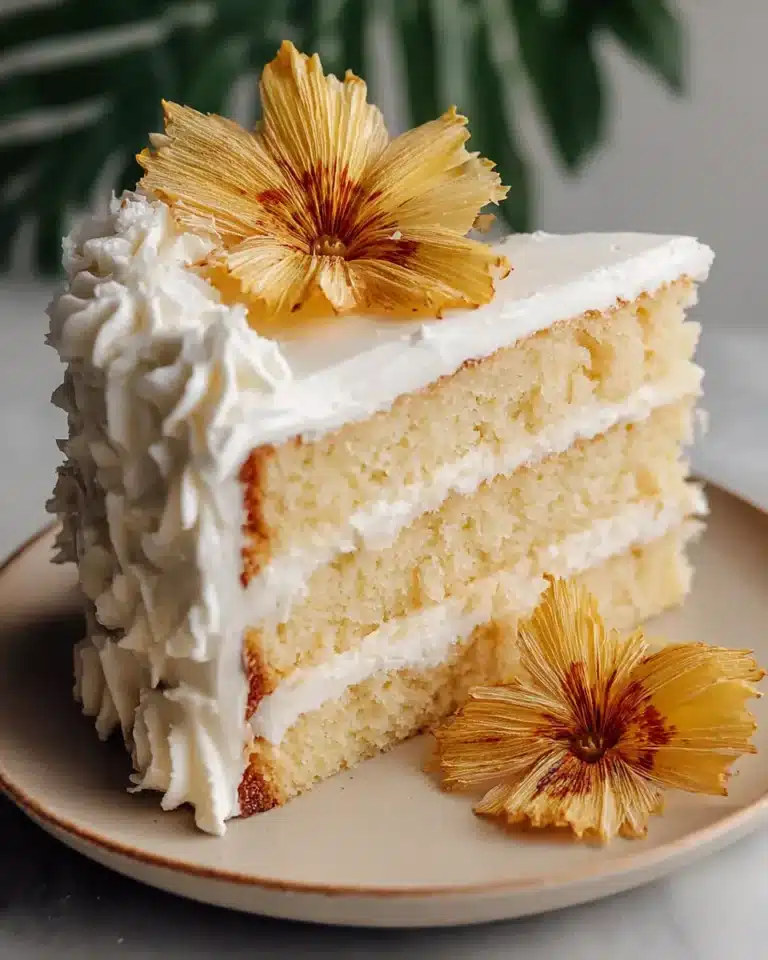
Pineapple Icing for Cake

Quick and beginner-friendly, Pineapple Icing for Cake gives any simple bake a sweet tropical finish with just three main ingredients. It spreads smoothly, sets gently, and adds bright flavor without turning heavy or overly rich.
This is the kind of icing that works beautifully when you want something softer and lighter than a classic buttercream. It brings a clean pineapple note, a glossy texture, and just enough sweetness to make an everyday cake feel a little more special.
Why You Will Love This Recipe
- Tropical Flavor: Infused with the bright, cheerful taste of pineapple, this icing offers a delightful tropical escape for your palate. It’s a refreshing change from more traditional, heavier frostings.
- Silky Smooth Texture: Achieved through careful sifting of confectioners’ sugar and gentle whisking, this icing boasts a luxurious, velvety smoothness that glides effortlessly onto your cakes. It creates a polished, professional look.
- Effortless Preparation: Requiring only a few common pantry staples and minimal mixing time, this recipe is perfect for beginners or when you need a quick dessert topping. No special equipment is needed to achieve fantastic results.
- Versatile Application: Whether for cupcakes, loaf cakes, or a simple sheet cake, this icing adapts beautifully. Its light yet satisfying consistency makes it a crowd-pleaser for any occasion, big or small.
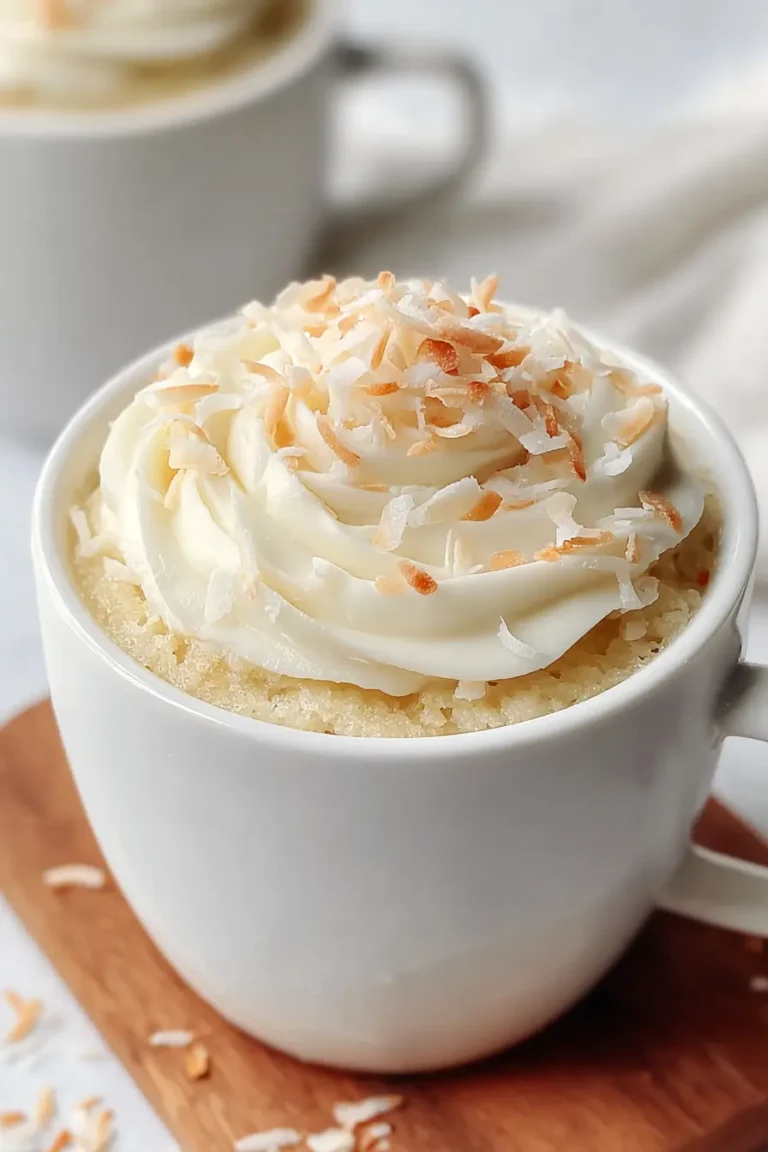
- Visually Appealing Finish: The natural gloss of the icing, especially when finished with a sprinkle of shredded coconut, creates a visually stunning presentation that elevates even the simplest baked goods. It’s as delightful to look at as it is to eat.
Ingredients You Need
The beauty of this pineapple icing lies in its simplicity, relying on just a few high-quality ingredients to deliver maximum flavor and texture. Selecting fresh, flavorful pineapple juice and good quality unsalted butter will make a noticeable difference in the final outcome. Proper preparation, such as sifting your sugar, is key to achieving that wonderfully smooth, glossy finish that makes this icing so special.
Pineapple Icing for Cake
A simple pineapple-flavored icing with a smooth texture and a lightly tropical finish, ideal for spreading over a cooled cake. Quick and beginner-friendly, it gives any simple bake a sweet tropical finish with just three main ingredients. It spreads smoothly, sets gently, and adds bright flavor without turning heavy or overly rich.
- 2 tablespoons melted unsalted butter
- 1 1/2 cups confectioners’ sugar, sifted for a velvety consistency
- 2 tablespoons pineapple juice
- 1Sift the confectioners’ sugar into a medium mixing bowl. This helps eliminate any lumps and creates a smoother icing.
- 2Add the melted butter and pineapple juice to the bowl. Whisk thoroughly until the mixture is thick, smooth, and fully blended, with no pockets of dry sugar remaining.
- 3Spread the finished icing evenly over a completely cooled cake using a spatula. For a tropical touch, top with shredded coconut, if desired.
- 4Let the icing stand for about 30 minutes before serving so it can set properly and cling well to the cake.
Keywords: Pineapple Icing, Cake Frosting, Tropical Flavor, Quick Icing, Beginner-Friendly
- confectioners’ sugar: the backbone of the icing, providing sweetness and structure for a smooth, even coating.
- unsalted butter: melted to impart a subtle richness and a softer, more pliable texture that prevents the icing from becoming too brittle.
- pineapple juice: the star ingredient, offering a bright, tangy tropical essence and the necessary liquid to achieve the perfect spreading consistency.
The exact quantities for these essential ingredients are readily available in the recipe card, ensuring you have all the details for success.
Variations
While the classic pineapple icing is divine on its own, its versatility allows for exciting flavor expansions. For a delightful twist, consider infusing it with a hint of citrus zest, such as lime or lemon. This would add an extra layer of brightness, cutting through the sweetness and enhancing the tropical notes even further, making it a perfect companion for cakes with a similar citrus profile.
Another fantastic variation involves incorporating a touch of warming spice. A tiny pinch of cinnamon or a whisper of ginger can add surprising depth and complexity. This would be particularly wonderful if you are pairing the icing with a spice cake or a gingerbread-inspired bake, offering a comforting yet still bright flavor profile.
For those seeking a richer, more indulgent experience, a subtle addition of coconut cream or a small amount of finely grated coconut can be whisked in. This not only amplifies the tropical theme but also introduces a delightful textural element and a creamier mouthfeel. This variation pairs exceptionally well with coconut cakes or even a simple vanilla sponge, turning it into a mini-getaway.
How to Prepare Pineapple Icing for Cake
Step 1: Prepare the Dry Ingredients
The first crucial step in creating this luscious pineapple icing is to ensure your confectioners’ sugar is perfectly smooth. To achieve this, it is highly recommended to sift the sugar into a medium-sized mixing bowl. This process removes any small lumps that might have formed during storage, guaranteeing a silky-smooth final consistency for your icing. Don’t skip this part; it truly makes a difference in the texture of the finished product.
Take your time with the sifting, using a fine-mesh sieve or a dedicated sifter. Gently tap the sides of the sieve to help all the sugar pass through. This attention to detail at the beginning sets the stage for a professional-looking and tasting icing. The bowl you choose should be large enough to accommodate all ingredients comfortably, allowing for easy whisking without spillage.
If you find your confectioners’ sugar is particularly clumpy, you might need to press some of the larger lumps through the sieve with the back of a spoon. This ensures that every particle of sugar is as fine as possible, ready to meld seamlessly with the wet ingredients. A well-sifted sugar is the foundation of a truly smooth icing, preventing any grittiness and ensuring a delightful mouthfeel.
Step 2: Incorporate the Wet Ingredients
Once your confectioners’ sugar is perfectly sifted and ready in the bowl, it’s time to introduce the liquid elements that will transform it into a spreadable glaze. Begin by adding the measured amount of melted unsalted butter. The butter adds a subtle richness and helps to create a more pliable icing that won’t crack when spread. Ensure your butter is melted but not hot, allowing it to incorporate smoothly into the sugar.
Next, pour in the pineapple juice. This is where the characteristic tropical flavor comes into play, and it also serves to loosen the sugar into the desired consistency. Measure the juice accurately to avoid making the icing too thin from the outset. The order of adding the butter and juice can sometimes matter, with some preferring to add the butter first to coat the sugar particles slightly before the juice is introduced, which can aid in a smoother blend.
As you add these wet ingredients, resist the urge to over-whisk immediately. Allow them a moment to begin mingling with the sugar. The goal is to create a rich, somewhat thick paste that will gradually become smoother as you continue to whisk. This initial blending ensures that there are no dry pockets of sugar left behind, which can be difficult to incorporate later on and might affect the final texture.
Step 3: Whisk to Perfection
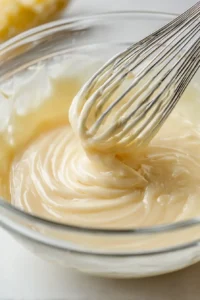
Now comes the satisfying part: whisking the mixture into a smooth, glossy icing. Begin with a gentle motion, gradually increasing the speed as the ingredients start to combine. You are looking for a consistency that is thick enough to coat the back of a spoon without immediately running off, yet fluid enough to spread easily over your cake. This stage is where the magic happens, transforming separate components into a cohesive, delectable topping.
The whisking action is key to developing the smooth texture. Keep whisking steadily for a minute or two, ensuring that you scrape the sides and bottom of the bowl to incorporate all the sugar. You should start to see a beautiful sheen develop on the surface of the icing as it emulsifies. This glossiness is a tell-tale sign that the ingredients are well-blended and the icing is developing its characteristic luxurious finish.
Pay close attention to the texture as you whisk. If you notice any streaks of sugar or if the mixture seems too stiff to blend, a tiny bit more pineapple juice can be added. Conversely, if it looks too thin, a little extra sifted confectioners’ sugar can be introduced. The aim is to achieve a perfect balance between spreadability and body. A well-whisked icing will look almost like a thick glaze, ready to adorn your baked masterpiece.
Step 4: Adjust Consistency as Needed
Once you have achieved a generally smooth mixture, it’s time to critically assess its texture and make any necessary adjustments. This step is crucial because oven temperatures, humidity, and even the specific type of pineapple juice can slightly alter the final consistency. Hold a spatula or spoon into the icing and lift it; the icing should coat the back smoothly and slowly drip off in a ribbon-like fashion.
If the icing feels too stiff to spread comfortably, almost like a paste, it needs a little loosening. Add more pineapple juice, but do so very cautiously – just a few drops at a time. Whisk thoroughly after each addition and re-evaluate the texture. You want to achieve a spreadable consistency that is not runny, but flows easily and evenly over the cake’s surface without creating drag marks. Too much liquid will result in an icing that slides off the cake.
On the other hand, if your icing seems too thin and watery, or it’s dripping off the spatula too quickly, it needs to be thickened. The best way to do this is by gradually adding more sifted confectioners’ sugar. Again, add it slowly, a tablespoon at a time, whisking until it’s fully incorporated. Continue this process until the icing reaches that perfect, creamy, spreadable consistency that will hold its shape on the cake without running off the sides.
Step 5: Apply to Cooled Cake
The most exciting part is now at hand: dressing up your baked creation with this beautiful pineapple icing. It is absolutely essential that your cake is completely cool before you begin icing. Applying icing to a warm cake will cause it to melt, slide off, and create a mess, negating all your hard work. Allow your cake to rest and cool down to room temperature, ideally on a wire rack.
Once the cake is cool, use an offset spatula or the back of a spoon to gently spread the icing over the top. Start from the center of the cake and work your way outwards. This technique helps to create an even layer and guides the icing towards the edges. You can aim for a smooth, polished finish or a more rustic, textured look, depending on your preference. The gentle spreading motion ensures the cake’s surface remains intact.
For an added touch of elegance, you can let the icing drip slightly over the sides of a loaf cake or allow it to pool naturally on the surface of a single-layer cake. If you are using a structured cake like a layer cake, try to create a neat edge. The goal is to cover the cake evenly, creating a delightful visual appeal and a delicious flavor contrast with the cake itself. Be patient and enjoy the process of transforming your bake.
Step 6: Allow the Icing to Set
After the icing has been beautifully applied, resist the temptation to slice and serve immediately. Allowing the icing a short period to set is a critical step that ensures a cleaner presentation and a more pleasant eating experience. This resting period allows the sugars in the icing to firm up slightly, making it less prone to smudging or sliding when the cake is cut.
Find a safe spot for your iced cake, away from any drafts or direct sunlight, and let it rest for approximately 30 minutes. During this time, the icing will develop a soft, satiny finish. This setting time is just enough to create a delicate crust, which helps to hold the icing in place, making each slice look neat and appealing on the plate. It’s a small step that significantly elevates the final presentation.
This brief setting time also allows the flavors to meld beautifully with the cake. The slightly firm yet still yielding texture of the set icing provides a lovely contrast to the soft crumb of the cake. It’s this final touch that makes your homemade cake look as if it came straight from a professional bakery. Patience here pays off handsomely in terms of appearance and enjoyment.
Pro Tips for Pineapple Icing for Cake
Sift Just Before Mixing: For the absolute best texture, sift your confectioners’ sugar immediately before you begin making the icing. This ensures it’s at its lightest and airiest, which will translate into a smoother, easier-to-whisk icing. Sugar can sometimes clump if left sitting too long after sifting, especially in humid conditions.
Cake Temperature is Key: Always ensure your cake is completely cool to the touch before applying the icing. Even a hint of warmth from a freshly baked cake can cause the icing to melt and slide right off. Patience here is rewarded with a perfectly set, smooth topping. A wire rack is your best friend for cooling cakes efficiently.
Embrace the Tropical Garnish: For an extra burst of tropical flair and visual appeal, consider a light sprinkle of shredded, sweetened coconut over the icing while it’s still wet. The icing will act as a ‘glue,’ holding the coconut in place. This adds a lovely texture and enhances the pineapple flavor profile beautifully, making your cake truly stand out.
Don’t Over-Whisk: While you want to achieve a smooth consistency, be mindful not to over-whisk the icing, especially after it has reached the desired texture. Excessive whisking can sometimes incorporate too much air, making the icing a bit frothy, or can break down the emulsification, leading to a thinner consistency than you initially aimed for. Whisk until smooth and glossy, then stop.
Taste and Adjust: Before you finalize the icing and apply it, always give it a quick taste. This is your opportunity to ensure the sweetness is to your liking and the pineapple flavor is pronounced enough. If it needs a touch more sweetness, add a tiny bit more sifted sugar; if it needs more tang, a drop more pineapple juice can work wonders. Adjusting at this stage is far easier than after application.
Serving Suggestions for Pineapple Icing for Cake
Decoration
The simple elegance of pineapple icing lends itself to a variety of beautiful decorative finishes. A classic choice is a light scattering of toasted shredded coconut, which not only adds a lovely textural contrast but also amplifies the tropical theme. For a more intricate look, you could pipe small rosettes or decorative borders around the edge of the cake using a star tip, creating a charming, handcrafted appeal.
Consider adding a few thin slices of fresh pineapple or delicate pineapple leaves as a vibrant garnish, making the cake an edible centerpiece. A dusting of edible glitter or shimmering luster dust can also impart a magical sparkle, perfect for celebrations. Even a simple swirl with the back of a spoon can create an appealing, rustic texture that looks wonderfully inviting.
For a more sophisticated presentation, try creating delicate patterns by drizzling a contrasting icing, like a thin white royal icing, over the pineapple glaze. Alternatively, a few strategically placed edible flowers can add a pop of color and a touch of natural beauty, transforming your cake into a stunning work of art.
Side Dishes
This pineapple icing pairs exquisitely with a range of cake flavors, and its bright, tropical profile makes it a fantastic accompaniment to lighter, fruit-forward desserts. Consider serving slices of this iced cake alongside a simple fruit salad featuring melon, berries, and mango; the fresh fruit flavors will complement the icing’s tanginess without competing.
For a truly tropical experience, pair it with a small scoop of coconut sorbet or a creamy scoop of vanilla bean ice cream. The cool, refreshing nature of the sorbet or the classic sweetness of the ice cream will provide a delightful contrast to the soft texture of the cake and its icing. These simple additions elevate the dessert into a more complex, satisfying experience.
If you are serving this cake as part of a larger dessert spread, it can also stand beautifully on its own. However, for an extra touch of decadence, a drizzle of a simple passionfruit or mango coulis around the plate can add another layer of tropical flavor and visual appeal. These complementary sauces enhance the overall tropical symphony of the dessert.
Creative Serving Ideas
Imagine presenting miniature pineapple-iced cupcakes as part of a brunch spread or a baby shower. Their small size makes them perfect for guests to sample, and the cheerful icing brings a touch of sunshine to any gathering. A simple toothpick topped with a small paper umbrella inserted into each cupcake adds a playful, festive touch.
Another creative idea is to use this icing on a loaf cake and slice it thinly for afternoon tea. Served alongside a delicate floral tea or a refreshing iced green tea, it creates an elegant and light refreshment. This sophisticated presentation is perfect for a more intimate gathering or a moment of personal indulgence.
For a truly unique dessert experience, consider using the pineapple icing as a filling between two smaller cake layers or even as a topping for a dense pound cake. You could also incorporate finely chopped fresh pineapple into the icing for added texture and bursts of juicy flavor. This adaptability means the icing can be the star of many different dessert creations.
Preparation & Storage
Storing Leftovers
If you find yourself with leftover pineapple icing that hasn’t yet graced a cake, it should be stored properly to maintain its quality. Seal it tightly in an airtight container or cover the bowl with plastic wrap, ensuring no air can get in. It’s best to store it in the refrigerator, where it will typically remain fresh and usable for up to 4 days.
When you are ready to use the refrigerated icing, it will likely be quite firm. Allow it to sit at room temperature for about 15 to 20 minutes to soften slightly. Then, give it a good whisk. This will help to break up any firm spots and restore its smooth, spreadable consistency. If it still feels a bit too stiff, a few drops of extra pineapple juice can help loosen it further.
If the icing has already been applied to a cake, cover the cake loosely with plastic wrap or place it in a cake dome to protect it. Store the iced cake in the refrigerator for about 3 days. It’s advisable to let slices stand at room temperature for a few minutes before serving to allow the icing to soften to its most pleasant texture.
Freezing
This pineapple icing is remarkably well-suited for freezing, making it a convenient option for making ahead of time. Once prepared, transfer the icing into a freezer-safe container. Ensure the container is airtight to prevent freezer burn and the absorption of any unwanted odors from other foods.
When properly sealed, the icing can be stored in the freezer for up to one month. Freezing is an excellent way to prepare it well in advance of a special occasion, saving you time on the day of baking. Label the container with the date of freezing to keep track of its freshness. This allows for spontaneous baking without the rush of making the icing from scratch.
To thaw the frozen icing, transfer the container to the refrigerator overnight. Once thawed, it will likely be firm. Before you plan to use it, let it sit at room temperature for a bit and then whisk it thoroughly. This re-whisking is essential to bring back its smooth, creamy texture. If it seems a little thick, a tiny splash of pineapple juice can be added to achieve the perfect spreadable consistency again.
Reheating
The term “reheating” might not be entirely accurate for this type of pineapple icing, as it is not a cooked frosting and doesn’t require heat to become usable again. Instead, the process involves gently bringing it back to the correct temperature and texture after it has been chilled or frozen.
If the icing has been refrigerated and has become firm, the primary method to “reheat” it is simply to let it come to room temperature. Leave it on the counter for about 15-20 minutes, then give it a vigorous whisk. This mechanical action helps to break down any solidified butter and smooth out the sugar crystals, restoring its creamy flow. If it’s still too stiff after this, as mentioned before, a few drops of pineapple juice can assist.
For icing that has been frozen, the thawing process in the refrigerator overnight is the first step. Afterward, it will also need to be brought back to room temperature and then thoroughly whisked. You are not looking to warm it up, but rather to ensure the ingredients are fully reintegrated and the texture is pliable. Never apply heat directly to this icing, as it will likely cause the sugar to melt and the butter to separate, ruining its consistency.
Frequently Asked Questions
-
Can I make this icing ahead of time, and how should I store it if I do?
Absolutely, this pineapple icing is a fantastic candidate for making ahead. You can prepare it and store it in an airtight container in the refrigerator for up to 4 days. Before you plan to use it, take it out of the fridge and let it sit at room temperature for about 15-20 minutes to soften slightly. Then, give it a good whisk to bring it back to its smooth, spreadable consistency. If it seems a bit too firm, you can add a few drops of extra pineapple juice to loosen it up to your desired texture.
-
What should I do if my pineapple icing turns out too thick or too thin?
It’s quite common to need to adjust the consistency of homemade icing, and this pineapple version is no exception. If your icing is too thick and difficult to spread, the solution is simple: add more pineapple juice. Introduce it very gradually, just a few drops at a time, whisking after each addition until you reach a smooth, easily spreadable consistency. Be cautious not to add too much, as it can quickly become too runny. Conversely, if the icing is too thin or runny, you can thicken it by adding more sifted confectioners’ sugar. Again, add it slowly, a tablespoon at a time, whisking thoroughly until the desired creamy, drizzly texture is achieved.
-
Can I use a different type of juice or flavoring in this icing?
Yes, you can certainly experiment with different flavors! The pineapple juice provides a specific tropical tang and liquid base. If you wish to substitute, consider using other bright, acidic fruit juices like orange juice, lemon juice, or lime juice. These will impart their own unique flavor profiles. You could also try using a dairy-based liquid like milk or cream, though this might alter the texture slightly. For non-juice flavorings, you can add extracts like vanilla, almond, or coconut, but be mindful that extracts are highly concentrated, so start with just a tiny amount and add more to taste.