Easy Patty Melt Recipe – Classic Comfort Food at Home!
Get ready to experience a diner classic reimagined for your home kitchen! This patty melt recipe is a symphony of flavors and textures, bringing together the savory goodness of a juicy burger with the comforting embrace of a perfectly grilled cheese.
Imagine tender, seasoned ground beef nestled between slices of toasted rye bread, generously layered with sweet, caramelized onions and ooey-gooey melted cheese. It’s the ultimate comfort food that’s surprisingly simple to prepare, making it a weeknight winner for the whole family.
Why You Will Love This Recipe
- Effortless Assembly: With a few key steps, you’ll have delicious patty melts ready to enjoy, perfect for a quick and satisfying meal.
- Rich, Savory Flavors: The combination of well-seasoned beef, deeply caramelized onions, and melty cheese creates an unforgettable taste profile.
- One-Skillet Simplicity: Most of the cooking can be done in a single skillet, minimizing cleanup and maximizing convenience.
- Customizable Delight: Easily adapt the cheese, bread, or even add extra toppings to suit your personal preferences and dietary needs.
- Nostalgic Comfort: This recipe taps into the beloved flavors of classic diners, offering a taste of familiar comfort with an elevated homemade touch.
Ingredients You Need
The magic of a great patty melt lies in the quality of its simple ingredients. Choosing fresh, good-quality ground beef and ripe onions will significantly elevate the final taste. Using your favorite bread and a blend of cheeses you adore ensures a personalized touch that makes this recipe uniquely yours. Remember, the success of this diner classic hinges on bringing out the best in each component.
Patty Melt Recipe
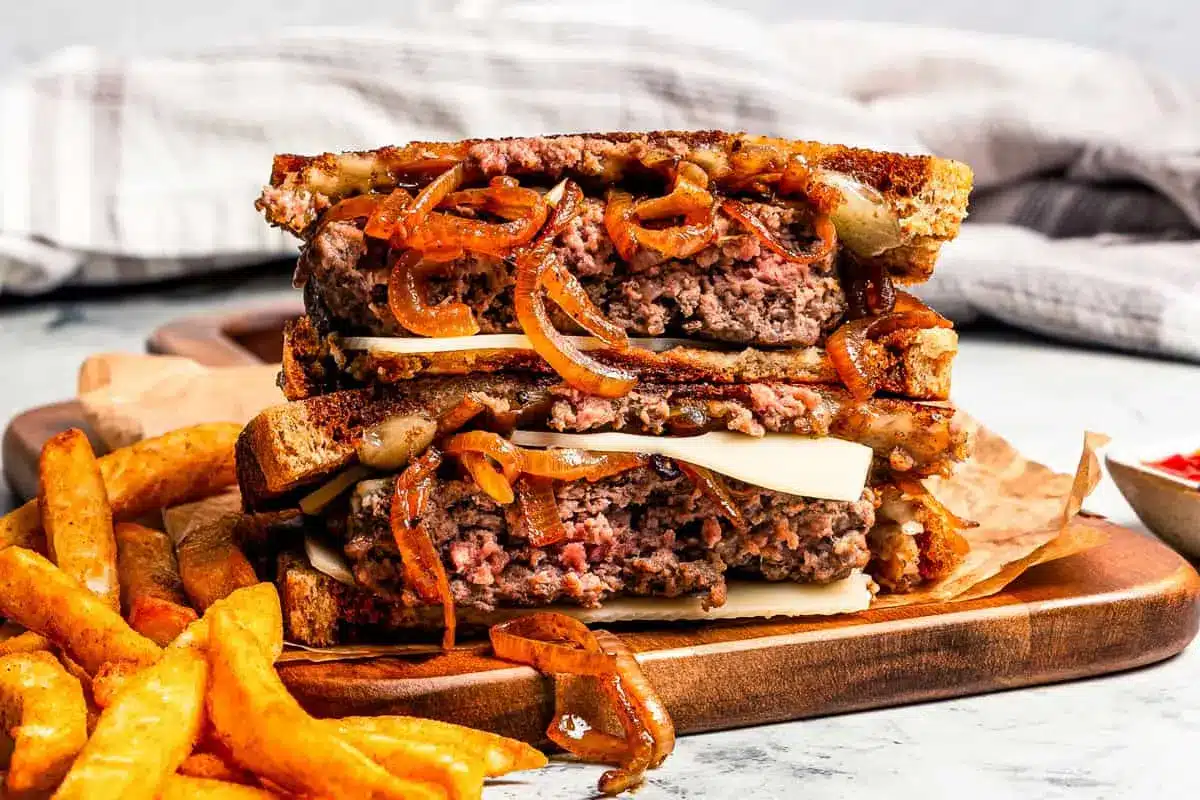
This classic patty melt recipe features caramelized onions, gooey, melty cheese, and juicy ground beef patties grilled between slices of toasted rye bread. It's a diner-style comfort food favorite that's easy to make at home.
- For the patties: 1/2 pound ground chuck, salt and freshly ground black pepper to taste, 1 1/2 tablespoons cooking oil
- For the onions: 1 large onion, 1 tablespoon butter, salt and freshly ground black pepper to taste, 2-3 tablespoons water (or as needed)
- Additional: 4 slices rye bread (or the desired type of bread), 2 tablespoons mayonnaise, 4 slices Provolone cheese, 2 slices Emmental cheese
- 1Season the ground beef with salt and pepper. Shape the meat into two patties, trying to mimic the shape of your bread slices.
- 2Heat oil in a skillet over medium-high heat. Add the patties and cook for 3-4 minutes per side or until cooked through. Remove the patties from the skillet and set aside, covered on a plate to collect the meat juices.
- 3Peel and thinly slice the onions into half-moons. Melt the butter in a large skillet over medium-high heat.
- 4Season the onions with salt and pepper, and cook for 5 minutes. Then reduce the heat to medium and cook the onions, stirring, until they start to change color. At this point, add some water to prevent burning. Scrape down any browned bits. Continue to cook the onions for 20 minutes, adding water as needed. Finally, stir any meat juices into the onions. Remove the onions from the skillet and set aside.
- 5Spread mayonnaise over one side of the bread slices. Add the bread slices to the skillet, mayonnaise side down. Place the skillet on the stove over medium-high heat.
- 6Add 2 slices of Provolone cheese on top of a slice of bread, followed by half of the onions and a cooked patty. Add the Emmental cheese on top of the meat patty, and close the sandwich with another piece of bread, mayonnaise side up.
- 7Cook for 2-3 minutes per side or until the bread is browned and the cheese is melted. Repeat the same with the second sandwich.
- 8Slice the patty melt in half and serve.
Keywords: patty melt, beef, burger, cheese, grilled cheese, rye bread, caramelized onions, diner food, comfort food
Quantities for all these wonderful ingredients are detailed in the printable recipe card.
Variations
Take your patty melt experience to the next level with these exciting variations. For a lighter, healthier option, consider using lean ground turkey or chicken. You can also experiment with different spice blends mixed into the ground meat for an extra layer of flavor. A pinch of smoked paprika or a dash of Worcestershire sauce can transform the beef patty.
For those following a low-carb lifestyle, the bread is the main hurdle. Opt for a lettuce wrap, using large, sturdy lettuce leaves like iceberg or butter lettuce to hold everything together. Alternatively, you could explore cloud bread or almond flour-based bread alternatives that offer a bread-like texture without the carbs. This adjustment maintains the delicious core of the patty melt.
Embrace a vegetarian twist by swapping the ground beef for a hearty mushroom-based patty or a well-seasoned plant-based ground substitute. Black bean or chickpea patties also work wonderfully, providing a different texture and flavor profile. Ensure your chosen vegetarian patty is flavorful on its own, as it will be the star of your meat-free melt.
How to Prepare patty melt recipe
Step 1: Crafting the Perfect Patties
Begin by taking your ground chuck and gently seasoning it. A generous pinch of salt and a good grind of fresh black pepper are essential to enhance the beef’s natural flavor. Avoid overworking the meat, as this can lead to tough patties; handle it just enough to combine the seasonings.
Next, divide the seasoned meat into two equal portions. Carefully shape each portion into a patty that is roughly the size of your bread slices. It’s helpful to create a slight indentation in the center of each patty; this prevents them from puffing up too much during cooking and ensures they cook evenly. Aim for a patty thickness that will cook through beautifully without becoming dry.
Step 2: Searing the Savory Foundations
Heat a tablespoon and a half of cooking oil in a sturdy skillet, ideally cast iron, over medium-high heat. Once the oil is shimmering and hot, carefully place the two seasoned patties into the skillet. Listen for that satisfying sizzle, a sign that you’re on your way to perfectly seared beef.
Allow the patties to cook undisturbed for approximately 3 to 4 minutes per side. This duration should be sufficient for them to cook through to a juicy medium or medium-well, depending on your preference. The goal is to achieve a beautiful brown crust on both sides while keeping the inside tender and succulent. Resist the urge to press down on the patties with your spatula, as this can squeeze out the flavorful juices.
Step 3: Resting and Juices
Once the patties have reached your desired level of doneness, carefully remove them from the skillet. Place them on a clean plate and loosely tent them with aluminum foil. This resting period is crucial; it allows the juices within the meat to redistribute, ensuring each bite is as moist and flavorful as possible. The residual heat from the patties will also continue to cook them slightly.
While the patties are resting, don’t immediately clean the skillet if you’re planning to use it for the onions and grilling. The browned bits of beef left in the pan, known as fond, are packed with incredible flavor and will contribute significantly to the taste of your caramelized onions and the final sandwich. This technique is a cornerstone of developing deep, savory flavors in cooking.
Step 4: The Art of Caramelizing Onions
Prepare your onions by peeling them and then slicing them thinly into half-moons. This uniform slicing ensures they cook evenly and develop that wonderful sweetness. Heat one tablespoon of butter in the same skillet you used for the patties, now over medium-high heat.
Add the sliced onions to the melted butter and season them with a pinch of salt and pepper. Allow them to cook for about 5 minutes, stirring occasionally, until they begin to soften and turn translucent. This initial sear helps to kickstart the caramelization process by developing some color and flavor on the onion surfaces.
Reduce the heat to medium and continue to cook the onions, stirring more frequently now to prevent them from burning. As they start to brown and sweeten, you’ll notice a significant change in their texture and aroma. To prevent any sticking or burning and to help them cook down further, add 2 to 3 tablespoons of water, or as needed, to the skillet. Scrape down any browned bits from the bottom of the pan; these add depth and richness to the onions.
Continue this process of cooking and deglazing for a total of about 20 minutes. The onions should become deeply golden brown, tender, and wonderfully sweet. The natural sugars in the onions have now been coaxed out, creating a delicious topping for your patty melt. This slow cooking is essential for achieving that signature sweet and savory onion flavor that defines a great patty melt.
In the final moments of caramelization, incorporate any meat juices that collected from the resting patties into the onions. Stir them in thoroughly; this simple step infuses the sweet onions with even more beefy essence, amplifying the overall savory profile of your sandwich. Once beautifully caramelized, remove the onions from the skillet and set them aside on a plate.
Step 5: Assembling the Masterpiece
Now it’s time to bring everything together. Take your slices of rye bread and spread a thin, even layer of mayonnaise on one side of each slice. The mayonnaise acts as a binder and creates a beautifully golden and crispy exterior when grilled, often superior to butter in achieving that perfect toast. Some prefer butter, but mayonnaise provides a lovely tangy richness.
Place the bread slices into the skillet, with the mayonnaise-covered side facing down. Position the skillet back over medium-high heat. This is where the transformation from raw ingredients to a delectable sandwich begins.
On top of one of the bread slices in the skillet, layer two slices of Provolone cheese. Allow the cheese to begin melting slightly from the heat of the pan. Next, generously spoon about half of the beautifully caramelized onions over the Provolone cheese, distributing them evenly.
Carefully place one of the rested, juicy beef patties on top of the layer of onions. The warmth from the onions and the skillet will help to continue cooking the patty gently. On top of the beef patty, place the two slices of Emmental cheese. The Emmental’s nutty flavor pairs wonderfully with the beef and onions.
Finally, crown your creation by placing the second slice of bread on top, ensuring the mayonnaise-covered side faces upwards, ready to grill. This meticulous layering ensures that every bite of your patty melt will be a harmonious blend of textures and tastes. The cheese will melt perfectly between the hot patty and the bread, creating a delightful gooeyness.
Step 6: The Golden Grill
Grill the assembled sandwiches in the skillet for approximately 2 to 3 minutes per side. Keep a close eye on them, as they can brown quickly. The goal is to achieve a perfectly golden-brown, crispy crust on the bread and to ensure the cheese is completely melted and gooey. Gently press down with your spatula occasionally to encourage even browning and cheese melt.
Once the first sandwich is beautifully golden and the cheese is oozing, carefully flip it to grill the other side. Repeat this process for the second sandwich, ensuring both sides of each patty melt achieve that desirable toasted perfection. The aroma filling your kitchen at this stage will be absolutely irresistible, a testament to the simple yet profound flavors at play.
Once both sandwiches are grilled to golden perfection and the cheese is delightfully melted, remove them from the skillet. Let them rest for just a moment before slicing. This brief rest allows the fillings to settle slightly, making them easier to slice and serve without everything spilling out. It’s the final flourish on your culinary masterpiece.
For the best presentation and ease of eating, slice each patty melt in half diagonally. This classic diner presentation showcases the beautiful layers of caramelized onions, melted cheese, and savory beef. Serve them immediately while they are hot, crispy, and incredibly satisfying. Enjoy the fruits of your labor!
Pro Tips for patty melt recipe
Don’t Skip the Onion Caramelization: This step is non-negotiable for achieving the signature sweetness and depth of flavor in your patty melt. Rushing this process will result in a less flavorful and less enjoyable sandwich. Patience here is key to unlocking the onions’ full potential.
Quality Bread Matters: Rye bread is traditional for a reason, offering a slightly tangy and hearty base that complements the rich fillings. However, don’t hesitate to experiment with sourdough, pumpernickel, or even a good quality challah if rye isn’t your favorite. The bread is a structural and flavorful component.
Cheese Combination is Key: While Swiss, cheddar, and American cheeses are popular choices, using a blend like Emmental and Provolone, as suggested, offers a complex flavor profile. Emmental provides a nutty sweetness, while Provolone adds a mild, slightly smoky, and stretchy melt. Consider a sharp cheddar for a bit of tang.
The Mayo Trick: Spreading mayonnaise on the outside of the bread slices instead of butter creates an exceptionally crispy and evenly browned crust. The oil and egg in the mayonnaise toast up beautifully, providing a slightly richer flavor than butter alone. It’s a simple technique that makes a big difference.
Skillet Choice: A well-seasoned cast-iron skillet is ideal for this recipe. It retains heat wonderfully, ensuring even cooking and that perfect crispy sear on the bread and patties. If you don’t have cast iron, a heavy-bottomed stainless steel skillet will also work effectively.
Serving Suggestions for patty melt recipe
Decoration
While the patty melt is a star on its own, a few simple decorative touches can enhance its appeal. A sprinkle of fresh chives or finely chopped parsley over the top of the sandwich just before serving can add a pop of color and a hint of fresh, herbaceous flavor. If you’re serving with a side of sauce, a small dollop of extra caramelized onions or a swirl of your favorite burger sauce on the side plate can look very professional.
Side Dishes
The classic accompaniment to a patty melt is, of course, french fries, and this recipe is no exception. Crispy, golden fries, whether homemade or store-bought, are the perfect salty counterpoint to the rich, savory sandwich. Sweet potato fries offer a slightly sweeter, more nutritious alternative that also pairs beautifully. For a lighter option, a crisp green salad with a simple vinaigrette provides a refreshing contrast, cutting through the richness of the melt.
Consider serving alongside coleslaw for a creamy, crunchy side. A simple cucumber and tomato salad can also offer a refreshing element. Roasted vegetable medleys, like broccoli or Brussels sprouts, can add a wholesome touch. Even a bowl of pickles, offering a briny crunch, completes the diner experience.
Creative Serving Ideas
For a truly elevated experience, consider serving your patty melt “au jus” style, reminiscent of a French dip. Prepare a simple, flavorful beef broth or demi-glace to serve in a small ramekin on the side for dipping. This adds an extra layer of savory depth and moisture to each bite.
You could also present your patty melt as part of a mini-diner platter, alongside a small portion of potato wedges, a dill pickle spear, and perhaps a tiny cup of coleslaw. This offers a complete, satisfying meal experience. Another fun idea is to offer a selection of dipping sauces, such as a homemade burger sauce, a spicy aioli, or even a classic ketchup and mustard combination, allowing guests to customize their flavors.
Preparation & Storage
Storing Leftovers
If you happen to have any leftover patty melt components, it’s best to store them separately to maintain optimal texture. Refrigerate any remaining cooked patties and caramelized onions in airtight containers. They will typically keep well in the refrigerator for 3 to 4 days. It’s generally not recommended to store fully assembled sandwiches, as the bread can become soggy.
Freezing
The cooked beef patties and the caramelized onions freeze remarkably well. Once completely cooled, wrap them individually or place them in freezer-safe bags or containers. They can be stored in the freezer for up to 2 months. Ensure they are well-sealed to prevent freezer burn. Thawing them in the refrigerator overnight is the best method before reheating.
Reheating
To reheat leftover patties and onions, you have a couple of good options. You can gently warm them in the microwave until heated through. For a better texture, especially for the patties, reheating them in a skillet on the stovetop over medium-low heat is preferable. Once reheated, you can assemble fresh slices of rye bread with mayonnaise and grill the patty melt as you would a fresh one.
Frequently Asked Questions
-
What type of bread is best for a patty melt, and can I use something other than rye?
The classic and most traditional bread for a patty melt is rye bread due to its slightly tangy flavor and sturdy texture, which holds up well to the fillings. However, you can absolutely substitute it with other breads that offer a good balance of flavor and structure. Sourdough bread is an excellent alternative, providing a pleasant tanginess that complements the rich ingredients. Pumpernickel bread offers a deeper, slightly sweet flavor. For a milder option, a good quality white bread or even brioche can be used, though they might not offer the same classic flavor profile. When choosing your bread, look for slices that are not too thin, as they need to withstand the grilling process and hold the juicy patty and melted cheese without falling apart. The key is to find a bread that toasts well and has enough integrity to support all the delicious components. -
How do I prevent my patty melt from becoming greasy or soggy?
To prevent a greasy patty melt, start by using ground beef that isn’t excessively fatty; 80/20 is good, but if you prefer leaner, 85/15 or 90/10 can also work, though they might require a bit more care to stay juicy. Ensure you drain any excess fat from the skillet after cooking the patties if there’s an overwhelming amount. For sogginess, the primary culprit is often moisture from the fillings or condensation. Ensure your caramelized onions are not overly wet; allow them to cool slightly before assembling the sandwich. Using mayonnaise on the outside of the bread, as opposed to butter, can also contribute to a crispier crust that acts as a better barrier against internal moisture. Grilling the sandwich until the bread is deeply golden and toasted on both sides is crucial; this crisp exterior helps seal in the fillings and prevents a soggy texture. -
Can I prepare the components of a patty melt ahead of time?
Yes, absolutely! Preparing components in advance can significantly speed up the assembly process, making this a fantastic meal for busy evenings. The beef patties can be formed and seasoned a day in advance and stored in the refrigerator. Caramelizing the onions is also an excellent make-ahead task; they can be cooked, cooled, and stored in an airtight container in the refrigerator for up to 3-4 days. The onions often taste even better after sitting for a day, as their flavors meld. Cheese can be sliced and ready to go. The bread should be kept at room temperature. When you’re ready to assemble, simply cook the patties if they weren’t pre-cooked, and then proceed with assembling and grilling the sandwiches. This makes the final cooking stage very quick and efficient.