Juicy Oven Roasted Chicken – No More Dry Chicken!
Discover the secret to perfectly juicy and tender oven-roasted chicken breasts that will redefine your weeknight meals. No more dry, flavorless poultry; this recipe guarantees succulent results every single time, turning a simple ingredient into a culinary star.
This method, perfected over countless culinary experiments, focuses on a quick brining process and a robust seasoning blend that infuses the chicken with incredible flavor and moisture. You’ll be amazed at how a few simple steps can transform ordinary chicken breasts into an extraordinary dish that even the pickiest eaters will adore.
Why You Will Love This Recipe
- Unbeatable Juiciness: This recipe guarantees chicken breasts that are incredibly moist and tender, eliminating the common pitfall of dry, overcooked poultry. The brining process is the key to this succulent texture.
- Effortless Preparation: Despite the restaurant-quality results, this dish is surprisingly easy to prepare, making it ideal for busy weeknights or when you want a fuss-free yet impressive meal. The steps are straightforward and require minimal active cooking time.
- Versatile Flavor Profile: The carefully crafted seasoning blend is delicious on its own, but this recipe also serves as a fantastic canvas for your favorite spices and herbs, allowing for endless flavor variations to suit any palate. It’s adaptable to your personal taste preferences.
- Quick Cooking Time: With a relatively short cooking period in the oven, you can have a wholesome and delicious meal on the table in under an hour, including the brining time. This efficiency makes it a go-to option for any occasion.
- Excellent for Meal Prep: The perfectly cooked chicken breasts store and reheat beautifully, making them an ideal component for healthy lunches or quick dinners throughout the week. Prepare a batch and enjoy the convenience.
Ingredients You Need
The success of this oven-roasted chicken breast recipe hinges on using fresh, quality ingredients. While the recipe is simple, paying attention to the caliber of your chicken and the freshness of your herbs and spices will elevate the final dish significantly. Opt for plump, firm chicken breasts with no visible bruising or discoloration.
Oven Roasted Chicken Breast

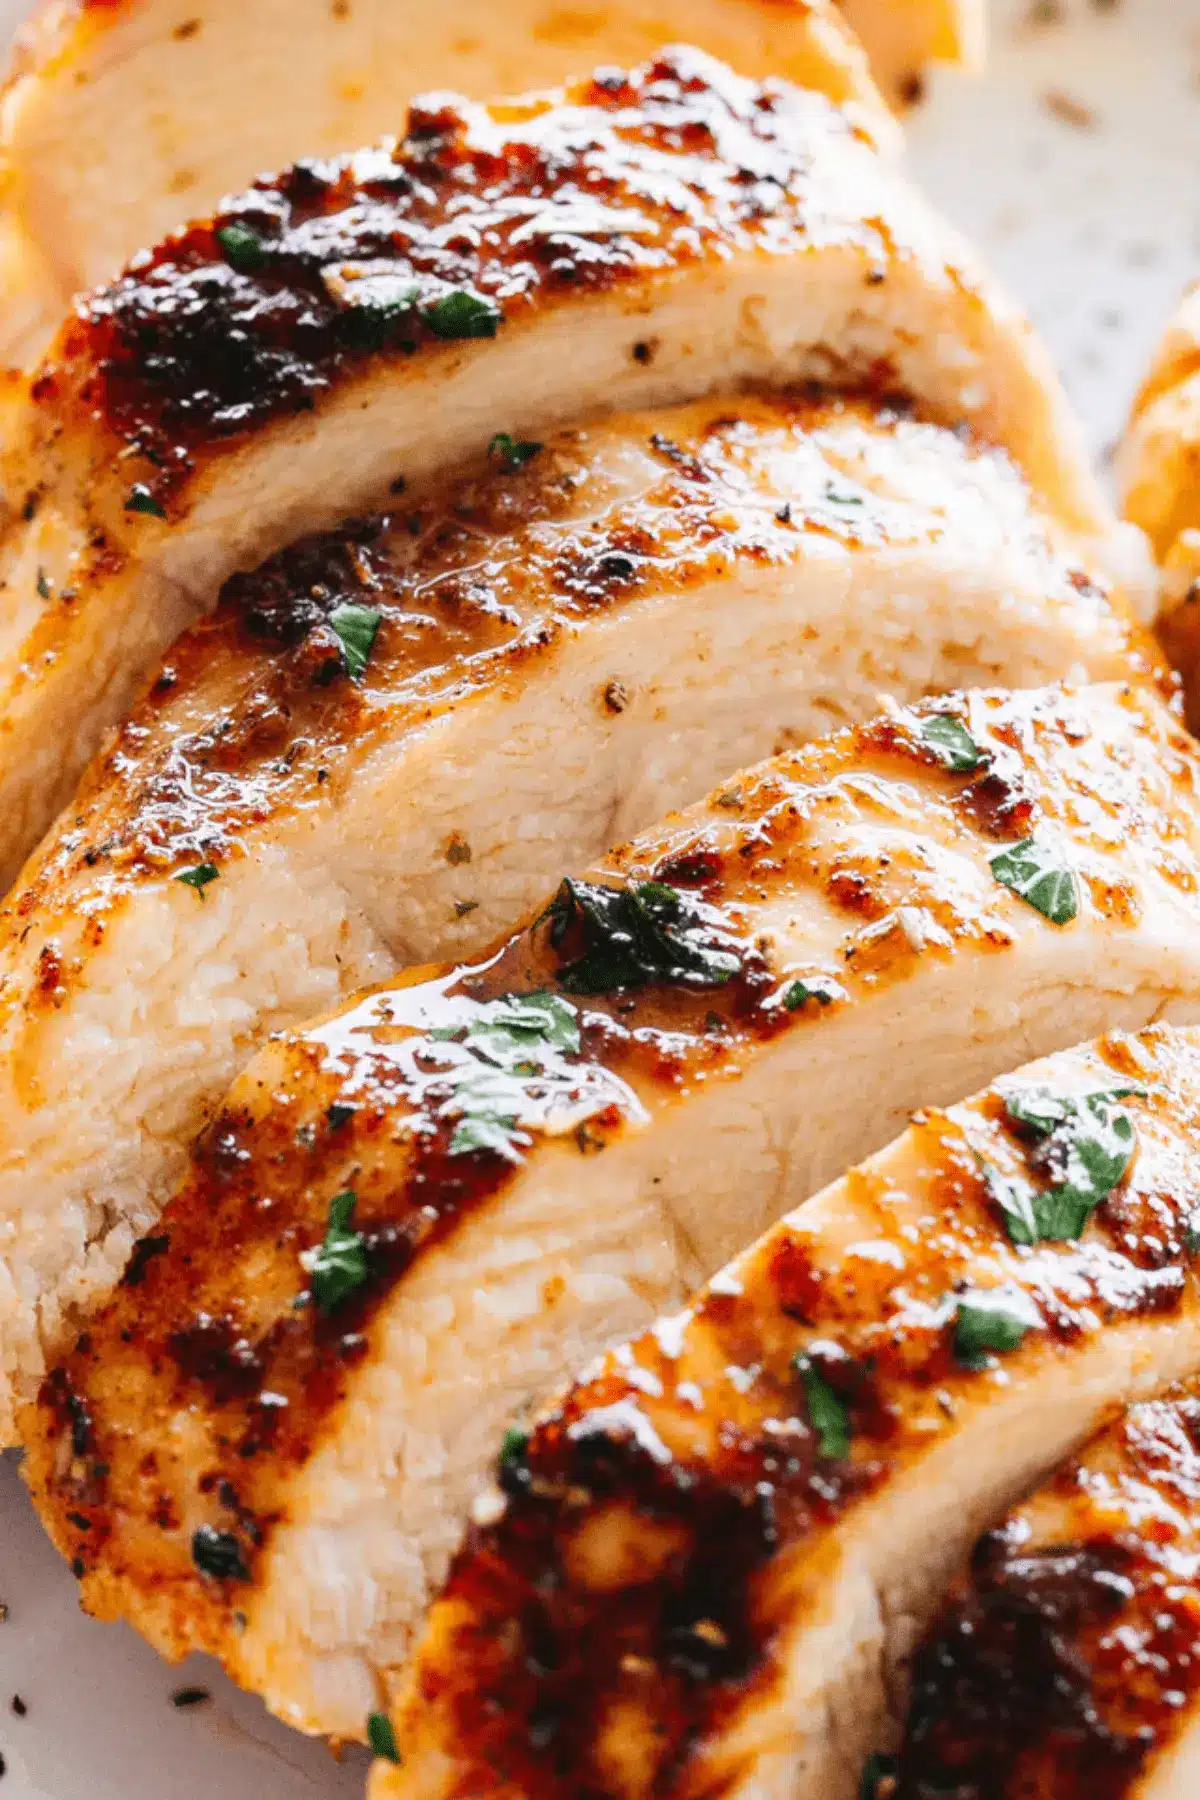
Juicy and tender, this tasty oven roasted chicken breasts recipe comes out perfect each and every time! No more dry chicken with this easy recipe, which uses a quick soak in salt water and a delicious homemade mix of spices.
- 1 to 1.5 pounds boneless, skinless chicken breasts
- 4 cups lukewarm water
- ¼ cup salt
- 1 tablespoon olive oil
- ¼ teaspoon salt (optional)
- ¼ teaspoon fresh ground black pepper
- ½ teaspoon smoked or sweet paprika
- ½ teaspoon garlic powder
- ½ teaspoon onion powder
- ½ teaspoon dried thyme
- ½ teaspoon dried basil
- ½ teaspoon dried rosemary
- ¼ teaspoon dried parsley
- ¹⁄&sbsp;² teaspoon cayenne pepper
- Fresh chopped parsley, for garnish
- 1Preheat the oven to 425°F.
- 2In a large bowl, combine lukewarm water and salt. Stir, then pour over chicken breasts. Set aside for 20 to 30 minutes (or refrigerate for up to 2 hours).
- 3In a small bowl, combine all the seasoning ingredients: salt, pepper, paprika, garlic powder, onion powder, dried thyme, dried basil, dried rosemary, dried parsley, and cayenne pepper. Stir until thoroughly incorporated.
- 4Pour out the salt water and rinse each chicken breast under cold water. Pat them dry with paper towels.
- 5Place the chicken in a baking dish and rub the olive oil all over each chicken breast. Sprinkle the seasoning blend evenly over the chicken breasts on all sides.
- 6Bake for 22 to 25 minutes, or until the internal temperature reaches 165°F. Use an instant-read meat thermometer to check for doneness.
- 7For a browned, crispy top, set your oven to broil on HIGH for the final 3 to 4 minutes, until golden on top.
- 8Remove the chicken breasts from the oven and transfer them to a serving plate to rest for 10 minutes before cutting and serving.
- 9Garnish with fresh chopped parsley and serve.
Keywords: chicken breast, roasted chicken, baked chicken, brined chicken, easy chicken recipe, dinner recipe, main course
- boneless, skinless chicken breasts: These are the stars of the show, providing a lean and versatile protein base for this dish.
- lukewarm water: This is essential for creating the brine, helping to tenderize the chicken and prepare it for seasoning.
- salt: Crucial for the brining solution, it helps the chicken retain moisture during the cooking process.
- olive oil: A light coating of olive oil helps the seasonings adhere to the chicken and promotes beautiful browning in the oven.
- salt (optional for seasoning blend): A small amount is included in the blend, but adjust based on how salty your brine was.
- fresh ground black pepper: Adds a subtle warmth and depth of flavor that complements the other spices.
- smoked or sweet paprika: Contributes a beautiful color and a mild, smoky or sweet undertone.
- garlic powder: Provides a convenient way to infuse that essential garlicky aroma and taste.
- onion powder: Offers a savory, sweet onion flavor that is a fundamental component of many classic spice blends.
- dried thyme: Imparts a slightly minty, earthy flavor that pairs wonderfully with poultry.
- dried basil: Adds a sweet, peppery, and slightly minty note, common in Mediterranean herb mixes.
- dried rosemary: Offers a pungent, pine-like aroma and a robust, slightly bitter flavor.
- dried parsley: A classic herb that adds a fresh, clean flavor and a touch of color to the seasoning.
- cayenne pepper: For those who enjoy a bit of heat, a pinch of cayenne adds a gentle warmth without overpowering the other flavors.
- fresh chopped parsley: Used as a garnish, it adds a vibrant green color and a fresh, herbaceous finish.
The exact quantities for each ingredient are readily available in the accompanying recipe card for your convenience.
Variations
This oven-roasted chicken breast recipe is incredibly adaptable, allowing you to customize it to your dietary needs and flavor preferences. Consider making it vegan by substituting firm tofu or seitan, marinating it in a similar spice blend, and baking until golden and firm.
For a low-carb option, focus on the seasonings and ensure your side dishes are keto-friendly. You can also experiment with different healthy fats for rubbing the chicken, such as avocado oil or a touch of melted ghee, to enhance the flavor profile and cater to specific dietary requirements.
If you’re looking for a global twist, try incorporating elements like a spoonful of soy sauce or tamari into the brine for an umami boost, or add a pinch of curry powder or za’atar to the spice blend for a taste of international cuisine. This flexibility ensures that the recipe remains exciting and relevant to your evolving culinary explorations.
How to Prepare Oven Roasted Chicken Breast
Step 1: Brine the Chicken
The journey to incredibly juicy chicken begins with a simple brine. In a large bowl or a sturdy zip-top bag, combine four cups of lukewarm water with a quarter cup of salt. Stir this mixture until the salt is completely dissolved, creating a saline solution that will work its magic on the chicken.
Gently immerse your boneless, skinless chicken breasts into this brining solution, ensuring they are fully submerged. Cover the bowl or seal the bag and let the chicken soak for a minimum of 20 minutes. For an even deeper tenderizing effect, you can leave it to brine for up to two hours in the refrigerator. This crucial step allows the salt to penetrate the meat, rehydrating it and setting the stage for maximum moisture retention during cooking.
While the chicken is brining, take this opportunity to prepare your aromatic spice blend. In a small bowl, combine a quarter teaspoon of salt (optional, as the brine adds saltiness), a quarter teaspoon of fresh ground black pepper, half a teaspoon each of smoked or sweet paprika, garlic powder, onion powder, dried thyme, dried basil, and dried rosemary, and a quarter teaspoon of dried parsley. If you enjoy a bit of heat, add a pinch of cayenne pepper to this mixture. Whisk these dry ingredients together thoroughly with a fork until they are well incorporated, creating a fragrant and flavorful rub that will coat the chicken.
Step 2: Season the Chicken
Once the brining period is complete, it’s time to prepare the chicken for its transformation in the oven. Carefully pour out the salty brine from the bowl or bag, discarding the liquid. Rinse each chicken breast under cold running water to wash away any residual salt from the brining solution. This step is important to prevent the chicken from becoming too salty.
After rinsing, thoroughly pat each chicken breast dry using paper towels. This is a vital step as it helps create a surface where the olive oil and seasonings can adhere effectively, promoting a better sear and preventing the chicken from steaming instead of roasting. Once the chicken is dry, place the breasts in a clean baking dish or on a parchment-lined baking sheet, ensuring they have a little space between them for even cooking.
Drizzle a tablespoon of olive oil over the chicken breasts, using your hands or a brush to ensure each piece is lightly coated on all sides. This oil acts as a binder for the spices and helps to create a wonderfully golden-brown exterior. Now, generously sprinkle your prepared seasoning blend evenly over the oiled chicken breasts. Make sure to coat both sides, pressing gently to help the spices adhere. You don’t necessarily need to use all of the seasoning blend; adjust the amount to your personal preference for flavor intensity.
Step 3: Bake the Chicken
With the chicken seasoned and ready, it’s time to introduce it to the heat of the oven. Preheat your oven to a hot 425 degrees Fahrenheit (220 degrees Celsius). This high temperature is key to achieving a lovely sear and ensuring the chicken cooks through relatively quickly, locking in those precious juices.
Carefully place the baking dish or baking sheet with the seasoned chicken breasts into the preheated oven. Allow the chicken to bake for approximately 20 to 25 minutes. The exact cooking time will depend on the thickness of your chicken breasts, so it’s important to monitor them closely. Thinner breasts will cook faster, while thicker ones may require a few additional minutes.
The most reliable way to ensure your chicken is perfectly cooked and safe to eat is to use an instant-read meat thermometer. Insert the thermometer into the thickest part of a chicken breast, avoiding any bone or fat. The chicken is done when it reaches an internal temperature of 165 degrees Fahrenheit (74 degrees Celsius). Starting to check for doneness around the 20-minute mark will help you avoid overcooking.
Step 4: Broil for Extra Crispiness (Optional)
For those who crave an extra layer of texture and visual appeal, an optional broiling step can elevate your oven-roasted chicken breast to new heights. After the chicken has reached its internal temperature of 165°F, you can switch your oven to the broil setting on HIGH. This intense, direct heat will quickly caramelize the surface of the chicken, creating a beautifully browned and slightly crispy exterior.
Position the oven rack so that the chicken is about 4-6 inches away from the broiler element. Keep a very close eye on the chicken during this stage, as broiling happens very quickly and can easily go from perfectly browned to burnt in a matter of moments. Rotate the pan if needed to ensure even browning across all the chicken breasts.
Continue broiling for approximately 3 to 4 minutes, or until the tops of the chicken breasts are golden brown and delightfully crisp. This brief period under the broiler adds a wonderful textural contrast to the tender, juicy interior of the chicken, making each bite even more satisfying. This step is highly recommended for an added touch of gourmet flair.
Step 5: Rest the Chicken
The final, and arguably one of the most critical, steps in achieving succulent oven-roasted chicken breast is allowing it to rest after cooking. Once the chicken has reached its desired internal temperature or has finished broiling, carefully remove the baking dish or sheet from the oven.
Transfer the cooked chicken breasts from the hot baking dish to a clean cutting board or a warm serving plate. Resist the temptation to cut into it immediately. Let the chicken rest for at least 5 to 10 minutes. During this resting period, the juices that have been driven to the surface during cooking will redistribute themselves back throughout the meat, resulting in a far more moist and flavorful final product.
If you skip this resting step, those delicious juices will simply run out onto the cutting board, leaving you with drier chicken. So, be patient; this short waiting period is well worth the superior texture and taste it provides. Once rested, your chicken is ready to be sliced and served.
Step 6: Serve and Enjoy
Your perfectly oven-roasted chicken breasts are now ready to be enjoyed in all their juicy, flavorful glory. Slice them thinly against the grain for tender, bite-sized pieces, or serve them whole as a magnificent centerpiece for your meal. For an extra pop of freshness and color, garnish generously with freshly chopped parsley just before serving.
This versatile chicken is fantastic served immediately as a main course. The aroma alone will be enough to entice everyone to the table. It pairs beautifully with a wide array of side dishes, from simple steamed vegetables to more elaborate roasted potatoes or a fresh, crisp salad, making it suitable for any occasion.
Don’t forget to appreciate the effort that went into creating such a delicious dish. The simple yet effective brining technique, combined with the flavorful seasoning blend, has resulted in a truly exceptional chicken breast that is sure to become a staple in your recipe repertoire. Enjoy every tender, juicy bite!
Pro Tips for Oven Roasted Chicken Breast
Use an Instant-Read Thermometer: This is your most valuable tool for perfectly cooked chicken. Insert it into the thickest part of the breast. Aim for 165°F (74°C) for juicy, safe chicken. Checking early and often prevents overcooking.
Don’t Skip the Rest: Resting the chicken for 5-10 minutes after cooking is crucial. It allows the juices to redistribute throughout the meat, ensuring every bite is moist and flavorful. Cutting too soon will result in juices running out, leaving the chicken dry.
Even Thickness is Key: Chicken breasts can vary significantly in thickness. For more uniform cooking, consider pounding the thicker ends of the chicken breasts with a meat mallet or the bottom of a heavy pan until they are an even thickness. This ensures all pieces are done at the same time.
Experiment with Seasonings: While the provided blend is excellent, don’t hesitate to get creative. Try adding smoked paprika for a deeper smoky flavor, a pinch of cumin for an earthy note, or your favorite pre-made chicken seasoning blend. Adjust to your taste preferences.
Consider Chicken Thighs: If breasts are too lean for your liking, boneless, skinless chicken thighs are an excellent alternative. They are more forgiving and naturally more moist, though they may require a few extra minutes of cooking time.
Serving Suggestions for Oven Roasted Chicken Breast
Decoration
Garnish your beautifully roasted chicken breasts with a sprinkle of fresh chopped parsley for a vibrant burst of green and a hint of fresh herbaceousness. A few thin slices of lemon artfully placed around the serving platter can add both visual appeal and a subtle citrus aroma. Edible flowers, if available and suitable, can also add an elegant and colorful touch to the presentation, transforming a simple dish into something truly special.
Side Dishes
Complement the succulent chicken with a variety of delicious side dishes that offer contrasting textures and flavors. Roasted asparagus or green beans tossed with garlic and a touch of lemon zest provide a healthy, crisp element. Creamy mashed potatoes or buttery hasselback potatoes offer a comforting and classic pairing, while a light and refreshing quinoa salad or a vibrant couscous pilaf can add a grain-based component. Consider a simple side salad with a light vinaigrette for a fresh counterpoint.
Creative Serving Ideas
Slice the rested chicken breast thinly and use it as a protein-packed topping for a hearty green salad or a vibrant Mediterranean bowl. Shredded chicken is perfect for filling tacos, enchiladas, or for creating delicious chicken salad sandwiches for lunch. The possibilities are endless; dice it and add it to soups like chicken noodle or pozole verde, or use it in a flavorful chicken stir-fry. It’s a versatile ingredient that can elevate countless dishes.
Preparation & Storage
Storing Leftovers
Leftover oven-roasted chicken breasts are a culinary treasure that can be stored safely in the refrigerator for up to 4 days. Ensure that the chicken has cooled down to room temperature before storing. Place the cooled chicken in an airtight container, or wrap it tightly in plastic wrap followed by aluminum foil, or place it in a freezer-safe bag to prevent it from drying out and to keep it fresh.
Proper storage is key to maintaining the quality and safety of your leftovers. Avoid leaving cooked chicken at room temperature for more than two hours, as this can lead to bacterial growth. When stored correctly, you can enjoy the deliciousness of your roasted chicken throughout the week in various meals.
Freezing
For longer storage, oven-roasted chicken breasts can be frozen for up to 3 to 4 months. After the chicken has completely cooled, wrap individual portions or the entire batch securely in plastic wrap, then in aluminum foil, or place them in heavy-duty freezer bags. The goal is to remove as much air as possible to prevent freezer burn and maintain the texture and flavor of the chicken.
When you’re ready to use the frozen chicken, the best method for thawing is to transfer it from the freezer to the refrigerator. Allow it to thaw completely, which may take overnight depending on the size of the portion. This slow thawing process helps to preserve the moisture and integrity of the chicken.
Reheating
Reheating your oven-roasted chicken breast requires a gentle approach to maintain its juicy texture. If reheating from refrigerated, place the chicken in a skillet with a tablespoon or two of water or butter, cover the skillet tightly, and heat over low to medium-low heat until warmed through. This steaming method helps to reintroduce moisture into the meat.
Alternatively, you can reheat it in a low oven (around 300°F or 150°C) for about 10-15 minutes, again covered, or in a microwave-safe dish with a splash of liquid. The key is to reheat it slowly and gently, avoiding high heat or prolonged cooking times, which can quickly turn the chicken dry and tough. For frozen chicken, thaw it completely in the refrigerator before reheating using these methods.
Frequently Asked Questions
-
Can I brine the chicken breasts for longer than 2 hours?
While brining for 20 minutes to 2 hours is ideal for optimal results, you can brine chicken breasts for a longer period, up to 12 hours in the refrigerator, if needed. However, be cautious with extended brining times, as it can sometimes lead to a mushy texture if the salt concentration is too high or the duration is excessive. For most recipes, the 2-hour mark provides a perfect balance of moisture and texture. Always ensure the chicken is fully submerged in the brine and kept chilled in the refrigerator during longer brining periods.
-
How do I ensure my chicken breasts don’t dry out if they are of varying thickness?
The best way to combat varying thickness in chicken breasts is to gently pound them to an even thickness before brining and seasoning. Use a meat mallet or the flat bottom of a heavy skillet. Aim for a consistent thickness of about ¾ to 1 inch across all breasts. This ensures that they cook through at the same rate, preventing thinner parts from becoming overcooked and dry while thicker parts are still cooking. Regular thermometer checks are also crucial, especially if you skip the pounding step.
-
What is the best way to check if the chicken is fully cooked without overcooking it?
The most foolproof method is to use an instant-read meat thermometer. Insert it into the thickest part of the chicken breast, ensuring it does not touch any bone or fat. For perfectly cooked and safe chicken, the internal temperature should register at 165°F (74°C). Some people prefer to remove the chicken slightly earlier, around 160-162°F, knowing that the residual heat will continue to cook it during the resting period, bringing it up to the safe temperature and ensuring maximum juiciness. Always allow the chicken to rest for at least 5 minutes after removing it from the heat.