Old Fashioned Coconut Cake
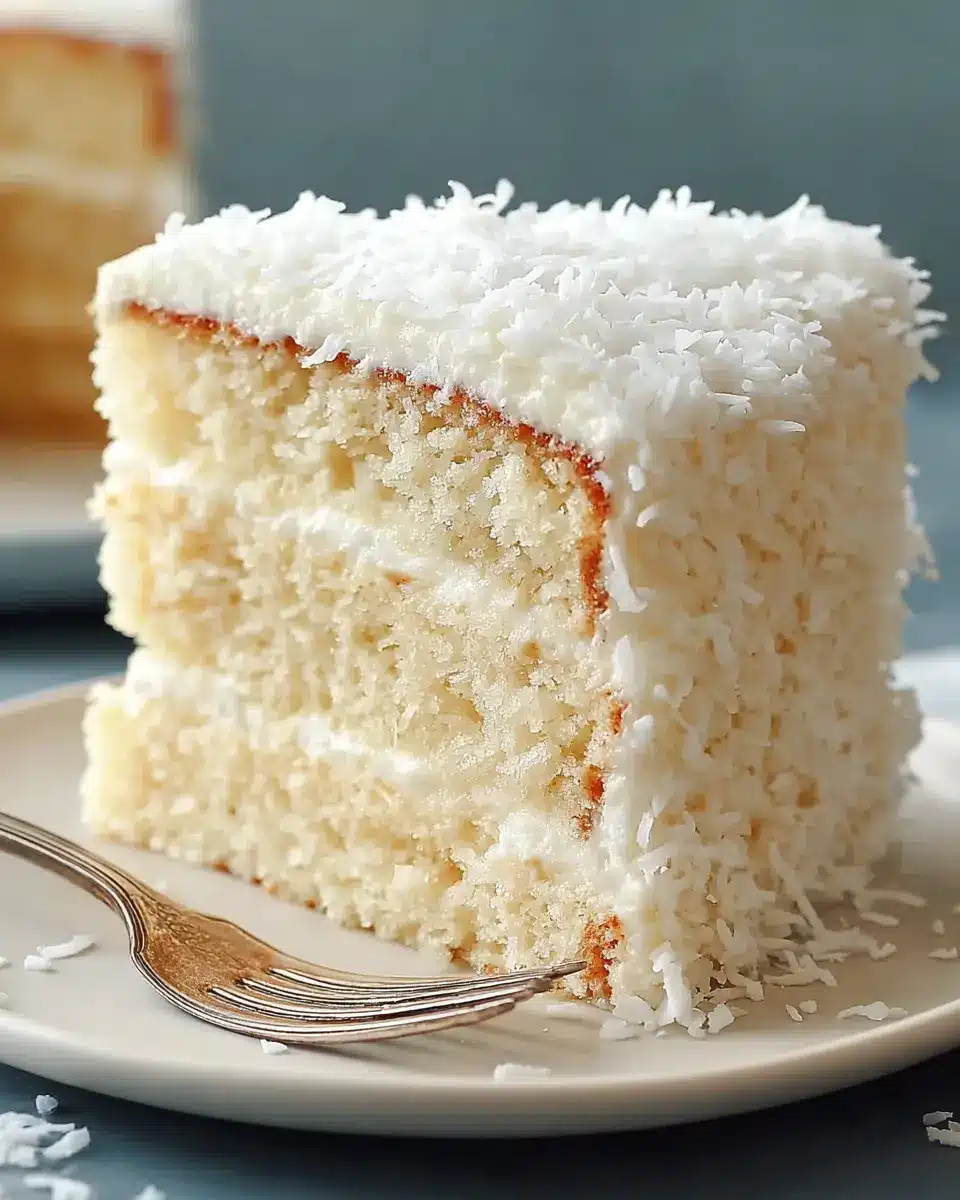
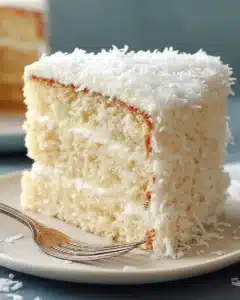
Old Fashioned Coconut Cake is a tender, buttery dessert with delicate coconut flavor, fluffy seven-minute frosting, and a snowy coconut finish that evokes a sense of nostalgic celebration. It’s a dependable choice for holidays, family gatherings, and any moment you desire a classic cake that feels special without being overly complicated or time-consuming to prepare.
This is the kind of cake that looks as lovely and charming on the table as it tastes, offering a comforting and familiar sweetness that brings back cherished memories. The crumb is remarkably soft and rich, thanks to the liberal use of butter, while the buttermilk ensures a consistently tender texture throughout, and the generous coconut topping provides that signature sweet and satisfying finish to every single bite.
Why You Will Love This Recipe
- Classic Flavor Profile: Experience the harmonious blend of rich butter, sweet coconut, and a hint of vanilla that defines this beloved dessert, making it a timeless favorite.
- Tender, Moist Crumb: The combination of butter and buttermilk creates an incredibly soft and moist cake that melts in your mouth, providing a delightful texture with every forkful.
- Beautiful Presentation: The iconic seven-minute frosting and generous coating of shredded coconut give this cake a stunning, snowy appearance that is perfect for any special occasion or holiday spread.
- Comforting Nostalgia: This cake offers a delightful trip down memory lane, reminiscent of childhood baking and classic family gatherings, bringing warmth and joy to any event.
- Achievable Elegance: Despite its elegant appearance and rich flavor, this cake is surprisingly straightforward to make, offering a rewarding baking experience for home cooks of all skill levels.
Ingredients You Need
The foundation of any exceptional cake lies in the quality of its ingredients, and this Old Fashioned Coconut Cake is no exception. Using fresh, high-quality components will ensure the most delightful flavor and texture, transforming simple pantry staples into a truly memorable dessert. From the richness of the butter to the subtle tang of the buttermilk and the sweet allure of the coconut, each element plays a crucial role in creating this classic confection.
Old Fashioned Coconut Cake
A classic coconut cake with a tender, buttery crumb and delicate coconut flavor, finished with a generous coating of sweetened shredded coconut over a layer of no-fail seven-minute frosting. It's dependable for holidays, family gatherings, and anytime you want a classic cake that feels special without being fussy.
- 1 cup unsalted butter, softened to room temperature
- 2 cups granulated sugar
- 5 large eggs
- 1 teaspoon vanilla extract
- 1 teaspoon coconut flavoring
- 2 1/2 cups all-purpose flour
- 1 teaspoon baking powder
- 1 teaspoon baking soda
- 1/4 teaspoon salt
- 1 cup buttermilk
- Vegetable shortening, for coating the pans
- All-purpose flour, for dusting the pans
- 2 cups sweetened shredded coconut, for finishing
- Seven-minute frosting (prepared separately)
- 1Preheat the oven to 350°F (175°C). Lightly grease two 9-inch round cake pans (or one 9x13-inch pan) with vegetable shortening, then dust with flour.
- 2In a large bowl, cream together the softened butter and granulated sugar with an electric mixer on medium speed until pale, smooth, and very creamy, about 4 minutes.
- 3Beat in the eggs one at a time, followed by the vanilla extract and coconut flavoring, until fully incorporated and smooth.
- 4In a separate medium bowl, whisk together the all-purpose flour, baking powder, baking soda, and salt until evenly distributed.
- 5Add half of the dry ingredients to the creamed mixture and mix on low speed until just combined. Pour in the buttermilk and mix again. Add the remaining dry ingredients and mix until the batter is smooth and fully combined, scraping down the bowl as needed.
- 6Divide the batter evenly between the prepared pans. Bake for 25-30 minutes for round pans or 30-35 minutes for a 9x13-inch pan, or until a toothpick inserted into the center comes out clean.
- 7Let the cakes cool completely in the pans before inverting them onto a wire rack to cool completely.
- 8Once the cakes are completely cool, frost the top and sides with seven-minute frosting.
- 9Generously scatter the sweetened shredded coconut over the frosted cake, gently pressing it onto the sides to adhere.
- unsalted butter: softened to room temperature, providing a rich base for the cake’s flavor and a wonderfully soft, tender crumb.
- granulated sugar: sweetens the batter beautifully and contributes to a pale, fluffy texture when creamed effectively with the butter.
- large eggs: add essential structure, richness, and lift, ensuring the cake slices cleanly while remaining delightfully moist.
- vanilla extract: contributes a classic, comforting aroma and a subtle depth of flavor to the cake batter.
- coconut flavoring: enhances the distinctive coconut notes, creating a more pronounced and bakery-style coconut essence.
- all-purpose flour: forms the main body of the cake, providing a sturdy yet tender crumb that holds up perfectly to frosting.
- baking powder: works with the baking soda to provide a reliable rise, ensuring a light and airy texture.
- baking soda: reacts with the acidic components in the batter to give the cake lift and a balanced, even texture.
- salt: balances the sweetness, sharpens all the flavors, and prevents the cake from tasting flat or one-dimensionally sweet.
- buttermilk: adds exceptional tenderness and a subtle, pleasing tang that beautifully counteracts the sweetness of the frosting and coconut topping.
- sweetened shredded coconut: the star of the topping, providing essential texture, sweetness, and the signature snowy finish that makes this cake instantly recognizable.
Specific quantities for each ingredient can be found within the detailed recipe card above, ensuring you have all the precise measurements needed for a perfect bake.
Variations
While the classic Old Fashioned Coconut Cake is undeniably perfect as is, its versatile nature lends itself beautifully to a few delightful variations that can cater to different dietary preferences or simply offer a new twist on a beloved recipe. These adaptations ensure that everyone can enjoy a slice of this comforting classic, regardless of their specific needs or cravings.
For those seeking a plant-based alternative, a Vegan Old Fashioned Coconut Cake can be achieved with a few smart substitutions. Instead of dairy butter, opt for a high-quality vegan butter substitute that creams well. For the eggs, a flax egg (one tablespoon of ground flaxseed mixed with three tablespoons of water, allowed to sit for five minutes) or a commercial egg replacer can provide the necessary binding and structure. Crucially, ensure your buttermilk substitute is vegan; this can be made by adding one tablespoon of lemon juice or apple cider vinegar to one cup of plant-based milk (like almond or soy), letting it sit for five minutes until it curdles. The rest of the ingredients, including the coconut and frosting (using vegan butter and plant-based milk for the frosting base), can often remain the same, yielding a delicious and cruelty-free version of this cherished cake.
A Low-Carb or Keto Coconut Cake offers a way to indulge in the delightful flavors without the high carbohydrate count. This variation would require significant ingredient adjustments. The all-purpose flour would be replaced with a blend of almond flour and coconut flour, which are keto-friendly and provide a good texture when combined properly. Granulated sugar would be substituted with a zero-calorie sweetener like erythritol, xylitol (be cautious if you have pets, as it’s toxic to them), or a monk fruit blend, ensuring the sweetness is maintained without the sugar. Eggs and fat sources like butter or coconut oil would remain, but the buttermilk might need to be replaced with a sugar-free, unsweetened plant-based milk like almond milk, perhaps with a touch of heavy cream for richness. The frosting would also need a sugar-free sweetener and potentially a different emulsification technique if relying on cream cheese or heavy whipping cream as a base instead of traditional powdered sugar frosting.
For those who adore a bit of citrus zest to cut through the richness, consider a Lemon Coconut Cake variation. This adaptation is wonderfully simple and adds a bright, refreshing dimension to the classic. Alongside the usual ingredients, you would incorporate the zest of one to two fresh lemons directly into the cake batter during the creaming stage with the butter and sugar. The lemon zest’s fragrant oils will infuse the cake with a subtle yet distinct citrus aroma and flavor, which pairs exceptionally well with the sweet coconut. You could also add a tablespoon or two of fresh lemon juice to the buttermilk mixture for an extra layer of tartness, ensuring it doesn’t make the batter too thin. The seven-minute frosting can also receive a whisper of lemon by adding a teaspoon of lemon extract or a tiny bit more zest, creating a delightful flavor synergy that is both classic and surprisingly vibrant, making it a perfect option for spring or summer celebrations.
How to Prepare Old Fashioned Coconut Cake
Step 1: Preparing Your Pans and Preheating the Oven
The journey to a perfectly baked Old Fashioned Coconut Cake begins with meticulous preparation, and this first step is crucial for ensuring your beautiful cake layers release cleanly from their pans. Start by selecting your preferred cake pans; two 9-inch round pans are traditional for a layer cake, but a 9×13-inch rectangular pan is also a fantastic option for easier serving at casual gatherings. Once you have your pans ready, thoroughly grease the interior surfaces with vegetable shortening, making sure to get into every corner and crevice, as this creates a non-stick barrier that is superior to butter for this purpose.
Next, take a bit of all-purpose flour and lightly dust the greased pans, tapping out any excess flour. This flour layer, combined with the shortening, forms a protective coating that prevents the cake from sticking. A perfectly greased and floured pan is your best defense against a broken cake layer. Concurrently, preheat your oven to the specified temperature of 350°F (175°C). It’s vital that the oven is fully preheated before the batter goes in; this ensures even baking from the moment the pans are placed inside, allowing the leavening agents to work their magic effectively and consistently.
The attention to detail in this initial stage directly impacts the final presentation and ease of handling your cake layers. Taking the extra few minutes to ensure your pans are impeccably prepared sets the stage for a professional-looking finish, making the subsequent frosting and decorating steps much more enjoyable and successful. Properly prepared pans mean you can confidently invert the cake layers without fear of them crumbling or sticking, preserving their beautiful shape.
Step 2: Creaming the Butter and Sugar
This is arguably the most critical step in achieving the signature light, tender, and airy crumb of an Old Fashioned Coconut Cake, so do not be tempted to rush through it. Begin by ensuring your unsalted butter is properly softened to room temperature; it should yield gently when pressed but not be melted or greasy. Place the softened butter and granulated sugar into a large mixing bowl, preferably one that is large enough to accommodate the volume as the mixture increases significantly.
Using an electric mixer on a medium speed, begin to beat the butter and sugar together. The goal here is to aerate the mixture thoroughly, incorporating as much air as possible into the fat and sugar crystals. Continue beating for at least 4 to 5 minutes, or even longer if necessary, until the mixture transforms from its initial yellow hue to a very pale yellow, almost white, and takes on a noticeably fluffy, cloud-like consistency. You should see a significant increase in volume. The creamed butter and sugar should look light and creamy, with fine sugar crystals suspended within the softened fat.
This extended creaming process is what builds the foundation for the cake’s delicate structure. The tiny air pockets created at this stage will expand in the oven, contributing to the cake’s lift and preventing it from becoming dense. A well-creamed mixture ensures a tender crumb that isn’t tough or chewy, providing that melt-in-your-mouth quality that defines this classic dessert. The texture should be smooth and even, with no visible large lumps of butter or undissolved sugar granules.
Step 3: Incorporating Eggs and Flavorings
Once the butter and sugar are perfectly creamed, it’s time to introduce the eggs, which add richness, structure, and act as an emulsifier, binding the fat and liquid components together. Ensure your eggs are also at room temperature, as this helps them incorporate more smoothly into the creamed mixture without causing it to curdle or seize. Add the eggs one at a time, beating well after each addition to ensure it is fully incorporated before adding the next. This gradual addition helps maintain the emulsion and the airiness of the batter.
After the eggs are thoroughly blended, add the vanilla extract and coconut flavoring. These extracts are essential for developing the characteristic flavors of the cake, providing that familiar, comforting aroma and taste. Ensure you use good quality extracts for the best flavor profile; imitation extracts can sometimes lend a artificial note. Beat the mixture again until it is completely smooth and uniformly combined, with no streaks of egg yolk or white visible. The batter should have a glossy sheen and appear silky at this stage.
If at any point the mixture looks like it might be separating or curdling, don’t panic; this can sometimes happen, especially if the ingredients are not at the same temperature. A common trick is to add a tablespoon or two of the dry flour mixture to the batter at this stage and mix it in briefly. The starch in the flour will help absorb excess moisture and bring the emulsion back together. The goal is a smooth, homogenous mixture that is rich and appears well-blended before you proceed to the dry and wet ingredients.
Step 4: Combining Dry and Wet Ingredients
In a separate medium-sized bowl, whisk together the all-purpose flour, baking powder, baking soda, and salt. Whisking the dry ingredients helps to evenly distribute the leavening agents (baking powder and soda) and salt throughout the flour, ensuring that they work uniformly during the baking process and contribute to an even rise and balanced flavor. Make sure there are no clumps of flour or leavening agents. Set this bowl aside.
Now, it’s time to combine the dry ingredients with the creamed butter-egg mixture, alternating with the buttermilk. This technique is standard for many cake recipes and helps to develop the gluten in the flour gently, preventing the cake from becoming tough. Begin by adding about one-third of the dry ingredient mixture to the creamed butter mixture and mix on low speed until just combined. Then, add half of the buttermilk and mix again until just incorporated. Repeat this process, adding another third of the dry ingredients, the remaining buttermilk, and finishing with the last third of the dry ingredients.
It is crucial to mix on low speed and only until each addition is just incorporated. Overmixing at this stage can develop the gluten too much, leading to a tough cake. Scrape down the sides and bottom of the bowl frequently with a rubber spatula to ensure all the ingredients are thoroughly blended and there are no pockets of dry flour or unmixed batter. The final batter should be smooth and uniform, with a consistency that is neither too thick nor too thin. The aim is to combine everything efficiently while maintaining the air incorporated earlier.
Step 5: Baking the Cake Layers
Once the batter is smooth and ready, carefully divide it evenly between your prepared cake pans. If using two round pans, try to eyeball the amount for each, or for ultimate precision, weigh them. This ensures that your cake layers bake up to a similar height, making the final assembly and frosting much easier. Smooth the top of the batter in each pan with an offset spatula or the back of a spoon to create an even surface.
Place the pans in the preheated oven, ideally on the center rack, ensuring they have some space around them for even air circulation. Bake for the recommended time, which is typically around 25-30 minutes for two 9-inch round pans, and slightly longer, 30-35 minutes, for a 9×13-inch pan. However, baking times can vary significantly depending on your oven’s calibration and the specific pans used. Therefore, it’s essential to start checking for doneness a few minutes before the lower end of the suggested time range.
To test for doneness, gently insert a wooden toothpick or a thin skewer into the center of the cake. If it comes out clean, or with just a few moist crumbs attached (but no wet batter), the cake is ready. Other indicators include the edges of the cake pulling away slightly from the sides of the pan, and the top of the cake springing back when lightly touched. Do not overbake, as this will result in a dry cake. Once baked, remove the pans from the oven and let them cool on a wire rack for about 10-15 minutes before attempting to invert them.
Step 6: Cooling and Frosting
After the initial cooling period in the pans, carefully invert the cake layers onto wire racks to cool completely. This step is non-negotiable; attempting to frost a warm cake will lead to a melted, messy frosting situation, and the frosting will not adhere properly. Ensure the cakes are at room temperature all the way through before moving on to the frosting stage. If the cakes are slightly domed on top, you can gently level them using a long, serrated knife once they are fully cooled. This creates a flat surface for even frosting application and a more professional finished look.
Prepare your seven-minute frosting according to its specific instructions; this is a cooked meringue-based frosting that is light, fluffy, and sets up quickly. Once the frosting is ready and the cake layers are completely cool, begin frosting. Spread a generous layer of the seven-minute frosting over the top of the first cake layer. Carefully place the second cake layer on top, then frost the top and sides of the entire cake, working quickly to create a smooth, even coating.
Immediately after frosting, and while the frosting is still soft and pliable, generously cover the entire cake with sweetened shredded coconut. You can do this by gently pressing handfuls of coconut onto the sides and top of the cake, ensuring an even, snowy coating. The slightly sticky frosting acts as the perfect adhesive for the coconut. Allow the frosting to set for a bit before slicing and serving, which usually takes about 30 minutes to an hour for the frosting to firm up slightly. The result is a stunning, classic Old Fashioned Coconut Cake, ready to be enjoyed.
Pro Tips for Old Fashioned Coconut Cake
Use Room Temperature Ingredients: For the creaming process, ensuring your butter, eggs, and even buttermilk are at room temperature is paramount. Room temperature butter creams more effectively with sugar, trapping air for a lighter cake. Similarly, room-temperature eggs emulsify better, preventing curdling and contributing to a smoother batter, which all translates to a finer, more tender crumb in your final Old Fashioned Coconut Cake.
Don’t Overmix the Batter: Once the dry ingredients are added to the wet ingredients, mix only until they are just combined. Overmixing develops the gluten in the flour too much, which can result in a tough, dense cake texture. Scrape down the bowl frequently to ensure everything is incorporated without prolonged beating, preserving the delicate crumb structure.
Cool Completely Before Frosting: Patience is key. Ensure your cake layers are entirely cooled on a wire rack before applying the seven-minute frosting. Applying frosting to a warm cake will cause it to melt, slide off, and create a very messy outcome. A fully cooled cake provides a stable base for the fluffy frosting and prevents any unwanted melting.
Gentle Handling is Essential: This cake is known for its tender crumb, which means it can be delicate. Handle the layers with care when assembling and frosting. If your layers have domed significantly, leveling them with a serrated knife can provide a flatter surface for frosting, making the process smoother and the final cake neater.
Freshness of Coconut: For the best flavor and texture, use fresh, good-quality sweetened shredded coconut. Stale coconut can lack the vibrant sweetness and soft chew that complements the cake so well. Gently pressing the coconut onto the frosting ensures it adheres well and creates that signature snowy finish.
Serving Suggestions for Old Fashioned Coconut Cake
Decoration
The classic decoration for an Old Fashioned Coconut Cake is its signature snowy coat of sweetened shredded coconut, pressed generously onto a fluffy seven-minute frosting. For an extra touch of elegance, consider a delicate sprinkle of toasted coconut flakes over the top, adding a slightly deeper, nutty flavor and visual texture. You can also pipe simple borders around the top and bottom edges of the cake using extra frosting for a more defined look. Some bakers like to add a few maraschino cherries nestled into the top frosting for a pop of color, reminiscent of vintage cake designs.
Side Dishes
This rich, sweet cake pairs wonderfully with lighter accompaniments that offer a contrast in flavor and texture. A simple bowl of fresh, ripe berries, such as strawberries, raspberries, or blueberries, adds a refreshing tartness and vibrant color that cuts through the cake’s sweetness beautifully. A small scoop of high-quality vanilla bean ice cream or a light dollop of whipped cream can also enhance the dessert experience, providing a cool, creamy element that complements the cake’s buttery crumb and coconut flavor.
Creative Serving Ideas
Beyond a simple slice, this cake can be incorporated into other delightful desserts. Consider serving individual slices with a drizzle of warm, homemade caramel sauce for added decadence. For a more interactive dessert experience, offer slices with a small side of passion fruit curd or lemon curd, providing a tangy counterpoint to the coconut sweetness. You could also transform leftovers into delightful cake pops by crumbling the cake, mixing it with a bit of frosting, and coating them in melted white chocolate, rolled in more shredded coconut for a fun, bite-sized treat.
Preparation & Storage
Storing Leftovers
This Old Fashioned Coconut Cake is best stored at room temperature for up to two days, especially if you plan to serve it for a party or gathering that spans a few days. Ensure it is kept well-covered in an airtight cake carrier or a container with a tight-fitting lid to prevent the cake from drying out and the frosting from becoming stale. If you are in a humid climate, or if you are concerned about spoilage, refrigerating the cake is also an option for longer storage.
When storing at room temperature, the frosting tends to stay softer and more spreadable, which is ideal for immediate consumption. The coconut topping will also maintain its pleasant texture better in a temperature-controlled environment. Avoid leaving it uncovered, as this will expose the delicate frosting and cake crumb to air, leading to a loss of moisture and flavor.
Freezing
For longer-term storage, freezing is an excellent option, though it’s best to freeze the unfrosted cake layers. Wrap each cooled cake layer tightly in plastic wrap, ensuring there are no air pockets, then place them in a freezer-safe bag or container. Unfrosted layers can be stored in the freezer for up to 2 months. Once you are ready to use them, thaw the layers in the refrigerator overnight, and then allow them to come to room temperature before frosting and finishing with coconut.
If you must freeze a frosted cake, be aware that the texture of the seven-minute frosting might change slightly upon thawing, potentially becoming a bit more sticky or prone to weeping. For best results, freeze the frosted cake uncovered until the frosting is firm, then wrap it tightly in plastic wrap and place it in a freezer-safe container. Thaw it slowly in the refrigerator.
Reheating
Because this cake is topped with a delicate meringue-based frosting, reheating is generally not recommended, as it could cause the frosting to melt or become unstable. Instead of warming the cake, if it has been refrigerated and feels too firm, simply allow slices to sit at room temperature for about 20-30 minutes before serving. This resting period will allow the butter-based crumb to soften to its optimal texture and the frosting to regain its light, airy consistency.
The goal is to bring the cake back to a pleasant serving temperature, not to cook it further. If the cake has been frozen, follow the thawing instructions carefully, allowing ample time for it to reach room temperature naturally. A gently warmed slice served with a cool scoop of ice cream can still be delightful, but direct reheating of the cake itself is best avoided to preserve its intended texture and appearance.
Frequently Asked Questions
-
Can I make this Old Fashioned Coconut Cake ahead of time for a party?
Absolutely! This cake is an excellent choice for make-ahead preparations, which can significantly reduce stress on the day of your event. The unfrosted cake layers can be baked up to two days in advance and stored tightly wrapped at room temperature, or even frozen for longer storage (up to two months). On the day before the party, or the morning of, you can frost and finish the cake with coconut. The seven-minute frosting holds up well for a day or two, making it ideal for busy hosts. Just ensure it’s stored properly, covered at room temperature, or refrigerated if preferred.
-
Why is my seven-minute frosting not firming up properly, or why is it weeping?
Several factors can influence the consistency of seven-minute frosting. One common issue is insufficient beating of the egg whites; they need to reach stiff, glossy peaks before the sugar syrup is added. Another is the temperature of the sugar syrup; it must be cooked to the correct temperature (around 240°F or 115°C, the soft-ball stage) to ensure it sets properly. If the syrup is too cool or not cooked enough, the frosting will be runny and may weep. Also, if the frosting is applied to a warm cake, the residual heat can cause it to melt and become fluid. Ensure your cake layers are completely cool and allow the frosting a good 30-60 minutes to set before slicing.
-
What is the difference between sweetened and unsweetened shredded coconut, and does it matter which I use?
Sweetened shredded coconut contains added sugar, which contributes to its sweetness and slightly softer texture, making it ideal for garnishing and enhancing the sweetness of cakes like this one. Unsweetened shredded coconut, on the other hand, contains no added sugar, making it less sweet and often drier or coarser in texture. For this Old Fashioned Coconut Cake, using sweetened shredded coconut is highly recommended as it’s integral to achieving the classic sweet flavor profile and the beautiful snowy finish without needing to add extra sugar to the frosting itself. If you only have unsweetened coconut, you would need to significantly increase the sugar in your frosting recipe to compensate for the lack of sweetness, which could alter the frosting’s texture and stability.