No Bake Himbeer Cheesecake mit Schmand und weißer Schokolade – Einfach und Lecker – Muma’s Kitchen
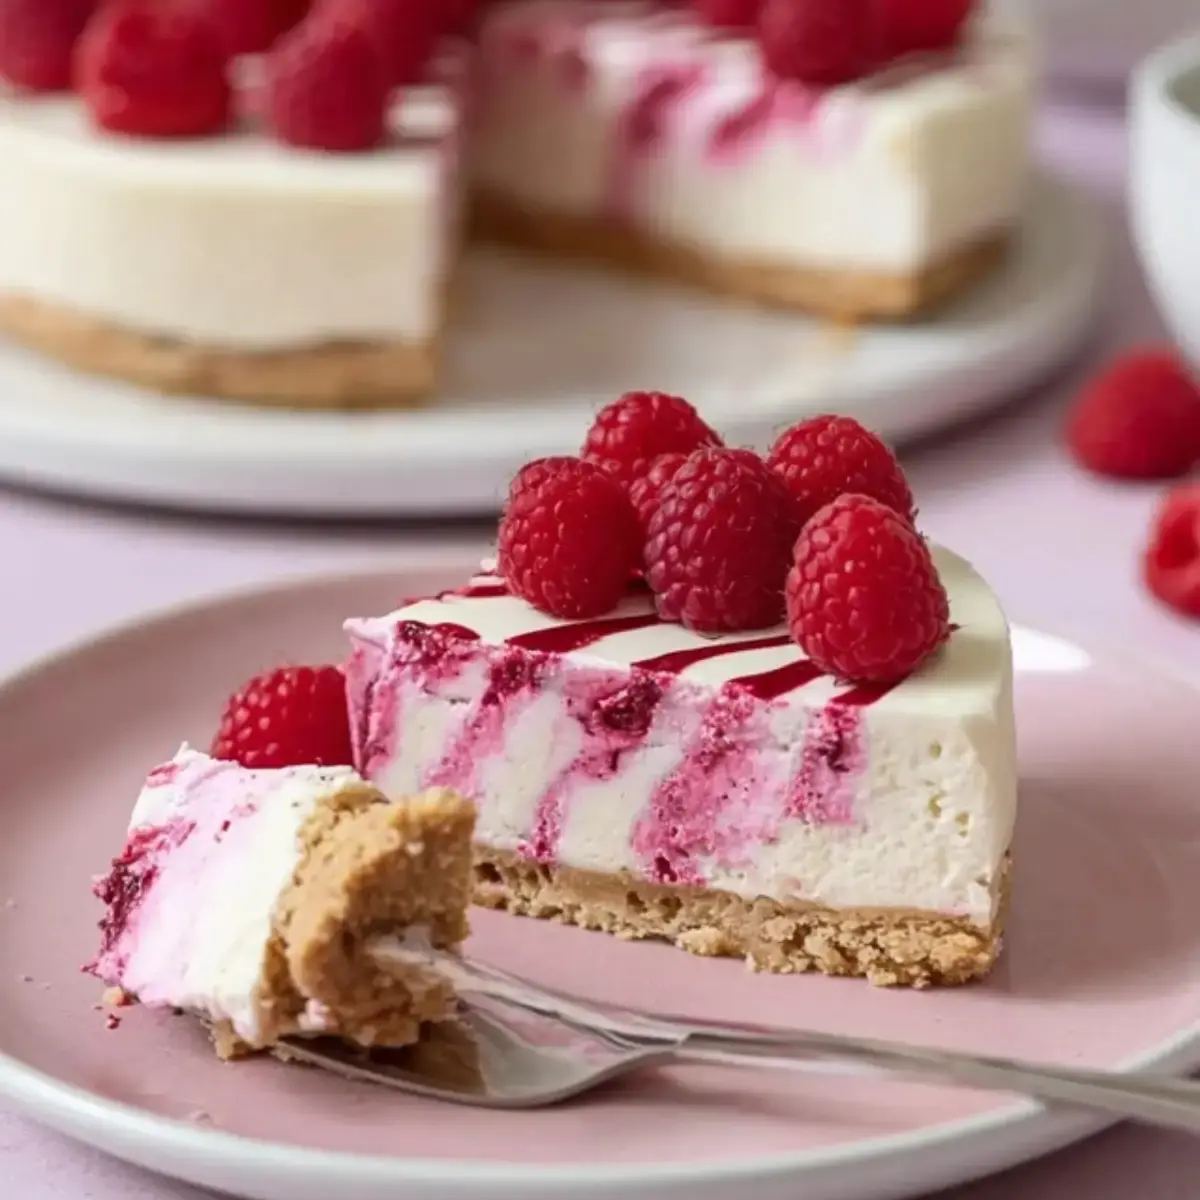
Indulge in the ultimate no-bake delight with this Creamy No Bake Himbeer Cheesecake, a dessert that promises pure bliss without the fuss of an oven. Imagine a perfectly smooth, cool filling infused with the subtle sweetness of white chocolate, all nestled upon a crisp, buttery biscuit base. This treat is especially wonderful on a warm summer day, offering a refreshing escape with every bite.
This recipe is designed for ease and maximum flavor, ensuring that even novice bakers can create a show-stopping dessert. The vibrant burst of fresh raspberries cuts through the richness, creating a harmonious balance that is utterly irresistible. Get ready to impress your guests or simply treat yourself to a slice of pure, unadulterated joy.
Why You Will Love This Recipe
- Effortless Preparation: This cheesecake requires no baking, making it an ideal choice when you want a delicious dessert without turning on the oven, perfect for hot weather or busy schedules.
- Creamy Texture: The combination of cream cheese, sour cream (Schmand), and melted white chocolate creates an incredibly smooth and luxurious filling that melts in your mouth.
- Fruity Freshness: Fresh raspberries are layered within and used as a topping, providing a delightful tartness and vibrant color that perfectly complements the sweet, creamy base.
- Quick Assembly: While it needs chilling time, the actual preparation of this no-bake cheesecake is remarkably fast, allowing you to assemble it in under 30 minutes.
- Visually Stunning: The contrast of the creamy white filling, the jewel-like raspberries, and the golden biscuit crust makes this cheesecake a feast for the eyes as well as the palate.
Ingredients You Need
The success of any great dessert lies in the quality of its ingredients. For this No Bake Himbeer Cheesecake, we are using simple yet high-quality components to achieve that signature creamy texture and delightful flavor profile. Using good quality cream cheese and fresh, ripe raspberries will elevate your cheesecake from good to extraordinary. Don’t underestimate the power of fresh ingredients in creating a truly memorable dessert experience.
No Bake Raspberry Cheesecake with Sour Cream and White Chocolate

A creamy and refreshing no-bake raspberry cheesecake with sour cream and white chocolate is the perfect choice for hot summer days or as an easy yet impressive dessert for any occasion. This cheesecake requires no baking and boasts a perfect balance of sweet raspberries and the delicate sweetness of white chocolate. If you're looking for a quick, delicious, and easy-to-prepare recipe, this cheesecake is just right for you.
- 200 g butter cookies
- 100 g butter
- 600 g cream cheese
- 400 g white chocolate
- 160 g sour cream
- 1 packet vanilla sugar
- 60 g powdered sugar
- 200 g fresh raspberries
- 1 handful raspberries for topping
- Fresh raspberries for decoration
- 1Prepare the base: Finely crush the butter cookies and mix them with the melted butter. Pour the mixture into a springform pan and press it down evenly to create a stable base. If desired, you can line the springform pan with parchment paper.
- 2Melt the white chocolate: Chop the white chocolate into small pieces and carefully melt it over a water bath or in the microwave. Let the chocolate cool slightly before mixing it with the sour cream.
- 3Fill the cheesecake: Stir the cream cheese with the vanilla sugar and powdered sugar until smooth. Mix in the cooled white chocolate, ensuring the mixture is uniform. Then, spread the fresh raspberries over the cookie base and pour the cream on top.
- 4Prepare the raspberry topping: Purée the raspberries and spread them evenly over the cheesecake surface. You can decorate the surface as desired or lightly marble it with a fork.
- 5Chill: Place the cheesecake in the refrigerator for at least 4 hours, or preferably overnight, to allow it to set and the flavors to develop.
- 6Decorate the cheesecake with fresh raspberries before serving.
Puréeing raspberries: To distribute the topping evenly, purée the raspberries well. If you prefer a lighter texture, you can also purée the raspberries less finely.
Avoid too much water in the chocolate: Be careful not to let any water get into the chocolate while melting it, as it could become lumpy.
Keywords: No Bake Cheesecake, Raspberry Cheesecake, White Chocolate Cheesecake, Summer Dessert, Easy Dessert, German Cheesecake
- butter biscuits: about 200 grams, finely crushed to form the base.
- butter: 100 grams, melted to bind the biscuit crumbs together for a sturdy crust.
- cream cheese: 600 grams, full-fat, at room temperature for a smooth and creamy filling.
- white chocolate: 400 grams, good quality, melted and slightly cooled before incorporating.
- sour cream (Schmand): 160 grams, adding a lovely tang and extra creaminess to the filling.
- vanilla sugar: 1 packet, to infuse the filling with a classic sweet vanilla aroma.
- powdered sugar: 60 grams, to sweeten the filling to perfection, adjust to your taste.
- fresh raspberries: 200 grams, for layering within the cheesecake and adding a burst of fruitiness.
- handful of raspberries: for the topping, to be puréed into a vibrant fruit coulis.
- fresh raspberries: for decoration, to garnish the finished cheesecake beautifully.
The exact quantities for these delicious components are detailed within the recipe card above for your convenience.
Variations
One of the most delightful aspects of this No Bake Himbeer Cheesecake is its inherent adaptability. You can easily tailor it to suit various dietary needs and flavor preferences, ensuring everyone can enjoy a slice of this heavenly dessert. Let’s explore a few creative twists that can transform this classic into something uniquely yours.
Vegan Delight: To create a delicious vegan version, substitute the butter biscuits with vegan-friendly cookies, ensuring they are free from dairy and eggs. For the creamy filling, opt for a high-quality vegan cream cheese alternative. You can also replace the butter with a vegan butter spread or coconut oil. Instead of white chocolate, use vegan white chocolate chips, which are readily available and melt beautifully. The sour cream can be substituted with a thick, unsweetened vegan yogurt or cashew cream for a rich and creamy texture. This vegan adaptation still captures the essence of the original, proving that plant-based desserts can be just as decadent and satisfying.
Low-Carb & Gluten-Free Option: For those mindful of carbohydrate intake or requiring a gluten-free dessert, this cheesecake can be easily modified. Replace the traditional butter biscuits with your favorite gluten-free and low-carb cookie crumbs, such as almond flour or coconut flour-based cookies. Ensure your sweetener of choice for the filling is also low-carb, like erythritol or stevia. When selecting white chocolate, look for sugar-free varieties specifically designed for low-carb diets. The sour cream and cream cheese are naturally low in carbs and gluten-free, so they remain perfect as is. This variation ensures that those with dietary restrictions can still indulge in a delightful cheesecake experience.
Citrus Zest Infusion: Elevate the flavor profile by adding a touch of citrus to your cheesecake. Finely grate the zest of one lemon or one orange and incorporate it into the cream cheese mixture along with the vanilla sugar and powdered sugar. The bright, zesty notes will cut through the richness of the white chocolate and cream cheese, adding an extra layer of complexity and freshness. This citrus infusion pairs beautifully with the tartness of the raspberries, creating a more nuanced and sophisticated flavor. It’s a simple addition that makes a significant impact, turning your no-bake cheesecake into a truly gourmet creation.
How to Prepare No Bake Himbeer Cheesecake
Step 1: Crafting the Perfect Biscuit Base
The foundation of any great cheesecake is a robust and flavorful base, and for this no-bake version, we’re starting with crushed butter biscuits. Begin by placing approximately 200 grams of your chosen butter biscuits into a sturdy zip-top bag or a food processor. If using a bag, use a rolling pin to crush the biscuits into fine crumbs; this method offers a satisfying tactile experience and ensures an even texture. If opting for a food processor, pulse until you achieve a consistently fine crumb, avoiding large chunks.
Once your biscuits are finely crumbled, transfer them into a medium-sized mixing bowl. Melt 100 grams of unsalted butter until it’s smooth and liquid; be careful not to overheat it. Pour the melted butter over the biscuit crumbs. Using a spatula or a spoon, mix thoroughly until every crumb is coated with butter, creating a consistency that resembles wet sand. This binding agent is crucial for holding the base together.
Prepare a springform pan, ideally one with a diameter of around 20-23 cm (8-9 inches). You can lightly grease the sides of the pan or line the bottom with parchment paper for easier removal later. Spoon the butter-biscuit mixture into the prepared pan. Using the back of a spoon or the bottom of a glass, press the crumbs firmly and evenly across the base of the pan, creating a compact and level layer. Ensure the edges are also well-formed and neat. This firm pressing is key to preventing the base from crumbling when sliced. For an extra firm base, you can place the pan in the refrigerator for about 15-20 minutes while you prepare the filling.
Step 2: Melting and Tempering the White Chocolate
The luxurious creaminess of this cheesecake is largely thanks to the white chocolate component. For optimal results, it’s best to use good quality white chocolate, as its flavor and texture will significantly impact the final dessert. Carefully chop about 400 grams of white chocolate into small, uniform pieces. This ensures that it melts evenly and prevents any burnt bits. Place the chopped white chocolate in a heatproof bowl.
There are two primary methods for melting chocolate: a double boiler or the microwave. For the double boiler method, fill a saucepan with a small amount of water and bring it to a gentle simmer over medium-low heat. Place the bowl containing the white chocolate over the saucepan, ensuring the bottom of the bowl does not touch the water. Stir the chocolate constantly with a rubber spatula until it is completely smooth and melted. The key is to melt it gently to avoid scorching, which can alter the chocolate’s taste and texture.
If using a microwave, place the bowl with the chopped white chocolate in the microwave and heat on 50% power in 30-second intervals, stirring well after each interval. Continue this process until the chocolate is almost entirely melted, then stir until the residual heat melts the remaining pieces completely. Once melted, remove the white chocolate from the heat and let it cool slightly for about 5-10 minutes. It should still be pourable but not piping hot, as very hot chocolate can cause the cream cheese to curdle. This slight cooling prevents issues and ensures a smooth incorporation into the filling.
Step 3: Creating the Silky Cream Cheese Filling
Now it’s time to assemble the heart of our cheesecake: the rich and velvety filling. In a large mixing bowl, combine 600 grams of full-fat cream cheese, ensuring it’s at room temperature for the smoothest texture. Add 1 packet of vanilla sugar and 60 grams of powdered sugar. You can adjust the amount of powdered sugar to your preferred level of sweetness, but remember the white chocolate is also sweet.
Using an electric mixer on medium speed, beat the cream cheese, vanilla sugar, and powdered sugar together until the mixture is completely smooth, creamy, and free of lumps. Scrape down the sides of the bowl periodically to ensure everything is evenly incorporated. The consistency should be light and airy, resembling whipped cream.
Gradually incorporate the slightly cooled, melted white chocolate into the cream cheese mixture. Continue mixing on low speed until just combined. Overmixing at this stage can introduce too much air, which might affect the cheesecake’s density. Next, gently fold in 160 grams of sour cream (Schmand) using a spatula. Fold until just incorporated, aiming for a homogenous, silky smooth batter. Avoid overmixing, as this can make the filling too loose. The mixture should be thick yet pourable, promising a delightfully creamy texture.
Step 4: Layering the Fruity Raspberry Surprise
This step introduces the vibrant burst of fruit that makes this cheesecake so special. Take approximately 200 grams of fresh raspberries. These will be spread as a layer over the biscuit base, providing a delightful tart contrast to the sweet filling. If your raspberries are particularly large, you might want to gently halve them, but whole berries often add a charming visual appeal.
Carefully pour half of the cream cheese and white chocolate mixture evenly over the prepared biscuit base in the springform pan. Using a spatula, gently spread this layer to create a smooth surface, ensuring it reaches the edges of the pan. Arrange the fresh raspberries evenly over this cream cheese layer. Try to distribute them in a single layer, allowing their vibrant color to peek through the creamy filling. This ensures that each slice will contain a delightful surprise of fruity tang.
Once the raspberries are positioned, carefully spoon the remaining half of the cream cheese mixture over the fruit layer. Again, use your spatula to gently spread this top layer, ensuring it completely covers the raspberries and creates a smooth, even surface. The goal is to encapsulate the berries within the creamy filling, making them a hidden treasure waiting to be discovered with every bite. A gentle tap of the pan on your work surface can help settle the mixture and remove any large air bubbles.
Step 5: Preparing the Luscious Raspberry Topping
The finishing touch for this no-bake masterpiece is a vibrant and flavorful raspberry topping that adds both visual appeal and an extra layer of fruity deliciousness. Take a handful of fresh raspberries, around 100-150 grams, for this purpose. Place these raspberries in a small blender or food processor.
Purée the raspberries until they form a smooth, vibrant sauce or coulis. If you prefer a seedless topping, you can pass the puréed raspberries through a fine-mesh sieve to remove the seeds. This process yields a wonderfully smooth and intensely flavored raspberry sauce that will crown your cheesecake. If you desire a slightly sweeter topping, you can add a teaspoon of powdered sugar while blending, though the natural sweetness of the berries is often sufficient.
Gently spoon or drizzle this raspberry purée over the top of the cheesecake. You can spread it evenly with a small offset spatula or create beautiful swirls and patterns using the back of a spoon or a skewer. For a marbled effect, gently drag a toothpick or skewer through the purée and the white filling. This creates an attractive visual design that hints at the fruity flavors within. You can also reserve a few whole raspberries for a final garnish. This topping not only enhances the flavor but also adds a beautiful, rustic charm to the presentation.
Step 6: The Essential Chilling Period
Patience is a virtue, especially when it comes to achieving the perfect texture for your no-bake cheesecake. Once the cheesecake has been assembled with its creamy filling and luscious topping, it’s time for its crucial chilling phase. This period allows the ingredients to set and firm up, transforming the mixture from a soft batter into a sliceable dessert.
Carefully cover the springform pan with plastic wrap, ensuring it’s sealed to prevent any odors from the refrigerator from affecting the cheesecake. Place the covered cheesecake in the refrigerator for a minimum of 4 hours. However, for the absolute best results and a perfectly firm consistency, it is highly recommended to let it chill overnight. This extended period allows the gelatinous properties of the cream cheese and the structure provided by the white chocolate to fully set, resulting in a slice that holds its shape beautifully.
During this chilling time, the flavors will also meld together, creating a more cohesive and satisfying taste experience. Resist the temptation to cut into it too early, as a slightly soft cheesecake can be disappointing. The overnight chill is truly the secret to achieving that signature dense yet creamy texture that defines a perfect cheesecake. Once thoroughly chilled, it will be ready to unmold and serve.
Pro Tips for No Bake Himbeer Cheesecake
The Importance of Room Temperature Ingredients: For the creamiest and smoothest filling, ensure your cream cheese and sour cream (Schmand) are at room temperature before you begin. Cold dairy products can lead to lumps and a less homogenous texture in your cheesecake filling. Allow them to sit on the counter for at least an hour before starting your preparation.
Gentle Melting of White Chocolate: White chocolate is more delicate than dark or milk chocolate and can easily scorch or seize. Always melt it slowly and gently, preferably using a double boiler or very short intervals in the microwave at a lower power setting. Stir continuously and remove it from the heat as soon as it’s mostly melted, allowing the residual heat to finish the job. Let it cool slightly before incorporating it into the cream cheese mixture to prevent it from becoming grainy.
Achieving a Firm Base: A strong and well-compacted biscuit base is essential for a no-bake cheesecake. After mixing the biscuit crumbs with melted butter, press them down firmly into the springform pan using the bottom of a glass or a measuring cup. Ensure there are no loose crumbs; the firmer you press, the less likely the base is to crumble when you cut the cheesecake. Chilling the base for about 15-20 minutes before adding the filling can also help solidify it further.
Don’t Overmix the Filling: While you want a smooth filling, overmixing the cream cheese mixture, especially after adding the white chocolate and sour cream, can incorporate too much air. This can lead to a cheesecake that is too light and may not set as firmly as desired. Mix until just combined and smooth, aiming for a dense yet creamy texture. Folding in the sour cream gently with a spatula is often better than vigorous mixer beating at this stage.
The Magic of Overnight Chilling: While 4 hours of chilling time is the minimum, allowing the cheesecake to chill in the refrigerator overnight is highly recommended. This extended period gives the ingredients ample time to fully set and meld together, resulting in a firmer, richer, and more cohesive dessert. The flavors develop beautifully, and the texture becomes perfectly dense and creamy, making it much easier to slice cleanly.
Serving Suggestions for No Bake Himbeer Cheesecake
Decoration
The visual appeal of a cheesecake is just as important as its taste, and this No Bake Himbeer Cheesecake offers ample opportunity for beautiful adornment. The most classic and effective decoration involves using fresh raspberries, both whole and as a vibrant coulis. Arrange a scattering of fresh, plump raspberries artfully across the top of the cheesecake. You can also create a more intricate design by piping the raspberry purée in swirls or patterns, or by lightly marbling it into the white filling with a toothpick before it sets.
Consider adding a few fresh mint leaves for a pop of green contrast and a hint of freshness. A light dusting of powdered sugar can add a delicate snowy effect, especially around the edges. For a touch of elegance, you might also sprinkle a few slivers of toasted almonds or finely chopped pistachios around the base or on top. Edible flowers, if available and suitable for consumption, can also lend a sophisticated and beautiful touch to your dessert.
Side Dishes
While this cheesecake is a complete dessert on its own, it pairs wonderfully with a few complementary side dishes that enhance its flavors without overpowering them. A simple and refreshing choice is a side of fresh berries. A mixed berry salad, featuring strawberries, blueberries, and perhaps a few more raspberries, adds another dimension of fruitiness and texture. The natural sweetness and slight tartness of these berries harmonize beautifully with the cheesecake.
Another excellent pairing is a light, fluffy whipped cream. A dollop of unsweetened or lightly sweetened whipped cream can offer a contrasting creamy element and a subtle flavor that complements the cheesecake without competing. For something a bit more decadent, a small scoop of good quality vanilla bean ice cream or a raspberry sorbet can be served alongside. The cold temperature and intense flavor of the ice cream or sorbet provide a delightful contrast to the cool, creamy cheesecake.
Creative Serving Ideas
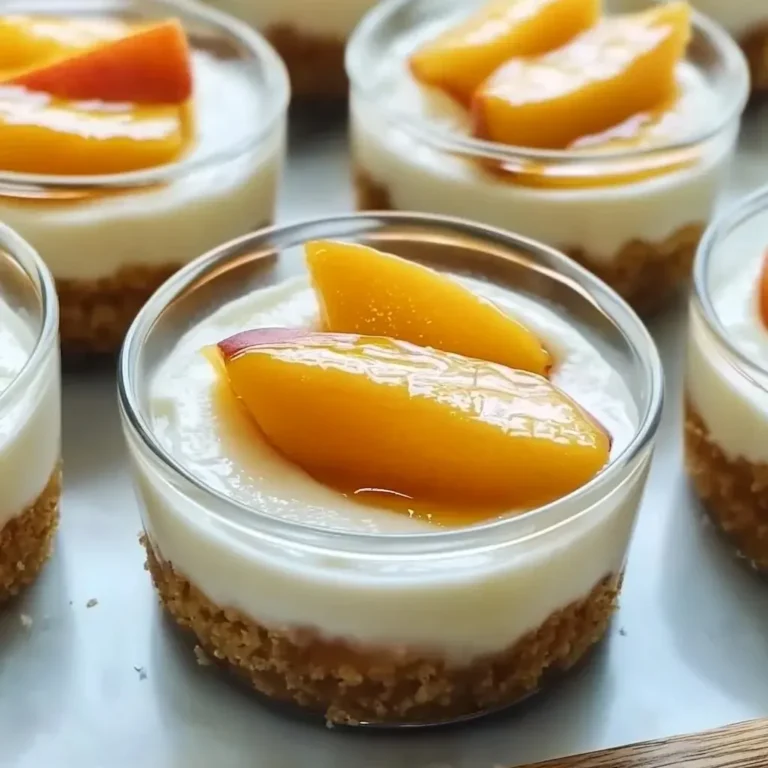
Beyond the traditional slice, there are several creative ways to serve this No Bake Himbeer Cheesecake that can make your dessert experience even more special. Consider serving individual portions in elegant glasses or small jars. This “cheesecake in a jar” approach is perfect for parties or when you want to offer pre-portioned desserts. Layer the crushed biscuit base, the creamy filling, and the raspberry topping in the glasses, ensuring each serving is a miniature work of art.
Another fun idea is to create mini cheesecakes. Use muffin tins lined with paper liners or individual tartlet molds. This allows each guest to have their own personal cheesecake, making it easier to serve and a delightful surprise. You can also serve warm slices of this no-bake cheesecake with a drizzle of warm raspberry sauce or a simple berry compote. The contrast between the cool cheesecake and the warm sauce creates a delightful sensory experience. For a more sophisticated presentation, cut the cheesecake into small, bite-sized cubes and serve them as part of a dessert platter or alongside coffee and tea.
Preparation & Storage
Storing Leftovers
Should you be fortunate enough to have any leftover No Bake Himbeer Cheesecake, proper storage is key to maintaining its deliciousness. The best way to store leftovers is to cover the cut cheesecake tightly with plastic wrap, ensuring no air can reach the surface. Alternatively, you can place the remaining cheesecake in an airtight container. If it’s already sliced, you can place the slices in a container with parchment paper between them to prevent sticking.
Store the covered cheesecake in the refrigerator. It will keep well for up to 3-4 days when stored correctly in a cool environment. The flavors tend to meld and deepen slightly over time, so it can be just as, if not more, delicious on the second or third day. Ensure it is kept away from strong-smelling foods in the refrigerator, as the cheesecake can absorb these odors.
Freezing
Yes, this No Bake Himbeer Cheesecake can indeed be frozen, offering a convenient way to have this delightful dessert on hand for future cravings. It’s best to freeze the cheesecake before it’s cut, if possible. If you need to freeze a portion of a cut cheesecake, wrap each slice very tightly in plastic wrap, followed by a layer of aluminum foil, or place them in a freezer-safe airtight container. This double layer of protection helps prevent freezer burn and preserves the quality.
For a whole cheesecake, place it in the freezer on a flat surface until firm, then wrap it tightly in plastic wrap and then in aluminum foil, or place it in a freezer-safe container. Frozen cheesecake can be stored for up to 1-2 months. Ensure it is well-sealed to maintain its texture and flavor. The biscuit base may become slightly softer after freezing and thawing, but the overall enjoyment remains high.
Reheating
Reheating is not typically necessary for a no-bake cheesecake, as it is designed to be served chilled. However, if you are looking to thaw a frozen cheesecake or simply want to slightly soften it before serving, the process is quite simple. The best method for thawing is to transfer the frozen cheesecake from the freezer to the refrigerator and allow it to thaw slowly overnight. This gradual thawing process helps the cheesecake retain its structure and texture.
Avoid thawing at room temperature for extended periods, as this can lead to the cheesecake becoming too soft or even melting. Once thawed in the refrigerator, it should be consumed within a day or two. If you’ve frozen individual slices, you can thaw them in the refrigerator for a few hours. There is no need to reheat the cheesecake; it is intended to be enjoyed cold and creamy. The cooling process is integral to its delightful texture and refreshing taste.
Frequently Asked Questions
-
How long does the No Bake Himbeer Cheesecake need to chill before serving to achieve the perfect texture?
For optimal results and a firm, sliceable consistency, the No Bake Himbeer Cheesecake requires a minimum of 4 hours of chilling time in the refrigerator. However, to ensure the cheesecake is perfectly set and the flavors have had ample time to meld beautifully, it is highly recommended to chill it overnight. This extended period allows the cream cheese and white chocolate to fully firm up, resulting in that signature dense yet creamy texture that is characteristic of a well-made cheesecake. Skipping or shortening this crucial chilling step can lead to a softer, less stable dessert that may not hold its shape when sliced.
-
Can I freeze the No Bake Himbeer Cheesecake, and if so, what is the best method to ensure quality upon thawing?
Yes, absolutely! This No Bake Himbeer Cheesecake freezes remarkably well, offering a fantastic way to prepare a dessert in advance or to save some for later indulgence. The most effective way to freeze it is to ensure it is completely chilled and then wrap it very securely. First, wrap the entire cheesecake (or individual slices) tightly in plastic wrap, pressing out as much air as possible. For an extra layer of protection against freezer burn, follow this with a layer of aluminum foil or place the wrapped cheesecake in an airtight freezer-safe container. When you’re ready to enjoy it, transfer the frozen cheesecake from the freezer to the refrigerator and allow it to thaw slowly overnight. This gradual thawing helps preserve the delicate texture of the filling and the crispness of the base.
-
What are the best practices for storing leftover No Bake Himbeer Cheesecake to maintain its freshness and flavor?
To keep your leftover No Bake Himbeer Cheesecake tasting as delicious as possible, proper storage is essential. Once cut, cover the remaining cheesecake tightly with plastic wrap, making sure to minimize any exposure to air, which can cause it to dry out or absorb refrigerator odors. If you have a larger portion remaining, an airtight container is an excellent option, especially if you place parchment paper between slices to prevent them from sticking together. Store the covered cheesecake in the refrigerator, where it should remain fresh and enjoyable for approximately 3 to 4 days. The flavors often continue to develop and deepen slightly during refrigeration, making the leftovers just as delightful as the initial serving.