P.F. Chang's Mongolian Beef Recipe
Get ready to recreate a beloved restaurant classic in your own kitchen with this sensational Mongolian Beef recipe. This dish, known for its irresistibly tender beef coated in a rich, savory-sweet sauce, is a guaranteed crowd-pleaser. It’s the perfect blend of comfort food and a touch of culinary adventure.
Often found on the menus of popular Chinese-American establishments, Mongolian Beef has a fascinating history that’s more about clever culinary adaptation than ancient tradition. This version aims to capture that authentic, craveable flavor profile with straightforward ingredients and clear instructions, making it accessible for home cooks of all skill levels.
Why You Will Love This Recipe
- Restaurant-Quality Taste: Experience the iconic flavors of your favorite takeout spot, perfectly replicated in your home kitchen. This recipe delivers that signature sweet and savory balance that makes Mongolian Beef so addictive.
- Speedy Weeknight Meal: With a total preparation and cooking time of just 30 minutes, this dish is your secret weapon for busy evenings when you crave something delicious and satisfying without the fuss. It’s a perfect example of a quick dinner that doesn’t compromise on flavor.
- Accessible Ingredients: You won’t need to embark on a quest for obscure items; the recipe calls for common pantry staples and readily available cuts of beef, making it easy to whip up anytime the craving strikes.
- Tender, Flavorful Beef: The key to this dish is perfectly cooked beef that’s both tender and infused with the delightful sauce. This recipe focuses on techniques that ensure optimal texture and taste.
- Customizable Heat: While this recipe focuses on the classic sweet and savory profile, there’s ample opportunity to adjust the spice level to your preference, making it truly your own.
Ingredients You Need
The beauty of this Mongolian Beef recipe lies in its simplicity and the quality of its core components. We focus on fresh, vibrant ingredients that come together harmoniously to create that unforgettable taste. Sourcing fresh ginger and good quality soy sauce will elevate the final dish, transforming your dinner into a culinary triumph.
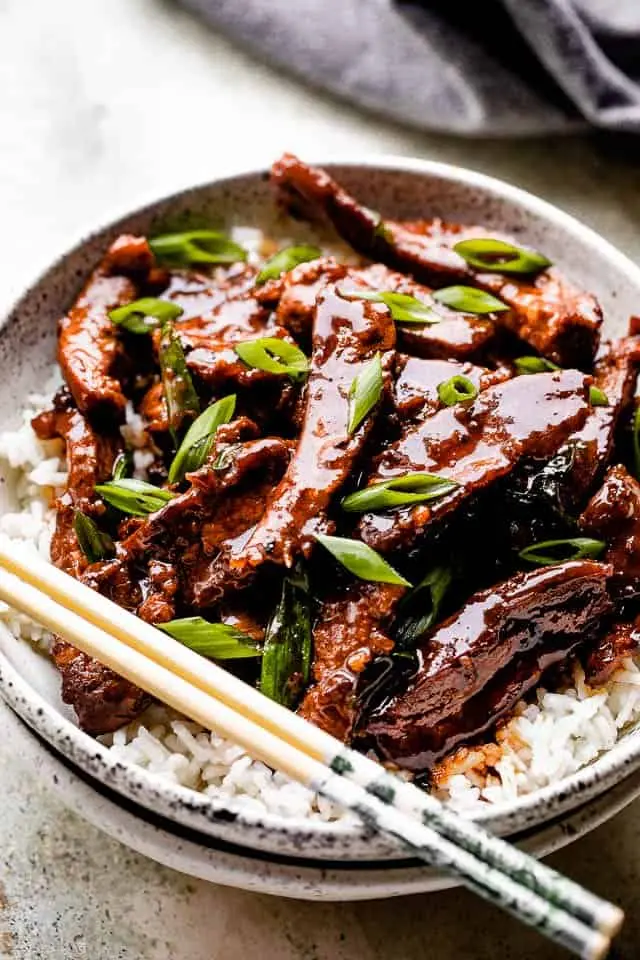
P.F. Chang’s Mongolian Beef Copycat

This copycat of P.F. Chang’s Mongolian Beef recipe features flank steak simmered in a delectable sweet sauce made with ginger, garlic, soy sauce, and brown sugar. It’s simple to prepare and perfectly captures the flavors of the renowned restaurant’s dish!
- 1 pound flank steak, thinly sliced across the grain on a diagonal
- ¼ cup cornstarch
- 2 teaspoons vegetable oil
- 1 teaspoon minced fresh ginger
- 1 tablespoon minced garlic
- ½ cup soy sauce
- ½ cup water
- ½ cup dark brown sugar
- 1 cup vegetable oil, for frying
- 2 green onions, green parts only, sliced on the diagonal into 2 inches
- 4 cups cooked white rice
- 1Place cornstarch on a shallow plate. Dip steak slices into the cornstarch, applying it on both sides of each slice of beef. Put the steak pieces aside for 10 minutes while you work on the sauce.
- 2In a saucepan, heat 2 teaspoons of vegetable oil over medium-low heat. Add ginger and garlic to the pan; cook for 10 seconds or until fragrant.
- 3Stir in the soy sauce and water. Whisk in brown sugar and cook while stirring until the sugar dissolves. Set to medium heat and cook the sauce until it thickens, about 10 minutes. Remove from heat and set aside.
- 4Place vegetable oil in a separate large skillet and heat over medium heat until hot. Add the steak slices to the oil and cook for 2 to 3 minutes or until cooked through, flipping the pieces over to cook on the opposite side.
- 5Using a pair of tongs, remove the steak pieces from the oil and let them drain on paper towels.
- 6Discard the oil. Return the saucepan to the stove and heat over medium heat. Add steak slices and cook for 1 minute. Gently stir in previously prepared sauce; continue to cook and stir for a minute. Stir in green onions and cook for 1 to 2 minutes, or until heated through. Remove from heat and serve over rice.
Keywords: Mongolian Beef, P.F. Chang's, Copycat, Chinese-American, Stir-fry, Beef, Dinner
The precise quantities for each ingredient are detailed within the recipe card, ensuring accuracy and ease of preparation.
Variations
While the classic Mongolian Beef is undeniably spectacular, there’s always room to experiment and tailor this dish to specific dietary needs or flavor preferences. These variations offer exciting new ways to enjoy this beloved recipe.
Vegan Mongolian “Beef”: For a plant-based twist, substitute the flank steak with extra-firm tofu or king oyster mushrooms. Press the tofu thoroughly to remove excess water before slicing it into bite-sized pieces. King oyster mushrooms can be sliced lengthwise and scored to mimic the texture of beef. In both cases, coat them in cornstarch and pan-fry until golden and slightly crispy. The sauce remains largely the same, though you might consider a touch of mushroom powder or nutritional yeast for added umami. This vegan rendition offers a satisfying chew and absorbs the delicious sauce beautifully, making it a fantastic vegan option.
Low-Carb Mongolian Beef Bowl: To reduce carbohydrates, skip the traditional rice and opt for a bed of cauliflower rice. Ensure the cauliflower rice is cooked until tender but not mushy. You can also add a variety of low-carb vegetables to the stir-fry, such as broccoli florets, bell pepper strips, or snow peas, adding both nutrients and texture to the dish. This adaptation makes for a lighter yet equally flavorful meal, perfect for those mindful of their carb intake.
Spicy Szechuan-Inspired Mongolian Beef: If you enjoy a bit of heat, infuse your Mongolian Beef with Szechuan flavors. Add a tablespoon or two of chili garlic sauce or a pinch of red pepper flakes to the sauce mixture. For an extra layer of authentic Szechuan heat and tingle, consider incorporating a small amount of ground Szechuan peppercorns into the cornstarch coating for the beef. This elevates the dish from simply savory to a thrillingly spicy sensation.
How to Prepare Mongolian Beef Recipe
Step 1: Preparing the Beef and Sauce Base
The foundation of a great Mongolian Beef starts with properly preparing the beef. This involves slicing it thinly and coating it with cornstarch, which is crucial for achieving that signature crispy exterior when fried. Take your time with this step, ensuring each piece is adequately coated. Freezing the beef briefly beforehand can make slicing significantly easier and more precise, leading to more uniformly cooked pieces.
Simultaneously, begin assembling the base of your flavorful sauce. This typically involves combining soy sauce, water, and brown sugar in a bowl. Whisking these ingredients together thoroughly ensures that the sugar dissolves completely, preventing any grittiness in the final sauce. The ratio of these ingredients is key to achieving the perfect balance of salty, sweet, and savory notes that define this dish. Consider tasting and adjusting the sweetness or saltiness at this stage if you have a particular preference.
Pro Tip: For incredibly easy slicing, place your flank steak in the freezer for about 20-30 minutes. It doesn’t need to freeze solid, just firm up enough so that you can slice through it cleanly against the grain. This technique is paramount for achieving tender, melt-in-your-mouth beef and avoiding a tough, chewy texture. Always slice against the natural grain of the meat.
Step 2: Cooking the Aromatics and Sauce
Once your beef is ready and the sauce components are mixed, it’s time to build the aromatic foundation. In a saucepan or wok, heat a small amount of vegetable oil over medium-low heat. Add your minced fresh ginger and garlic to the hot oil. Sauté them for a very short period, just until they become fragrant. This quick sauté releases their essential oils and infuses the oil with their pungent, wonderful aroma, which is critical for the sauce’s complexity.
Be careful not to burn the garlic and ginger, as this can impart a bitter taste to your sauce. The goal is a gentle fragrance that signals they are ready to contribute their flavor. This step is relatively brief, often lasting only about 10-30 seconds, depending on the heat of your pan. The fragrant oils released at this stage are the soul of the sauce.
The Art of the Sauce: After the aromatics have bloomed, pour in your pre-mixed soy sauce and water mixture. Bring this liquid to a gentle simmer. Now, whisk in the brown sugar until it is completely dissolved. Continue to cook the sauce over medium heat, stirring occasionally, until it thickens to your desired consistency. This usually takes about 10 minutes. A slightly thickened sauce will cling beautifully to the beef, ensuring every bite is packed with flavor.
Step 3: Frying the Beef to Perfection
This is where the magic happens and the beef gets its characteristic texture. In a separate, large skillet or wok, heat a more generous amount of vegetable oil over medium-high heat. You want the oil to be hot enough to crisp the beef quickly without making it greasy. Test the oil by dropping a tiny piece of cornstarch-coated beef into it; if it sizzles immediately, it’s ready.
Carefully add the cornstarch-coated beef slices to the hot oil in a single layer. It’s crucial not to overcrowd the pan; you may need to cook the beef in batches. Overcrowding will steam the beef instead of frying it, resulting in a less desirable texture. Fry the beef for about 2 to 3 minutes per side, or until it achieves a beautiful golden-brown color and a slightly crispy exterior. The inside should remain tender and juicy. This rapid cooking preserves the beef’s tenderness.
Don’t Overcrowd: This is a cardinal rule for achieving perfectly fried beef. Each piece needs direct contact with the hot oil to develop a crispy crust. If you cram too many pieces into the pan, the oil temperature will drop, leading to soggy, greasy beef. Work in manageable batches to ensure optimal results. This might add a few minutes to your overall cooking time, but the superior texture of the beef is well worth it.
Step 4: Draining and Combining
Once the beef is perfectly fried and golden brown, it’s time to remove it from the hot oil. Using a slotted spoon or tongs, carefully lift the beef slices from the skillet and place them on a plate lined with paper towels. This step is essential for draining off any excess oil, preventing the finished dish from feeling greasy. Allow the beef to rest for a moment on the paper towels while you proceed to the next step.
After draining the beef, carefully discard most of the frying oil from the skillet, leaving just a teaspoon or two. Return the skillet to medium heat. This is the point where you’ll bring everything together: the perfectly cooked beef and the luscious sauce. Ensure the skillet is warm enough to heat the beef through without overcooking it.
The Grand Finale: Return the drained, fried beef slices to the skillet. Pour the prepared, slightly thickened sauce over the beef. Gently stir and toss the beef to ensure each piece is evenly coated in the rich sauce. Allow it to cook for just another minute or so, allowing the sauce to adhere to the beef and the flavors to meld beautifully. This brief simmering time ensures the beef absorbs the sauce’s essence.
Step 5: Adding the Finishing Touches
The final flourish for this Mongolian Beef recipe involves adding the vibrant green onions. Once the beef and sauce are combined and heated through, stir in the sliced green onions. Cook for an additional 1 to 2 minutes, just until the green onions are slightly tender and bright green. They add a fresh, sharp contrast to the richness of the beef and sauce, providing a pleasant visual appeal and a subtle oniony bite.
The green onions are typically added at the very end to maintain their fresh flavor and vibrant color. Overcooking them can make them wilt and lose their appeal. A quick toss is all they need to integrate seamlessly into the dish. This final step brings together all the elements for a harmonious and delicious result.
Presentation is Key: Serve your glorious Mongolian Beef immediately while it’s hot and the sauce is still glossy. The most traditional and perhaps best way to enjoy this dish is over a bed of fluffy, steamed white rice. The rice acts as a perfect vessel for soaking up every last drop of that incredible sauce. You can also garnish with a few extra slivers of green onion or toasted sesame seeds for an added touch of elegance and flavor.
Step 6: Serving and Enjoying
Your restaurant-quality Mongolian Beef is now ready to be savored. The aroma alone is enough to make mouths water. Plate generous portions of the glazed beef over your chosen rice. The combination of tender beef, sticky sauce, and fluffy rice is a textural and flavor explosion that is incredibly satisfying.
Don’t be shy about spooning extra sauce over the beef and rice. It’s truly the star of the show! This dish is best enjoyed fresh, so gather your loved ones around the table and dig in. It’s a testament to how achievable authentic, delicious takeout-style meals can be right in your own home. This dish is a fantastic example of a satisfying dinner recipe that feels special.
A Note on Authenticity: While this recipe is a delicious take on a popular Chinese-American classic, it’s worth noting that true Mongolian cuisine is quite different. The name “Mongolian Beef” is more a product of culinary evolution and naming conventions in Taiwanese and Chinese restaurants outside of Mongolia. Regardless of its origins, this version delivers the flavors that have made it a global favorite. For more delicious inspiration, explore other copycat recipes like our German Pancake Recipe which offers a different kind of comfort.
Pro Tips for Mongolian Beef Recipe
Mastering this Mongolian Beef recipe is all about understanding a few key techniques that elevate it from good to exceptional. These tips are designed to help you achieve restaurant-quality results every time you make this dish.
Slice Against the Grain: This is perhaps the most critical tip for tender beef. When you freeze the meat slightly, it becomes firmer and easier to slice precisely. Look for the lines (fibers) in the meat and slice perpendicular to them. Cutting with the grain will result in tough, chewy beef, no matter how well you cook it. This technique applies to many beef recipes and is a fundamental skill for any home cook. Understanding the grain of the meat is key to unlocking its tenderness.
Achieve the Perfect Sear: A hot pan is your best friend when it comes to frying the beef. Ensure the oil is shimmering before you add the meat. This high heat sears the outside of the beef quickly, creating a delightful crispiness while keeping the inside moist and tender. If the pan isn’t hot enough, the beef will absorb too much oil and become greasy instead of crispy. This rapid searing is what gives the beef its satisfying texture and prevents it from becoming tough.
Don’t Overcrowd the Pan: This tip ties directly into achieving that perfect sear. Frying the beef in batches ensures that each piece has ample space to cook properly and develop a crispy exterior. Overcrowding lowers the pan’s temperature, leading to steamed, greasy meat rather than beautifully fried pieces. It might take an extra few minutes, but the difference in texture and overall quality is significant. Patience here yields delicious rewards.
Balance the Sauce: The sauce is the heart of Mongolian Beef. Taste and adjust the balance of soy sauce (salty), brown sugar (sweet), and potentially a splash of rice vinegar (tangy) to suit your palate. While the recipe provides a solid base, personal preference plays a role. A perfectly balanced sauce is slightly sweet, deeply savory, and coats the beef luxuriously. Experimentation within these guidelines can lead to your signature Mongolian Beef sauce.
Consider the Cornstarch Coating: The cornstarch coating is vital for both crispiness and thickening the sauce. Ensure the beef slices are well-coated, but shake off any excess before frying. This prevents clumps and ensures an even crust. The cornstarch that falls off into the oil also contributes to thickening the sauce later when you combine the ingredients. It’s a simple ingredient that performs multiple essential functions.
Serving Suggestions for Mongolian Beef Recipe
Decoration
Elevate the visual appeal of your Mongolian Beef with simple yet effective garnishes. A scattering of thinly sliced fresh green onions provides a vibrant splash of green and a fresh, sharp aroma. For an added layer of subtle crunch and nutty flavor, a sprinkle of toasted sesame seeds is a classic choice. If you’re feeling adventurous, consider a few finely julienned red bell peppers for a pop of color and a hint of sweetness, or some delicate cilantro sprigs for a fresh, herbaceous note.
Side Dishes
Mongolian Beef is incredibly versatile when it comes to accompaniments. For a classic pairing, fluffy steamed white rice is unparalleled; its mild flavor and soft texture perfectly soak up the rich sauce. If you’re looking for something more adventurous, consider crispy fried rice, perhaps with a hint of garlic or chili for added depth. A refreshing Asian cucumber salad, with its crisp texture and tangy vinegar dressing, offers a delightful counterpoint to the richness of the beef. Alternatively, simple steamed or stir-fried bok choy or broccoli provides a healthy and colorful green element to the meal. For those seeking lighter options, cauliflower rice or even a bed of tender noodles can serve as excellent bases.
Creative Serving Ideas
Move beyond the standard bowl and get creative with your Mongolian Beef presentation. Consider serving it as a filling for lettuce wraps, offering a lighter, more interactive dining experience. Another idea is to create “bento boxes” with small portions of the beef alongside a variety of complementary sides like edamame, pickled ginger, and a small fruit salad for a complete and visually appealing meal. You could also incorporate the beef into a savory noodle dish, tossing it with lo mein or chow mein noodles and extra vegetables for a heartier, one-pan meal. For a truly unique approach, try using the Mongolian Beef as a topping for loaded baked potatoes or sweet potatoes, creating an unexpected yet delicious fusion dish. A delightful recipe that pairs well with these ideas is the Easy Lobster Bisque Recipe, showcasing versatility in meal planning.
Preparation & Storage
Storing Leftovers
Leftover Mongolian Beef can be stored in an airtight container in the refrigerator for up to 3 to 4 days. Ensure the beef and sauce are completely cooled before sealing the container. This practice helps to maintain the quality and safety of the food, preventing spoilage. Properly stored leftovers can be a convenient and delicious meal for the days following the initial preparation.
Freezing
Yes, Mongolian Beef can be frozen for longer storage. Place the cooled beef and sauce in a freezer-safe airtight container or a heavy-duty zip-top bag. Remove as much air as possible before sealing to prevent freezer burn. Frozen Mongolian Beef can be stored for up to 3 to 4 months. It’s advisable to portion it into individual servings before freezing for easier reheating and quicker thawing.
Reheating
To reheat refrigerated Mongolian Beef, the best method is to use a skillet over medium-low heat. This allows the sauce to warm through evenly and helps to restore some of the crispness to the beef. Add a splash of water or broth if the sauce seems too thick. If reheating from frozen, you can microwave it directly, stirring halfway through for even heating, or thaw it in the refrigerator overnight and then reheat in a skillet. Avoid microwaving for extended periods, as this can toughen the beef.
Frequently Asked Questions
-
What is the best cut of beef for Mongolian Beef?
The best cuts of beef for Mongolian Beef are those that are tender and suitable for quick cooking, such as flank steak, sirloin steak, or even skirt steak. These cuts can be thinly sliced against the grain to ensure tenderness and a quick cooking time. Flank steak is particularly popular due to its good balance of flavor and texture when prepared correctly. Using a cut that requires long, slow cooking would fundamentally change the nature of this quick stir-fry dish, leading to a less desirable outcome.
-
Why is my Mongolian Beef not crispy?
Several factors can contribute to Mongolian Beef not being crispy. First, ensure your oil is sufficiently hot before adding the beef; it should shimmer. Second, avoid overcrowding the pan, as this causes the beef to steam rather than fry, leading to sogginess. Cooking the beef in batches is essential for achieving optimal crispiness. Lastly, make sure the beef is well-coated in cornstarch, but shake off any excess powder before it hits the oil, as too much can clump and burn.
-
Can I make the sauce ahead of time for Mongolian Beef?
Yes, absolutely! The sauce for Mongolian Beef can be prepared ahead of time and stored in the refrigerator for up to 2-3 days. This is a great way to save time on busy weeknights. Simply whisk together the soy sauce, water, and brown sugar, and then cook it until thickened as per the recipe instructions. Store it in an airtight container. When you’re ready to cook, you’ll just need to reheat the sauce briefly and then add your fried beef and green onions. This advance preparation makes the final cooking process much quicker and more efficient, bringing you closer to enjoying this delightful dish from Pinterest and beyond.