Easy Maki Roll Recipe – Make Your Own Sushi
Mastering the art of homemade sushi can feel like an exotic journey, but with this straightforward Maki Roll recipe, you’re on your way to culinary delight. These vibrant rolls combine the satisfying chew of perfectly cooked sushi rice with the crisp freshness of vegetables and the savory hint of imitation crab, all encased in a crisp sheet of nori.
Forget the hassle of dining out for sushi; this recipe empowers you to create these delightful parcels in your own kitchen. It’s a surprisingly simple process, yielding a result that’s both visually appealing and incredibly delicious, perfect for a special weeknight dinner or an engaging weekend activity.
Why You Will Love This Recipe
- Easy Assembly: With a little practice and a few key tips, rolling your own maki becomes an enjoyable and accessible culinary skill.
- Fresh & Flavorful: The combination of crunchy vegetables, tender imitation crab, and perfectly seasoned sushi rice creates a harmonious and satisfying taste profile.
- Customizable Fillings: This recipe provides a fantastic base, but it’s incredibly versatile, allowing you to experiment with a wide array of your favorite ingredients.
- Impressive Presentation: Homemade maki rolls are not only delicious but also a beautiful addition to any meal, sure to impress your family and friends.
Ingredients You Need
The foundation of any great maki roll lies in the quality of its ingredients. For this recipe, we’re focusing on fresh produce and high-quality sushi essentials to ensure optimal flavor and texture. Using the right kind of rice is paramount, as is the freshness of your vegetables and imitation crab.
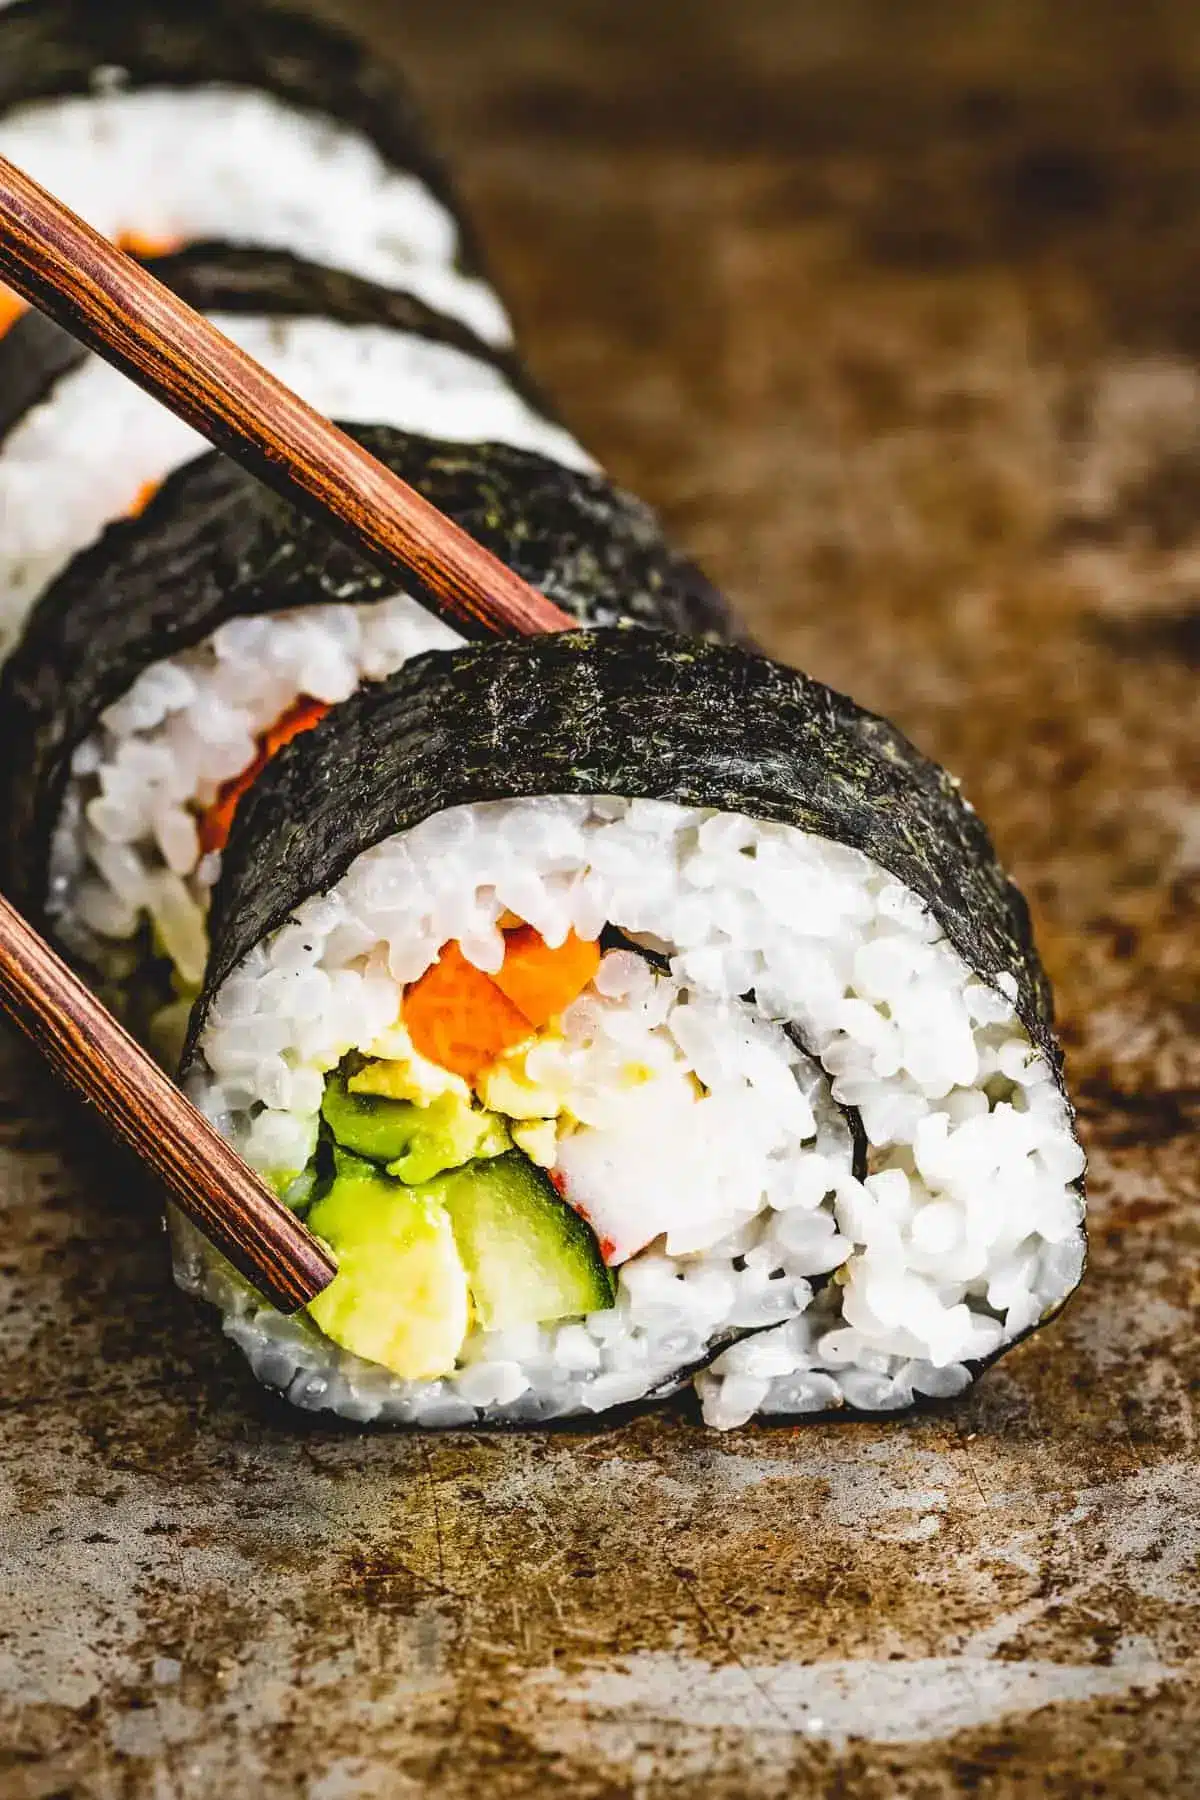
Easy Maki Roll Recipe

Master the art of homemade sushi with this easy Maki Roll recipe! Featuring nori and perfectly cooked sushi rice wrapped around a colorful combo of imitation crab, cucumber, avocado, and carrots, these rolls promise a fun and flavorful dining experience! Forget going out. Make your own maki sushi! Sushi always seemed daunting to make at home, but with some trial and error and a bit of help from my next door neighbors, who also shared their technique for making delicious shrimp shumai , I’ve mastered this maki roll recipe! It’s surprisingly easy. Inspired by a California roll (but with the seaweed on the outside), it’s filled with imitation crab, cucumber, avocado, and carrot, all rolled up in sweet, sticky sushi rice and nori. It’s a balanced and delicious meal in every bite! Why You’ll Love This Homemade Sushi Recipe Tasty and clean. These sushi rolls are delicious and a clean and light lunch or dinner option. Great for meal prep. Make these rolls on Sunday night and pack them for lunch for the next two days. Interactive. Rolling sushi is perfect for an engaging dinner party. Get some friends together and let everyone make their own roll. Versatile. This maki roll recipe is easily adaptable to a variety of preferences. The crab and veggie combo is one of my favorites, but feel free to grab other filling options. What Is Maki? Maki, a traditional Japanese dish, features sticky rice and dried seaweed (sushi nori) packed with various fillings, from veggies to seafood. There are many maki types, ranging from single to multiple fillings, with nori or rice on the outside and even some without rice. Some are tightly wrapped and sliced, while others are more loosely rolled, resembling a burrito. Today, we’re making chumaki, which is a medium-sized roll with nori on the outside and a mix of ingredients inside. What Goes In A Maki Roll? For the Rice: You’ll need to use sushi rice – it has higher starch content than regular rice, which gives it the required sticky consistency to hold the maki rolls together. Also, grab some rice vinegar and granulated sugar to mix with the rice. For assembling the sushi: You’ll need sushi nori ( dried seaweed ), English cucumber, carrot, avocado, and imitation crab meat. Tips for Making Sushi Rolls at Home Rinse the rice. It is important to rinse the sushi rice before cooking it because too much starch will leave you with a gummy product that is nearly impossible to work with. If you don’t have a sushi mat , line a thick towel with plastic wrap instead. Keep your fingers wet. Wet your fingers before spreading the rice over the nori to avoid sticky hands. Roll tightly. When rolling up the maki sushi, squeeze between each fold to wrap tightly around the filling. Cut with a sharp, wet knife. When cutting a maki roll, use a sharp knife dipped in warm water to help you make clean cuts. Wipe the blade with a damp towel and dip it in warm water again if it gets sticky between cuts. Recipe Variations Use a different fish. Try raw salmon (like the kind used in poke bowls ), sashimi-grade tuna, or halibut. Just make sure the fish is always sushi-grade . You can also use cooked or smoked fish. Make it sweet. I love adding mango to my maki rolls. It adds texture and sweetness. Add some crunch. Add chopped macadamia nuts or cashews to your roll for a little extra crunch. Sauce. Dipping maki rolls in soy sauce mixed with some wasabi is commonplace. You could also dip it in teriyaki sauce , unagi sauce, or even sweet chili sauce. Put the rice on the outside. Spread the rice on the mat before placing a piece of nori on top, and then fill and roll. How To Make Sushi In Advance? You can prepare the sushi rice, slice the veggies, chop the imitation crab, and store each component in separate airtight containers in the refrigerator for up to 2 days. When you are ready to enjoy, all that’s left to do is take your sushi mat out and start rolling.
- 1½ cups sushi rice
- 1½ cups water
- ¼ cup rice wine vinegar
- 1½ tablespoons granulated sugar
- 4 sheets sushi Nori
- 1 English cucumber , peeled and sliced into thin strips
- 1 medium carrot , peeled and sliced into thin strips
- 1 avocado , sliced
- 4 sticks imitation crab , cut in half, longwise
- 1Prep the rice. In a fine mesh strainer, rinse the rice until the water runs clear.
- 2Cook the rice. Combine the rice and the water in the bowl of an Instant Pot. (You can also cook the rice according to the directions on the package.) Seal the Instant Pot and cook on high pressure for 10 minutes. Allow the pressure to release naturally for 12 minutes before opening the instant pot and fluffing the rice with a fork.
- 3Meanwhile, make the rice wine vinegar mixture. In a small saucepan, combine the rice wine vinegar and the sugar and cook over medium heat until the sugar dissolves.
- 4Combine and cool. Fold the rice vinegar mixture into the prepared sushi rice. Allow the rice to cool to just above room temperature before using.
- 5Prep. Place a sheet of nori over a bamboo sushi mat. Wet your fingers with warm water. This will help keep the rice from sticking to your hands. I like to keep a bowl of warm water near me when I'm making sushi rolls.
- 6Add the rice. Press about ¾ cup of the prepared sushi rice over the nori. Use your hand to press it into an even layer, covering the nori.
- 7Layer the veggies and crab. Stack 1 row of English cucumbers, 1 row of carrots, 1 row of imitation crab, and 1 row of avocado slices on top of each other in a line at one end of the mat.
- 8Roll. Fold the nori and rice over the filling, then squeeze the bamboo mat to create a tight cylinder. Continue folding the roll over itself, squeezing it into a cylinder after each fold, until you reach the end of the roll. Repeat with the remaining ingredients.
- 9Cut and serve. Wet a sharp knife with warm water and slice the rolls into ½ inch slices, wetting the knife between slices if it starts to get sticky. Serve the sushi rolls with your favorite sushi dipping sauce(s).
. You can also use cooked or smoked fish if you do not have access to sushi-grade seafood. Add Fruit: I like to add mango or pineapple to my maki rolls. Dipping Sauce: Dipping maki rolls in soy sauce mixed with a bit of wasabi is excellent, but you could also dip them in teriyaki sauce, unagi sauce , or sweet chili sauce. If you don’t have a bamboo mat
, use a thick towel covered with plastic wrap. Keep a bowl of warm water near you
as you assemble the rolls. It will help keep the sushi rice from sticking to your hands. Wet your fingers before spreading the rice over the nori.
When rolling up the maki, squeeze between each fold.
You want the rice and nori wrapped tightly around the filling.
When cutting a maki roll into slices, use a sharp knife
dipped in warm water. This will help you make clean cuts.
Keywords: maki roll, sushi, homemade sushi, japanese, seafood, imitation crab, cucumber, avocado, carrot, nori, rice vinegar, sugar, quick dinner, meal prep, dinner party
The exact quantities for each component are detailed within the recipe card provided above for your convenience.
Variations
While the classic combination of imitation crab, cucumber, avocado, and carrot is a beloved choice, the world of maki is vast and open to your creativity. Don’t hesitate to venture beyond the basic to discover new and exciting flavor profiles that cater to your unique palate.
For a delightful dessert twist, consider incorporating sweet elements. Thin slices of ripe mango or a drizzle of sweet teriyaki glaze can transform your maki into a surprisingly sweet treat. This approach opens up a whole new dimension of flavor, proving that maki can be enjoyed beyond the savory realm.
If you’re looking to reduce carbohydrates, consider making a “rice-less” maki roll. Instead of sushi rice, you can use thinly sliced cucumber or even a delicate omelet as your base, then fill it with your favorite vegetables and protein. This adaptation maintains the satisfying textures and flavors while catering to a dinner that aligns with a low-carb lifestyle.
Another exciting avenue is to explore different protein options. While imitation crab is a classic, consider using finely chopped cooked shrimp, smoked salmon, or even seasoned tofu for a vegan alternative. The key is to ensure whatever protein you choose is cut into manageable, thin strips that will roll easily within the nori.
For those who enjoy a bit of heat, incorporating a thin layer of sriracha or a sprinkle of chili flakes into the filling can add a pleasant kick. This simple addition can dramatically alter the flavor profile, offering a spicy counterpoint to the other ingredients, making each bite a thrilling adventure.
The beauty of maki lies in its adaptability. Whether you’re aiming for a healthier lunch option, a fun party appetizer, or a creative way to use up leftover ingredients, the possibilities are truly endless. Experimentation is highly encouraged to find your signature maki roll.
How to Prepare maki roll recipe
Step 1: Preparing the Sushi Rice
The cornerstone of any exceptional maki roll is the sushi rice. Its sticky texture is crucial for holding the roll together, and achieving this requires a specific preparation method. Begin by thoroughly rinsing your sushi rice under cold running water until the water runs clear, a vital step to remove excess starch which can lead to gummy rice.
Once rinsed, combine the rice with the specified amount of water in your cooking vessel. Whether you’re using an Instant Pot or a stovetop, following the cooking instructions precisely is key to achieving the perfect consistency. The goal is tender, slightly firm grains that clump together without being mushy. Allow for proper resting and pressure release if using an Instant Pot to ensure the rice cooks evenly and fully.
While the rice is cooking, prepare the sushi vinegar mixture. In a small saucepan, gently heat the rice wine vinegar and granulated sugar until the sugar has completely dissolved. Avoid boiling the mixture; you simply want to create a smooth, infused liquid. This sweet and tangy seasoning is what gives sushi rice its characteristic flavor and helps preserve its texture.
Once the rice is cooked, carefully transfer it to a large, non-metallic bowl. Gently fold in the warm sushi vinegar mixture using a rice paddle or a wooden spoon. The folding motion is important to avoid mashing the delicate rice grains. Continue to gently fold and fan the rice to help it cool down to just above room temperature. This cooling process allows the rice to absorb the vinegar and achieve the ideal sticky consistency for rolling.
The Best Part: The aroma that fills your kitchen as the seasoned rice cools is truly inviting, signaling the delicious journey ahead. This well-prepared sushi rice will form the perfect, stable base for all your maki creations. It’s worth taking the extra time to get this step just right.
Step 2: Preparing the Fillings
With your sushi rice perfectly prepared and cooling, it’s time to turn your attention to the vibrant fillings that will bring your maki rolls to life. Having all your ingredients prepped and ready before you start rolling will make the entire process much smoother and more enjoyable. This is where you can really begin to envision the colorful tapestry of your finished rolls.
Start by peeling your English cucumber and carefully slicing it into thin, uniform strips. Aim for consistency in size so that each roll has an even distribution of cucumber. Similarly, peel your medium carrot and cut it into thin julienne strips, ensuring they are roughly the same thickness as the cucumber. These vegetables provide a refreshing crunch and a lovely visual contrast.
Next, prepare your avocado. Halve the avocado, remove the pit, and carefully slice it into thin, even strips. Avocado adds a creamy texture that beautifully complements the crispness of the other vegetables and the chewiness of the rice. Work with the avocado just before you’re ready to roll to prevent it from browning.
If you are using imitation crab sticks, cut each stick in half lengthwise. This creates more manageable pieces for rolling and ensures that the crab meat is evenly distributed throughout the roll. The imitation crab provides a mild, slightly sweet flavor that is a classic component of many popular maki rolls, like the California roll.
Crucial Tip: Ensure all your filling ingredients are cut into thin, elongated strips that are roughly the same length. This uniformity will make the rolling process significantly easier and contribute to a more aesthetically pleasing finished product. Having everything pre-portioned and ready will prevent any last-minute scrambling and allow you to focus on the art of rolling.
Step 3: Assembling the Maki Rolls
Now comes the exciting part: assembling your maki rolls! This is where all your carefully prepared components come together. You’ll need a bamboo sushi mat (makisu) for this step, which is essential for shaping the rolls evenly. If you don’t have a bamboo mat, a clean kitchen towel covered tightly with plastic wrap can serve as a makeshift alternative.
Begin by placing a sheet of nori, shiny side down, onto the bamboo mat. The rougher side is where the rice will adhere. Have a small bowl of warm water nearby; this is your secret weapon for preventing the sticky sushi rice from clinging to your hands. Dip your fingers into the water, shake off any excess, and then gently gather about ¾ cup of the prepared sushi rice.
Carefully spread the rice evenly over the nori, leaving about a 1-inch border at the top edge of the nori sheet. Use your wet fingertips to gently press and distribute the rice, creating a consistent layer. Avoid pressing too hard, as this can make the rice dense and difficult to roll. The goal is a light, even covering that reaches close to the edges.
The Best Part: Imagine the vibrant colors of the fillings you’re about to place on this bed of perfectly seasoned rice. It’s like painting a culinary masterpiece, preparing for the final, satisfying roll.
Step 4: Layering the Fillings
With the rice evenly spread on the nori, it’s time to artfully arrange your chosen fillings. This step requires a bit of precision to ensure that the fillings are placed in a way that will allow for a tight and even roll. The placement of the ingredients is crucial for the structural integrity and visual appeal of your maki.
Start by layering one row of your prepared cucumber strips across the rice, about an inch from the bottom edge of the nori. Follow this by placing a row of carrot strips directly on top of the cucumber. Then, arrange a row of your halved imitation crab sticks over the carrots, ensuring they lie flat. Finally, carefully place a row of avocado slices alongside the imitation crab.
The key is to stack these ingredients neatly in a line. Try not to overfill the roll, as this can make it difficult to close and may cause the fillings to spill out when sliced. A balanced amount of each filling ensures that every bite of your maki roll will be a delightful mix of flavors and textures. The visual appeal of these stacked layers is a promise of the deliciousness to come.
Tip: Arrange your fillings slightly closer to the edge of the nori that will be the bottom of your roll when you start to fold. This positioning helps create a tighter seal and prevents the fillings from escaping as you roll the sushi.
Step 5: Rolling the Maki
This is the moment of truth – the rolling of your maki! With the fillings neatly in place, it’s time to use the bamboo mat to create a perfect cylinder. Start by lifting the edge of the bamboo mat closest to you, using your thumbs and forefingers to gently fold the nori and rice over the filling.
As you begin to fold, tuck the edge of the nori and rice firmly around the filling. Once you’ve made the initial fold, gently squeeze the bamboo mat to tighten the roll. This initial squeeze is crucial for creating a compact and well-formed cylinder. Continue to roll the mat forward, using it to guide and shape the sushi as you go.
After each turn, give the roll another gentle squeeze with the mat to ensure it remains tight and uniformly shaped. This process of folding, rolling, and squeezing is repeated until you reach the opposite edge of the nori. The goal is a firm, cohesive roll that holds its shape without being so tight that the nori tears or the fillings are crushed.
Expert Technique: When you reach the end of the roll, use the mat to seal the seam. You can moisten the exposed edge of the nori slightly with a dab of water to help it stick and create a clean finish. Take your time with this step; practice makes perfect, and the results are well worth the effort.
Step 6: Slicing and Serving
Your beautifully rolled maki is almost ready to be enjoyed! The final steps involve cleanly slicing the roll and presenting it for your enjoyment. The key to achieving clean, professional-looking slices is using a very sharp knife and keeping it moist.
Dip a sharp chef’s knife into a glass of warm water. Allow any excess water to drip off. Begin by slicing the roll in half. Wipe the knife clean with a damp cloth and re-dip it in warm water between each cut. This simple trick prevents the sticky rice from clinging to the blade and ensures you get neat, distinct pieces.
Continue slicing the roll into approximately ½-inch thick pieces. You should get about 6-8 slices per roll, depending on the thickness you prefer. Arrange the slices attractively on a serving platter. The vibrant colors of the fillings peeking out from the nori and rice create a stunning visual presentation that’s perfect for any occasion.
The Grand Finale: Serve your freshly made maki rolls immediately with your favorite accompaniments. Soy sauce for dipping, a dollop of wasabi for a kick, and some pickled ginger to cleanse the palate are classic choices. Enjoy the fruits of your labor – delicious homemade sushi!
Pro Tips for maki roll recipe
Wet Your Hands Frequently: Sushi rice is notoriously sticky. Keeping a bowl of warm water nearby and wetting your hands thoroughly before handling the rice is the single most effective way to prevent it from sticking to your fingers. This simple step makes spreading the rice so much easier.
Don’t Overfill the Nori: While it might be tempting to pack your rolls with as much filling as possible, resist the urge. Overfilling can make the roll difficult to close tightly, and the fillings may squeeze out when you cut it. A balanced amount ensures a neater, more stable roll.
Use a Sharp, Wet Knife for Slicing: A dull knife will crush the roll, while a dry knife will get stuck in the rice. A very sharp knife, dipped in warm water and wiped clean between each cut, is essential for achieving clean, professional-looking slices. This makes a significant difference in presentation.
Practice Makes Perfect with Rolling: Don’t be discouraged if your first few rolls aren’t perfectly shaped. The technique of rolling sushi takes a little practice. Focus on applying even pressure with the bamboo mat and tightening the roll with each turn. Each attempt will bring you closer to mastering the craft.
Toast Your Nori (Optional but Recommended): For an extra layer of flavor and crispness, you can lightly toast the nori sheets over a low flame on your gas stove or under a broiler for a few seconds until they become fragrant and slightly crisp. Be very careful not to burn them. This step adds a subtle depth that enhances the overall taste experience.
Serving Suggestions for maki roll recipe
Decoration
Garnish your maki platter with delicate touches that enhance its visual appeal. A few strategically placed slivers of avocado, a sprinkle of toasted sesame seeds, or a vibrant dot of tobiko (flying fish roe) can elevate the presentation from homemade to restaurant-quality. Thinly sliced radishes can add a lovely pink hue and a slight peppery bite, contrasting beautifully with the other ingredients.
Side Dishes
Complement your maki rolls with classic Japanese accompaniments. A simple bowl of miso soup offers a warm, savory start to the meal. For something refreshing, consider an Asian cucumber salad or a crisp, lightly dressed edamame salad. These sides provide a pleasant contrast in textures and flavors, balancing the richness of the sushi.
Creative Serving Ideas
Transform your maki into a fun dining experience by presenting it in a bento box, allowing for individual portions and easy transport. You could also arrange the rolls on a tiered stand for a visually striking appetizer display at a party. Consider creating a “sushi bar” at home, where guests can assemble their own rolls with a variety of pre-cut fillings, making it an interactive and engaging culinary adventure for everyone involved.
Preparation & Storage
Storing Leftovers
To store leftover maki rolls, the key is to prevent them from drying out. Wrap each individual roll tightly in plastic wrap. Then, place the wrapped rolls in an airtight container. Store them in the refrigerator for no more than 2 days. Sushi is best enjoyed fresh, but proper storage will help maintain its quality for a short period.
Freezing
Freezing maki rolls is generally not recommended. The sushi rice texture can become mushy and unpleasant upon thawing due to the high water content. Additionally, the fresh vegetables and avocado may lose their crispness and become waterlogged. For the best flavor and texture, it’s advisable to prepare maki rolls fresh when you intend to consume them.
Reheating
Maki rolls are meant to be eaten cold or at room temperature and should not be reheated. Attempting to reheat sushi can alter the texture of the rice and the fillings, diminishing the overall eating experience. If you have leftovers, simply enjoy them cold within the recommended storage timeframe.
Frequently Asked Questions
-
Can I use regular white rice instead of sushi rice?
While you can technically make maki rolls with regular white rice, it is highly discouraged if you want to achieve the authentic texture and structure of sushi. Sushi rice is a short-grain variety with a higher starch content, which makes it naturally sticky. This stickiness is essential for holding the nori, rice, and fillings together. Regular long-grain rice lacks this glutenous quality and will result in a loose, crumbly roll that is very difficult to handle and eat.
-
What kind of fish is safe to use for maki rolls?
For maki rolls intended to be eaten raw, it is absolutely critical to use only “sushi-grade” or “sashimi-grade” fish. This designation means that the fish has been handled and frozen according to strict guidelines to kill any parasites, making it safe for raw consumption. If you cannot find sushi-grade fish, it is much safer to opt for cooked seafood like cooked shrimp, crab sticks (imitation or real), smoked salmon, or grilled eel. Always err on the side of caution when it comes to consuming raw fish.
-
My maki rolls are falling apart when I slice them. What am I doing wrong?
There are a few common reasons why maki rolls might fall apart. Firstly, ensure your sushi rice is properly seasoned and cooled to the correct consistency – not too wet and not too dry. Secondly, you might be overfilling the roll; try using fewer fillings or distributing them more evenly. Thirdly, the rolling itself needs to be tight. Use the bamboo mat to squeeze the roll firmly after each fold to compress the ingredients. Finally, make sure you are using a very sharp, wet knife for slicing, as this is crucial for clean cuts. Practicing these techniques will significantly improve your rolling and slicing success.