Ajvar (Roasted Red Pepper Relish) – Easy Macedonian Recipe!

The aroma of late summer, a symphony of roasting peppers filling the air, is a memory etched deep in my culinary soul. Ajvar, this vibrant red pepper relish, is more than just a condiment; it’s a taste of tradition, a communal celebration distilled into a jar. My childhood was punctuated by the rhythm of its creation, a cherished ritual that brought families together under the sun.
In Macedonia, Ajvar season was a highlight, a time when red peppers reached their zenith of flavor. This beloved spread, often called “poor man’s caviar,” transcends its humble origins with a complex blend of sweet, tangy, and smoky notes. While industrial versions abound, the true magic lies in the homemade touch, a dedication to preserving the authentic taste that defined my youth.
Why You Will Love This Recipe
- Simple Ingredients: Crafted with just a handful of core components, this recipe proves that minimal ingredients can yield maximum flavor, making it accessible and enjoyable for everyone.
- Deep Flavor Profile: The magic begins with roasting the peppers to perfection, coaxing out their natural sweetness and imparting a delightful smoky essence that is further enhanced by a slow, patient simmer.
- Incredible Versatility: This relish is a culinary chameleon, enhancing everything from grilled meats and vegetables to simple bread and even pizzas, proving its worth across countless dishes throughout the year.
- Nostalgic Connection: For many, this recipe evokes cherished memories of family gatherings and traditional cooking, offering a warm and comforting taste of home and heritage with every spoonful.
Ingredients You Need
The heart of exceptional Ajvar lies in the quality of its simple ingredients. Opting for the freshest, ripest red bell peppers will yield the most vibrant color and profound sweetness, forming the delicious foundation of this traditional relish. Ensuring you have good quality sunflower or vegetable oil is also crucial for the slow cooking process that allows the flavors to meld beautifully. The limited ingredient list is a testament to the power of letting the main component shine through.
Macedonian Ajvar (Roasted Red Pepper Relish)
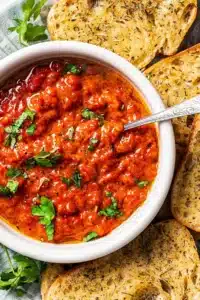
An authentic Macedonian recipe for Ajvar, a homemade red pepper relish that tastes great on just about everything, from grilled meats to bread, and more.
- 8 to 10 pounds red bull horn peppers, or red bell peppers
- 3 teaspoons salt, or to taste
- 1 teaspoon freshly ground black pepper, or to taste
- 1¾ cup sunflower oil or vegetable oil, divided
- 4 (12 ounce) jars, for jarring
- 1Preheat the oven to 450°F.
- 2Wash and dry the peppers, then prick them in several places with a fork.
- 3Place the peppers on a baking sheet and roast for 30 to 40 minutes or until charred and tender, turning occasionally. Rotating them periodically ensures even roasting. Due to space, you'll need to roast the peppers in batches.
- 4Transfer the peppers to a plastic bag and close the bag. Let stand for 10 to 15 minutes. This traps the steam and makes it easier to peel the peppers.
- 5Remove the peppers from the bag, peel off the skin, and discard it. Cut the peppers open and discard the seeds. Place them in a mesh bag and let them drain overnight by suspending the bag over a container.
- 6The next day, roughly chop the peppers, place them in a food processor, and pulse a few times to a chutney consistency.
- 7Put the pepper puree in a pot, add salt, pepper, and 3/4 cup of sunflower oil, and bring to a boil. Reduce to a simmer and cook for 2 to 3 hours, stirring frequently with a long wooden spoon to prevent it from burning on the bottom of the pot. Ajvar is done once it has thickened and almost all the liquid has evaporated. When done, taste for salt and pepper and adjust accordingly.
- 8In the meantime, sterilize the jars by preheating the oven to 180°F. Wash the jars, place them on a baking sheet, and then put them in the oven for 30 minutes. Sterilize the lids by placing them in a bowl and pouring boiling water over them.
- 9When the Ajvar is done, remove it from the stove and let it cool for about 8 to 10 minutes. Pack the Ajvar into the jars and place the jars back on the baking sheet. Preheat the oven to 350°F and place the jars in the oven for 15 minutes or until a thin crust forms on top of the Ajvar.
- 10Meanwhile, heat 1 cup of cooking oil on the stovetop. Once you see the crust on the Ajvar form, remove the jars from the oven, and pour some of the heated oil into each jar over the Ajvar, just enough to cover the surface.
- 11Wipe the rims of the jars clean before applying the lids. Seal the jars with the lids. Arrange the jars in a crate or box and cover them with kitchen towels.
- 12Leave them covered to cool down for 24 to 48 hours or until completely cooled.
Keywords: Ajvar, Roasted Red Pepper Relish, Macedonian, Balkan, Condiment, Relish, Canning
- red bull horn peppers or red bell peppers: 8 to 10 pounds
- salt: 3 teaspoons, or to taste
- freshly ground black pepper: 1 teaspoon, or to taste
- sunflower oil or vegetable oil: 1¾ cup, divided
- jars: 4 (12 ounce) jars, for jarring
Quantities for each ingredient can be found within the detailed recipe card.
Variations
While the classic Macedonian Ajvar is a masterpiece in itself, its inherent simplicity invites delightful experimentation. For those seeking to enrich its depth, the inclusion of roasted eggplant is a time-honored variation that adds a velvety texture and a subtle, earthy undertone to the relish. Roasting the eggplant alongside the peppers allows their flavors to harmonize beautifully, creating a more complex and satisfying spread that is still wonderfully easy to prepare.
For garlic enthusiasts, incorporating whole cloves of garlic into the roasting pan alongside the peppers offers a gentle, mellowed garlic flavor that complements the sweetness of the peppers without overwhelming them. These roasted garlic cloves can then be blended directly into the Ajvar, infusing the entire relish with their aromatic essence. This simple addition elevates the relish, making it an even more compelling accompaniment to a variety of dishes.
To cater to those who appreciate a bit of heat, introducing chili peppers to the roasting mix is an excellent strategy. Roasting one or two chili peppers alongside the red bell peppers will impart a nuanced spiciness, which can then be blended into the relish for an integrated warmth. Alternatively, a pinch of red chili flakes can be stirred in towards the end of the cooking process, offering a more direct and easily adjustable level of heat for those who enjoy a fiery kick.
How to Prepare Macedonian Ajvar recipe
Step 1: Roasting the Peppers
Begin by preheating your oven to a robust 450°F (230°C). This high temperature is crucial for achieving the characteristic char on the peppers, which is essential for developing their deep, smoky flavor. Wash and thoroughly dry your red bell peppers, as excess moisture can inhibit proper roasting and charring.
Next, and this is a vital step, prick each pepper a few times with a fork or a sharp knife. This seemingly small action prevents the peppers from bursting open dramatically during the intense heat of roasting, allowing steam to escape and ensuring more even cooking. Place the pricked peppers directly onto a baking sheet, ensuring they have a little space between them for optimal air circulation.
Now, it’s time for the transformation. Roast the peppers for approximately 30 to 40 minutes, or until their skins are blistered, charred, and they have become wonderfully tender. The key here is to turn them occasionally with tongs or a spatula to ensure even exposure to the oven’s heat on all sides, encouraging that desirable smoky char. You may need to roast the peppers in batches depending on the size of your oven and baking sheet, so be patient and work in manageable portions.
Once the peppers are beautifully roasted and tender, immediately transfer them to a large plastic bag or a pot with a tightly fitting lid. Seal the bag or close the pot securely and allow the peppers to sit for about 10 to 15 minutes. This steaming period, created by the trapped heat and moisture from the roasted peppers, is absolutely critical for softening the skins, making them incredibly easy to peel away in the next step. It’s a simple yet indispensable part of the process.
Step 2: Peeling, Cleaning, and Draining
With the peppers having steamed and cooled slightly in their bag or pot, it’s time to deal with those beautifully roasted skins. Carefully remove the peppers from the bag or pot. You’ll find that the heat has loosened the skins considerably, allowing you to easily pull them off with your hands. Discard the charred skins as you go.
Next, cut each pepper open lengthwise and carefully remove and discard the seeds and the white pithy membranes inside. These elements can add a bitterness that you want to avoid in the finished Ajvar. Ensure you are thorough in removing all the seeds and membranes to maintain the pure, sweet pepper flavor.
Once the peppers are peeled and seeded, place them in a mesh bag or a fine-mesh sieve set over a bowl. This is a crucial draining stage. Allow the peppers to drain for at least several hours, and ideally, overnight. This step is essential for removing excess liquid. Too much moisture will result in a watery Ajvar, which won’t have the desired thick, spreadable consistency. The draining process concentrates the pepper’s flavor and ensures a richer final product.
Step 3: Processing the Peppers
After the peppers have had ample time to drain overnight, they are ready for the next stage of processing. Take the drained peppers and roughly chop them into smaller, manageable pieces. This makes them easier to handle in your food processor or blender. The goal at this point is to achieve a texture that is not completely smooth, but rather has a slight chunkiness, akin to a coarse chutney.
Transfer the chopped peppers into a food processor. Pulse them a few times, stopping to scrape down the sides as needed. You want to process them until they reach that desired chutney-like consistency. Avoid over-processing them into a completely liquid purée, as the slight texture is part of what makes homemade Ajvar so appealing. If you don’t have a food processor, a blender can also be used, or even a meat grinder for a more traditional texture, though a food processor is generally the most efficient.
This consistency is important because it will affect the final texture of your Ajvar. A slightly chunky texture provides a satisfying mouthfeel, while a very smooth purée might resemble a sauce more than a relish. Experiment with pulsing until you achieve a consistency that you personally enjoy. This textural element is a key differentiator from mass-produced versions.
Step 4: The Slow Simmer
Now, it’s time to bring all the flavors together in a slow, patient simmer. Transfer the processed pepper purée into a large, heavy-bottomed pot or Dutch oven. A pot with a thick base is essential to prevent the Ajvar from scorching, as it will be cooking for an extended period. Add the salt and freshly ground black pepper to the pot. Seasoning at this stage is important, but remember that the flavors will concentrate as it cooks, so it’s often best to under-season slightly at the beginning and adjust at the end.
Next, add 3/4 cup of the sunflower or vegetable oil to the pot. This oil plays a crucial role in the cooking process, helping to meld the flavors and develop the rich texture of the Ajvar. Bring the mixture to a boil over medium-high heat, stirring occasionally. Once it reaches a boil, immediately reduce the heat to low, so the Ajvar is gently simmering.
This is where patience truly pays off. Allow the Ajvar to simmer for 2 to 3 hours, stirring frequently with a long wooden spoon. The frequent stirring is absolutely critical to prevent the Ajvar from sticking to the bottom of the pot and burning, which would impart an undesirable bitter taste. The long simmering time allows the excess liquid to evaporate, concentrating the flavors and thickening the relish to its perfect spreadable consistency. You’ll know it’s done when it has thickened considerably and most of the liquid has evaporated, achieving a rich, jam-like texture.
During the last stages of simmering, taste the Ajvar and adjust the seasoning as needed. Add more salt and pepper if you feel it requires it, but be cautious not to over-salt, as the flavors will have intensified significantly. Once you are happy with the taste and consistency, remove the pot from the heat. Allow the Ajvar to cool slightly for about 8 to 10 minutes before proceeding to the jarring process. This slight cooling period makes it easier and safer to handle.
Step 5: Jarring and Sealing for Preservation
While your Ajvar is simmering, it’s the perfect time to prepare your jars for long-term storage through canning. Proper sterilization is paramount to ensuring the Ajvar remains fresh and safe to consume for an extended period. Begin by washing your 12-ounce jars thoroughly with soap and hot water. Then, place them on a baking sheet and put them in a preheated oven at 180°F (82°C) for at least 30 minutes. This heat sterilizes the jars and keeps them warm, reducing the risk of thermal shock when you fill them with hot Ajvar.
Sterilize the lids by placing them in a bowl and pouring boiling water over them. This process sterilizes the rubber sealing compound on the lids, ensuring a proper seal. Ensure you have clean canning lids and bands that are free from rust or damage. The jars should be filled while they are still warm from the oven.
Once the Ajvar has cooled slightly after cooking, carefully spoon it into the sterilized, warm jars. Fill the jars, leaving about 1/2 inch of headspace at the top. This headspace is important for creating a vacuum seal. Wipe the rims of the jars clean with a damp cloth to remove any residual Ajvar or oil, which could interfere with the seal. Place the sterilized lids on top of the jars and screw on the bands until they are fingertip tight; do not overtighten.
Arrange the filled jars on a baking sheet and place them back into the oven, which should now be preheated to 350°F (175°C). Bake the sealed jars for approximately 15 minutes. During this time, a thin crust should form on top of the Ajvar in each jar. This final oven process helps to further pasteurize the Ajvar and create a more robust seal.
Step 6: The Finishing Touch and Cooling
While the jars are in their final 15-minute pasteurization in the oven, it’s time to prepare the finishing oil layer. Heat the remaining 1 cup of cooking oil in a small saucepan on the stovetop until it’s hot but not smoking. This hot oil will be carefully poured over the Ajvar in each jar after it’s removed from the oven.
As soon as you see the thin crust forming on the surface of the Ajvar in the jars, carefully remove the baking sheet from the oven. Immediately, and with great care, pour a small amount of the hot oil into each jar, just enough to cover the surface of the Ajvar. This layer of hot oil acts as an additional barrier, further protecting the Ajvar from air and potential spoilage, contributing to its longevity.
After adding the hot oil, immediately seal the jars securely by screwing on the lids tightly. If the bands were previously fingertip tight, tighten them a little more, but still avoid overtightening, which can prevent the vacuum seal from forming. Once sealed, arrange the hot jars in a crate or a box and cover them completely with clean kitchen towels or blankets. This insulation is crucial for the cooling process, allowing the jars to cool down gradually and evenly.
Leave the covered jars undisturbed for at least 24 to 48 hours, or until they have completely cooled to room temperature. During this period, you should hear the satisfying “ping” sound as the lids seal, indicating a successful vacuum seal. Once completely cooled, check each jar to ensure the lid has been pulled down, signifying a proper seal. Unsealed jars should be refrigerated and consumed within a week or two.
Pro Tips for Macedonian Ajvar recipe
Choosing the Right Peppers: For an authentic experience, seek out red bull horn peppers, also known as Ajvarka peppers. These are often meatier and have a unique flavor profile ideal for Ajvar. If they are unavailable, standard red bell peppers are a perfectly acceptable substitute, but choose peppers that are ripe and feel substantial, as they will yield less liquid during roasting and cooking.
Don’t Skip the Steam: After roasting, immediately bagging the peppers is non-negotiable. This steaming process is the secret to effortlessly peeling the skins. The trapped moisture softens the skins significantly, making removal a breeze and preserving the tender flesh of the pepper beneath.
The Art of Draining: Allowing the peeled and seeded peppers to drain thoroughly, preferably overnight in a mesh bag, is critical. This step removes excess water, preventing a watery final product and ensuring your Ajvar achieves that desirable thick, spreadable consistency that is characteristic of this relish.
Stirring is Key: Throughout the long simmering process, frequent stirring is paramount. Use a long wooden spoon to reach the bottom of the pot and consistently move the Ajvar. This prevents it from sticking and burning, which would compromise the flavor and texture. A wooden spoon also handles heat well.
Taste and Adjust: Seasoning is an ongoing process. While you should add salt and pepper at the beginning, remember that flavors intensify as the Ajvar cooks down. It’s often wise to be a little conservative with salt initially and then adjust to your preference towards the end of the cooking time, ensuring a perfectly balanced final product.
Serving Suggestions for Macedonian Ajvar recipe
Decoration
Elevate the presentation of your homemade Ajvar by adding a final touch of freshness and color. A sprinkle of finely chopped fresh parsley or chives over the top of the Ajvar before serving adds a vibrant green contrast to the rich red hue of the relish. This simple garnish not only enhances the visual appeal but also introduces a subtle herbaceous note that complements the savory flavors of the Ajvar.
Side Dishes
Ajvar is incredibly versatile and pairs beautifully with a wide array of side dishes. It is a classic accompaniment to grilled meats such as lamb, chicken, and various sausages, offering a tangy counterpoint to the richness of the grilled items. For a lighter option, serve it alongside roasted vegetables like zucchini, bell peppers, and eggplant, allowing the Ajvar to enhance their natural flavors. It also makes a delightful spread for crusty bread, crackers, or even as a base for pizzas.
Creative Serving Ideas
Beyond its traditional uses, Ajvar can be incorporated into numerous creative culinary applications. Try spreading a thin layer on a piece of toasted bread before topping it with a fried egg for a flavorful breakfast twist. It can also be stirred into soups or stews to add depth and a subtle smoky sweetness, or used as a flavorful binder in meatballs and burgers. For an appetizer spread, serve it alongside a selection of cheeses, cured meats, and olives for a delightful mezze platter experience.
Preparation & Storage
Storing Leftovers
Once a jar of homemade Ajvar has been opened, it needs to be stored in the refrigerator. Ensure the lid is securely fastened after each use. Properly refrigerated, opened Ajvar will typically remain fresh and delicious for about one to two weeks. Always check for any signs of spoilage before consuming.
Freezing
If you have a surplus of Ajvar and wish to preserve it for a longer period, freezing is an excellent option. It’s important to note that Ajvar should be frozen *before* it has been canned. Allow the cooked Ajvar to cool completely to room temperature. Transfer the cooled relish into airtight freezer-safe containers or heavy-duty freezer bags, leaving a little headspace to allow for expansion during the freezing process. Frozen Ajvar can be stored for up to six months.
Reheating
When you’re ready to enjoy frozen Ajvar, the best method is to defrost it slowly in the refrigerator. Once thawed, give the Ajvar a good stir to reincorporate any separated liquids and ensure a consistent texture. It can then be used as you would fresh Ajvar, and it’s ready to be spread, dipped, or added to your favorite recipes. If you’re reheating refrigerated Ajvar that has been opened, a gentle warming in a small saucepan over low heat can enhance its flavors.
Frequently Asked Questions
-
What is the best type of pepper to use for authentic Macedonian Ajvar?
While red bell peppers are a widely accessible and excellent choice for making Ajvar, the most authentic Macedonian Ajvar traditionally uses a specific pepper variety known as red bull horn peppers, or “Ajvarka.” These peppers are often meatier and possess a unique sweet-tart flavor profile that lends itself exceptionally well to relish-making. If you can find them, they will undoubtedly provide a more traditional taste. However, when Ajvarka peppers are not available, high-quality, ripe red bell peppers are a perfectly suitable and delicious alternative, ensuring a wonderful result regardless.
-
Can I make Ajvar spicier, and how?
Absolutely, you can easily adjust the heat level of your Ajvar to suit your preference for spiciness. For a mild to moderate increase in heat, consider roasting one or two small chili peppers, such as jalapeños or serranos, alongside your main batch of red bell peppers. Once roasted and peeled, these chilies can be blended into the relish with the other peppers. Alternatively, for a more direct and controllable heat, you can stir in a pinch of red pepper flakes towards the end of the simmering process. Start with a small amount, taste, and add more until you achieve your desired level of warmth. Some traditional recipes even call for specific hot pepper varieties, so don’t hesitate to experiment.
-
What is the importance of the slow cooking and stirring process for Ajvar?
The slow cooking and consistent stirring are arguably the most critical elements in achieving the perfect texture and flavor of homemade Ajvar. The extended simmering period, typically lasting 2 to 3 hours, allows the excess moisture to evaporate, concentrating the natural sweetness and smoky notes of the roasted peppers. This evaporation process thickens the relish to its signature dense, spreadable consistency, transforming it from a watery purée into a rich condiment. The frequent stirring, often done with a wooden spoon, is essential to prevent the Ajvar from scorching or sticking to the bottom of the pot, which would impart an unpleasant bitter taste and ruin the batch. This patient cooking method ensures a smooth, flavorful, and well-developed Ajvar that is far superior to quick-cooking methods.