Ultimate Key Lime White Chocolate Macadamia Nut Cookies Delight

There’s a certain magic that happens when familiar flavors are infused with an unexpected twist, creating a dessert that is both comforting and exciting. These Key Lime White Chocolate Macadamia Nut Cookies achieve precisely that, offering a delightful journey for your taste buds with every bite. The vibrant tang of key lime beautifully complements the sweet, creamy white chocolate, all punctuated by the satisfying crunch of macadamia nuts.
Imagine the perfect cookie: slightly crisp around the edges, wonderfully chewy in the center, and bursting with a complex yet harmonious flavor profile. This recipe has been meticulously crafted to deliver just that, making it an ideal choice for any occasion, from casual gatherings to more formal celebrations. Prepare to impress yourself and your guests with this truly exceptional creation.
Why You Will Love This Recipe
- Bright Flavor Profile: The zesty key lime offers a refreshing contrast to the sweetness of white chocolate and the richness of macadamia nuts, creating a uniquely delightful taste experience.
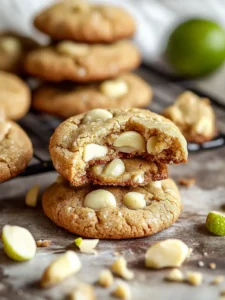
- Texture Sensation: Enjoy the perfect balance of chewy interiors and slightly crisp edges, enhanced by the satisfying crunch of toasted macadamia nuts, making each bite a textural adventure.
- Visually Appealing: The pale, inviting color, speckled with white chocolate and nuts, makes these cookies as beautiful to look at as they are delicious to eat, adding a touch of elegance to any dessert spread.
- Versatile Enjoyment: These cookies are perfect as a standalone treat, paired with coffee or tea, or even as a delightful accompaniment to ice cream, offering a range of serving possibilities.
- Easy to Share: While the recipe yields a good batch, their irresistible taste often means they disappear quickly, making them a beloved treat for sharing with friends, family, or colleagues.
Ingredients You Need
The foundation of any exceptional cookie lies in the quality of its ingredients, and this recipe is no exception. Using fresh, high-quality components will ensure that the distinct flavors of key lime, white chocolate, and macadamia nuts shine through, creating a truly memorable treat. We’ve carefully selected each item to contribute to the perfect balance of taste and texture, promising a delightful baking experience from start to finish. Remember that the recipe card below provides the precise measurements needed for these delectable cookies.
Key Lime White Chocolate Macadamia Nut Cookies
These Key Lime White Chocolate Macadamia Nut Cookies offer a delightful explosion of flavors, balancing zesty lime and sweet white chocolate with the satisfying crunch of macadamia nuts. They are perfect for brightening up any gathering and are surprisingly easy to make.
- 2 cups All-Purpose Flour
- 1 teaspoon Baking Soda
- 1 teaspoon Salt
- 1 cup Salted or Unsalted Butter
- 1 cup Dark Brown Sugar
- 1/2 cup Granulated Sugar
- Zest from 2 limes
- 1 large Egg
- 1 large Egg Yolk
- 1 teaspoon Vanilla Extract
- 8 oz White Chocolate
- 3/4 cup Roasted Macadamia Nuts
- 1Brown the Butter: Heat the butter in a heavy-bottomed saucepan over medium heat until golden amber and nutty aroma develops. Transfer to a bowl to cool slightly.
- 2Mix Ingredients: In a mixing bowl, combine the cooled brown butter, dark brown sugar, granulated sugar, and lime zest. Beat for 1-2 minutes until creamy.
- 3Add Eggs and Vanilla: Incorporate the egg, egg yolk, and vanilla extract, beating until smooth and well combined.
- 4Combine Dry Ingredients: In a separate bowl, whisk all-purpose flour, baking soda, and salt. Gradually add to the wet mixture, mixing until just combined.
- 5Fold in Chocolate and Nuts: Gently fold in white chocolate and macadamia nuts until evenly distributed.
- 6Chill the Dough: Scoop 2 tablespoons of dough, roll into balls, and place on a baking sheet. Chill in the refrigerator for 1 hour.
- 7Preheat Oven: Preheat your oven to 350°F (175°C).
- 8Bake the Cookies: Arrange the chilled dough balls on a baking sheet, spacing apart. Bake for 9-11 minutes or until edges are lightly golden.
- 9Cool: Let cookies cool on the baking sheet for 5 minutes before transferring to a wire rack.
Keywords: Key Lime, White Chocolate, Macadamia Nut, Cookies, Zesty, Sweet, Crunchy, Baking, Dessert, American
- all-purpose flour: the essential structure for our cookies, providing a sturdy yet tender base.
- baking soda: crucial for achieving that perfect lift and tender crumb, ensuring our cookies aren’t dense.
- salt: a flavor enhancer that balances the sweetness and brings out the best in every ingredient.
- salted or unsalted butter: the rich foundation that provides moisture, tenderness, and that characteristic cookie chewiness; choose your preference and adjust salt accordingly.
- dark brown sugar: contributes a deep, molasses-rich flavor and helps create a wonderfully soft and chewy texture.
- granulated sugar: adds essential sweetness and aids in achieving that desirable golden-brown edge.
- lime zest: the star of our tropical twist, providing an intense burst of key lime fragrance and zesty flavor.
- large egg & egg yolk: working together to bind the ingredients, add richness, and contribute to that sought-after chewy texture.
- vanilla extract: a classic flavor enhancer that rounds out all the other tastes and adds a layer of warmth.
- white chocolate: luscious, sweet chunks that melt into creamy pockets throughout the cookie.
- roasted macadamia nuts: offering a buttery, slightly sweet crunch that perfectly complements the other components.
You’ll find the exact quantities required for each ingredient listed in the detailed recipe card provided elsewhere on this page.
Variations
The beauty of this Key Lime White Chocolate Macadamia Nut Cookie recipe lies not only in its delightful original form but also in its incredible adaptability. These cookies can be transformed to suit a variety of dietary needs and flavor preferences, ensuring everyone can enjoy a taste of this tropical-inspired delight. Experimentation is highly encouraged to find your perfect personalized version of this already spectacular cookie.
For those seeking a vibrant, citrus-forward experience, consider amplifying the lime element by adding a teaspoon of fresh lime juice to the wet ingredients. This will intensify the tang and create a more pronounced zesty flavor that pairs exceptionally well with the sweet white chocolate. Alternatively, a touch of lime extract can provide a powerful punch of lime without adding extra liquid, a useful option when precise dough consistency is key.
If you’re looking to cater to guests with dietary restrictions, several modifications are possible. To create a dairy-free version, simply swap out the butter for a high-quality vegan butter alternative and ensure your white chocolate is also dairy-free. Similarly, for a gluten-free iteration, a reliable gluten-free all-purpose flour blend can be used in place of traditional flour, yielding wonderfully chewy results.
Another exciting variation involves introducing other complementary flavors. Adding finely shredded unsweetened coconut to the dough alongside the macadamia nuts will enhance the tropical theme and introduce a lovely chewy texture. For a sophisticated twist, consider a hint of cardamom or a whisper of ginger in the dry ingredients to add a warm, exotic depth that beautifully interacts with the lime and chocolate.
The white chocolate can also be swapped for other varieties like milk chocolate or dark chocolate chips, each offering a different level of sweetness and intensity that will redefine the cookie’s character. For a truly decadent touch, imagine drizzling the cooled cookies with a thin layer of melted dark chocolate or a simple lime glaze made from powdered sugar and lime juice. These small adjustments can lead to vastly different yet equally delicious outcomes.
How to Prepare Key Lime White Chocolate Macadamia Nut Cookies
Step 1: Browning the Butter
Begin by carefully browning your butter in a heavy-bottomed saucepan over medium heat. This process involves melting the butter and then continuing to cook it, stirring occasionally, until the milk solids at the bottom turn a lovely golden-amber color and release a wonderfully nutty aroma. This step is critical for developing a rich, complex flavor base that significantly elevates the cookies beyond a standard butter cookie.
It’s essential to watch this process closely, as butter can go from perfectly browned to burnt very quickly. The nutty scent is your cue that it’s ready. Once this desirable color and aroma are achieved, immediately transfer the browned butter to a heatproof bowl. This stops the cooking process and prevents it from becoming bitter. Allow it to cool slightly before proceeding; it should still be warm but not so hot that it will cook the eggs prematurely.
The unique flavor imparted by browned butter is subtle yet profound, adding a depth that cannot be replicated with standard melted butter. This foundational step sets these cookies apart, offering a sophisticated nuance that will be appreciated with every bite. Don’t skip this crucial stage; it’s where much of the cookie’s characteristic richness begins to develop. This fragrant liquid is the secret to a gourmet cookie.
Step 2: Creaming the Sugars and Zest with Browned Butter
In a large mixing bowl, combine the slightly cooled browned butter with the dark brown sugar, granulated sugar, and freshly grated key lime zest. This is where the primary sweet and citrus elements of the cookie come together. Use an electric mixer, or a sturdy whisk and some elbow grease, to beat these ingredients together for a good 1-2 minutes. You’re aiming for a well-blended, creamy mixture that is light in color and fluffy in texture.
The dark brown sugar will lend its characteristic moisture and depth of flavor, while the granulated sugar contributes to the crispness of the cookie edges. The key lime zest, ideally zested just before adding to maximize its volatile oils and vibrant aroma, will begin to perfume the entire mixture. This creaming process incorporates air, which is vital for the cookie’s final texture and structure, so don’t rush it. A well-creamed base ensures a tender cookie.
Ensure that the sugar is well incorporated into the butter mixture. You should see a noticeable change in the consistency, becoming smoother and slightly lighter. This step is fundamental to achieving cookies that are both tender and flavorful, setting the stage for the other ingredients to work their magic. Properly creaming these components is a hallmark of well-made cookies.
Step 3: Incorporating Eggs and Vanilla
To the creamy butter and sugar mixture, add the large egg, the additional egg yolk, and the pure vanilla extract. The egg acts as a binder, holding all the components together, while the extra egg yolk contributes crucial fat and moisture, leading to a chewier, richer cookie. Vanilla extract, a staple in most baking, enhances all the other flavors present and adds its own subtle warmth.
Beat this mixture thoroughly until it becomes smooth, well-combined, and appears light and slightly thickened. Scrape down the sides of the bowl periodically to ensure everything is evenly incorporated and no pockets of unmixed ingredients remain. This stage is about creating a cohesive, emulsified base that will properly distribute all the delicious flavors throughout the cookie dough.
The consistency should be uniformly creamy, with no visible streaks of egg or unincorporated sugar. Properly incorporating these wet ingredients is essential for the texture of the final cookie. If you’re using room temperature eggs, as is often recommended for baking, they will emulsify more easily into the butter mixture, resulting in a smoother batter. This step is critical for the cookie’s overall success and delightful chewiness.
Step 4: Combining Dry Ingredients and Adding to Wet
In a separate, medium-sized bowl, whisk together the all-purpose flour, baking soda, and salt. Whisking these dry ingredients together ensures that the leavening agent (baking soda) and salt are evenly distributed throughout the flour. This prevents pockets of saltiness or uneven rising in the finished cookies, contributing to a consistent texture and flavor. This simple step is often overlooked but is vital for baking success.
Gradually add this combined dry mixture to the wet ingredients in the large bowl. Mix on low speed, or by hand with a spatula, until the ingredients are *just* combined. It is incredibly important not to overmix the dough at this stage. Overmixing can develop the gluten in the flour too much, resulting in tough, dense cookies instead of the desired chewy texture. Stop mixing as soon as you no longer see streaks of dry flour.
The dough should look cohesive but might still have a slightly shaggy appearance. This is perfectly normal and desirable. Ensuring the dry ingredients are evenly distributed is key to a uniform cookie. A gentle approach here guarantees the tender crumb and delightful chew that these cookies are known for. Resist the urge to mix until perfectly smooth; stopping at the right moment is an art.
Step 5: Folding in White Chocolate and Macadamia Nuts
Now comes the exciting part: adding the stars of the show – the white chocolate chips and roasted macadamia nuts. Gently fold these ingredients into the cookie dough using a spatula. The goal here is to distribute them evenly throughout the dough without overworking it further. A gentle folding motion, using the spatula to cut through the dough and bring the bottom up and over, is ideal.
Ensure that every portion of the dough gets a good mix of both the sweet white chocolate and the crunchy macadamia nuts. This even distribution guarantees that each cookie will have those delightful pockets of creamy chocolate and satisfying nut crunch. The macadamia nuts should be roughly chopped if they are very large, ensuring they are integrated smoothly into the dough without creating overly bulky spots.
The dough will become quite thick and studded with the inclusions. Take your time with this step to ensure thorough, yet gentle, incorporation. Properly mixed inclusions are what make these cookies truly special, providing bursts of flavor and texture in every bite. This is the final mix before the dough is ready for chilling and baking, so make sure those gems are well-distributed.
Step 6: Chilling the Dough
Scoop approximately 2-tablespoon portions of the cookie dough. You can use a cookie scoop or two spoons for this. Gently roll each portion into a ball. Placing these dough balls onto a baking sheet lined with parchment paper or a silicone mat is the next crucial step. Ensure there is a little space between each dough ball, even though they will be chilled.
Place the baking sheet with the dough balls into the refrigerator and chill for at least 1 hour. This chilling period is absolutely vital for several reasons. Firstly, it solidifies the fat in the butter, which prevents the cookies from spreading excessively and becoming too thin during baking, helping them retain a lovely, slightly thicker shape. Secondly, chilling allows the flavors to meld and deepen, enhancing the overall taste profile of the cookies.
A well-chilled dough leads to cookies with a better texture – a chewy interior and crisp edges. If you’re short on time, you can try chilling for 30 minutes, but the full hour provides optimal results. For even better flavor development, you can chill the dough balls for up to 24 hours. This patient step will pay dividends in the final texture and flavor of your cookies, making them superior.
Step 7: Preheating the Oven and Baking
While the cookie dough is chilling, or just before you’re ready to bake, preheat your oven to 350°F (175°C). It’s important that the oven reaches the correct temperature and maintains it consistently throughout the baking process for even cooking. Ensure your oven rack is positioned in the center of the oven, providing a stable and even heat source.
Once the dough is thoroughly chilled and the oven is preheated, arrange the chilled dough balls on a baking sheet lined with parchment paper. Leave adequate space between each ball, typically about 2 inches, to allow for slight spreading during baking without the cookies merging into one another. A baking sheet that is too crowded can lead to uneven cooking.
Bake the cookies for 9 to 11 minutes, or until the edges are lightly golden brown. The centers should still appear slightly soft and underdone; they will continue to cook and set on the hot baking sheet as they cool. Be careful not to overbake, as this will result in dry, hard cookies. The goal is that perfect chewy center with lightly crisped edges.
Step 8: Cooling the Cookies
After removing the baking sheet from the oven, allow the cookies to cool on the sheet for about 5 minutes. This brief cooling period on the hot pan is important because it allows the cookies to set up further. They are still quite delicate immediately after baking and can fall apart if moved too soon. The residual heat from the baking sheet helps to finish the cooking process in the center.
After the initial 5-minute rest on the baking sheet, carefully transfer the cookies to a wire cooling rack. Use a spatula to gently lift them. Allow them to cool completely on the wire rack. Cooling on a rack promotes air circulation around the cookies, preventing the bottoms from becoming soggy and ensuring they achieve their final desired texture. This is also when you might consider any optional decorative touches.
Ensure they are entirely cool before storing them in an airtight container. Warm cookies will create condensation in the container, leading to a less desirable texture. Patience during the cooling phase is key to enjoying these cookies at their absolute best. The transformation from soft-baked to perfectly textured is complete on the cooling rack.
Pro Tips for Key Lime White Chocolate Macadamia Nut Cookies
- Master the Brown Butter: Pay close attention during the butter browning stage; the nutty aroma is your guide, and vigilance is needed to prevent burning, which can impart a bitter taste.
- Chill is Key: Don’t skimp on the chilling time for the dough balls; a minimum of one hour ensures they hold their shape beautifully during baking, preventing excessive spread and promoting a thicker cookie.
- Room Temperature Ingredients: For optimal emulsification and a smoother dough consistency, ensure your egg is at room temperature. This helps it incorporate more evenly with the butter and sugar mixture.
- Accurate Flour Measurement: Spoon your flour into the measuring cup and level it off with a straight edge rather than scooping directly from the bag. Too much flour can lead to dry, dense cookies.
- Quality White Chocolate: Opt for good quality white chocolate chips or chopped bars. Higher quality chocolate melts better and offers a superior flavor that makes a noticeable difference in the final cookie.
- Don’t Overmix: Once the dry ingredients are added, mix only until just combined. Overmixing develops gluten, resulting in tougher cookies; stop as soon as the flour streaks disappear.
Serving Suggestions for Key Lime White Chocolate Macadamia Nut Cookies
Decoration
For an extra touch of elegance and flavor, consider drizzling the cooled cookies with a bit of melted white chocolate. A thin stream applied artfully can create a beautiful visual contrast and add another layer of sweetness. Alternatively, a simple glaze made from powdered sugar whisked with a touch of key lime juice can be drizzled over the cookies. This adds an extra zing and a glossy finish that complements the cookie’s inherent tartness.
Side Dishes
These cookies are delightful on their own, but they pair exceptionally well with a variety of beverages and accompaniments. A cold glass of milk, a steaming cup of coffee, or a refreshing iced tea all provide a wonderful counterpoint to the cookie’s sweetness and tang. For a more indulgent experience, consider serving them alongside a scoop of creamy vanilla bean ice cream or a refreshing lime sorbet, which enhances the citrus theme.
Creative Serving Ideas
Arrange these cookies on a tiered dessert stand for a visually appealing presentation at parties or gatherings. They also make for a beautiful addition to a dessert buffet, especially when presented alongside other complementary treats. For a unique twist, serve them as part of a “tropical trio” with small portions of coconut panna cotta and a tropical fruit salad, celebrating the vibrant flavors.
Preparation & Storage
Storing Leftovers
To maintain the delightful texture and flavor of your Key Lime White Chocolate Macadamia Nut Cookies, store them in an airtight container at room temperature. This prevents them from drying out and absorbing unwanted odors from the air. When stored properly, these cookies can remain fresh and delicious for up to 7 days, making them perfect for enjoying over the course of a week.
Ensure the container is truly airtight to preserve their chewiness. If the cookies are stored in a less-than-ideal container, they can become stale or tough very quickly. For best results, place a piece of parchment paper between layers of cookies if stacking them to prevent them from sticking together, especially if they have a slight glaze.
It’s also important to ensure the cookies are completely cooled before storing. Storing warm cookies will create condensation within the container, leading to a soggy bottom and an undesirable texture. Patience during the cooling phase significantly contributes to the longevity and quality of your stored cookies.
Freezing
For longer-term storage, these cookies freeze exceptionally well. You can freeze them either baked or as unbaked dough balls. To freeze baked cookies, arrange them in a single layer on a baking sheet and place them in the freezer until solid, which usually takes about an hour. This prevents them from sticking together once they are in a freezer-safe bag or container.
Once frozen solid, transfer the cookies to a heavy-duty freezer bag or an airtight freezer-safe container. They can be stored in the freezer for up to 3 months. When you’re ready to enjoy them, simply allow them to thaw at room temperature. This method ensures you have delicious, freshly baked-tasting cookies readily available whenever a craving strikes.
If freezing unbaked dough, scoop the dough into balls, place them on a parchment-lined baking sheet, and freeze until solid. Then, transfer the frozen dough balls to a freezer bag. You can bake them directly from frozen, adding a couple of extra minutes to the baking time. This makes impromptu cookie baking incredibly convenient and ensures a delightful homemade treat.
Reheating
If your cookies have been stored for a while or have lost a bit of their initial warmth and chewiness, reheating can bring them back to life. The best method is often a brief stint in a low oven or a toaster oven. Place the cookies on a baking sheet and warm them in a preheated oven at around 300°F (150°C) for 3-5 minutes.
This gentle heat will soften the chocolate chips and revive the chewy texture of the cookie. Be careful not to overheat, as this can lead to overcooked and dry cookies. The goal is just to warm them through, bringing back that fresh-baked feel. This is especially effective for cookies that might have become slightly hard.
Alternatively, you can microwave a cookie for about 10-15 seconds. This is the quickest method but can sometimes result in a slightly different texture, so use it judiciously. It’s best for a single cookie when you want a quick fix. The oven method is generally preferred for maintaining the best cookie texture after reheating.
Frequently Asked Questions
-
What type of limes are best for this recipe, and how much zest is truly needed?
For the most authentic and vibrant flavor, Key Limes are highly recommended due to their unique, intensely tart, and aromatic profile. If Key Limes are unavailable in your region, a single large Persian lime can be substituted, though the flavor may be slightly less concentrated. The recipe calls for the zest of two limes, which is a generous amount designed to infuse the entire cookie with a noticeable citrus zing. Zesting the limes should be done just before you plan to add them to the batter to capture their volatile oils and maximum freshness, as these oils dissipate quickly after zesting.
-
How can I ensure my cookies don’t spread too much during baking, and what’s the best way to store them for maximum freshness?
Excessive spreading in cookies is often due to warm dough or overmixing. To combat this, ensure your dough is thoroughly chilled for at least one hour before baking; this solidifies the butter, preventing it from melting too quickly in the oven. Avoid overmixing the dough once the dry ingredients are added. For optimal freshness, store baked cookies in a truly airtight container at room temperature for up to 7 days. If you desire a longer shelf life, refrigerate them in an airtight container for up to two weeks, allowing them to come to room temperature before serving to restore their texture.
-
Can I freeze the cookie dough, and if so, how long will it last and how do I bake it from frozen?
Absolutely, freezing the cookie dough is an excellent option for convenient baking. Portion the dough into your desired cookie size balls, place them on a parchment-lined baking sheet, and freeze them until solid. Once firm, transfer the frozen dough balls into a freezer-safe bag or airtight container. They can be stored this way for up to 3 months. When ready to bake, you can typically bake them directly from frozen; you may need to add an extra minute or two to the baking time to ensure they are cooked through. Thawing the dough in the refrigerator for a few hours before baking is also an option, though baking from frozen often yields excellent results.