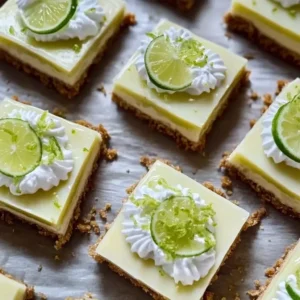
Irresistible Key Lime Pie Bars

Are you searching for a dessert that offers a vibrant burst of sunshine and a delightful tang? Key Lime Pie Bars are your answer, a treat that masterfully balances sweetness with a zesty punch. They are the perfect finale to any meal or a welcome pick-me-up on a warm afternoon, promising a truly refreshing experience for your palate.
These bars encapsulate the essence of a tropical getaway, transforming familiar ingredients into an extraordinary dessert. The creamy, luscious filling, bursting with the distinctive flavor of Key limes, provides an invigorating contrast to the rich, buttery graham cracker crust. It’s a combination that is both comforting and exciting, making it an unforgettable indulgence for any dessert lover.
Why You Will Love This Recipe
- Refreshing Flavor Profile: Experience the delightful interplay of sweet creaminess and sharp, citrusy tang that defines Key lime pie, perfectly captured in a convenient bar form.
- Simple to Prepare: With straightforward steps and readily available ingredients, you can achieve impressive results without spending hours in the kitchen, making it ideal for busy weeknights or spontaneous gatherings.
- Crowd-Pleasing Appeal: The bright, balanced flavors of these bars are universally loved, ensuring they will be a hit with family, friends, and even the most discerning palates.
- Make-Ahead Convenience: Prepare these bars in advance, allowing them ample time to chill and set, which means less stress when it’s time to entertain or serve.
- Visually Appealing: The vibrant yellow hue of the filling and the golden crust make these bars as beautiful to look at as they are delicious to eat, adding a pop of color to any dessert spread.
Ingredients You Need
The magic of these Key Lime Pie Bars lies in the quality and simplicity of the ingredients used. Opting for fresh Key limes will undoubtedly elevate the authentic flavor, but good quality bottled Key lime juice can also yield delicious results. Ensuring your cream cheese is at room temperature is crucial for achieving a smooth, lump-free filling that sets perfectly.
Key Lime Pie Bars
These delightful Key Lime Pie Bars embody the perfect balance of sweet and tangy flavors, offering a refreshing treat perfect for any occasion.
- 1 1/2 cups graham cracker crumbs
- 1/2 cup unsalted butter, melted
- 1/4 cup granulated sugar
- 2 (8 oz) packages cream cheese, softened
- 1 cup powdered sugar
- 1/2 cup Key lime juice
- 1 tablespoon Key lime zest
- 1 teaspoon vanilla extract
- Whipped cream (for topping)
- 1Preheat your oven to 350°F (175°C). In a mixing bowl, combine graham cracker crumbs, melted butter, and granulated sugar. Mix until crumbs are evenly coated. Press the mixture into the bottom of a greased 9×9-inch baking dish.
- 2Bake the crust in the preheated oven for about 10 minutes until golden brown and fragrant. Remove from the oven and let cool.
- 3In a bowl, beat the softened cream cheese and powdered sugar until smooth (about 2-3 minutes).
- 4Add the Key lime juice, zest, and vanilla extract. Beat until fully combined.
- 5Pour the Key lime filling over the cooled crust and spread it evenly.
- 6Cover with plastic wrap and refrigerate for at least 4 hours or overnight to set.
- 7Once set, cut into squares and serve topped with whipped cream. Enjoy your homemade Key Lime Pie Bars!
Keywords: Dessert Recipe, easy treats, Key Lime Pie Bars, Refreshing Bars, Summer Dessert
- graham cracker crumbs: the foundation of your delicious crust, providing a satisfying crunch and buttery base.
- unsalted butter, melted: binds the crumbs together and adds a rich, savory depth to the crust.
- granulated sugar: adds a touch of sweetness to the crust, balancing the tartness of the lime filling.
- cream cheese, softened: the creamy, dreamy heart of the filling, providing a smooth, luxurious texture.
- powdered sugar: sweetens the cream cheese filling and contributes to its silky smooth consistency.
- Key lime juice: the star ingredient, delivering that signature bright, zesty, and tangy flavor that defines this dessert.
- Key lime zest: intensifies the lime flavor and adds a fragrant aromatic quality to the filling.
- vanilla extract: enhances the overall flavor profile, adding a warm, comforting note that complements the citrus.
- whipped cream (for topping): a light, airy cloud of sweetness to crown each bar, adding an extra layer of indulgence.
Quantities for each ingredient are readily available in the detailed recipe card.
Variations
While the classic Key Lime Pie Bars are undeniably superb, there are numerous ways to put your own creative spin on this delightful dessert. These variations cater to different tastes and dietary needs, ensuring everyone can enjoy a slice of sunshine.
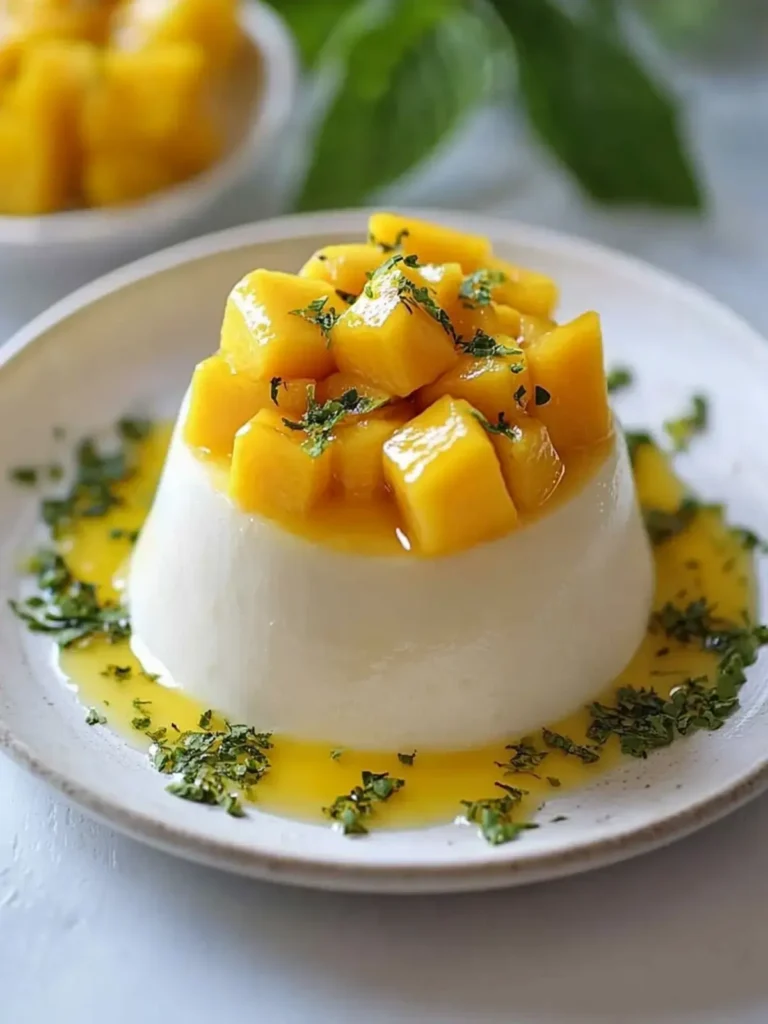
For a Tropical Twist: Infuse your bars with the lush flavor of mango. Simply puree a ripe mango and gently fold it into the cream cheese filling before pouring it over the crust. The sweet, tropical notes of mango harmonize beautifully with the tartness of the Key lime, creating an exotic and refreshing dessert that’s perfect for summer.
A Coconut Lover’s Dream: Enhance the crust by incorporating unsweetened shredded coconut. Mix about half a cup of shredded coconut into the graham cracker crumb mixture before pressing it into the pan. The toasted coconut adds a wonderful texture and a subtle, nutty flavor that pairs exceptionally well with the lime filling.
Decadent Chocolate-Lime Fusion: For those who crave a richer, more indulgent treat, a chocolate drizzle is the perfect addition. Once the bars are set and sliced, melt some semi-sweet or dark chocolate and drizzle it generously over the top. The contrast between the rich chocolate and the bright lime is surprisingly addictive.
Dietary Adaptations for Inclusive Indulgence: Crafting a vegan version is surprisingly simple. Substitute the cream cheese with a good quality vegan cream cheese alternative (often made from cashews or soy) and use a dairy-free butter substitute for the crust. Ensure your graham crackers are also vegan-friendly. For a gluten-free adaptation, opt for certified gluten-free graham crackers or explore alternatives like an almond flour or crushed pecan crust.
How to Prepare Key Lime Pie Bars
Step 1: Crafting the Perfect Crust
The foundation of any great bar is its crust, and for these Key Lime Pie Bars, we’re starting with a classic graham cracker base. Begin by preheating your oven to 350°F (175°C). This moderate temperature is ideal for achieving a golden-brown crust without scorching.
In a medium-sized bowl, combine the graham cracker crumbs, melted unsalted butter, and granulated sugar. Use a fork or your fingertips to ensure all the crumbs are thoroughly moistened by the butter and the sugar is evenly distributed. This mixture should resemble wet sand, holding together when squeezed.
Next, take a greased 9×9-inch baking dish. Pour the graham cracker mixture into the dish and press it down firmly and evenly across the bottom. You can use the bottom of a measuring cup or a flat-bottomed glass to get a compact and uniform layer. This ensures the crust won’t crumble when you slice the bars later.
Step 2: Baking the Crust to Golden Perfection
Once the crust mixture is pressed into the baking dish, it’s time to give it a preliminary bake. Place the dish in the preheated oven and let it bake for approximately 8 to 10 minutes. Keep a close eye on it; you’re looking for the edges to turn a light golden brown and for the crust to become fragrant.
The goal of this brief bake is to toast the crumbs slightly, which helps to set the crust and lock in its buttery flavor. Overbaking can make the crust too hard and dry, so timing is key here. Remove the dish from the oven once it reaches the desired golden hue.
Allow the baked crust to cool completely on a wire rack while you prepare the luscious Key lime filling. This cooling period is important; adding a warm filling to a hot crust can lead to a softer, less defined texture in the final product.
Step 3: Preparing the Creamy Key Lime Filling
Now, let’s move on to the star of the show: the vibrant Key lime filling. In a large mixing bowl, place your softened cream cheese. It’s crucial that the cream cheese is truly at room temperature; this will ensure it creams smoothly without any lumps, leading to a velvety-smooth filling.
Add the powdered sugar to the softened cream cheese. Using an electric mixer (handheld or stand mixer), beat the cream cheese and powdered sugar together on medium speed. Continue beating for about 2 to 3 minutes, scraping down the sides of the bowl occasionally, until the mixture is completely smooth, light, and fluffy. This creates the perfect creamy base.
Once the cream cheese and sugar are well combined, it’s time to introduce the key flavor components. Add the fresh Key lime juice, finely grated Key lime zest, and pure vanilla extract to the bowl. Make sure you’re using real Key lime juice and zest for the most authentic and intense flavor, as these small limes pack a powerful punch.
Step 4: Blending the Flavors into a Smooth Emulsion
With all the filling ingredients now in the bowl, continue to beat them together with your electric mixer. Start on a low speed to incorporate the wet ingredients without splashing, then gradually increase to medium speed. Beat until the mixture is thoroughly combined, smooth, and has a uniform pale-yellow color. This process ensures that the tartness of the lime is beautifully balanced by the sweetness and richness of the cream cheese and sugar.
The zest will be evenly distributed throughout the filling, providing little bursts of intense lime flavor and aroma. The vanilla extract acts as a wonderful enhancer, rounding out the citrus notes and adding a subtle warmth to the overall taste profile. You should aim for a texture that is pourable but still holds its shape.
Taste a tiny bit of the filling at this stage (if you can resist!) to check the balance of sweet and tart. You can add a touch more powdered sugar if you prefer it sweeter, or a tiny bit more lime juice if you crave more tang, though be careful not to add too much liquid which could affect the setting.
Step 5: Assembling and Chilling for Perfect Set
Carefully pour the luscious Key lime filling over the cooled graham cracker crust in the baking dish. Use a spatula or the back of a spoon to gently spread the filling evenly, ensuring it covers the entire surface of the crust right to the edges. A smooth, even layer of filling is key to achieving uniform bars when you slice them.
Once the filling is spread, cover the baking dish tightly with plastic wrap. It’s important to ensure it’s sealed well to prevent any odors from the refrigerator from permeating the filling. Place the dish in the refrigerator and let it chill for a minimum of 4 hours, or preferably overnight. This extended chilling time is absolutely crucial for the bars to set properly and achieve their signature firm, yet creamy, texture.
Resist the temptation to cut into the bars too early. The setting process allows the ingredients to meld and firm up, creating the perfect consistency for slicing and serving. Patience here will be rewarded with beautifully structured and delicious bars.
Step 6: Slicing and Serving Your Masterpiece
After the long chilling period, your Key Lime Pie Bars should be perfectly set and ready to be transformed into individual servings. Remove the plastic wrap from the chilled dish. For the cleanest cuts, it’s recommended to use a large, sharp knife.
Dip the knife into a glass of hot water and wipe it dry before each cut. This technique helps the knife glide through the chilled filling smoothly, preventing it from sticking and creating neat, clean edges. You can slice the 9×9 inch dish into 9 larger bars or 16 smaller, more delicate portions.
Arrange the sliced bars on a serving platter. For an extra touch of elegance and deliciousness, top each bar with a generous dollop of whipped cream. You can use homemade whipped cream or your favorite store-bought variety. Fresh lime slices or a sprinkle of lime zest can also serve as a beautiful and flavorful garnish, adding a final flourish to your homemade dessert.
Pro Tips for Key Lime Pie Bars
The Importance of Softened Cream Cheese: For the smoothest, most decadent filling, ensure your cream cheese is truly softened to room temperature. Cold cream cheese will result in a lumpy filling, no matter how long you mix it, which can affect the overall texture and appearance of your bars.
Key Limes vs. Regular Limes: While regular limes can be used in a pinch, Key limes are smaller, seedless, and have a more intense, aromatic, and less acidic flavor. If possible, seek out fresh Key limes for the most authentic and vibrant taste experience. Their unique zest also contributes significantly to the overall aroma and flavor profile.
Achieving a Clean Cut: To get perfectly neat slices, chill the bars thoroughly. Then, use a long, sharp knife, wiping it clean and warming it slightly with hot water between each cut. This method ensures clean edges and prevents the filling from smearing, presenting your bars beautifully.
Crust Consistency is Key: Ensure your graham cracker crust mixture is evenly moistened with butter. It should hold together when you pinch it. If it seems too dry, add a touch more melted butter. Press the crumbs firmly into the pan to create a solid base that won’t fall apart when sliced.
Patience with Chilling: Do not rush the chilling process. The minimum of 4 hours is essential for the bars to set properly. Overnight chilling will yield the best results, resulting in a firm yet creamy texture that is characteristic of excellent Key Lime Pie Bars. This step is non-negotiable for success.
Serving Suggestions for Key Lime Pie Bars
Decoration
Elevate the visual appeal of your Key Lime Pie Bars with thoughtful decoration. A classic choice is a generous swirl of freshly whipped cream, adding a cloud-like softness and extra richness. For a pop of color and an intensified lime aroma, sprinkle finely grated Key lime zest over the whipped cream. Thin slices of fresh lime or lime wheels, perhaps with a small notch to stand them up, also add a sophisticated touch.
Consider adding a scattering of toasted shredded coconut around the edges or over the top for a tropical flair that complements the lime perfectly. Edible flowers, such as pansies or violas, can also provide a delicate and beautiful garnish, making your bars look truly gourmet. A light dusting of powdered sugar can add a touch of elegance without altering the flavor profile significantly.
Side Dishes
While Key Lime Pie Bars are a delightful dessert on their own, they can be wonderfully complemented by certain accompaniments. Fresh berries, such as raspberries, blueberries, or sliced strawberries, offer a vibrant contrast in both color and flavor. Their slight tartness and sweetness play well with the lime, creating a balanced palate experience.
For a more cooling sensation, a small scoop of vanilla bean ice cream or a light coconut sorbet can be served alongside. The creamy vanilla or refreshing coconut provides a comforting contrast to the zesty lime. If serving at a brunch or a more substantial gathering, consider pairing them with light, fruity beverages like sparkling lemonade or a refreshing glass of iced tea. Even a simple glass of chilled water can help cleanse the palate between bites.
Creative Serving Ideas
Think beyond the traditional square slice for a unique presentation. Use small, decorative cookie cutters to create fun shapes from the set bars, perfect for children’s parties or themed events. You can also arrange the bars artfully on a tiered dessert stand for a visually stunning display at gatherings.
Consider serving them in individual mini tart molds or ramekins if you’ve adjusted the recipe slightly for a single-serving size. Another creative idea is to offer them as part of a dessert tasting platter, alongside other small treats like mini fruit tarts or chocolate truffles. This allows guests to sample a variety of flavors and textures, with your Key Lime Pie Bars serving as a bright, citrusy centerpiece.
Preparation & Storage
Storing Leftovers
Proper storage is key to maintaining the delightful texture and fresh flavor of your Key Lime Pie Bars. Once cooled and set, cover the baking dish tightly with plastic wrap or transfer the sliced bars to an airtight container. Ensure there are no gaps where air can enter, as this can lead to the bars drying out or absorbing unwanted odors from the refrigerator.
Refrigerated, these bars will typically stay fresh and delicious for up to 5 to 7 days. For the best quality, it’s advisable to consume them within the first few days. If you’ve topped them with whipped cream, it’s best to add that just before serving to prevent it from becoming watery or deflating.
Freezing
Key Lime Pie Bars freeze remarkably well, making them an excellent option for making ahead of time or for enjoying at a later date. To freeze, it’s best to slice the bars first. Wrap each individual bar tightly in plastic wrap, ensuring no part is exposed. Then, place the wrapped bars in a single layer in a freezer-safe container or a heavy-duty freezer bag.
This double-layer protection helps prevent freezer burn and preserves their texture and flavor. Properly stored, Key Lime Pie Bars can be kept in the freezer for up to 2 to 3 months. They make a convenient dessert option to have on hand for unexpected guests or a sudden craving.
Reheating
Key Lime Pie Bars are best enjoyed chilled, so reheating is generally not necessary. In fact, their refreshing coolness is a significant part of their appeal, especially in warmer weather. If, for some reason, you prefer them slightly warmer or have taken them out of the freezer and want to speed up the thawing process, there are a couple of gentle methods.
You can allow the bars to thaw at room temperature for about 15-20 minutes before serving. This will slightly soften the filling without warming it significantly. Avoid microwaving them, as this can cause the filling to become overly soft and potentially melt the crust. If thawing frozen bars, allow at least 30-60 minutes at room temperature, or thaw them overnight in the refrigerator for the best texture.
Frequently Asked Questions
-
Can I make Key Lime Pie Bars ahead of time?
Yes, these bars are an excellent make-ahead dessert. In fact, they are best prepared at least a few hours in advance, or ideally the day before, to allow them ample time to chill and set properly. This ensures they have the perfect texture and flavor. Storing them in an airtight container in the refrigerator will keep them fresh until you’re ready to serve.
-
How long do Key Lime Pie Bars last in the fridge?
When stored correctly in an airtight container in the refrigerator, Key Lime Pie Bars can typically last for up to 5 to 7 days. However, for optimal flavor and texture, it’s recommended to consume them within the first 3 to 4 days. Always check for any signs of spoilage before consuming after prolonged storage.
-
Can I freeze Key Lime Pie Bars?
Absolutely! Key Lime Pie Bars freeze beautifully. For best results, slice them into individual portions and wrap each bar tightly in plastic wrap. Then, place the wrapped bars into a freezer-safe container or bag. They can be stored in the freezer for approximately 2 to 3 months. Thaw them overnight in the refrigerator or at room temperature for about 20-30 minutes before serving.
-
What should I do if my filling is too runny?
A runny filling usually indicates that the bars haven’t chilled long enough to set completely. Ensure they have been refrigerated for the minimum recommended time (at least 4 hours, preferably overnight). If it’s still slightly soft, place them back in the refrigerator for a few more hours. Avoid adding more liquid ingredients if the recipe was followed correctly, as this could further destabilize the filling.
-
Can I adjust the sweetness of the bars?
Yes, the sweetness of Key Lime Pie Bars can be adjusted to suit your personal preference. You can add a little more powdered sugar to the filling if you find it too tart, or reduce the amount slightly if you prefer a more pronounced lime flavor. Similarly, you can adjust the granulated sugar in the crust. However, it’s important to maintain a good balance between sweet and tart for the classic Key lime flavor profile.